Stampin’ Up! Quiet Meadow for Fun Fold Friday

Good Friday morning stamping friends and welcome to my Fun Fold Friday.  Are you starting to make plans for the weekend yet? I’ll be at work all day Saturday and then we have out quarterly team meeting in person on Sunday. I love those meetings; we get to stamp together and chat for a bit and of course laugh.

Today’s card I was planning on doing on my live on Wednesday afternoon, but my contractor had other plans. After waiting 5 months for him to come replace doors in my craft studio and around the house, he thought Wednesday was the perfect day.  If you’d like to see a quick video of how I made today’s card, Click Here to go to my Instagram Reels. Here’s My card for today.

Stampin' Up! Quiet Meadow Fun Fold 1 creativestampingdesigns.com

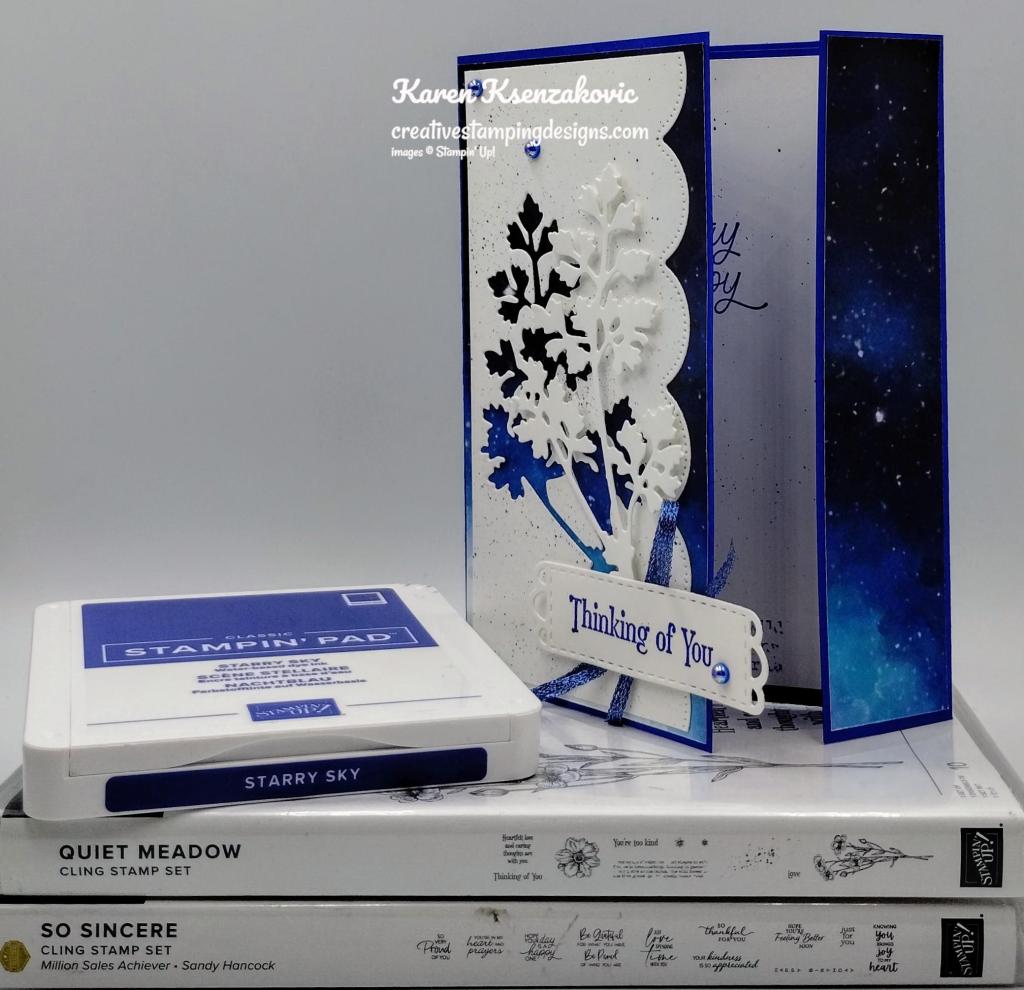
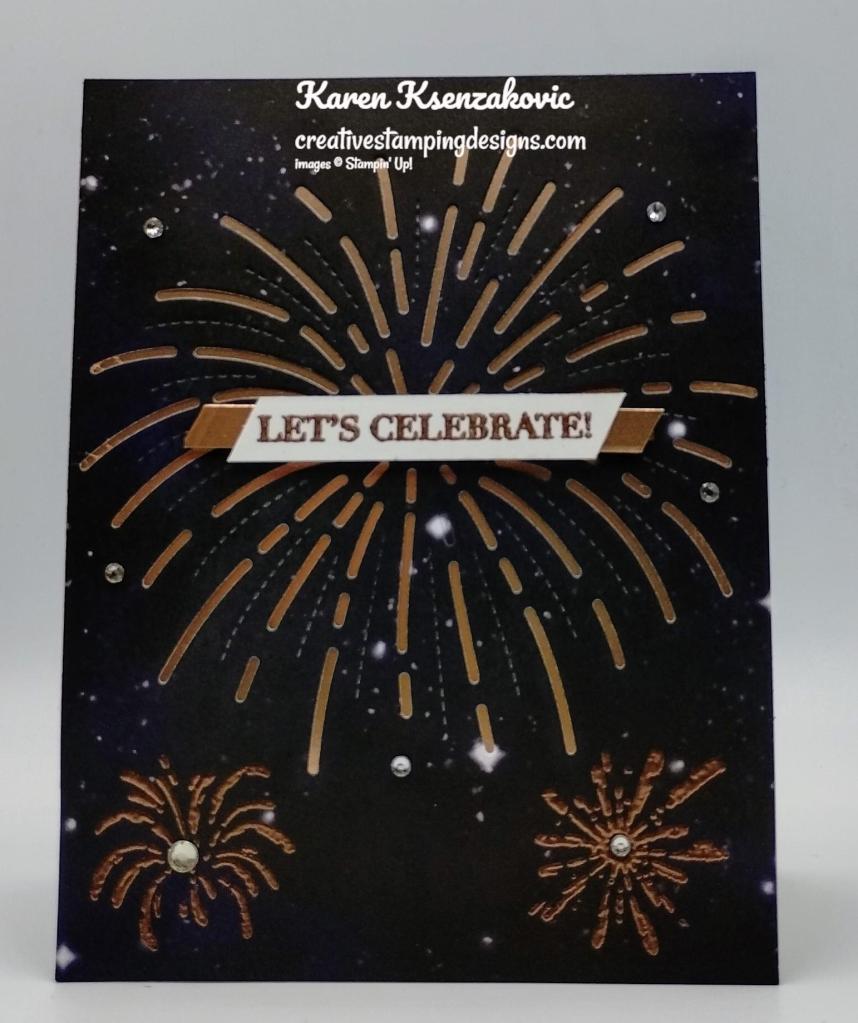
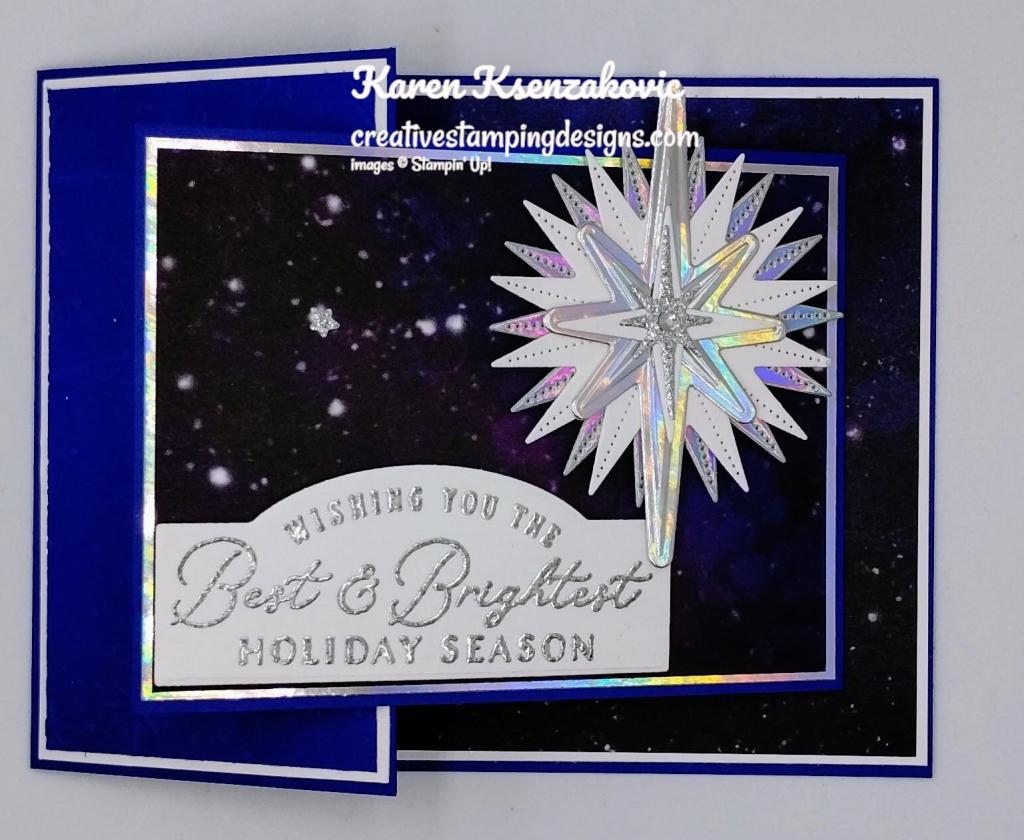
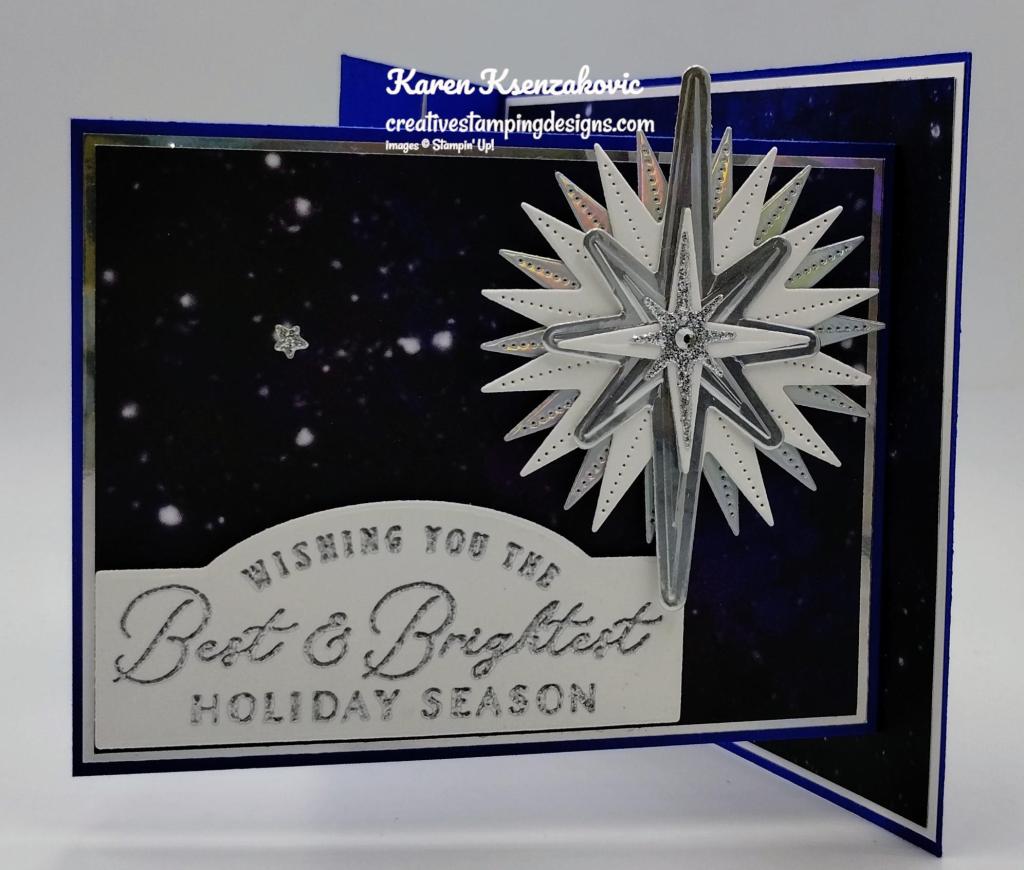
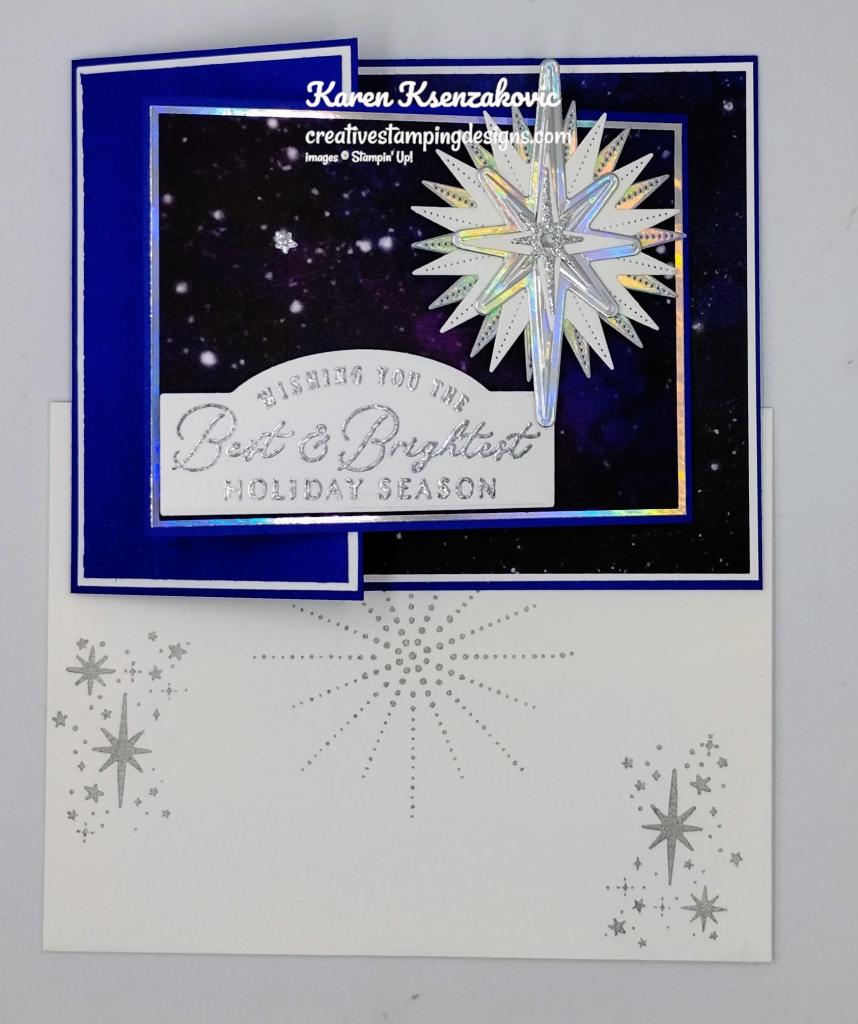
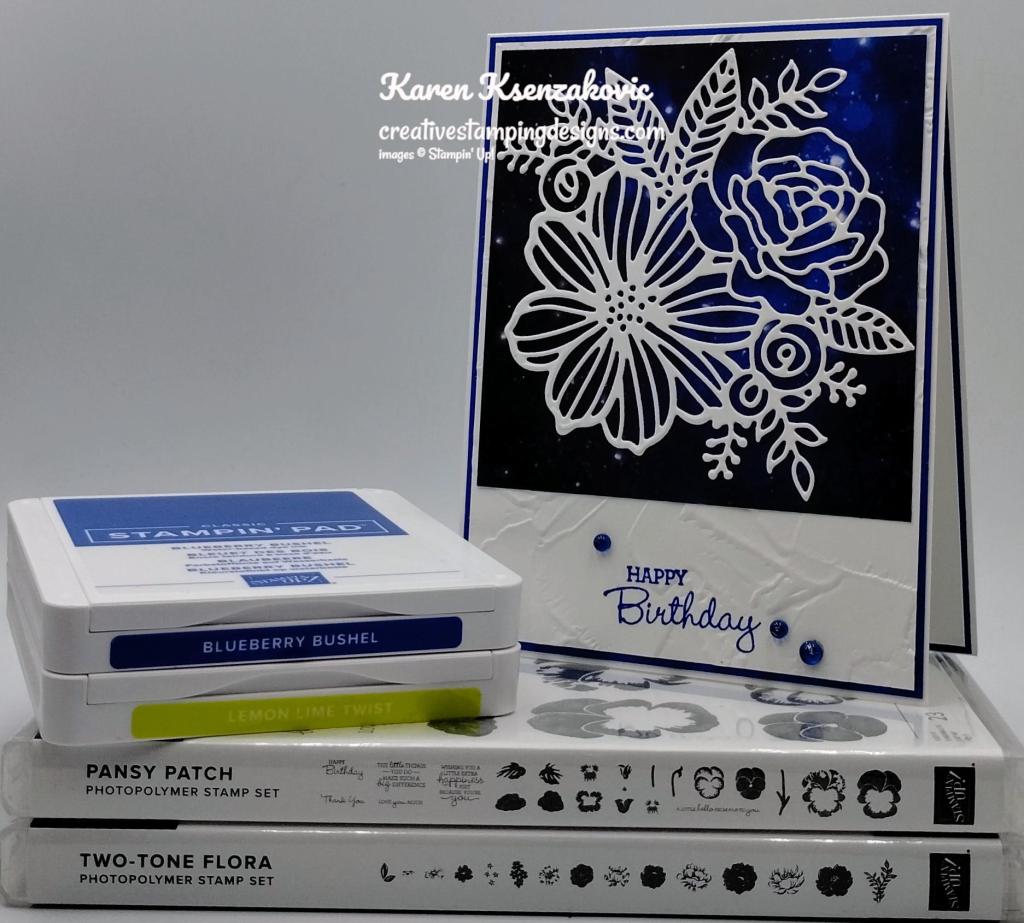
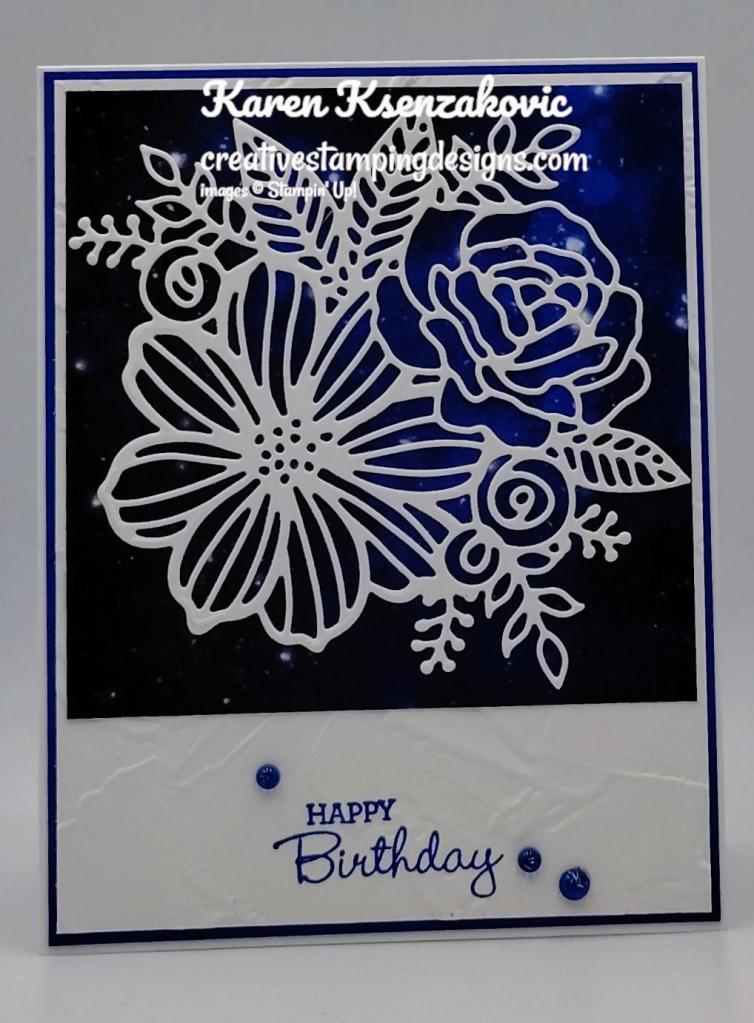
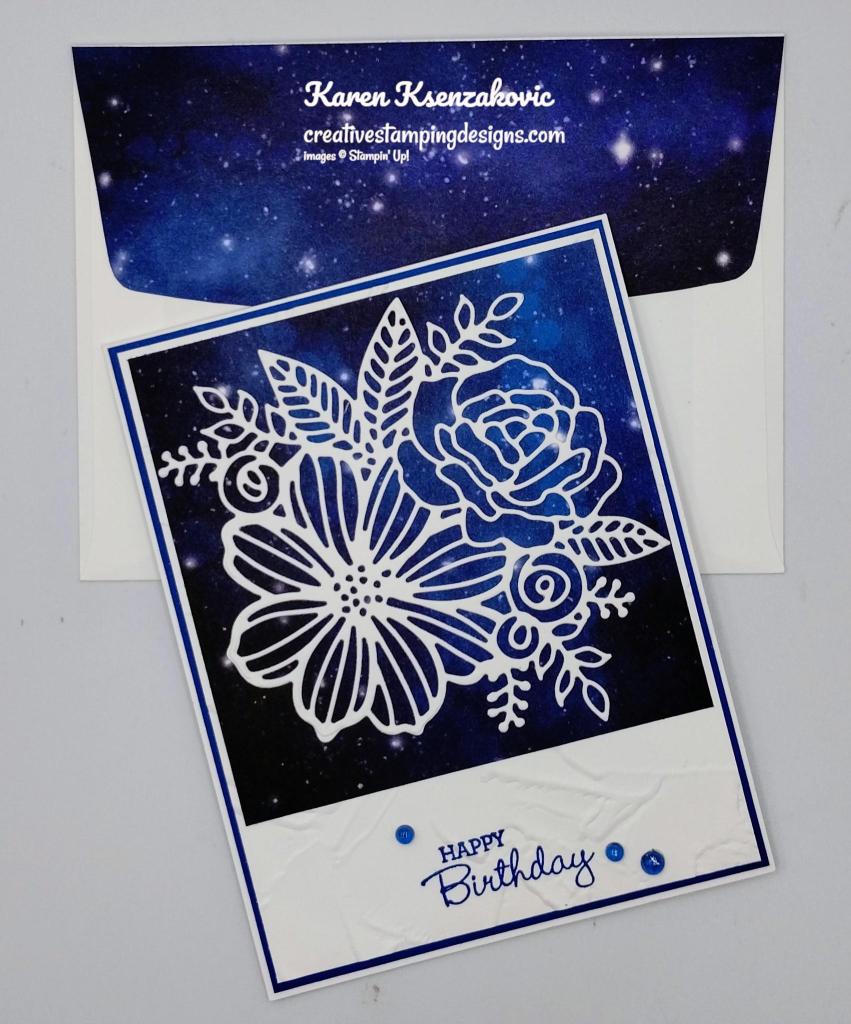
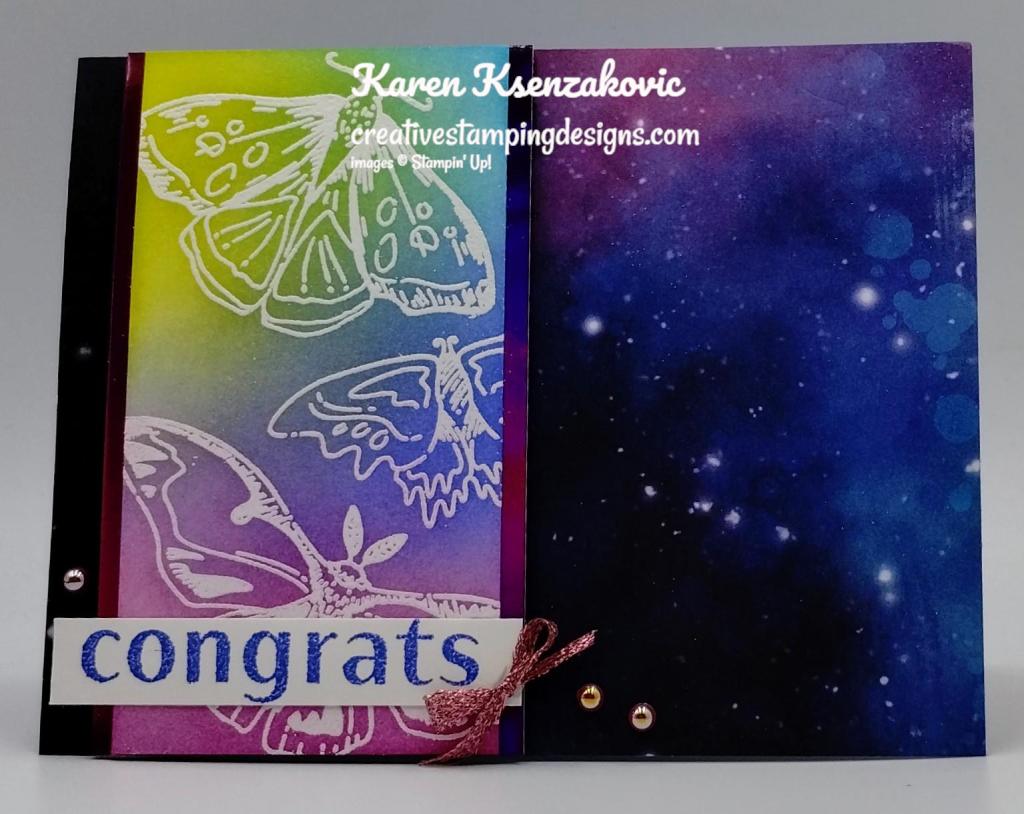
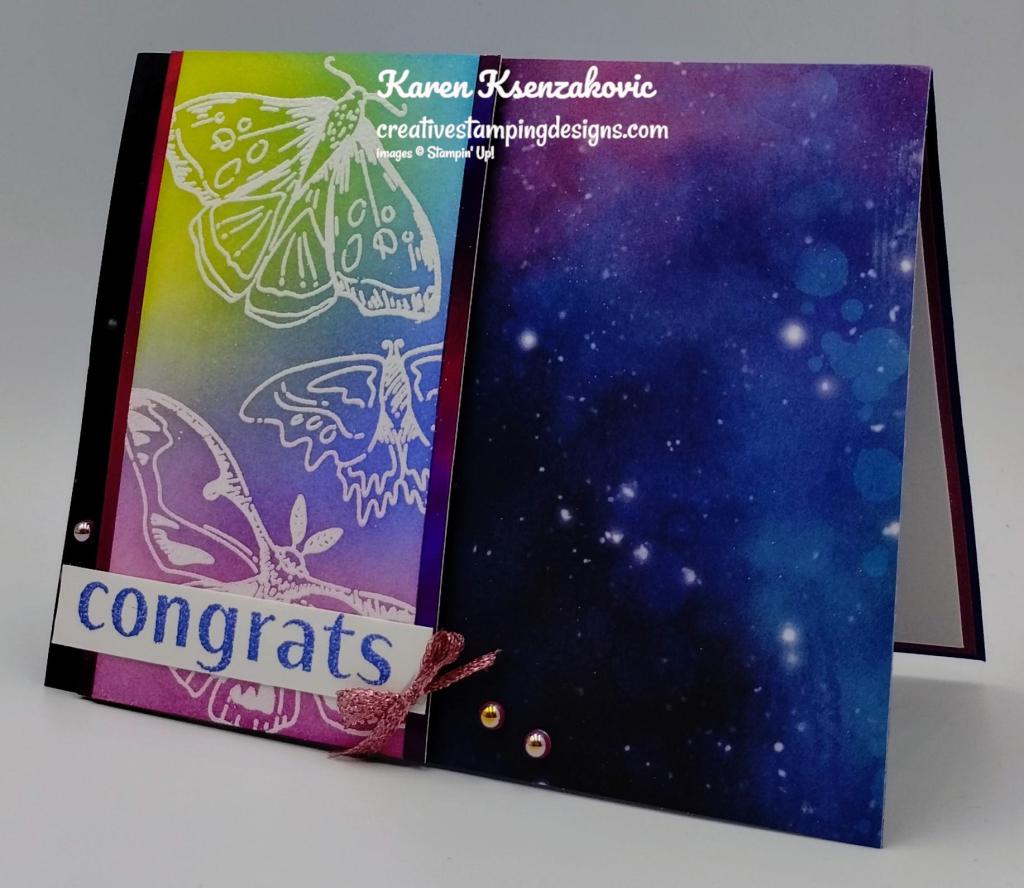
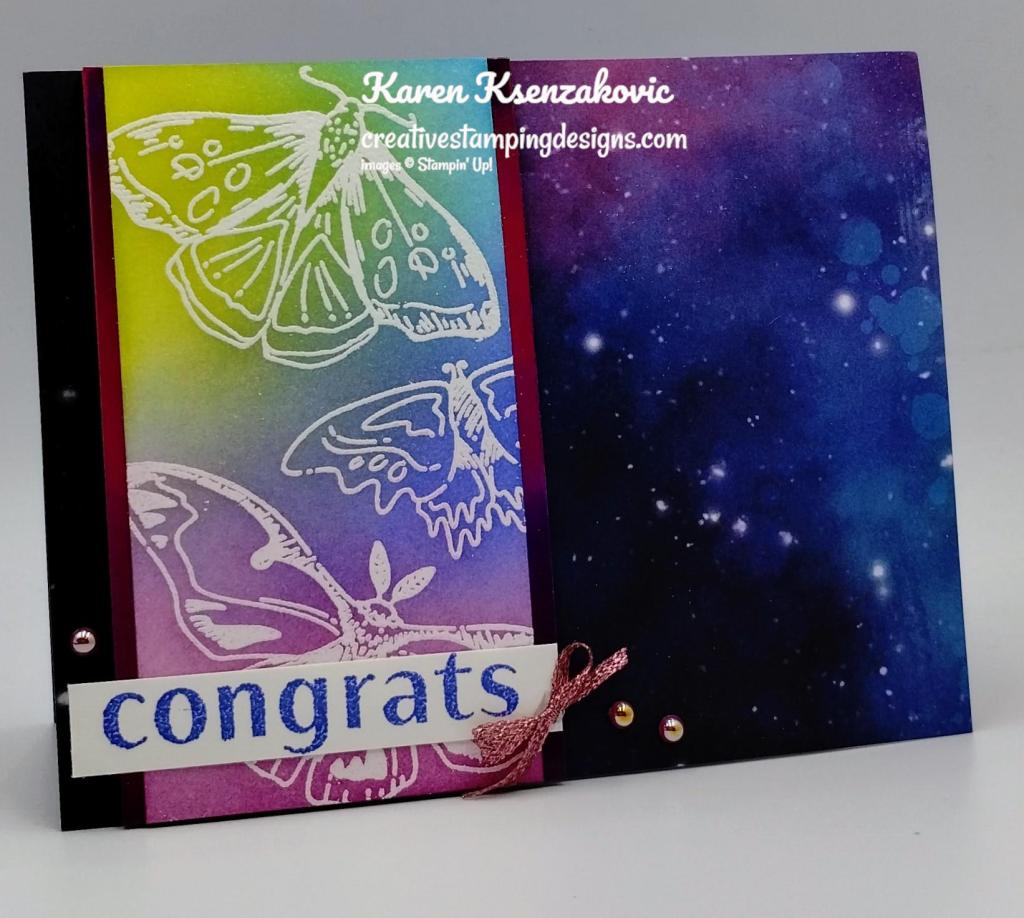
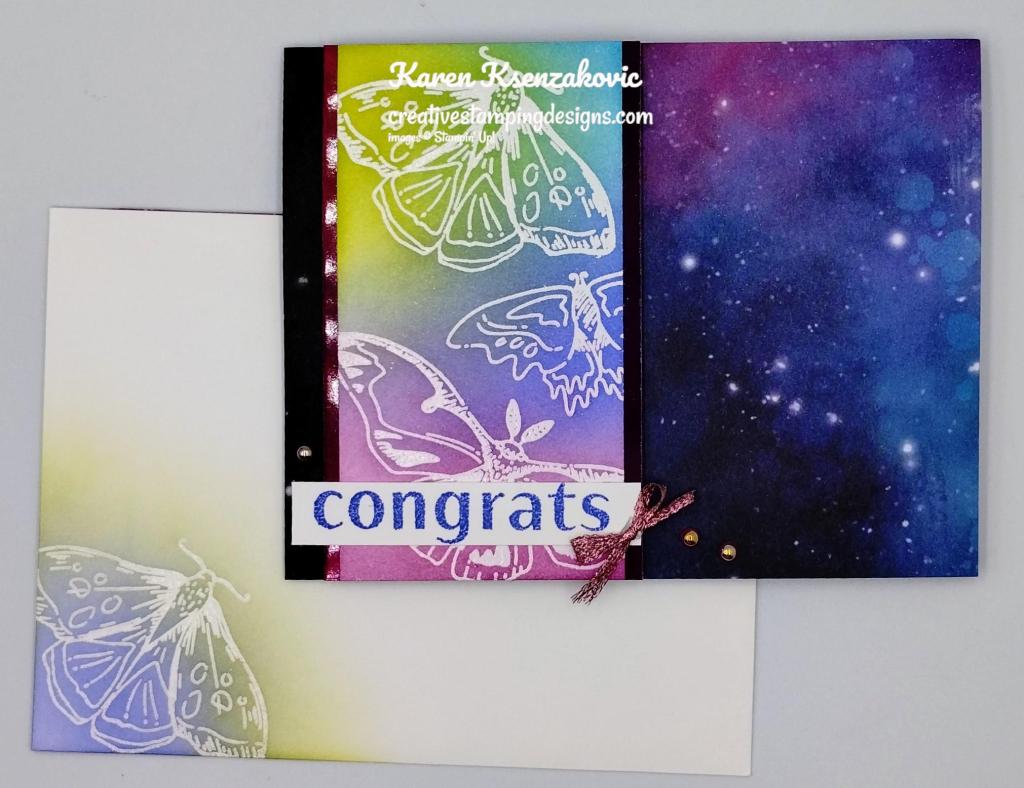
I used the Stampin’ Up! Quiet Meadow Cling Stamp Set along with the Meadow Dies, Scalloped Contours Dies, Stargazing Designer Series Paper and Stampin’ Up! So Sincere Cling Stamp Set for my card today.

Stampin' Up! Quiet Meadow Fun Fold 2 creativestampingdesigns.com

I started by cutting a panel of Basic White using the Scalloped Contours Dies. I then cut the leaf die from the Meadow Dies from the center of the Basic White panel. Using my Starry Sky Stampin’ Write Marker, I flicked specks on the die cut panel.

Stampin' Up! Quiet Meadow Fun Fold 3 creativestampingdesigns.com

I adhered a panel of Stargazing DSP to the left front of a Starry Sky card base using Liquid Glue. I adhered the Basic White panel to the DSP card front using Liquid Glue. I adhered the die cut leaf to the card front using Stampin’ Dimensionals. I tied a bow using the Starry Sky 1/8″ Metallic Ribbon and adhered it to the bottom of the leaf stem using a Glue Dot. On a panel of Basic White, I stamped the sentiment from the Quiet Meadow stamp set in Starry Sky Ink. I cut the sentiment out using the Meadow Dies. I adhered the sentiment using Stampin’ Dimensionals. I added a few 2022-2024 In-Color Pearls to the card front.

Stampin' Up! Quiet Meadow Fun Fold 4 creativestampingdesigns.com

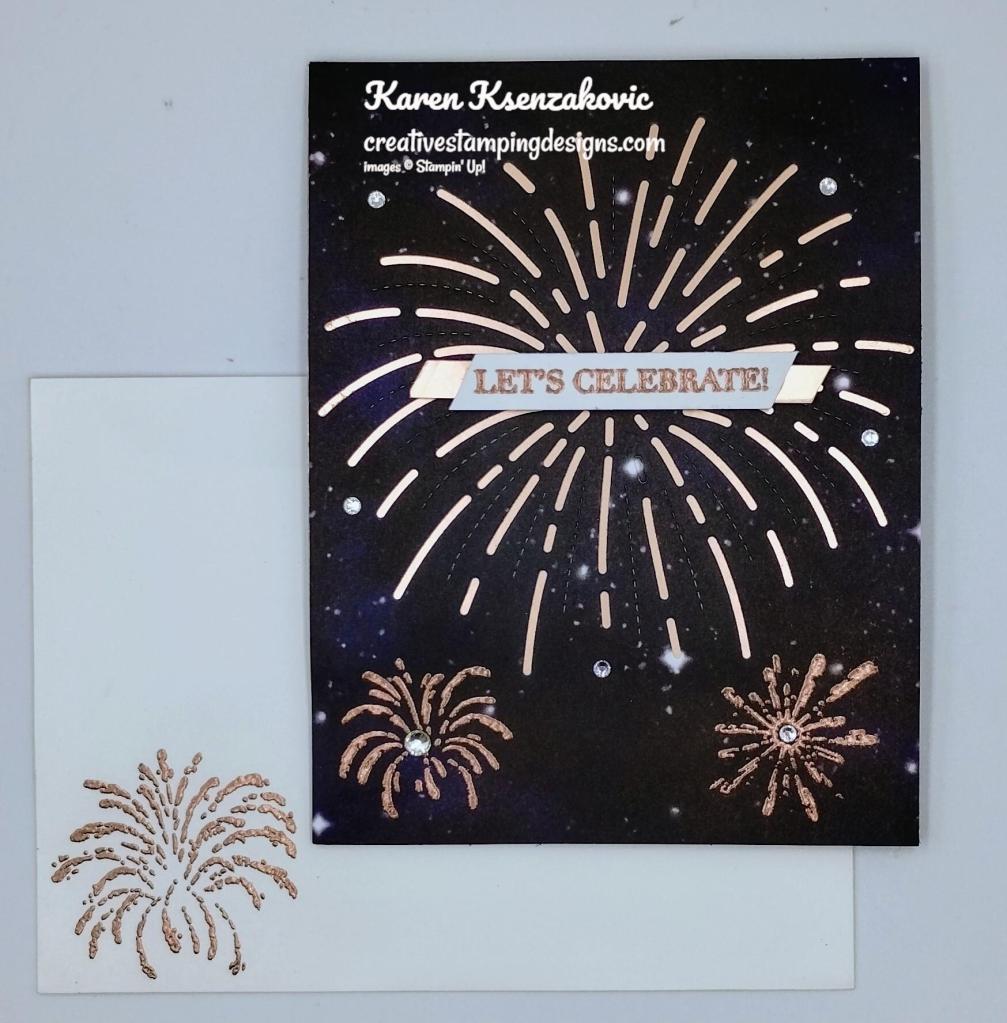
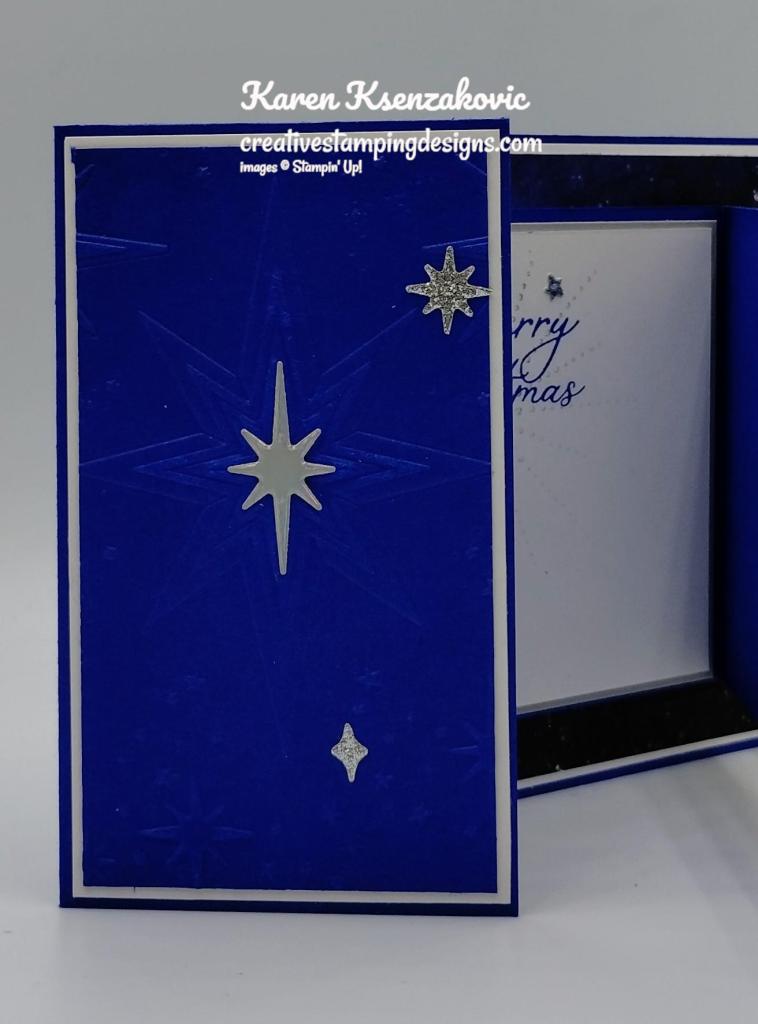
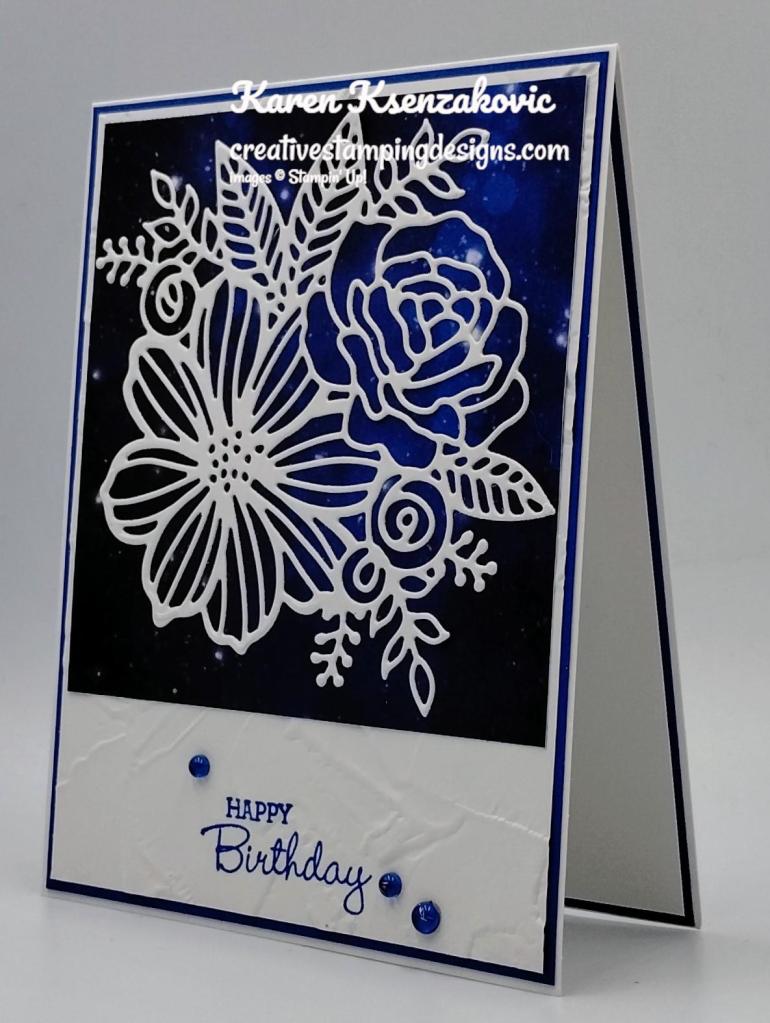
I adhered a panel of Stargazing DSP to the right front of the Starry Sky card base using Liquid Glue.

Stampin' Up! Quiet Meadow Fun Fold 5 creativestampingdesigns.com

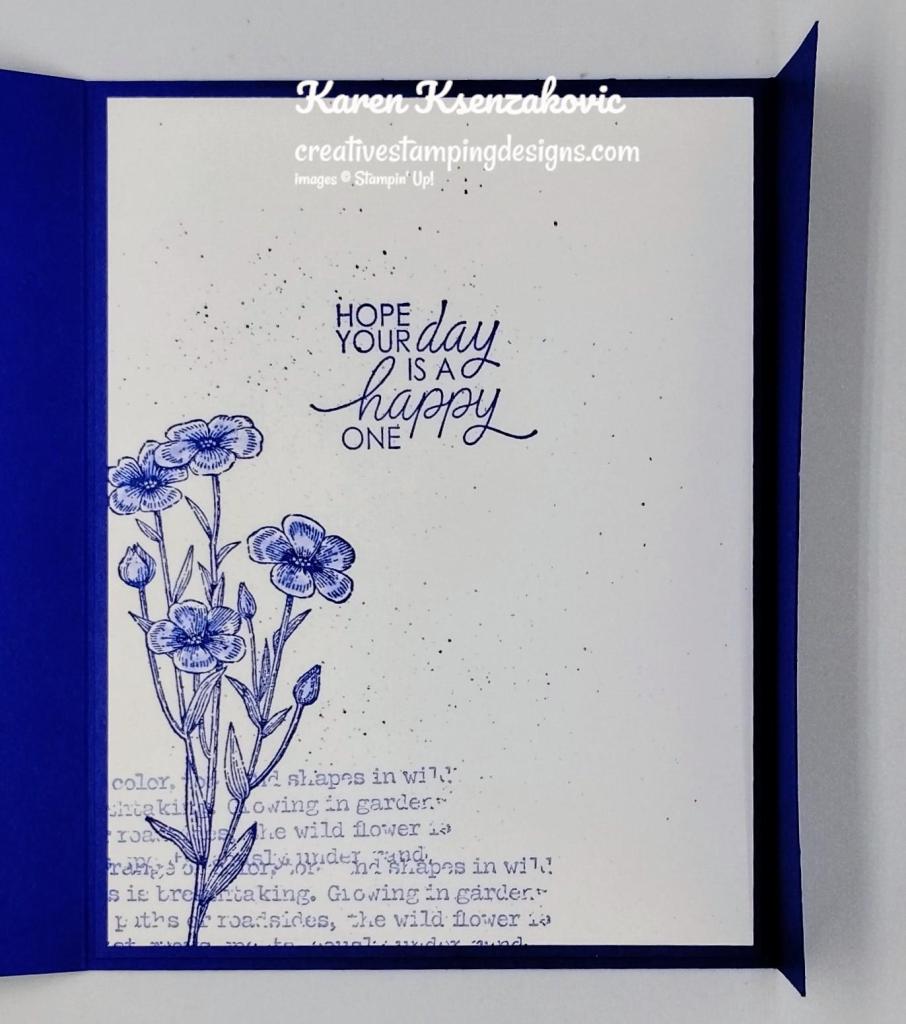
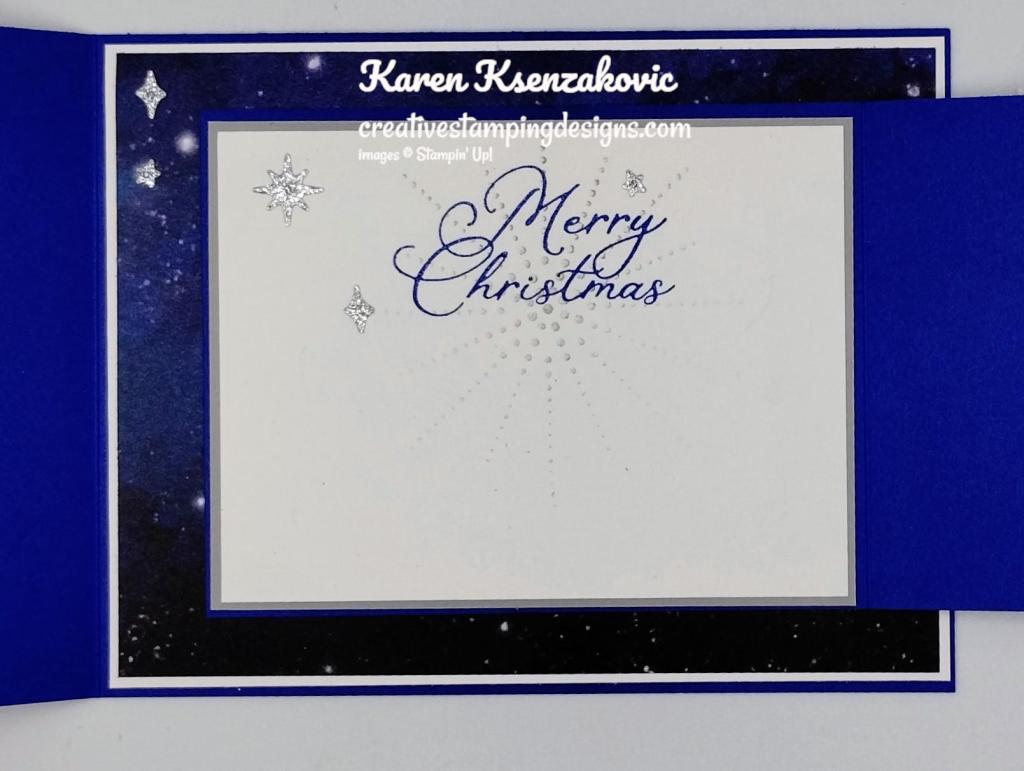
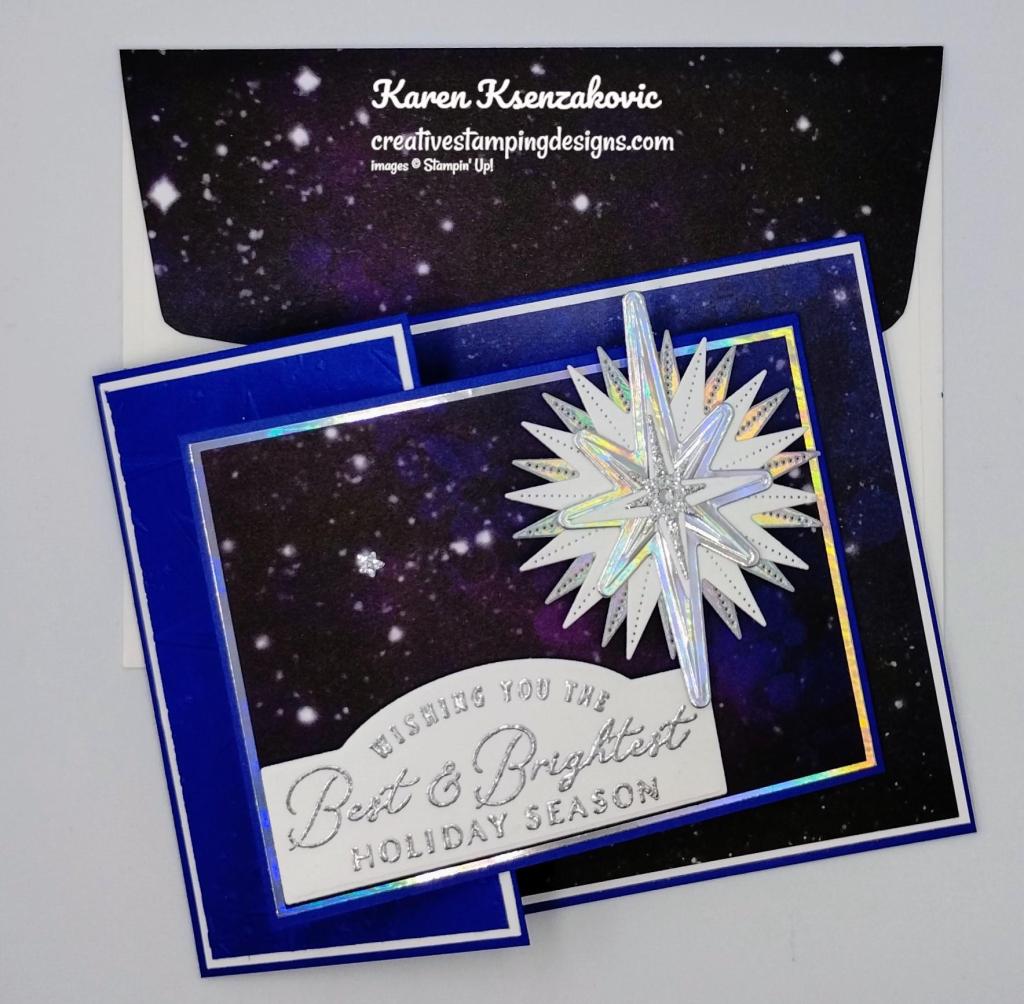
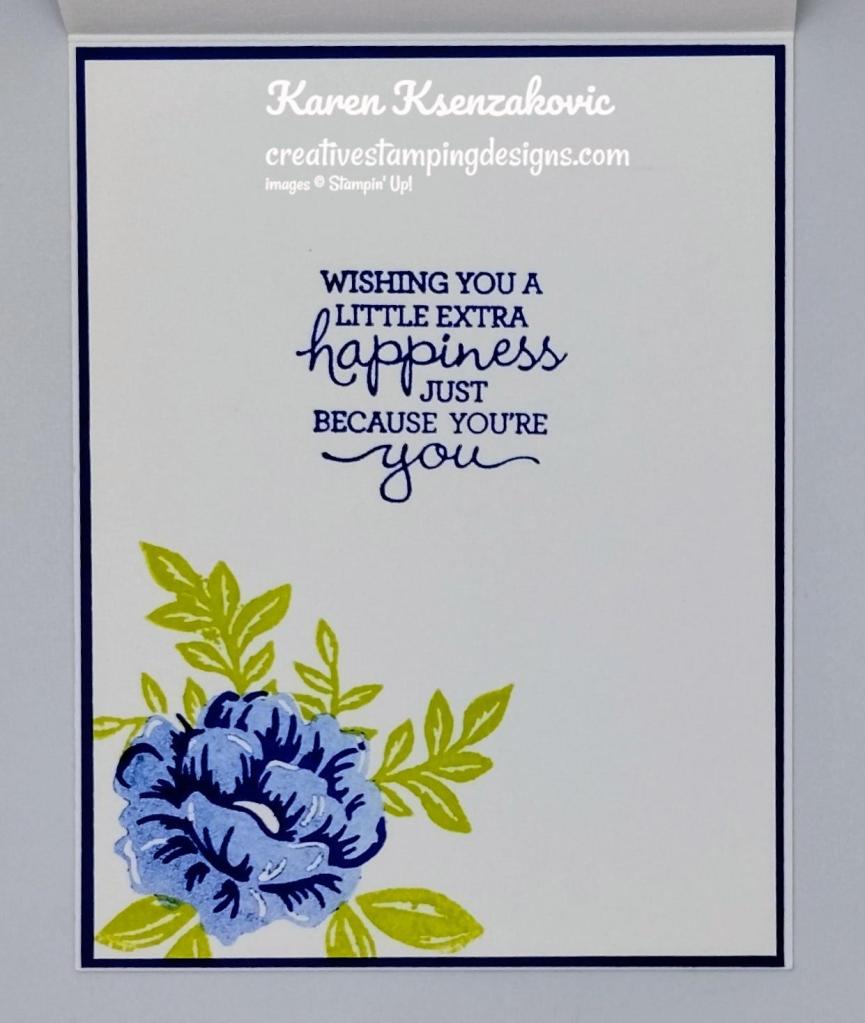
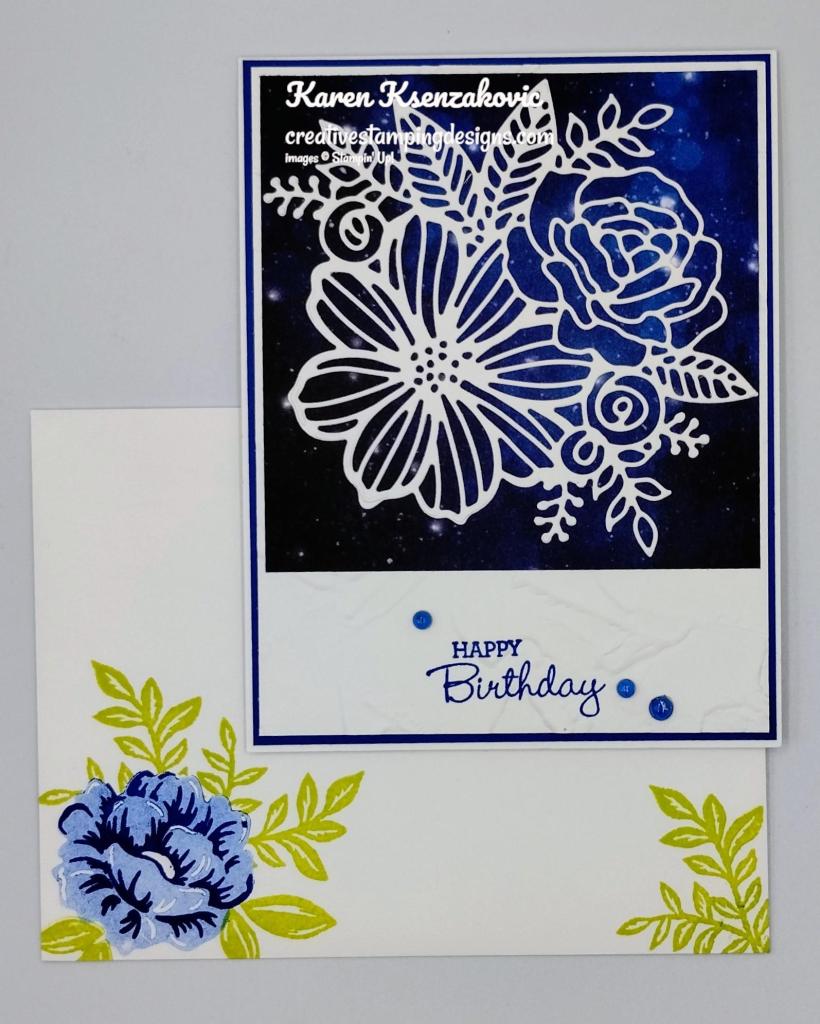
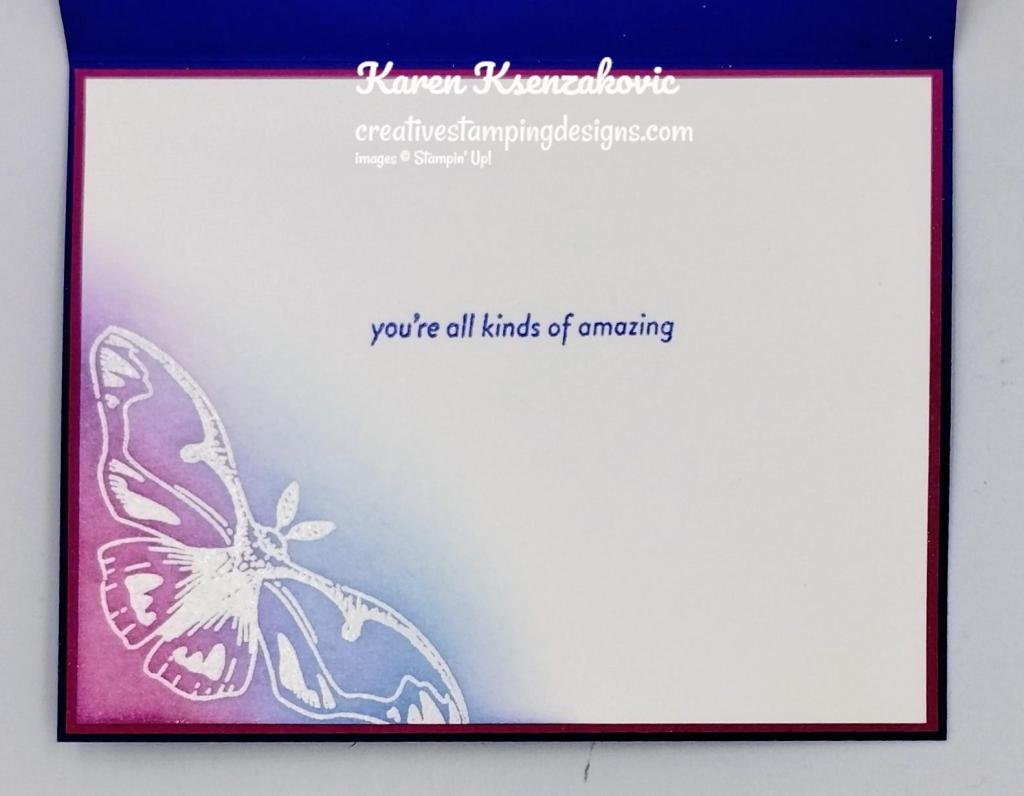
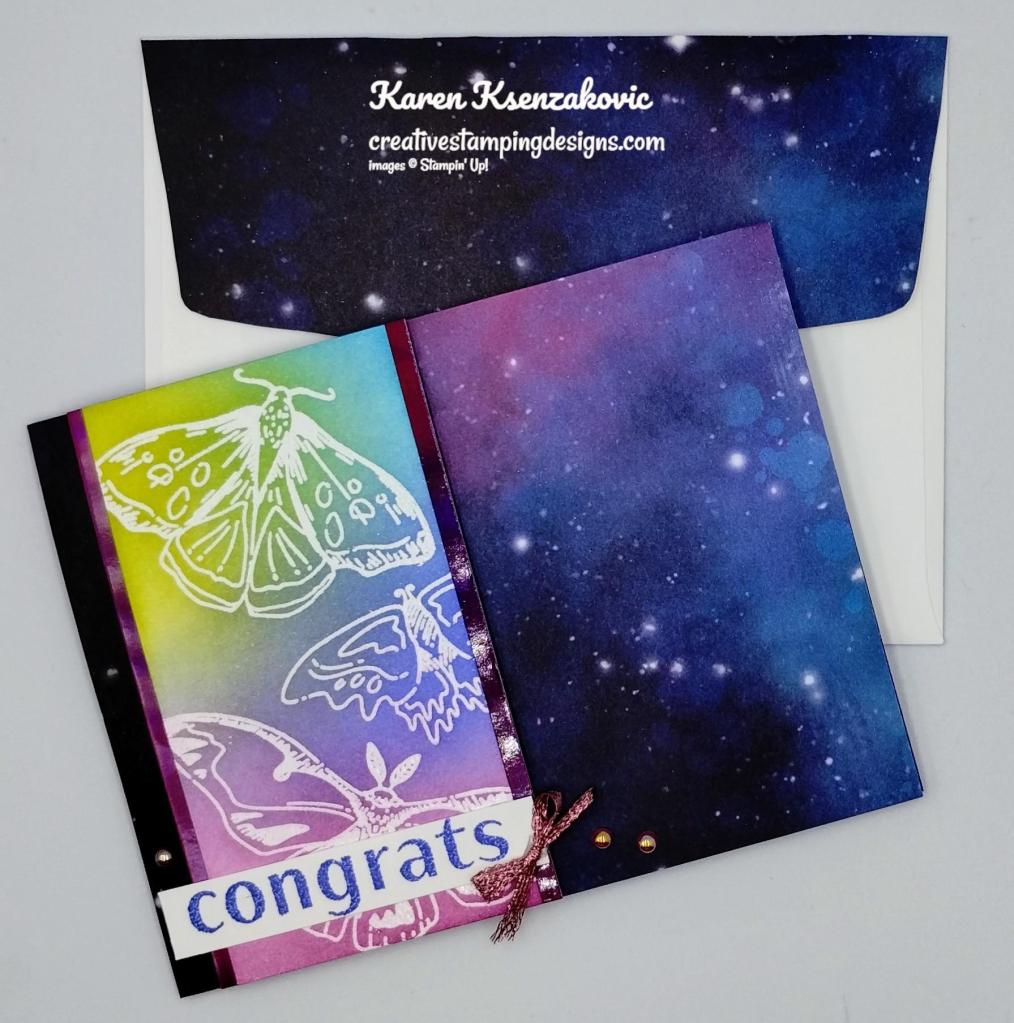
On the inside, I stamped the sentiment from the So Sincere stamp set in Starry Sky Ink on a panel of Basic White. I stamped the script image from the Quiet Meadow stamp set in Starry Sky Ink 2 times on the bottom of the panel, stamping off twice on scrap paper before stamping on the panel. I stamped the flower image from the Quiet Meadow stamp set in Starry Sky Ink on the side of the panel. I blended the flowers using a Blender Pen to spread the color a little. I flicked a little ink using my Starry Sky Stamp’ Write Marker. I adhered the Basic White panel to a Starry Sky mat then to the inside of the Starry Sky card base.

Stampin' Up! Quiet Meadow Fun Fold 6 creativestampingdesigns.com

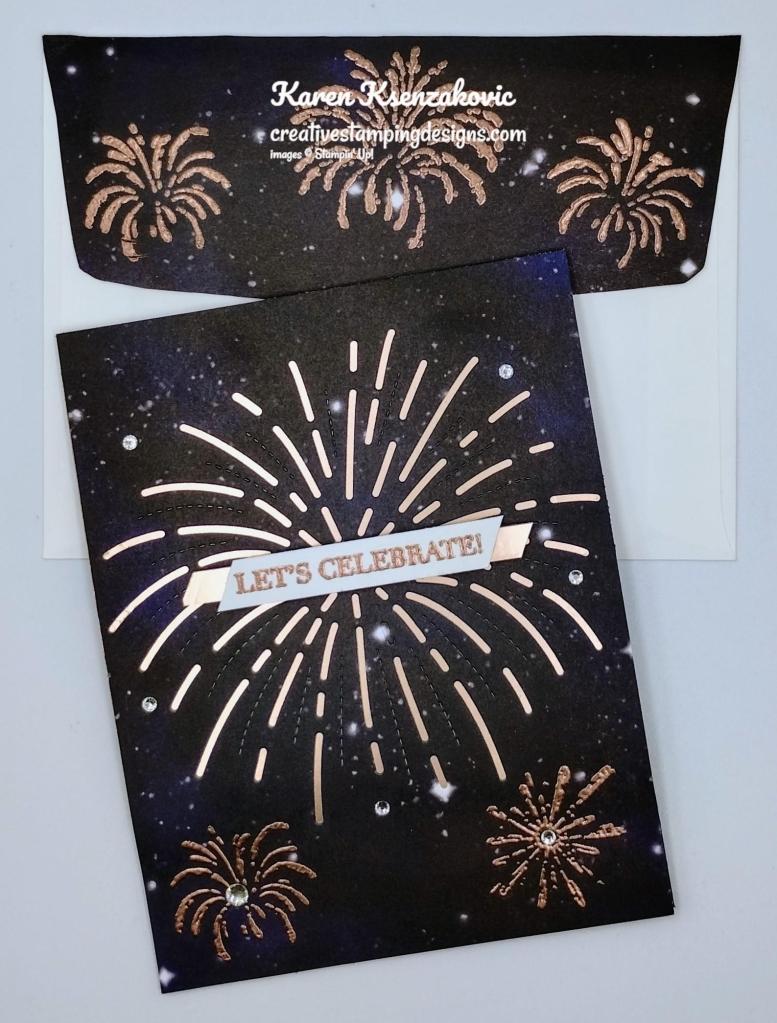
To finish my card, I decorated a Basic White Medium Envelope. I stamped the script image from the Quiet Meadow stamp set on the envelope front in Starry Sky Ink twice, stamping off on scrap paper twice before stamping on the envelope. I stamped the flower image from the Quiet Meadow stamp set in Starry Sky Ink over the script image. I blended the flowers using my Blender Pen. I adhered a panel of Stargazing DSP to the envelope flap.

Stampin' Up! Quiet Meadow Fun Fold 7 creativestampingdesigns.com

Thank you for stopping by my blog today. I hope you like the card and will give it a try. Happy Stamping!!

*********************************************************************************************************

If you need any stamping supplies, I’d love to be your Demonstrator. Just click HERE to go directly to my online store or drop me an email if you have any questions. 

MY CURRENT HOST CODE IS:   AHZBFDC4

Use this host code when placing an order with me. When you order $50 or greater you will receive a free gift from me! If your order is over $150, please do not use this code, but you’ll still get the free gift. The free gift is your choice of any 1 item valued up to $10.00 from the 2023-2024 Annual Catalog, the January-April 2024 Mini Catalog or from the Online Exclusives!  Unfortunately, packs of cardstock are no longer an option for a free gift. Shipping has become too expensive to ship and it’s costing me as much to ship as the cardstock costs. For any orders $50 or more I will also send you my monthly class tutorials.  Click HERE or go to my Customer Rewards for more details and to see what this month’s tutorials are.

Please remember to use my current Host Code and make sure that you can see my name on the final checkout page listed as your Demonstrator when you order so that you know that you’re ordering with me, and you’ll get my rewards! 

Happy Stamping, Karen

*********************************************************************************************************

In response to changing policies at Stampin’ Up – I’m adjusting my Ordering Gift policy as well.  I’m having to get a little more tough on the adding of Host codes when you place your order thru my Online Store.

Not to worry – you’re still going to get that $10 ordering gift for orders of $50 (before shipping & tax) or greater.  And the gift is still any 1 SU! product up to that $10 value – which includes some of our fun Host Sets!

But – if you DO NOT use the Host code for your orders of less than $150 (this is the RETAIL total before Shipping & Handling), then you’ll have two options:

  1. You’ll need to call Stampin’ Up! (1-800-Stamp-Up) and ask them to add it for you. They’re very helpful and will get it done quickly!  OR….
  2. If your order was over the $50 threshold but under $150, then…you’ll forfeit that $10 ordering gift and rewards – this is the Bummer Option – and I REALLY don’t want to do this, SO please remember to add my Current Host Code.

*********************************************************************************************************

Stampin’ Up! has two new kits available to order beginning today!! 

Kits by Stampin’ Up! are perfect for new crafters, busy crafters, or crafters who want quick and easy projects. All-inclusive project kits have everything you need in one box! Give as a gift or try them yourself. Kits are while supplies last. Order today!

Your Day To Shine Kit

Say hello, happy birthday, or recognize someone with the Your Day to Shine Kit. Everyone will appreciate one of these pretty floral cards and matching envelopes. If you’re new to card making, you’ll love how this kit makes crafting super simple, because all of the pieces are printed, die cut, and ready to use—no stamping or cutting needed! If you’re an experienced crafter, you’ll love the artistic beauty of these card designs. Includes sentiments in English, Dutch, French, and German.

Kit includes:
* Predesigned projects
* Step-by-step instructions
* Precut pieces (No prep work! Get right to crafting)
* Makes 9 cards: 3 each of 3 designs
* Folded card sizes: 5-1/2″ x 4-1/4″ (14 x 10.8 cm), 3″ x 3″ (7.6 x 7.6 cm)
* 9 preprinted envelopes
* Enough adhesive to complete projects
* Adhesive-backed iridescent rhinestones
* Die-cut vellum pieces
* Printed labels and die cut images
* Printed sentiments in four languages: English, Dutch, French, German

Product colors: Berry Burst, Calypso Coral, Crushed Curry, Fresh Freesia, Misty Moonlight, Mossy Meadow

++++++++++++++++++++++++++++++++++++++++++++++++++++++++++++++++++++++

Frog & Friends Game Kit

DIY a classic cup-and-ball game! With the Frog & Friends Kit, you can craft six cup-and-ball games in three designs: a fun frog, a flashy fish, and a silly shark. The kit includes everything you need to complete the toys, even googly eyes! It’s a great kit for crafting with kids, grandkids, nieces and nephews, play groups—kids and kids at heart!

Kit includes:
* Predesigned projects
* Step-by-step instructions
* Precut pieces (No prep work! Get right to crafting)
* Makes 6 cup-and-ball games: 2 each of 3 designs
* Finished size: 4-1/4″ x 7-1/4″ x 1-1/2″ (10.8 x 18.4 x 3.8 cm)
* Enough adhesive to complete projects
* Acrylic shapes
* Stickers
* Twine

Product colors: Azure Afternoon, Balmy Blue, Crushed Curry, Granny Apple Green, iridescent, Lemon Lime Twist, Poppy Parade

You can find all the Kits Here at my Online Store.

*********************************************************************************************************

Stampin’ Up! has some new Online Exclusive items that are available to order now!!  You won’t find these products in any catalog, they’ll only be listed in the online store.  

The Online Exclusive product releases will continue throughout the year so there will be new products to shop from, in addition to new catalogs!  A new set of Online Exclusives are now available for ordering.

Go check out my Online Store for the NEW Online Exclusive products available. Get those orders placed early so you don’t miss out on the pretty new suites and new bundles.
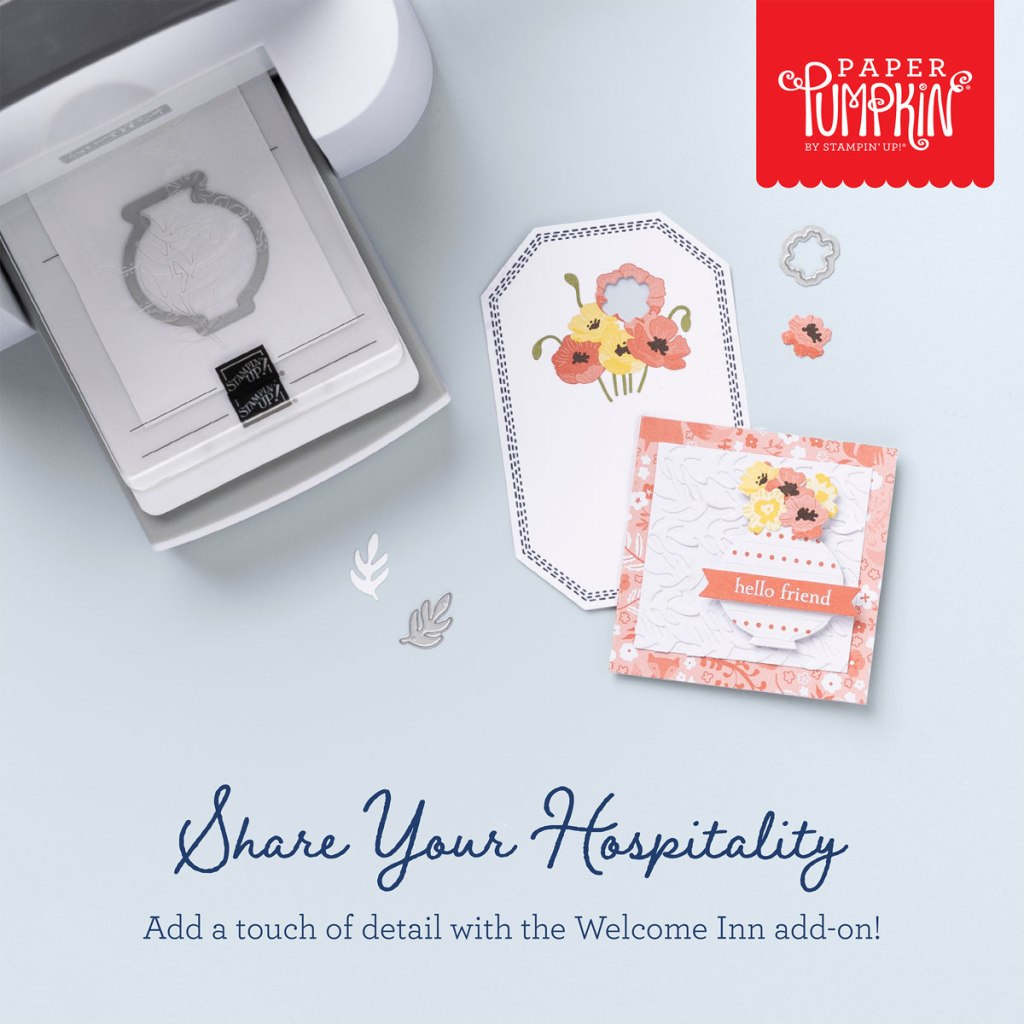
*********************************************************************************************************

Memorable Meadows

Subscribe February 11 – March 10

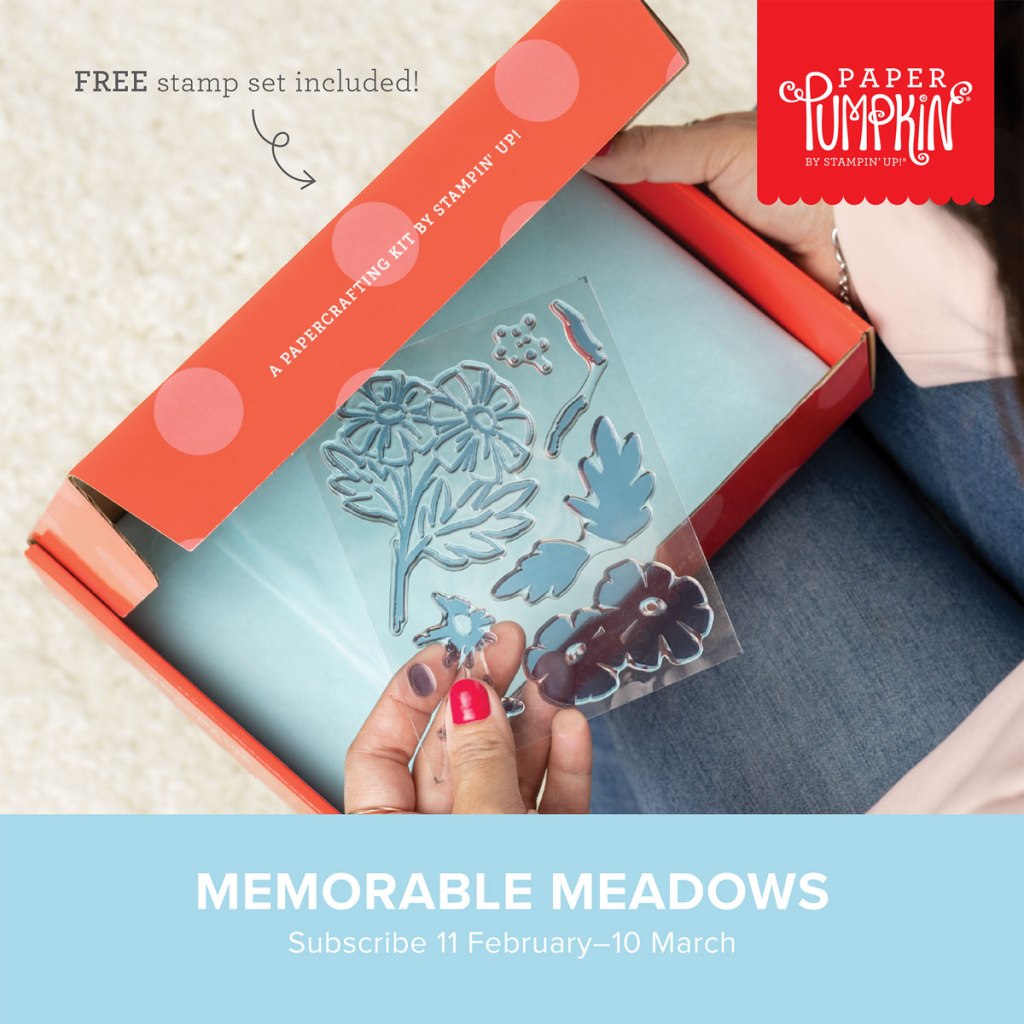
Share nature’s beauty with lovely all-occasion cards!
• Makes 9 cards: 3 each of 3 designs with 9 coordinating envelopes
• Precut vellum pieces & wood embellishments
• Coordinates with the Meandering Meadows Suite Collection (item 162745)
• Coordinating colors: Granny Apple Green, Garden Green (Classic Stampin’ Spot),
Balmy Blue, Night of Navy, Gorgeous Grape, Fresh Freesia

Don’t miss the coordinating Love of Spring Dies add-on!

The dies will coordinate with the January, February and March Paper Pumpkin Kit.

The Love of Spring Dies Add-On—available only while supplies last!

Item # 164396 $12.00

This exclusive add-on coordinates with the three upcoming kits! Paper Pumpkin subscribers can purchase it beginning 11 December. The add-on is available only while supplies last, so it’s best to shop early!

Subscribe to the February Paper Pumpkin Kit between 11 January and 10 February by clicking here!

Note: Supplies may be limited toward the end of the subscription period.

*********************************************************************************************************

Card stock cuts for this project:

  • Basic White Cardstock 3″ X 5 1/4″ (card front panel), 1 1/4″ X 3 1/2″ (sentiment), 4″ x 5 1/4″ (inner liner)
  • Starry Sky Cardstock 5 1/2″ X 8 1/2″ (card base scored & folded at 1 1/4″ & 5 1/2″), 4 1/8″ X 5 3/8″ (inner liner mat)
  • Stargazing Designer Series Paper 2 7/8″ X 5 3/8″ (card front panel), 1 1/8″ X 5 3/8″ (card front panel), 2 1/4″ x 6″ (envelope flap)

*********************************************************************************************************

Product List
Quiet Meadow Cling Stamp Set
$21.00
So Sincere Cling Stamp Set (English)
$24.00
Basic White 8 1/2" X 11" Cardstock
$10.50
Starry Sky 8 1/2" X 11" Cardstock
$10.00
Stargazing 12" X 12" (30.5 X 30.5 Cm) Designer Series Paper
$12.50
Starry Sky Classic Stampin' Pad
$9.00
Blender Pens
$13.00
2022–2024 In Color Stampin' Write Markers
$17.50
Meadow Dies
$38.00
Scalloped Contours Dies
$35.00
2022–2024 In Color Pearls
$7.00
Starry Sky 1/8'' (3.2 Mm) Metallic Woven Ribbon
$9.00
Basic White Medium Envelopes
$8.50
Stampin' Cut & Emboss Machine
$128.00
Mini Glue Dots
$5.75
Multipurpose Liquid Glue
$5.50
Mini Stampin' Dimensionals
$4.25
Stampin' Dimensionals
$4.25
Stampin' Seal
$8.00
Bone Folder
$7.00
Paper Snips
$11.00
Paper Trimmer
$26.00
Clear Block Bundle
$80.75

Stampin’ Up! Light The Sky for The Happy Inkin’ Thursday Blog Hop

Good Thursday morning my stamping friends welcome to our Happy Inkin’ Thursday Blog Hop. If you are starting with me, thank you, I hope you will stop by everyone’s blog to see what they have created this week. If you are hopping over from Akiko’s blog, thank you for stopping by. This week we have Theme Challenge. If you’d like to see a quick video on how I made this card, Click Here to go to my Instagram Reels. Here is my card using this week’s theme.

Stampin' Up! Light The Sky Celebrate 1 creativestampingdesigns.com

I used the Stampin’ Up! Light The Sky Bundle along with the Stampin’ Up! Heartfelt Hexagon Photopolymer Stamp Set, Stargazing Designer Series Paper and Rose Gold Specialty Paper for my card today.

This is our theme for this week

Stampin' Up! Light The Sky Celebrate 2 creativestampingdesigns.com

I started by using the largest die from the Light The Sky Dies and cut a Stargazing DSP card front. I stamped 2 of the firework images from the Stampin’ Up! Light The Sky Photopolymer Stamp Set in Versamark Ink on the bottom of the panel. I sprinkled them with Copper Embossing Powder and set them using the Heat Tool.

Stampin' Up! Light The Sky Celebrate 3 creativestampingdesigns.com

I adhered a panel of Rose Gold Spec Paper to the back of the panel, behind the firework, using Stampin’ Seal. I adhered the layered panel to a Basic Black card base using Liquid Glue. On a strip of Basic White, I stamped the sentiment from Light The Sky stamp set in Versamarik Ink. I sprinkled it with Copper Embossing Powder and set it using the Heat Tool.

Stampin' Up! Light The Sky Celebrate 4 creativestampingdesigns.com

I cut the ends of the sentiment using Paper Snips. I adhered the sentiment to a strip of Rose Gold Spec Paper using Stampin’ Seal. I cut the ends of the foil paper using Paper Snips. I adhered the sentiment to the card front using Stampin’ Dimensionals. I added a few Rhinestones Basic Jewels to the card front.

Stampin' Up! Light The Sky Celebrate 5 creativestampingdesigns.com

On the inside, I stamped the sentiment from the Heartfelt Hexagon stamp set in Tuxedo Black Ink on a panel of Basic White. I stamped the firework images from the Light The Way stamp set in Versamark Ink on the top of the panel. I sprinkled them with Copper Embossing Powder and set them using the Heat Tool. I adhered a strip of Stargazing DSP to the bottom of the panel. I adhered the Basic White panel to a Copper Clay mat then to the inside of the Basic Black card base,

Stampin' Up! Light The Sky Celebrate 6 creativestampingdesigns.com

To complete my card, I decorated a Basic White Medium Envelope. I stamped the firework from the Light The Sky stamp set in Versamark Ink on the envelope front. I sprinkled it with Copper Embossing Powder and set it using the Heat Tool. I stamped 3 fireworks from the Light The Sky stamp set on a panel of Stargazing DSP in Versamark Ink, sprinkled them with Copper Embossing Powder and set them with the Heat Tool. I adhered the Stargazing DSP to the envelope flap.

Stampin' Up! Light The Sky Celebrate 7 creativestampingdesigns.com

Thank you for stopping by my blog today. Now that you’ve seen my card, take a minute to hop through and see everyone’s projects today. If you click on the Next Blog button, you’ll go to Tara’s page. Or you can just click on the names below to go directly to all their blogs! Happy Hopping!

Amy Koenders

Mary Deatherage

Karen Finkle

Akiko Sudano

Karen Ksenzakovic You Are Here

Tara Carpenter

Terry Lynn Bright

Nel Thames

*********************************************************************************************************

If you need any stamping supplies, I’d love to be your Demonstrator. Just click HERE to go directly to my online store or drop me an email if you have any questions. 

MY CURRENT HOST CODE IS:   SMAQYYMJ

Use this host code when placing an order with me. When you order $50 or greater you will receive a free gift from me! If your order is over $150, please do not use this code, but you’ll still get the free gift. The free gift is your choice of any 1 item valued up to $10.00 from the 2023-2024 Annual Catalog!  Unfortunately, packs of cardstock are no longer an option for a free gift. Shipping has become too expensive to ship and it’s costing me as much to ship as the cardstock costs. For any orders $50 or more I will also send you my monthly class tutorials.  Click HERE or go to my Customer Rewards for more details and to see what this month’s tutorials are.

Please remember to use my current Host Code and make sure that you can see my name on the final checkout page listed as your Demonstrator when you order so that you know that you’re ordering with me, and you’ll get my rewards! 

Happy Stamping, Karen

*********************************************************************************************************

In response to changing policies at Stampin’ Up – I’m adjusting my Ordering Gift policy as well.  I’m having to get a little more tough on the adding of Host codes when you place your order thru my Online Store.

Not to worry – you’re still going to get that $10 ordering gift for orders of $50 (before shipping & tax) or greater.  And the gift is still any 1 SU! product up to that $10 value – which includes some of our fun Host Sets!

But – if you DO NOT use the Host code for your orders of less than $150 (this is the RETAIL total before Shipping & Handling), then you’ll have two options:

  1. You’ll need to call Stampin’ Up! (1-800-Stamp-Up) and ask them to add it for you. They’re very helpful and will get it done quickly!  OR….
  2. If your order was over the $50 threshold but under $150, then…you’ll forfeit that $10 ordering gift and rewards – this is the Bummer Option – and I REALLY don’t want to do this, SO please remember to add my Current Host Code.

*********************************************************************************************************

Lovely Lavender

Subscribe December 11 – January 10

Make love-themed cards for special occasions, Valentine’s Day, anniversaries, and more!

This kit includes:
• Makes 8 cards: 4 each of 2 designs with 8 coordinating envelopes
• 4 bonus tags that punch out from the card front
• Precut paper pieces and linen thread
• Coordinating colors: Garden Green, Pretty Peacock, Lost Lagoon, Highland Heather,
Gorgeous Grape (Classic Stampin’ Spot), Berry Burst

Don’t miss the coordinating Love of Spring Dies add-on!

The dies will coordinate with the January, February and March Paper Pumpkin Kit.

The Love of Spring Dies Add-On—available only while supplies last!

Item # 164396 $12.00

This exclusive add-on coordinates with the three upcoming kits! Paper Pumpkin subscribers can purchase it beginning 11 December. The add-on is available only while supplies last, so it’s best to shop early!

Subscribe to the January Paper Pumpkin Kit between 11 December and 10 January by clicking here!

Note: Supplies may be limited toward the end of the subscription period.

*********************************************************************************************************

Card stock cuts for this project:

  • Basic White Cardstock 3/8″ X 2 1/2″ (sentiment), 45″ X 5 1/4″ (inner liner)
  • Basic Black Cardstock 4 1/4″ X 11″ (card base scored & folded at 5 1/2″)
  • Copper Clay Cardstock 4 1/8″ x 5 3/8″ (inner liner mat)
  • Stargazing Designer Series Paper 4 1/4″ X 5 1/2″ (card front), 1/2″ X 4″ (inner liner), 2 1/4″ X 6″ (envelope flap)
  • Rose Gold Specialty Paper 4 1/4″ X 4 1/2″ (firework panel), 1/4″ X 3″(sentiment mat)

*********************************************************************************************************

Product List

Light The Sky Bundle (English)

$47.50

Light The Sky Photopolymer Stamp Set (English)

$20.00

Light The Sky Dies

$33.00

Heartfelt Hexagon Photopolymer Stamp Set (English)

$20.00

Basic White 8 1/2" X 11" Cardstock

$10.50

Basic Black 8-1/2" X 11" Cardstock

$10.00

Copper Clay 8 1/2" X 11" Cardstock

$10.00

Stargazing 12" X 12" (30.5 X 30.5 Cm) Designer Series Paper

$12.50

Rose Gold 12” X 12” (30.5 X 30.5 Cm) Specialty Paper

$10.00

Tuxedo Black Memento Ink Pad

$6.50

Versamark Pad

$9.50

Metallics Embossing Powders

$18.00

Heat Tool (Us And Canada)

$31.00

Rhinestone Basic Jewels

$6.00

Basic White Medium Envelopes

$8.50

Stampin' Cut & Emboss Machine

$128.00

Mini Glue Dots

$5.75

Multipurpose Liquid Glue

$5.50

Mini Stampin' Dimensionals

$4.25

Stampin' Dimensionals

$4.25

Stampin' Seal

$8.00

Bone Folder

$7.00

Paper Snips

$11.00

Paper Trimmer

$26.00

Clear Block Bundle

$80.75

Stampin’ Up! Stars At Night for Fun Fold Friday

Good Friday morning stamping friends and welcome to my Fun Fold Friday. How was everyone’s week? Are you ready for the weekend? I hope you are starting to make some plans. I’ll be at work all day tomorrow. Don’t forget I still have my Double Creative Stamping Designs Rewards going on for my birthday week until Monday November 20th.

Today’s card I made on YouTube Live on Wednesday. If you were able to join me or watched the replay, thank you. If you’d like to watch my video and stamp along, the measurements are below, just above the supply list, along with the link to my YouTube channel. Here is my card for today.

Stampin' Up1 Stars At Night Fun Fold 1 creativestampingdesigns.com

I used the Stampin’ Up! Stars At Night Bundle along with the Stargazing Designer Series Paper, Holographic Specialty Paper and Online Exclusive Silver & Gold Adhesive-Backed Glimmer Paper for my card today.

Stampin' Up1 Stars At Night Fun Fold 2 creativestampingdesigns.com

I adhered a panel of Stargazing DSP to a Basic White mat using Stampin’ Seal. I adhered the layered panel to the back inside of the large card base using Liquid Glue. From panels of Holographic paper, Silver Glimmer paper and Basic White, I cut multiple stars, large and small using the Stars At Night Hybrid Embossing Folder and Dies.

Stampin' Up1 Stars At Night Fun Fold 3 creativestampingdesigns.com

I embossed a small panel of Starry Sky using the Stars At Night Hybrid Embossing Folder. I adhered the embossed panel to a Basic White mat using Liquid Glue. I adhered the layered panel to the large card base using Liquid Glue. I added a Holographic star to the center of the large, embossed star using Liquid Glue. I added a few of the Silver Glimmer stars to the panel. On the video I had added a larger star, but it was too large, so I switched it out.

Stampin' Up1 Stars At Night Fun Fold 4 creativestampingdesigns.com

I adhered a panel of Stargazing DSP to a Holographic mat using Stampin’ Seal. I adhered the layered panel to the front of the small Starry Sky card base using Liquid Glue. I layered the stars the way I wanted them using Glue Dots. I adhered the layered stars to the small card front using Stampin’ Dimensionals. On a panel of Basic White, I stamped the sentiment from the Stampin’ Up! Stars At Night Photopolymer Stamp Set in Versamark Ink. I sprinkled it with Silver Embossing Powder and set it using the Heat Tool. I cut the sentiment out using the Stars At Night Dies. I adhered the sentiment to the small card front using Stampin’ Dimensionals.

Stampin' Up1 Stars At Night Fun Fold 5 creativestampingdesigns.com

On the inside of the small card base, I stamped the sentiment from the Stars At Night stamp set in Starry Sky Ink on a panel of Basic White. I stamped the large, dotted star image from the Stars At Night stamp set in Smoky Slate Ink, stamping off once on scrap paper, over the sentiment. I adhered the Basic Whtie panel to a Smoky Slate mat then to the inside of the small Starry Sky card base. I added a few of the tiny Silver Glimmer stars around the sentiment.

Stampin' Up1 Stars At Night Fun Fold 6 creativestampingdesigns.com

To finish my card, I decorated a Basic White Medium Envelope. I stamped the star images from the Stars At Night stamp set in Smoky Slate Ink on the envelope front. I adhered a panel of Stargazing DSP to the envelope flap.

Stampin' Up1 Stars At Night Fun Fold 7 creativestampingdesigns.com

Thank you for stopping by my blog today. I hope you liked my card and will give it a try. I hope you will CASE this card and please feel free to post it in the comments of my Facebook page under my post. I’d love to see your take on the card. The list of measurements are below if you’d like to stamp along while watching the video. You can watch my video on my YouTube Channel Here.

If you watch this on my YouTube channel, please remember to subscribe so that you will get notified when a new video goes live. Thank you to those that have subscribed already. Happy Stamping!!

*********************************************************************************************************

If you need any stamping supplies, I’d love to be your Demonstrator. Just click HERE to go directly to my online store or drop me an email if you have any questions. 

MY CURRENT HOST CODE IS:   BX4UV6HE

Use this host code when placing an order with me. When you order $50 or greater you will receive a free gift from me! If your order is over $150, please do not use this code, but you’ll still get the free gift. The free gift is your choice of any 1 item valued up to $10.00 from the 2023-2024 Annual Catalog!  Unfortunately, packs of cardstock are no longer an option for a free gift. Shipping has become too expensive to ship and it’s costing me as much to ship as the cardstock costs. For any orders $50 or more I will also send you my monthly class tutorials.  Click HERE or go to my Customer Rewards for more details and to see what this month’s tutorials are.

Please remember to use my current Host Code and make sure that you can see my name on the final checkout page listed as your Demonstrator when you order so that you know that you’re ordering with me, and you’ll get my rewards! 

Happy Stamping, Karen

*********************************************************************************************************

In response to changing policies at Stampin’ Up – I’m adjusting my Ordering Gift policy as well.  I’m having to get a little more tough on the adding of Host codes when you place your order thru my Online Store.

Not to worry – you’re still going to get that $10 ordering gift for orders of $50 (before shipping & tax) or greater.  And the gift is still any 1 SU! product up to that $10 value – which includes some of our fun Host Sets!

But – if you DO NOT use the Host code for your orders of less than $150 (this is the RETAIL total before Shipping & Handling), then you’ll have two options:

  1. You’ll need to call Stampin’ Up! (1-800-Stamp-Up) and ask them to add it for you. They’re very helpful and will get it done quickly!  OR….
  2. If your order was over the $50 threshold but under $150, then…you’ll forfeit that $10 ordering gift and rewards – this is the Bummer Option – and I REALLY don’t want to do this, SO please remember to add my Current Host Code.

*********************************************************************************************************

New Online Exclusives Now Available

Go check out my Online Store for the NEW Online Exclusive products available. Get those orders placed early so you don’t miss out on the pretty new suite and new bundles.

*********************************************************************************************************

The Best Destination Kit Now Available

Plan a crafting getaway today with the all-inclusive The Best Destination Kit! This kit lets you make nine tri-fold cards with a colorful, nostalgic, travel vibe. Resort-hopping was never so easy!

This month’s kit includes:

  • Enough supplies to create 9 cards—3 each of 3 designs
  • 9 coordinating envelopes
  • Best Destination Photopolymer Stamp Set
  • One Gorgeous Grape Ink Spot
  • Printed card bases, printed die cuts, adhesive, embellishments, and a clear block
  • Finished card size: 5-1/2″ x 4-1/4″ (14 x 10.8 cm)
  • Coordinating colors: Balmy Blue, Boho Blue, Cajun Craze, Calypso Coral, Coastal Cabana, Crushed Curry, Daffodil Delight, Early Espresso, Flirty Flamingo, Fresh Freesia, Gorgeous Grape, Granny Apple Green, Misty Moonlight, Pecan Pie, Petal Pink, Pretty Peacock, and Shaded Spruce

163186 $20.00 USD

*********************************************************************************************************

All The Best

Subscribe November 11 – December 10

Send a wish to all your loved ones with the December Paper Pumpkin Kit! It comes with nine card fronts, three each of three designs, and nine coordinating envelopes. It has paper pieces detailed with gold foil, embellishments, an all-occasion stamp set, and an acetate box where you can store your finished cards! You can gift the kit itself or the finished product in the acetate box; either way, it’s the perfect last-minute gift for any occasion. 

The paper pieces in the December Paper Pumpkin kit have gold foil detailing. Whether it’s an elegant boarder, or woven into the floral artwork, it’s a detail that will surely catch your recipient’s eye! It’s the perfect way to take any paper craft to the next level. 

The beauty of the December Paper Pumpkin Kit lies in the hand drawn artwork. The bright blue skies and elegant yellow flowers compliment the different design elements perfectly. It’s a simple yet sophisticated design that will catch any recipient’s eye! 

This kit includes:

  • 9 cards; 3 each of 3 designs.
  • 9 coordinating envelopes.
  • 1 Acetate box to fit cards and envelopes from the kit.
  • 1 Pebbled Path Stampin’ Spot.
  • 1 photopolymer stamp set.
  • Embellishments.
  • Specialty gold foil die cuts.
  • Enough adhesive to finish the project.
  • Finished card size: 4-1/4″ x 5-1/2″ (10.8 x 14 cm)
  • Coordinating Stampin’ Up! colors: Balmy Blue, Crushed Curry, gold foil, Old Olive, Pebbled Path

Subscribe to the November Paper Pumpkin Kit between 11 November and 10 December by clicking here!

Note: Supplies may be limited toward the end of the subscription period.

*********************************************************************************************************

Card stock cuts for this project:

  • Basic White Cardstock 1 3/4″ x 3 1/2″ (sentiment), 2 1/2″ X 3 1/2″ (stars), 2 3/8″ X 4 1/8″ (embossed panel mat), 4 1/8″ X 5 3/8″ (back panel mat)
  • Smoky Slate Cardstock 3 1/8″ X 4 1/8″ (inner liner mat)
  • Starry Sky Cardstock 4 1/4″ X 8″ (large card base scored & folded at 2 1/2″), 3 1/4″ X 8 1/2″ (small card base scored & folded at 4 1/4″), 2 1/4″ X 4″ (embossed panel)
  • Stargazing Designer Series Paper 3″ X 4″ (small card front), 4″ X 5 1/4″ (back panel), 2 1/4″ X 6″ (envelope flap)
  • Holographic Specialty Paper 3 1/8″ X 4 1/8″ (small card front mat), 1 3/4″ X 3 1/4″ (embossed star), 3″ X 3″ (stars)
  • Silver & Gold Adhesive-Backed Glimmer Paper 2″ X 2″ (stars)

*********************************************************************************************************

Product List

Stars At Night Bundle (English)

$56.50

Stars At Night Photopolymer Stamp Set (English)

$24.00

Stars At Night Hybrid Embossing Folder

$39.00

Basic White 8 1/2" X 11" Cardstock

$10.50

Smoky Slate 8-1/2" X 11" Cardstock

$10.00

Starry Sky 8 1/2" X 11" Cardstock

$10.00

Stargazing 12" X 12" (30.5 X 30.5 Cm) Designer Series Paper

$12.50

 Holographic Trio 12" X 12" (30.5 X 30.5 Cm) Specialty Paper

$10.00

Silver & Gold 12" X 12" (30.5 X 30.5 Cm) Adhesive Backed Glimmer Paper

$7.00

Smoky Slate Classic Stampin' Pad

$9.00

Starry Sky Classic Stampin' Pad

$9.00

Versamark Pad

$9.50

Metallics Embossing Powders

$18.00

Heat Tool (Us And Canada)

$31.00

Basic White Medium Envelopes

$8.50

Stampin' Cut & Emboss Machine

$128.00

Mini Glue Dots

$5.75

Multipurpose Liquid Glue

$5.50

Mini Stampin' Dimensionals

$4.25

Stampin' Dimensionals

$4.25

Stampin' Seal

$8.00

Bone Folder

$7.00

Paper Snips

$11.00

Paper Trimmer

$26.00

Clear Block Bundle

$80.75

Stampin’ Up! Fruitful Blessings

Good Saturday morning stamping friends welcome to the weekend and HAPPY AUTUMN!!! I can’t believe summer is over. Summer one of my favorite seasons, but I do like spring and autumn and winter too. I’m just a hot weather person. I hope you are getting some plans in the works for the weekend. I’ll be working all day today.

Since it’s Autumn, I only thought it would be appropriate to have a fall card for you today. To see a quick video on how I made this card, click Here for my Instagram Reels. Here’s my card for the day.

Stampin' Up! fruitful Blessings Hello 1 creativestampingdesigns.com

I used the Stampin’ Up! Fruitful Blessings Bundle along with the Stampin’ Up! Textured Floral Photopolymer Stamp Set, Timeworn Type 3D Embossing Folder, Deckled Rectangle Dies, Stargazing Designer Series Paper and Them Bones Designer Series Paper for my card today.

Stampin' Up! fruitful Blessings Hello 2 creativestampingdesigns.com

I started by embossing a Cajun Craze card front using the Timeworn Type 3D EF. I adhered the embossed panel to a Pebbled Path card base using Multipurpose Liquid Glue. Using the Deckled Rectangle Dies, I cut the panel of Stargazing DSP partway through, I moved the die so that I would cut a square and cut again from the opposite side. I stamped the splatter image from the Textured Floral stamp set in Pebbled Path Ink, stamping off once on scrap paper, all around the panel. I adhered the stamped DSP panel to a Pebbled Path mat using Stampin’ Seal. I adhered the layered panel to the card front using Multipurpose Liquid Glue.

Stampin' Up! fruitful Blessings Hello 3 creativestampingdesigns.com

I adhered a panel of Them Bones DSP to a Pebbled Path mat using Stamin’ Seal. I adhered the layered panel to the card front using Multipurpose Liquid Glue. Using the Fruitful Blessings Dies I cut the solid corn die from a panel of Cajun Craze, the detailed corn die from a panel of Crushed Curry, the corn husk from a panel of Crumb Cake and the leaves from a panel of Old Olive.

Stampin' Up! fruitful Blessings Hello 4 creativestampingdesigns.com

On a panel of Pebbled Path, I stamped the sentiment from the Stampin’ Up! Fruitful Blessings Cling Stamp Set in Versamark Ink. I sprinkled it with White Embossing Powder and set it using the Heat Tool. I adhered the sentiment to the card front using Stampin’ Dimensionals. I adhered the detailed corn to the solid corn die. I adhered the leaves to the card front using Multipurpose Liquid Glue. I adhered the corn and corn husk using Stampin’ Dimensionals and a Glue Dot. I added a few Rustic Metallic Adhesive Backed Dots to the card front.

Stampin' Up! fruitful Blessings Hello 5 creativestampingdesigns.com

On the inside, I stamped the sentiment from the Fruitful Blessings stamp set in Pebbled Path Ink on a panel of Basic White. I stamped the leaf image from the Fruitful Blessings stamp set in Tuxedo Black Ink on the panel and colored the images with Old Olive Stampin’ Blends Markers. I adhered the Basic White panel to a Cajun Craze mat then to the inside of the Pebbled Path card base.

Stampin' Up! fruitful Blessings Hello 6 creativestampingdesigns.com

To finish my card, I decorated a Basic White Medium Envelope. I stamped the leaf image from the Fruitful Blessings stamp set in Tuxedo Black Ink on the envelope front. I colored the image with Old Olive Stampin’ Blends Markers. I adhered a panel of Them Bones DSP to the envelope flap.

Stampin' Up! fruitful Blessings Hello 7 creativestampingdesigns.com

Thank you for stopping by my blog today. I ho9pe you like the card and will give it a try. Happy Stamping!!

*********************************************************************************************************

If you need any stamping supplies, I’d love to be your Demonstrator. Just click HERE to go directly to my online store or drop me an email if you have any questions. 

MY CURRENT HOST CODE IS:   P6UQN4GZ

Use this host code when placing an order with me. When you order $50 or greater you will receive a free gift from me! If your order is over $150, please do not use this code, but you’ll still get the free gift. The free gift is your choice of any 1 item valued up to $10.00 from the 2023-2024 Annual Catalog!  Unfortunately, packs of cardstock are no longer an option for a free gift. Shipping has become too expensive to ship and it’s costing me as much to ship as the cardstock costs. For any orders $50 or more I will also send you my monthly class tutorials.  Click HERE or go to my Customer Rewards for more details and to see what this month’s tutorials are.

Please remember to use my current Host Code and make sure that you can see my name on the final checkout page listed as your Demonstrator when you order so that you know that you’re ordering with me, and you’ll get my rewards! 

Happy Stamping, Karen

*********************************************************************************************************

In response to changing policies at Stampin’ Up – I’m adjusting my Ordering Gift policy as well.  I’m having to get a little more tough on the adding of Host codes when you place your order thru my Online Store.

Not to worry – you’re still going to get that $10 ordering gift for orders of $50 (before shipping & tax) or greater.  And the gift is still any 1 SU! product up to that $10 value – which includes some of our fun Host Sets!

But – if you DO NOT use the Host code for your orders of less than $150 (this is the RETAIL total before Shipping & Handling), then you’ll have two options:

  1. You’ll need to call Stampin’ Up! (1-800-Stamp-Up) and ask them to add it for you. They’re very helpful and will get it done quickly!  OR….
  2. If your order was over the $50 threshold but under $150, then…you’ll forfeit that $10 ordering gift and rewards – this is the Bummer Option – and I REALLY don’t want to do this, SO please remember to add my Current Host Code.

*********************************************************************************************************

CLEARANCE RACK REFRESH

Stampin’ Up! has refreshed the clearance rack!!! There are lots of new savings on Paper, Dies, Embellishments, Inks and even Stamp Sets. Clearance Rack Deals are only while supplies last though, so hurry over to the Clearance in my Online Store and start saving!!!

*********************************************************************************************************

Inkin’ Krew World Card Making Day Event – Saturday, October 7!

Save the date!!  Our team will be hosting a World Card Making Day event again this year!  We’ll be setting up a Facebook page where we’ll be going live and posting videos showing you card projects all day long!  

The event will be Saturday, September 7 and will start around 9 AM ET that day and run through around 9 PM ET that evening.  Replays will be available for all of the presentations if you aren’t able to watch that day. 

We’ll be posting a link to the event page a few days ahead of the event and opening it for all to attend so keep an eye out for that in early October!

Hope to see you then!

*********************************************************************************************************

Stampin’ Up! World Card Making Day Event – Saturday, October 7!

You are invited to craft along with Stampin’ Up! for about three hours, and create three unique cards for World Card Making Day! Everyone is invited and welcome and the event and registration are FREE! 

Don’t miss out on this opportunity to connect with others who love crafting as much as you do and to experience all that Stampin’ Up! has to offer.  Mark your calendars now and join us on October 7!


EVENT DETAILS

Who: Anyone!
When: October 7 from 2:00–5:00 p.m. (MT)
Where: Online
Price of Event: Free
Registration Dates: September 6 – October 7, 2023 

You can participate in the event without registering. However, registration is encouraged because it’s the best way to stay up to date regarding event details. The email address provided will only be used for event communication.

Language of Event: Most of the event will be presented in English with language interpretation voiceover and subtitles in English, French, German, and Dutch. 

Help Support : Support will be available on the event platform one hour before the event begins, during the event, and for 30 minutes following the event. 

Video on Demand: The World Card Making Day event will be recorded, and you’ll be able to access it after the live event. It will be available October 8-31. 

Click Here to open a full-size flyer showing you the stamp set bundles that will be used (including the new Heartfelt Hexagon bundle!!) for the projects on World Card Making Day.

Click Here for the measurements and card stock cuts for the three projects that will be shared at the World Card Making Day event.

*********************************************************************************************************

Home for the Holidays

Subscribe September 11 – October 10

Create dazzling traditional Christmas cards with the Home for the Holidays Paper Pumpkin Kit! This kit includes eight beautiful cards—four each of two designs. Whether you want to send a few to your loved ones or fill your home with some extra special Christmas cheer, this kit has everything you need to make some sparkly, festive cards. Keep reading to learn more!

One extra fun feature of the Home for the Holidays Paper Pumpkin Kit is the bottle of glitter glue! You can use this glue to add shimmery, shiny details to the Christmas scenes on their cards. You can add some glitter to the trees, houses, snow, and more. There are endless possibilities you will have with this glue and the kit.

Bring some inspiration to your creations with the coordinating box design! This box could help create a cute village Christmas scene with your cards, and more. You could even use the box as a photo op prop! This is a fun way to make the most of the kit. Don’t let the Christmas crafts end once you finish with this kit! Since the Home for the Holidays Kit perfectly coordinates with the November Paper Pumpkin Kit, you and you will be able to extend your holiday crafting experience even further. So make sure your subscription is up to date!

This kit includes:

  • All the supplies you’ll need to create 8 sparkly and dazzling Christmas cards—4 each of 2 designs—and eight coordinating envelopes.
  • A coordinating photopolymer stamp set with endearing holiday sentiments and festive designs.
  • A Real Red Stampin’ Spot
  • A bottle of Glitter Glue
  • Beautiful Christmasy-themed precut pieces

Finished folded card size: 4-1/4″ x 5-1/2″ (10.8 x 14 cm)

Coordinating Stampin’ Up! colors: Balmy Blue, Blueberry Bushel, Cherry Cobbler, Crumb Cake, Crushed Curry, Daffodil Delight, Lemon Lolly, Mossy Meadow, Night of Navy, Old Olive, Pecan Pie, Real Red

Subscribe to the August Paper Pumpkin Kit between 11 September and 10 October by clicking here!

Note: Supplies may be limited toward the end of the subscription period.

*********************************************************************************************************

Card stock cuts for this project:

  • Basic White Cardstock 4″ X 5 1/4″ (inner liner)
  • Cajun Craze Cardstock 2 – 4 1/8″ X 5 3/8″ (card front & inner liner mat)
  • Crumb Cake Cardstock 1 3/4″ X 1 3/4″ (corn husk)
  • Crushed Curry Cardstock 1″ X 3″ (corn)
  • Old Olive Cardstock 3″ X 4″ (leaves)
  • Pebbled Path Cardstock 8 1/2″ X 5 1/2″ (card base scored & folded at 4 1/4″), 2 11/16″ X 2 11/16″ & 1 5/8″ X 3 5/8″ (dsp mats), 1 1/4″ X 4″ (sentiment)
  • Stargazing Designer Series Paper 2 3/4″ X 2 3/4″ (card front panel)
  • Them Bones Designer Series Paper 1 1/2″ X 3 1/2″ (card front panel), 2 1/4″ X 6″ (envelope)

*********************************************************************************************************

Product List

Stampin’ Up! Pansy Patch Birthday

Good
Saturday morning stamping friends and welcome to the weekend!! I hope you have some plans in the works for the weekend. It’s supposed to be a beautiful one here in NJ. Last I looked there’s no rain in the forecast, 1st time in a few weeks.

I have a quick card for you today using some older products that I haven’t played with in a while. Here’s my card for today.

Stampin' Up! Pansy Patch Birthday 1 creativestampingdesigns.com

I used the Stampin’ Up! Pansy Patch Photopolymer Stamp Set along with the Artistic Dies, Painted Textures 3D Embossing Folder, Stargazing Designer Series Paper and Stampin’ Up! Two-Tone Flora Photopolymer Stamp Set for my card today.

Stampin' Up! Pansy Patch Birthday 2 creativestampingdesigns.com

I started by stamping the sentiment from the Pansy Patch stamp set in Blueberry Bushel Ink on the bottom of a Basic White card front. I embossed the panel using the Painted Textures 3D Embossing Folder. I adhered the embossed panel to a Blueberry Bushel mat using Multipurpose Liquid Glue.

I adhered the layered panel to a Basic White Thick card base using Multipurpose Liquid Glue. From a panel of Basic White, I cut the largest Die from the Artistic Dies. I adhered the floral die to a panel of Stargazing DSP.

Stampin' Up! Pansy Patch Birthday 4 creativestampingdesigns.com

I adhered the layered die panel to the top of the card front using Multipurpose Liquid Glue. I added a few Blueberry Bushel Tinsel Gems Four Pack to the card front.

Stampin' Up! Pansy Patch Birthday 5 creativestampingdesigns.com

On the inside, I stamped the sentiment from the Pansy Patch stamp set in Blueberry Bushel Ink on a panel of Basic White. I stamped the large detail glower from the Two-Tone Flora stamp set in Blueberry Bushel Ink on the bottom of the panel. I stamped the large solid flower from the Two-Tone Flora stamp set in Blueberry Bushel Ink, stamping off twice on scrap paper, over the detailed image. I stamped the leaves from the Two-Tone Flora stamp set around the flower in Lemon Lime Twist Ink. I adhered the Basic White panel to a Blueberry Bushel mat then to the inside of the Basic White Thick card base.

Stampin' Up! Pansy Patch Birthday 6 creativestampingdesigns.com

To finish my card, I decorated a Basic White Medium Envelope. I stamped the large detail flower from the Two-Tone Flora stamp set in Blueberry Bushel Ink on the envelope front. I stamped the large solid flower from the Two-Tone Flora stamp set in Blueberry Bushel Ink, stamping off twice on scrap paper, over the detailed image. I stamped the leaves from the Two-Tone Flora stamp set in Lemon Lime Twist Ink. I adhered a panel of Stargazing DSP to the envelope flap.

Stampin' Up! Pansy Patch Birthday 7 creativestampingdesigns.com

Thank you for stopping by my blog today. I hope you like the card and will give it a try. Happy Stamping!!

*********************************************************************************************************

If you need any stamping supplies, I’d love to be your Demonstrator. Just click HERE to go directly to my online store or drop me an email if you have any questions. 

MY CURRENT HOST CODE IS:   MHTQEVEX

Use this host code when placing an order with me. When you order $50 or greater you will receive a free gift from me! If your order is over $150, please do not use this code, but you’ll still get the free gift. The free gift is your choice of any 1 item valued up to $10.00 from the 2023-2024 Annual Catalog!  Unfortunately, packs of cardstock are no longer an option for a free gift. Shipping has become too expensive to ship and it’s costing me as much to ship as the cardstock costs. For any orders $50 or more I will also send you my monthly class tutorials.  Click HERE or go to my Customer Rewards for more details and to see what this month’s tutorials are.

Please remember to use my current Host Code and make sure that you can see my name on the final checkout page listed as your Demonstrator when you order so that you know that you’re ordering with me, and you’ll get my rewards! 

Happy Stamping, Karen

*********************************************************************************************************

In response to changing policies at Stampin’ Up – I’m adjusting my Ordering Gift policy as well.  I’m having to get a little more tough on the adding of Host codes when you place your order thru my Online Store.

Not to worry – you’re still going to get that $10 ordering gift for orders of $50 (before shipping & tax) or greater.  And the gift is still any 1 SU! product up to that $10 value – which includes some of our fun Host Sets!

But – if you DO NOT use the Host code for your orders of less than $150 (this is the RETAIL total before Shipping & Handling), then you’ll have two options:

  1. You’ll need to call Stampin’ Up! (1-800-Stamp-Up) and ask them to add it for you. They’re very helpful and will get it done quickly!  OR….
  2. If your order was over the $50 threshold but under $150, then…you’ll forfeit that $10 ordering gift and rewards – this is the Bummer Option – and I REALLY don’t want to do this, SO please remember to add my Current Host Code.

*********************************************************************************************************

Bonus Days Going On NOW!!!

We’re bringing back one of our favorite promotions—BONUS DAYS! Because do you know what’s a great deal? Getting rewarded for all the crafting supplies you’re already going to buy! When you shop between 6–31 July and spend $50 USD you will earn a $5 USD coupon! Make sure you save all your coupons because you can redeem them (and we mean ALL of them) between 1–31 August. There’s no limit to how many coupons you can earn! So, get your ready to earn and redeem coupons!

Ordering Deadlines

Earning Period: July 6th – July 31, 2023 at 11:59 p.m. (MT)

  • Earn a $5 USD coupon for every $50 USD spent (before shipping and tax).
  • All coupon codes will be emailed right after a qualifying purchase has been made.
  • If a participant earns multiple codes from a single order, they will receive one email with multiple codes. If they earn multiple codes from multiple orders, they will receive separate emails for each code earned.
  • All order types qualify for this promotion. Phone and email orders still require an email address.
  • Orders that are started before the promotion begins will not count toward earning coupon codes. For example, if you add items to your cart before 6 July and wait to purchase until that date or later, then those items will not qualify towards earning coupons. You must add items to your cart and complete your purchase during the earning period.
  • There is no limit to the number of coupon codes participants can earn per order or throughout the duration of the earning period.

Ordering Deadlines

Redemption Period: August1– August 31, 2023 at 11:59 p.m. (MT)

  • There is no limit to the number of coupon codes participants can redeem on an order during the redemption period. If using multiple codes, they must be separated by a space.
  • Coupons may be redeemed one time only.
  • Coupon codes may be redeemed for any product (excluding Starter Kits, demonstrator supply items, and Paper Pumpkin month-to-month subscriptions).
  • New prepaid Paper Pumpkin codes may be discounted using Bonus Days coupon codes.

*********************************************************************************************************

Thirteen states are having Back-to-School Sales Tax Holidays this year and some Stampin’ Up! items qualify for the tax break in those states!

The states with upcoming tax holidays are:  Alabama, Arkansas, Florida, Massachusetts, Mississippi, Missouri, New Jersey, New Mexico, Ohio, South Carolina, Tennessee, Texas, and West Virginia.  So, if you live in one of those states, take a second to download the spreadsheet Click Here and mark your calendar!

Please note that you must place your order with Stampin’ Up! during the tax holiday period in your state in order to receive these items tax-free (which is midnight on the first day to midnight on the last day of the tax holiday).  Also, keep in mind that this is a state sales tax holiday; the state statute may not apply to county, city, and special jurisdiction taxes.

For those wondering about Georgia, Louisiana, Virginia, and Wisconsin, those states have suspended the sales tax holiday again this year.

*********************************************************************************************************

Meaningful Flowers

Subscribe Julu 11 – August 10

Discover messages of friendship and loyalty in the flowers from the August Paper Pumpkin Kit! This kit includes 8 cards, 4 each of 2 designs, and 8 coordinating envelopes. The kit is special because of the way it uses the meaning of flowers. On each card, you’ll find a small inscription of what the flowers represent. As you craft with the included vellum and watercolor paper pieces, you’ll know you’re sending a message of encouragement and loyalty to your recipients. The Meaningful Flowers Paper Pumpkin Kit is full of florals that are meant to spread hope, encouragement, and remind you of your favorite memories. The kit focuses specifically on forget-me-nots and lotuses. Their meaning is enscripted on the back of each card. Subscribe by 10 August to send beautiful paper crafts with thoughtful messages to those you love. 

And don’t wait, because anyone who subscribes to this month’s kit will get a FREE stamp set! This Distinktive stamp set is perfect for a variety of occasions! 

This kit includes:

  • 8 cards; 4 each of 2 designs
  • 8 coordinating envelopes
  • 1 photopolymer stamp set
  • 1 Pretty Peacock Ink Spot
  • Linen thread
  • Vellum and precut paper pieces
  • FREE Distinktive stamp set
  • Adhesives
  • Final card size: 4-1/4″ x 5-1/2″ (10.8 x 14 cm)

Coordinating Stampin’ Up! colors: Bubble Bath, Crushed Curry, Garden Green, Melon Mambo, Misty Moonlight, Orchid Oasis, Pretty Peacock, Tahitian Tide

Subscribe to the August Paper Pumpkin Kit between 11 July and 10 August by clicking here!

Note: Supplies may be limited toward the end of the subscription period.

*********************************************************************************************************

Card stock cuts for this project:

  • Basic White Cardstock 3 – 4″ X 5 1/4″ (card front, die cut, inner liner)
  • Basic White Thick Cardstock 4 1/4″ X 11″ (card base scored & folded at 5 1/2″)
  • Blueberry Bushel Cardstock 2 – 4 1/8″ X 5 3/8″ (card front & inner liner mats)
  • Stargazing Designer Series Paper 3 7/8″ X 3 7/8″ (die cut mat), 2 1/4″ X 6″ (envelope)

*********************************************************************************************************

Product List

Stampin’ Up! Night of Flight for Happy Thursday Inkin’ Blog Hop

Good Thursday morning my stamping friends welcome to our Happy Inkin’ Thursday Blog Hop. If you are starting with me, thank you, I hope you will stop by everyone’s blog to see what they have created this week. If you are hopping over from Akiko’s blog, thank you for stopping by. This week we have Sketch Challenge. Here is my card using this week’s sketch.

Stampin' Up! Night of Flight Congrats 1 creativestampingdesigns.com

I used the Stampin’ Up! Flight Of Night Host Photopolymer Stamp Set along with the Stampin’ Up! Phrases For All Photopolymer Stamp Set, Stargazing Designer Series Paper and Holographic Specialty Paper for my card today. I did the Emboss Resist Technique for my card.

This is our sketch for this week.

Stampin' Up! Night of Flight Congrats 2 creativestampingdesigns.com

I started by stamping the moth images from the Night of Flight stamp set in Versamark Ink on a panel of Basic White. I sprinkled the images with White Embossing Powder and set it with the Heat Tool. Using the Blending Brushes, I added Lemon Lime Twist, Tahitian Tide, Orchid Oasis and Berry Burst Ink to the panel. I adhered the embossed panel to a Holographic Specialty Paper mat using Stampin’ Seal.

Stampin' Up! Night of Flight Congrats 3 creativestampingdesigns.com

I adhered a panel of Stargazing DSP to a Starry Sky card base using Multipurpose Liquid Glue. I adhered the layered panel to the card front using Stampin’ Dimensionals.

Stampin' Up! Night of Flight Congrats 4 creativestampingdesigns.com

On a strip of Basic White, I stamped the sentiment from Phrases For All stamp set in Orchid Oasis Ink. I adhered the sentiment to the artwork using Glue Dots. I tied a small bow using the 1/8″ Sweet Sorbet Metallic Ribbon and adhered it to the sentiment with a Glue Dot. I added a few 2022-2024 In-Color Pearls to the card front.

Stampin' Up! Night of Flight Congrats 5 creativestampingdesigns.com

On the inside, I stamped the sentiment from the Phrases For All stamp set in Orchid Oasis Ink on a panel of Basic White. I stamped the large moth image from the Night of Flight stamp set in Versamark Ink on the bottom of the panel. I sprinkled it with White Embossing Powder and set it using the Heat Tool. Using the Blending Brushes, I added Berry Burst and Tahitian Tide Ink. I adhered the Basic White panel to a Berry Burst mat then to the inside of the Starry Sky card base.

Stampin' Up! Night of Flight Congrats 6 creativestampingdesigns.com

To complete my card, I decorated a Basic White Medium Envelope. I stamped the moth image from the Night of Flight stamp set in Versamark Ink on the envelope front. I sprinkled it with White Embossing Powder and set it using the Heat Tool. Using my Blending Brushes, I added Lemon Lime Twist and Orchid Oasis Ink. I adhered a panel of Stargazing DSP to the envelope flap.

Stampin' Up! Night of Flight Congrats 7 creativestampingdesigns.com

Thank you for stopping by my blog today. I hope you liked my card and will give it a try. Now that you’ve seen my card, take a minute to hop through and see everyone’s projects today. If you click on the Next Blog button, you’ll go to Tara’s page. Or you can just click on the names below to go directly to all their blogs! Happy Hopping!

Amy Koenders

Mary Deatherage

Jaimie Babarczy

Karen Finkle

Akiko Sudano

Karen Ksenzakovic You Are Here

Tara Carpenter

Terry Lynn Bright

Carol Buckalew

*********************************************************************************************************

If you need any stamping supplies, I’d love to be your Demonstrator. Just click HERE to go directly to my online store or drop me an email if you have any questions. 

MY CURRENT HOST CODE IS:   MHTQEVEX

Use this host code when placing an order with me. When you order $50 or greater you will receive a free gift from me! If your order is over $150, please do not use this code, but you’ll still get the free gift. The free gift is your choice of any 1 item valued up to $10.00 from the 2023-2024 Annual Catalog!  Unfortunately, packs of cardstock are no longer an option for a free gift. Shipping has become too expensive to ship and it’s costing me as much to ship as the cardstock costs. For any orders $50 or more I will also send you my monthly class tutorials.  Click HERE or go to my Customer Rewards for more details and to see what this month’s tutorials are.

Please remember to use my current Host Code and make sure that you can see my name on the final checkout page listed as your Demonstrator when you order so that you know that you’re ordering with me, and you’ll get my rewards! 

Happy Stamping, Karen

*********************************************************************************************************

In response to changing policies at Stampin’ Up – I’m adjusting my Ordering Gift policy as well.  I’m having to get a little more tough on the adding of Host codes when you place your order thru my Online Store.

Not to worry – you’re still going to get that $10 ordering gift for orders of $50 (before shipping & tax) or greater.  And the gift is still any 1 SU! product up to that $10 value – which includes some of our fun Host Sets!

But – if you DO NOT use the Host code for your orders of less than $150 (this is the RETAIL total before Shipping & Handling), then you’ll have two options:

  1. You’ll need to call Stampin’ Up! (1-800-Stamp-Up) and ask them to add it for you. They’re very helpful and will get it done quickly!  OR….
  2. If your order was over the $50 threshold but under $150, then…you’ll forfeit that $10 ordering gift and rewards – this is the Bummer Option – and I REALLY don’t want to do this, SO please remember to add my Current Host Code.

*********************************************************************************************************

Bonus Days Going On NOW!!!

We’re bringing back one of our favorite promotions—BONUS DAYS! Because do you know what’s a great deal? Getting rewarded for all the crafting supplies you’re already going to buy! When you shop between 6–31 July and spend $50 USD you will earn a $5 USD coupon! Make sure you save all your coupons because you can redeem them (and we mean ALL of them) between 1–31 August. There’s no limit to how many coupons you can earn! So, get your ready to earn and redeem coupons!

Ordering Deadlines

Earning Period: July 6th – July 31, 2023 at 11:59 p.m. (MT)

  • Earn a $5 USD coupon for every $50 USD spent (before shipping and tax).
  • All coupon codes will be emailed right after a qualifying purchase has been made.
  • If a participant earns multiple codes from a single order, they will receive one email with multiple codes. If they earn multiple codes from multiple orders, they will receive separate emails for each code earned.
  • All order types qualify for this promotion. Phone and email orders still require an email address.
  • Orders that are started before the promotion begins will not count toward earning coupon codes. For example, if you add items to your cart before 6 July and wait to purchase until that date or later, then those items will not qualify towards earning coupons. You must add items to your cart and complete your purchase during the earning period.
  • There is no limit to the number of coupon codes participants can earn per order or throughout the duration of the earning period.

Ordering Deadlines

Redemption Period: August1– August 31, 2023 at 11:59 p.m. (MT)

  • There is no limit to the number of coupon codes participants can redeem on an order during the redemption period. If using multiple codes, they must be separated by a space.
  • Coupons may be redeemed one time only.
  • Coupon codes may be redeemed for any product (excluding Starter Kits, demonstrator supply items, and Paper Pumpkin month-to-month subscriptions).
  • New prepaid Paper Pumpkin codes may be discounted using Bonus Days coupon codes.

*********************************************************************************************************

Blossom Wishes Kit Now Available

Introducing the newest addition to the Stampin’ Up! Kit’s Collection: Blossom Wishes! This kit is special for its trendy, slimline card design, and includes all the precut paper pieces for a fun card for a friend!

This kit includes: 

  • Enough supplies to create 8 cards—4 each of 2 designs
  • 8 coordinating envelopes.
  • Embossed card bases, printed die cuts, vellum blossoms, adhesive, and embellishments.
  • Precut sentiments in Dutch, English, French, and German.
  • Finished card size: 8-1/2″ x 3-1/2″ (21.6 x 8.9 cm), 6-1/4″ x 3-1/4″ (15.9 x 8.3 cm)
  • Coordinating colors: Lemon Lolly, Orchid Oasis, Petal Pink, Starry Sky, Sweet Sorbet, Wild Wheat

162431 $13.00 USD

*********************************************************************************************************

New Online Exclusives Now Available

Stampin’ Up! has some new Online Exclusive items that are available to order now!!  You won’t find these products in any catalog, they’ll only be listed in the online store.

The Online Exclusive product releases will continue throughout the year so there will be new products to shop from, in addition to new catalogs!

We got some new Online Exclusive items on July 6. Click HERE and head over to my Online Store to see the Online Exclusives Now.

*********************************************************************************************************

Meaningful Flowers

Subscribe Julu 11 – August 10

Discover messages of friendship and loyalty in the flowers from the August Paper Pumpkin Kit! This kit includes 8 cards, 4 each of 2 designs, and 8 coordinating envelopes. The kit is special because of the way it uses the meaning of flowers. On each card, you’ll find a small inscription of what the flowers represent. As you craft with the included vellum and watercolor paper pieces, you’ll know you’re sending a message of encouragement and loyalty to your recipients. The Meaningful Flowers Paper Pumpkin Kit is full of florals that are meant to spread hope, encouragement, and remind you of your favorite memories. The kit focuses specifically on forget-me-nots and lotuses. Their meaning is enscripted on the back of each card. Subscribe by 10 August to send beautiful paper crafts with thoughtful messages to those you love. 

And don’t wait, because anyone who subscribes to this month’s kit will get a FREE stamp set! This Distinktive stamp set is perfect for a variety of occasions! 

This kit includes:

  • 8 cards; 4 each of 2 designs
  • 8 coordinating envelopes
  • 1 photopolymer stamp set
  • 1 Pretty Peacock Ink Spot
  • Linen thread
  • Vellum and precut paper pieces
  • FREE Distinktive stamp set
  • Adhesives
  • Final card size: 4-1/4″ x 5-1/2″ (10.8 x 14 cm)

Coordinating Stampin’ Up! colors: Bubble Bath, Crushed Curry, Garden Green, Melon Mambo, Misty Moonlight, Orchid Oasis, Pretty Peacock, Tahitian Tide

Subscribe to the August Paper Pumpkin Kit between 11 July and 10 August by clicking here!

Note: Supplies may be limited toward the end of the subscription period.

*********************************************************************************************************

Card stock cuts for this project:

  • Basic White Cardstock 2 1/4″ X 4 1/4″ (artwork), 1/2″ X 2 1/2″ (sentiment), 4″ X 5 1/4″ (inner liner)
  • Berry Burst Cardstock 4 1/8″ X 5 3/8″ (inner liner mat)
  • Starry Sky Cardstock 8 1/2″ X 5 1/2″ (card bae scored & folded at 4 1/4″)
  • Stargazing Designer Series Paper 4 1/4″ X 5 1/2″ (card front )
  • Holographic Trio Specialty Paper 2 1/2″ X 4 1/4″(artwork mat)

*********************************************************************************************************

Product List

Stampin’ Up! Little Dreamers Pop Up Baby Girl for Fun Fold Friday

Good Friday morning stamping friends and welcome to my fun fold Friday. We’ve made it through another week and this was a different one. I’ve spent most of the week inside unfortunately. Tuesday afternoon it got really windy here and very smokey. My daughter came running inside closing windows thinking there was a house on our street or the next block on fire. There was not, it was the smoke from the horrible fires in Canada coming down. I’ve never seen anything like that before. Wednesday afternoon my husband said we were the worst in the area. Because of my asthma I just kept myself inside.

Today’s card is one that we made at last Sunday’s team meeting. This card was designed by my team member Carmelita Gordon, and it is just the cutest card ever. I’m not going to be able to explain the whole card, I was going to make one on my live Wednesday afternoon, but I ended up with a bad migraine and just needed to relax. I will make one live so I can explain and show you how to make it soon. I used the Stampin’ Up! Little Dreamers Bundle along with the Stargazing Designer Series Paper, 2023-2025 In- Color 6 X 6 Designer Series Paper, the Decorative Circle Punch and 2″ Circle Punch for the card.

Stampin' Up! Little Dreamer Pop Up Baby Girl 1 creativestampingdesigns.com

I started by scoring and folding the large and small card bases. I adhered panels of 2023-2025 In-Color DSP to Moody Mauve mats using Stampin’ Seal. I adhered the layered panel to the Bubble Bath card base using Multipurpose Liquid Glue. I adhered a panel of Stargazing DSP to the back of the large card base. I adhered the small front card base to the larger card base using Multipurpose Liquid Glue only on the right side.

Stampin' Up! Little Dreamer Pop Up Baby Girl 2 creativestampingdesigns.com

On a panel of Basic White, I stamped the lion, cow, elephant stars and star with rainbow images from the Stampin’ Up! Little Dreamers Cling Stamp Set in Tuxedo Black Ink. I colored all the images using Basic Black, Berry Burst Bubble Bath, Crumb Cake, Gray Granite, Lemon Lolly, Moody Mauve, Pecan Pie and Pumpkin Pie Stampin’ Blends Markers. I cut all the images out using the Little Dreamers Dies. I adhered the lion to the front of the small card base using Stampin’ Dimensionals.

Stampin' Up! Little Dreamer Pop Up Baby Girl 3 creativestampingdesigns.com

I stamped the sentiment from the Little Dreamers stamp set in Moody Mauve Ink on a panel of Basic White and punched it out using the 2″ Circle Punch. From a panel of Fresh Freesia, I cut 2 of the Decorative Circles Punch. I adhered the sentiment to the Fresh Freesia circle using Stampin’ Seal. I adhered the layered circle to the card front using Multipurpose Liquid Glue just in the center. I added the star with the rainbow using Stampin’ Dimensionals.

Stampin' Up! Little Dreamer Pop Up Baby Girl 4 creativestampingdesigns.com

After adhering the pop-up mechanism on the inside, I adhered the cow and stars to the Fresh Freesia circle using Multipurpose Liquid Glue. I adhered the left side of the card front using Multipurpose Liquid Glue. I added a few Adhesive-Backed Sparkel Gems to the back panel.

Stampin' Up! Little Dreamer Pop Up Baby Girl 5 creativestampingdesigns.com

On the back of the card, I stamped the sentiment from the Little Dreamers stamp set in Moody Mauve Ink on a panel of Basic White. I adhered the elephant using Multipurpose Liquid Glue. From a scrap of Lemon Lolly, I cut the moon using the Little Dreamers Dies. I adhered the moon under the elephant using Multipurpose Liquid Glue. I adhered the Basic White panel to a Moody Mauve mat then to the back of the card based using Multipurpose Liquid Glue.

Stampin' Up! Little Dreamer Pop Up Baby Girl 6 creativestampingdesigns.com

To complete my card, I decorated a Basic White Medium Envelope. I stamped the cow image from the Little Dreamers stamp set on the envelope front in Tuxedo Black Ink. I stamped the cluster of stars and star with the rainbow images from the Little Dreamers stamp set in Tuxedo Black Ink on the envelope flap. I colored all the images the same as I did for the card.

Stampin' Up! Little Dreamer Pop Up Baby Girl 7 creativestampingdesigns.com

Thank you for stopping by my blog today. I hope you like the card and will give it a try. Happy Stamping!!

*********************************************************************************************************

If you need any stamping supplies, I’d love to be your Demonstrator. Just click HERE to go directly to my online store or drop me an email if you have any questions. 

MY CURRENT HOST CODE IS:   GVEBWYZ6

Use this host code when placing an order with me. When you order $50 or greater you will receive a free gift from me! If your order is over $150, please do not use this code, but you’ll still get the free gift. The free gift is your choice of any 1 item valued up to $10.00 from the 2022-2023 Annual Catalog or the January-April 2023 Mini Catalog!  Unfortunately, packs of cardstock are no longer an option for a free gift. Shipping has become too expensive to ship and it’s costing me as much to ship as the cardstock costs. For any orders $50 or more I will also send you my monthly class tutorials.  Click HERE or go to my Customer Rewards for more details and to see what this month’s tutorials are.

Please remember to use my current Host Code and make sure that you can see my name on the final checkout page listed as your Demonstrator when you order so that you know that you’re ordering with me, and you’ll get my rewards! 

Happy Stamping, Karen

*********************************************************************************************************

In response to changing policies at Stampin’ Up – I’m adjusting my Ordering Gift policy as well.  I’m having to get a little more tough on the adding of Host codes when you place your order thru my Online Store.

Not to worry – you’re still going to get that $10 ordering gift for orders of $50 (before shipping & tax) or greater.  And the gift is still any 1 SU! product up to that $10 value – which includes some of our fun Host Sets!

But – if you DO NOT use the Host code for your orders of less than $150 (this is the RETAIL total before Shipping & Handling), then you’ll have two options:

  1. You’ll need to call Stampin’ Up! (1-800-Stamp-Up) and ask them to add it for you. They’re very helpful and will get it done quickly!  OR….
  2. If your order was over the $50 threshold but under $150, then…you’ll forfeit that $10 ordering gift and rewards – this is the Bummer Option – and I REALLY don’t want to do this, SO please remember to add my Current Host Code.

*********************************************************************************************************

June 1st through June 30th, we have an amazing joining special going on. June is a fabulous time to join Stampin’ Up! You will get even more FREE products in your customizable Starter Kit! If you sign up between 1–30 June, you can get $125 USD | $165 CAD $155 USD worth of products for only $99 USD + free business supplies + free shipping + all the fun being a part of Stampin’ Up!

STARTER KIT+ PROMOTION DETAILS:

  • When you purchase you Starter Kit, you will be able to redeem $155 of Starter Kit eligible products for just  $99.
  • New demonstrators who submit their Independent Demonstrator Agreement (IDA) before June 1 or after June 30 will not  be eligible for this offer.
  • This offer begins June 1, 2023 and ends at 11:50 PM MT on June 30, 2023.

There is Never an Obligation to sell, you do NOT have to use this as a business, you can join just to enjoy the discount for yourself. I would LOVE to have you on my team. Join as a hobby demonstrator and enjoy all the benefits. All your future orders will be eligible for at least a 20% discount on products ordered. PLUS if you are a demonstrator and there is a special, like the upcoming 15% discount on Designer Series Paper, you will get your 20% discount on top of the 15%. Now that’s an awesome deal. This is a great way to get everything you want on your wish list at a discounted price. Enjoy at least a 20% discount on the future products you purchase. Join now and start enjoying that discount right away!!! Contact me at creativestampingdesigns@gmail.com and we can talk about you joining. We have people on our team from all over the United States. We get together monthly via Zoom; we have team Facebook pages where we share what we make and ask questions. This was one of the best decisions I’ve ever made, I’ve made a lot of new friends from all over.

Joining Stampin’ Up! as a demonstrator offers some fabulous opportunities, including:

  • Becoming part of our wonderful community
  • Attending exclusive demonstrator-only events
  • Having early access to products
  • Receiving a copy of our catalogs early
  • Getting a 20% discount on our magnificent coordinating products
  • Joining our exclusive demonstrator-only Facebook group
  • Having the opportunity to earn a supplemental income if you choose to make it a business.
  • Accessing our demonstrator-only weekly newsletter: Succeed Weekly
  • Receiving training information and accessing resources to help you through your first year and beyond.

I would LOVE to have you on my team. Don’t wait until the last minute, contact me today and we can talk about you joining!

*********************************************************************************************************

SAVE 15% ON SELECT DESIGNER SERIES PAPERS!

We all love beautiful Designer Series Paper, and in June, you can enjoy a 15% discount on select Designer Series Papers from our new 2023–2024 Annual Catalog and Online Exclusives. Whether you’re a scrapbooker, a card maker or simply a paper lover, this is a great time to stock up and save on gorgeous paper, so you have artistic and versatile paper designs on hand for your next projects! Click HERE for a printable PDF flyer.

SALES PERIOD: 1–30 JUNE
  • All order types qualify for this promotion.
  • There is no limit to how many packages of Designer Series Paper may be purchased during this promotion.
  • Only select Designer Series Papers are available at a 15% discount during this promotion.
  • Orders must be placed—and closed—during the promotion period for the 15% discount to apply.
  • Designer Series Paper ordered as part of a Starter Kit or with Stampin’ Rewards qualify for the 15% discount.
  • Designer Series Papers are from the new 2023–2024 Annual Catalog (p. 129–132) and Online Exclusives.
ORDER DEADLINES
  • 30 June 2023; 11:59 PM (MT)

*********************************************************************************************************

Boho Beach Kit Now Available

Are you new to stamping and don’t know where to start? Stampin’ Up! has some amazing kits available some with and some without stamping. These are a great way to get your feet wet with card making. Visit my Online store HERE to see what you can choose from. Don’t forget when you are checking out to make sure you are shopping with me and use my Current Host Code GVEBWYZ6.

It’s time to sit back, relax, and take family and friends to the beach from the comfort of your home with our latest kit: Boho Beach Kit! It comes with everything you need to make beach-inspired cards, evoking vacation and relaxation in minutes! Send a friendly note to the people you love and don’t miss the acrylic-poured paint art style used in this kit for a dazzling marbled color effect.

This month’s kit includes: 

  • Enough supplies to create 8 cards—4 each of 2 designs
  • 8 coordinating envelopes
  • Boho Beach photopolymer stamp set
  • One Pecan Pie Ink Spot
  • Printed card bases, printed die cuts, adhesive, embellishments, and a clear block
  • Finished card size: 5-1/2″ x 4-1/4″ (14 x 10.8 cm)
  • Coordinating colors: Crumb Cake, Lost Lagoon, Pecan Pie, Pool Party, Wild Wheat

162418 $22.00 USD

Available starting 7 June. Also available in French (item 162420).

*********************************************************************************************************

Spanish Translated Stamp Set Bundle Available In The New Catalog!

Do you speak Spanish? Or know someone who does?  Stampin’ Up! is excited to share that they have the new Texturas Naturales (161785), a Spanish stamp set, bundle and suite collection in their 2023–2024 Annual Catalog!

You can find the Spanish translated items in my online store Here 

*********************************************************************************************************

Welcome Inn

Subscribe May 11 – June 10

Show hospitality to all your guests with the Welcome Inn Paper Pumpkin Kit! This kit includes nine elegant and detailed cards—three each of three designs. Whether you’re hosting friends and family, or want to invite someone over, this kit has what you need to create sophisticated and elevated cards!

You can also pair this kit with a coordinating die add-on! (Available while supplies last. Stampin’ Cut & Emboss Machine sold separately). Keep reading to learn more!

The Welcome Inn Paper Pumpkin Kit perfectly coordinates with the Countryside Inn Suite Collection (item number 161474) from the 2023–2024 Annual Catalog! You can use the stamps and paper from both the suite and kit to create cards that are stylish and refined. You can create these elegant hospitality cards using the suite’s Countryside Inn 12″ x 12″ (30.5 x 30.5 cm) Designer Series Paper and the kit’s beautiful floral cards. There are endless creative possibilities of this kit and suite coordination!

This kit includes:

  • All the supplies you’ll need to create 9 elegant and sophisticated cards—3 each of 3 designs—and 9 coordinating envelopes.
  • A coordinating photopolymer stamp set with floral designs and friendly, hospitality-themed sentiments.
  • A Night of Navy Stampin’ Spot and beautiful embellishments
  • Lovely floral details and precut vases

Finished card size: 4-1/4″ x 5-1/2″ (10.8 x 14 cm)

Coordinating Stampin’ Up! colors: Balmy Blue, Boho Blue, Calypso Coral, Daffodil Delight, Early Espresso, Misty Moonlight, Night of Navy, Old Olive

Don’t forget! This kit perfectly coordinates with the Countryside Inn Suite Collection (Item number: 161474).

Subscribe to the May Paper Pumpkin Kit between 11 May 2023 and 10 June 2023 by clicking here!

Note: Supplies may be limited toward the end of the subscription period.

ADD-ON

Welcome Inn Dies (Available for purchase starting 11 May, while supplies last).

Item number: 163192

$6.00 USD / $8.25 CAD

This add-on includes:

  • One coordinating vase die: 1-1/2″ x 1-1/2″ (3.8 x 3.8 cm)
  • One coordinating flower die
  • One beautiful leaf die

Note: Stampin’ Cut & Emboss Machine sold separately.

*********************************************************************************************************

Card stock cuts for this project:

  • Basic White Cardstock 2 – 4″ X 5 1/4″ (artwork & card back), 2 1/2″ X 2 1/2″ (sentiment)
  • Bubble Bath Cardstock 4 1/4″ X 8 1/2″ (scored & folded at 5 1/2″ & 7″), 2 1/4″ X 8 1/2″ (front panel scored & folded at 1 1/2″ & 3″), 1″ X 2″ (pop-up mechanism)
  • Fresh Freesia Cardstock 2 – 3″ X 3″ (decorative circle)
  • Lemon Lolly Cardstock scrap for moon
  • Moody Mauve Cardstock 1 3/8″ X 4″, 2″ X 5 1/4″ & 2 – 1 3/8″ X 2″ (dsp mats), 4 1/8″ X 5 3/8″ (back panel mat)
  • 2023-2025 In-Color 6 X 6 Designer Series Paper 1 1/4″ X 3 7/8″, 1 7/8″ X 5 1/8″ & 2 – 1 1/4″ x 1 7/8″ (casrd front panels)
  • Stargazing Designer Series Paper 4″ X 5 1/4″ (card front back panel)
  • Window Sheet 1/2″ X 2 1/2″ (pop-up)

*********************************************************************************************************

Product List

Paper Snips

[103579]
$11.00