Good Tuesday morning my stamping friends welcome to Amy’s Inkin’ Krew Team Blog Hop. It’s the 2nd Tuesday of the month so that means Blog Hop Day!! If you are starting with me, be sure to hop around to see everyone’s beautiful projects. If you’ve hopped over from Amy’s blog, welcome to my blog and thank you for stopping by. The theme this month is “Celebrate”. If you’d like to see a quick video on how I made this card, Click Here to go to my Instagram Reels. Here’s my card for today.
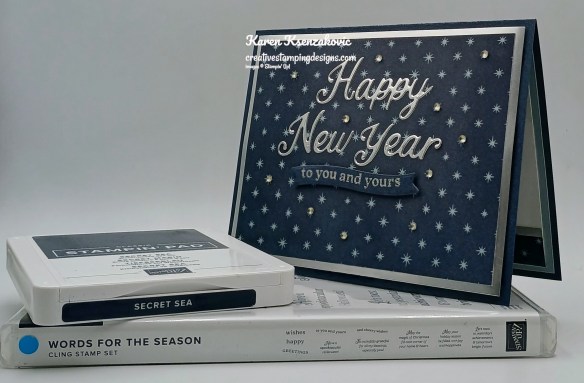
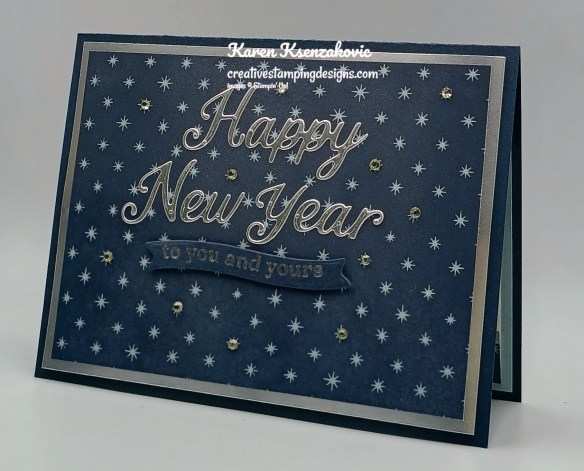
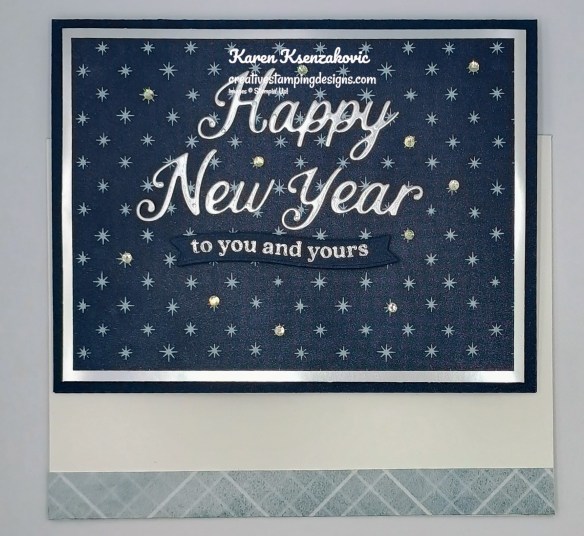
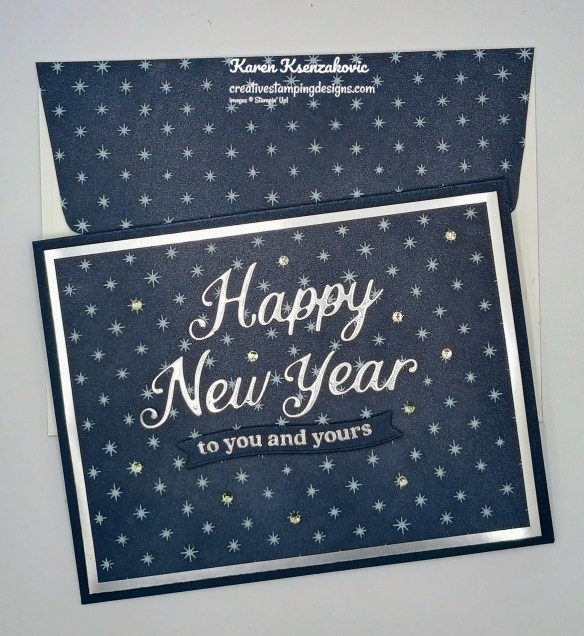
I used the Stampin’ Up! Words For The Season Bundle along with the Peaceful Garden Designer Series Paper and Silver Foil Paper for my card today.
Adhere a panel of Peaceful Garden DSP to a Silver Foil mat. Adhere the layered panel to a Secret Sea card base with Stampin’ Dimensionals.
Cut the sentiments from a panel of Silver Foil using the Words For The Season Dies. Adhere the die cut sentiment to the card front.
On a panel of Secret Sea, stamp the sentiment from Words For The Season stamp set in Versamark Ink. Sprinkle the sentiment with Silver Embossing Powder and set it using the Heat Tool. Cut the sentiment out using the Words For The Season Dies. Adhere the sentiment below the die cut sentiment with Stampin’ Dimensionals. Add Rhinestone Basic Jewels to the card front.
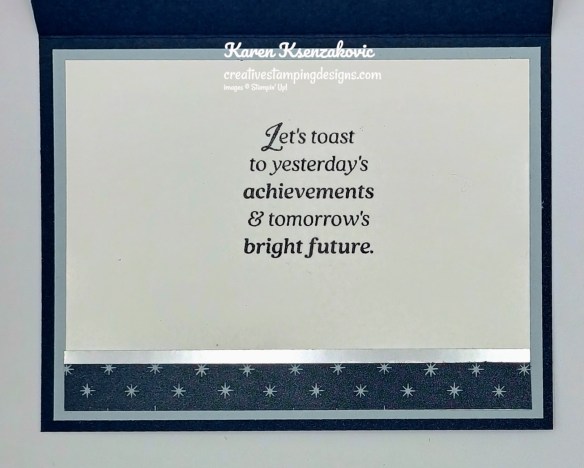
Stamp the sentiment from Words For The Season stamp set in Secret Sea Ink on a panel of Basic White. Adhere a strip of Peaceful Garden DSP & Silver Foil to the bottom of the panel. Adhere the Basic White panel to a Cloud Cover mat then to the inside of the Secret Sea card base.
Decorate a Basic White Medium Envelope to complete your card. Adhere a strip of Peaceful Garden DSP to the envelope front and a panel to the envelope flap.
Thank you for stopping by my blog today. Now that you’ve seen my card, let’s get on with the hop! Click on the Next Blog button to move on to Mary’s project. Happy Hopping.
Just in case you get lost along the way, here is a list of the team members involved in the hop today.
If you need any stamping supplies, I’d love to be your Demonstrator. Just click HERE to go directly to my online store or drop me an email if you have any questions.
Good Saturday morning stamping friends. We are having the best time every here in GA. We’ve been doing a lot of laughing, catching up and eating. There’s always a lot of eating going on when we’re together. Yesterday started with James’ delicious Blueberry French toast and homemade Hash Browns. Lunch was a little lighter with a Baked Potato bar & Salad. We had an amazing Dijon-Crusted Roast Pork Loin with Cranberry & Apple Chutney along with his famous Carrot Souffle (which he really needs to make a double batch of), Roasted Brussels Sprouts and Spinach & Mushroom Risotto.
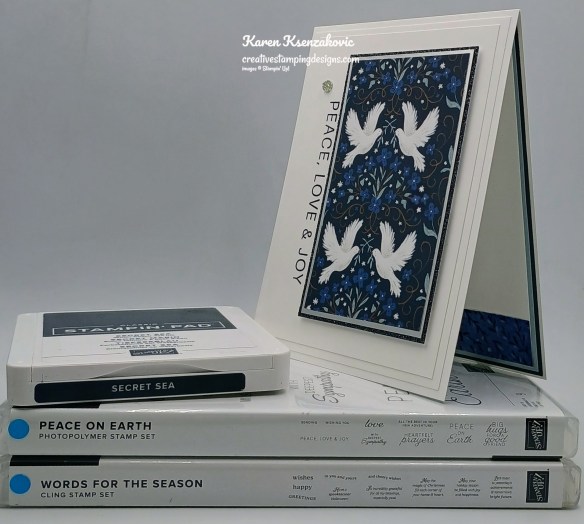
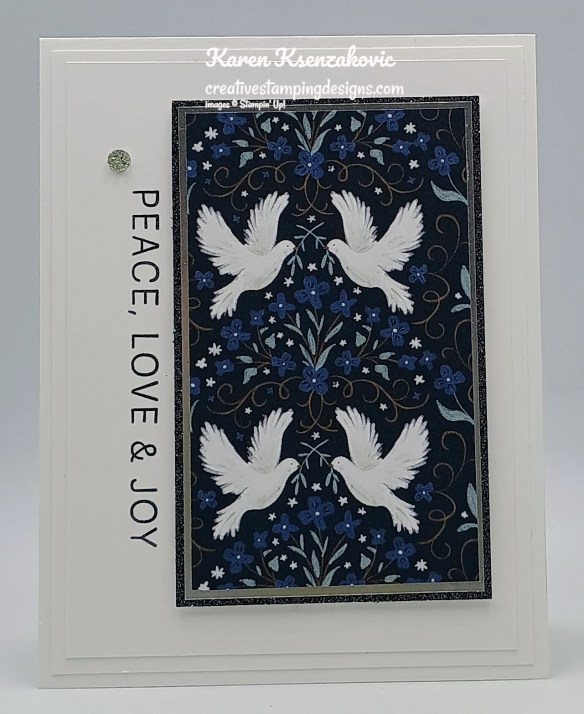
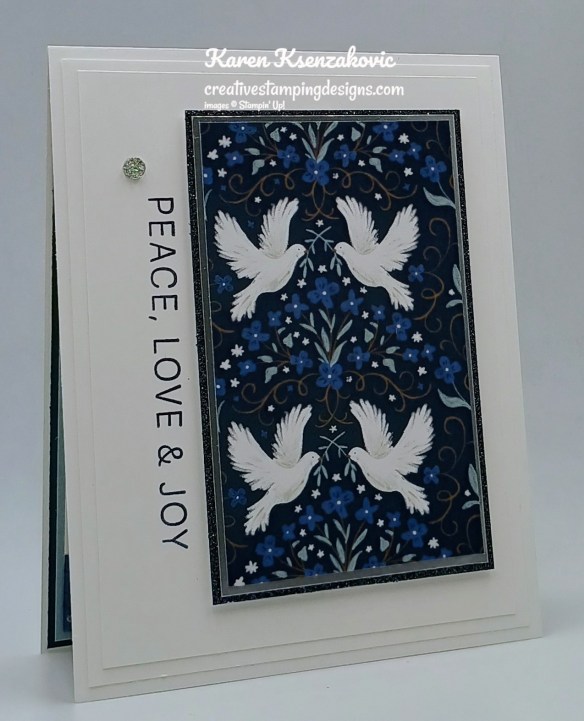
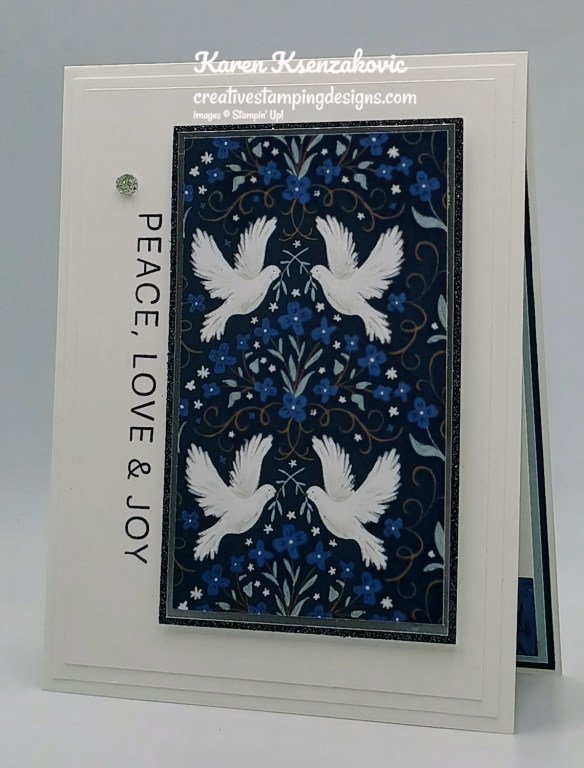
Today’s card is one of the cards I prepared for our shoebox card swap. We all have to bring a card for everyone else to make at the retreat. I used a design I made a few weeks ago and just changed up the DSP. If you’d like to see a quick video of how I made this card, Click Here to go to my Instagram Reels. Here’s my card for today.
I used the Stampin’ Up! Peace On Earth Photopolymer Stamp Set along with the Peaceful Garden Designer Series Paper, Peaceful Garden Glimmer Paper,Silver Foil Sheets, Stampin’ Up! Words for the Season Cling Stamp Set and Stampin’ Up! Textured Notes Cling Stamp Set for my card today.
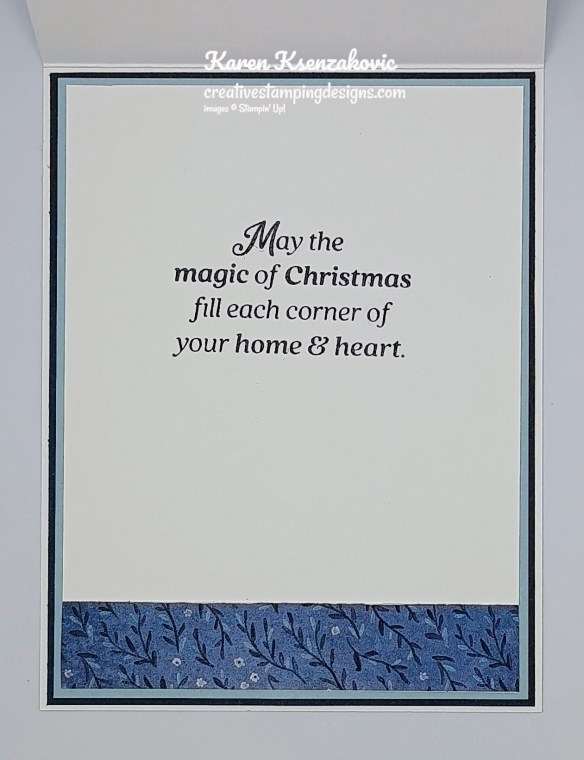
Stamp the sentiment from the Peace on Earth stamp set in Secret Sea Ink on the panel of Basic White.
Adhere the Basic White panel to a Basic White mat. Adhere the layered panel to a Basic White Thick card base.
Adhere the panel of Peaceful Garden DSP to the Silver Foil mat. Adhere the layered panel to a Peaceful Garden Glimmer mat. Adhere the layered panel to the card front with Stampin’ Dimensionals. Add a Drusy Adhesive-Backed Embellishment.
Stamp the sentiment from Words for the Season stamp set in Secret Sea Ink on a panel of Basic White. Adhere a panel of Peaceful Garden DSP to the bottom of the panel. Adhere the Basic White panel to a Cloud Cover mat and a Secret Sea mat then to the inside of the Basic White Thick card base.
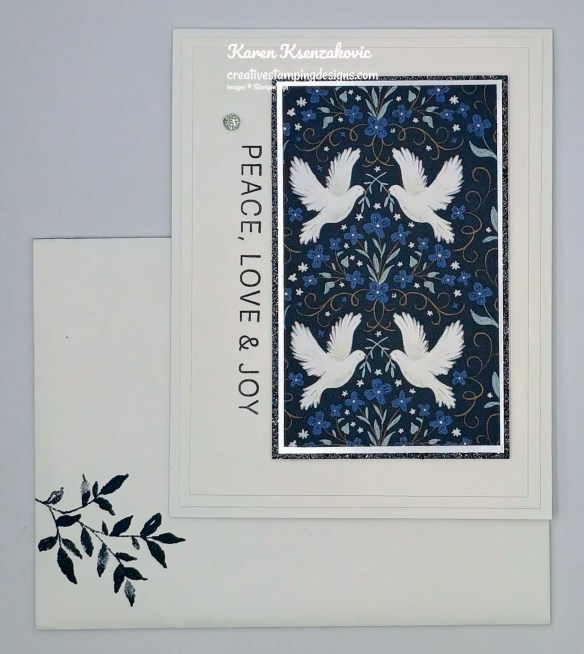
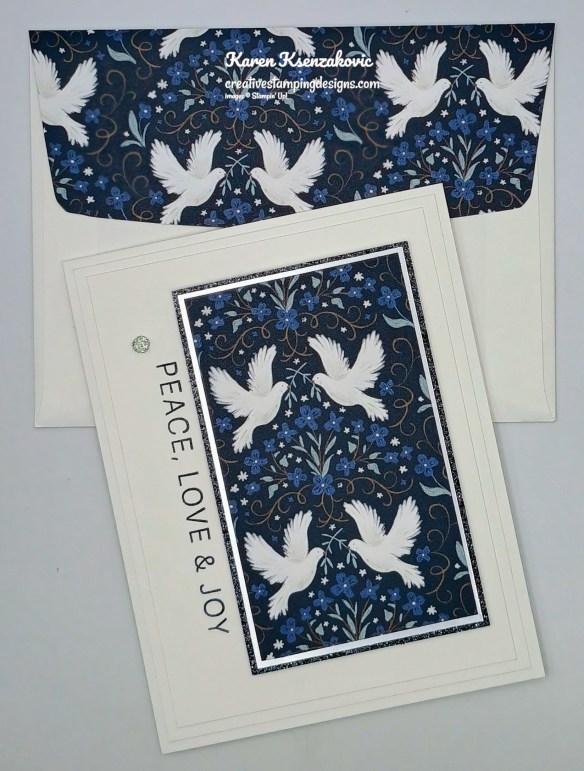
Decorate a Basic White Medium Envelope to finish your card. Stamp the small leaf image from the Textured Notes stamp set on the envelope front in Secret Sea Ink. Adhere a panel of Peaceful Garden DSP to the envelope flap.
Thank you for stopping by my blog today. I hope you like the card and will give it a try. Happy Stamping!!
If you need any stamping supplies, I’d love to be your Demonstrator. Just click HERE to go directly to my online store or drop me an email if you have any questions.
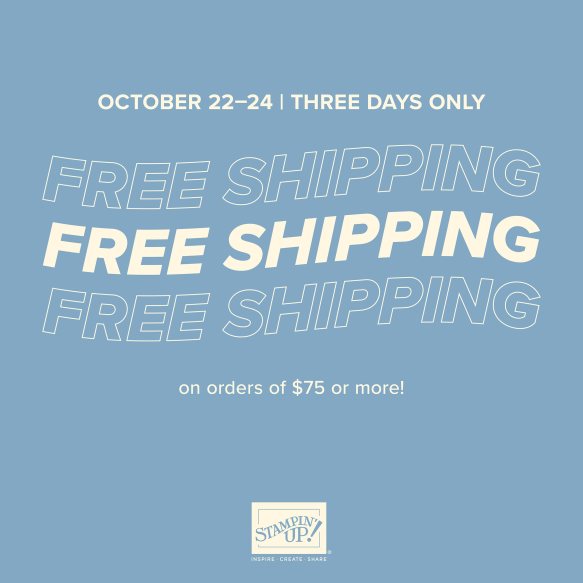
FREE SHIPPING Starts TODAY, October 22 – October 24 on orders of $75 or more
All order types qualify for this promotion.
Free shipping is for three days only. Orders must be opened and closed from October 22–24.
Free shipping automatically applies to your cart after the qualifying amount has been met, which is $75 USD (before tax).
Coupon codes and Stampin’ Rewards will lower your order’s retail amount. Orders must meet the qualifying amount to be eligible for free shipping.
The additional cost for expedited shipping is not covered by this promotion.
Prepaid 3-, 6-, and 12-month Paper Pumpkin subscriptions and month-to-month subscriptions do not qualify for free shipping. Refills, past kits and add-ons do qualify toward free shipping, but you must be a subscriber to purchase. Subscriptions billed and shipped this month will be charged for the normal amount ($27.00 USD shipping included) + tax.
Only 9 Days Left for Stampin’ Up! BEST JOINING SPECIAL EVER – October 1 – 31
What would you say about getting $125 in products of your choice for ONLY $35? Or how about getting $189 in products of your choice for only $99? I don’t know about you, but I’d say YES!!!!! Are you new to stamping or do you know someone that wants to get started but doesn’t know where to start. I’m here to help you. I recommend for someone brand new to stamping to start with our all-inclusive kits. It’s a great place to start and you can add the New Kits along with New preorder Online Exclusive products to your starter kit.
Crafting is even more fun with community, and there’s never been a better time to join. Become a demonstrator and enjoy all the perks that come with that, like a 20–25% product discount, exclusive early access to the latest releases and catalogs, the opportunity to earn a modest supplemental income, the chance to attend incredible training and crafting events, and so much more! Have you ever thought about joining the Stampin’ Up! community? Are you into scrapbooking and have you seen all the new scrapbook products Stampin’ Up! has? Wouldn’t you love to get all these products at a discount? Why not consider joining the Stampin’ Up! community between October 1-31, and save on everything you buy? Are you new to stamping and don’t know where to start, but would like to join to save? Ask me for help, I’m here to help and assist you anyway that I can. OCTOBER is the best time ever to join!! The best part is you can put November Online Exclusive preorder items in the Starter Kit. Contact me and we can talk about signing you up. There’s never an obligation to sell, you can join to enjoy the discount for yourself. Why not give it a try, you have nothing at all to lose!!
From October 1 to 31, anyone who purchases the Starter Kit can choose between two amazing offers. In addition to FREE shipping, FREE business supplies, and a FREE Paper Pumpkin kit, you can either get $125 worth of products for just $35, an amazing first time ever offer, OR $189 worth of products for just $99!
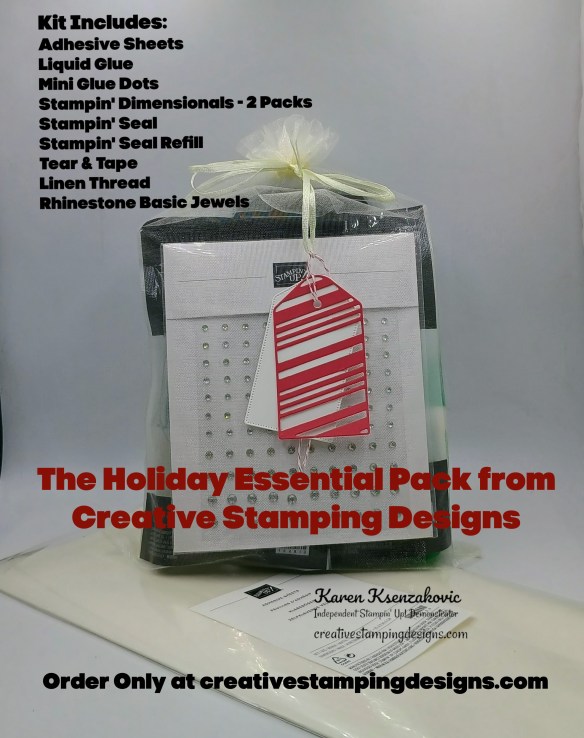
My Holiday Essential Pack is back for ordering October 11 – 31. Everyone seemed to love this essential pack when I offered it in August so I thought I’d offer it again since Holiday card making is approaching fast.
I’m offering a Holiday Essential Pack to get those holiday cards made. Let’s get a head on making those Holiday cards this year. Get all your adhesives ordered now so you don’t run out while you’re in the middle of making those Holiday cards.
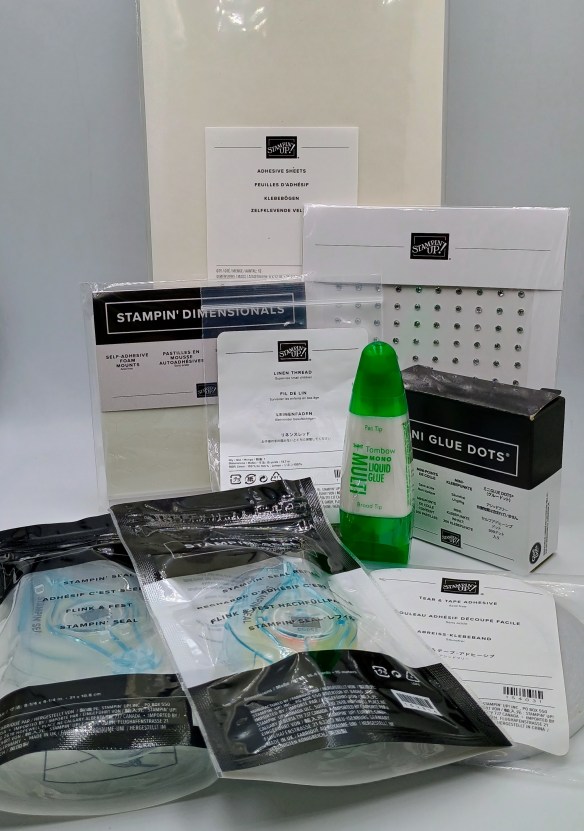
Each Kit will Include Full Packs of:
Adhesive Sheets
Liquid Glue
Mini Glue Dots
Stampin’ Dimensionals – 2 Packs
Stampin’ Seal
Stampin’ Seal Refill
Tear & Tape Adhesive
Linen Thread
Rhinestone Basic Jewels
If you were to order all this separately it would cost $65.25 + shipping. I’m offering it for $56.00 plus $9.00 for Priority Mail Shipping. All orders must be submitted by October 31st. I’ll be placing 2 separate orders, once on October 22 for the first group and a 2nd order on November 1st. Once everything arrives, I’ll package it up in a cut little bag and ship it out to you.
As an EXTRA BONUS I’ll also throw in a pack of Basic White Medium Envelopes
Click Hereto place your order for the Essential Pack Today!!Deadline to order is Friday October 31st
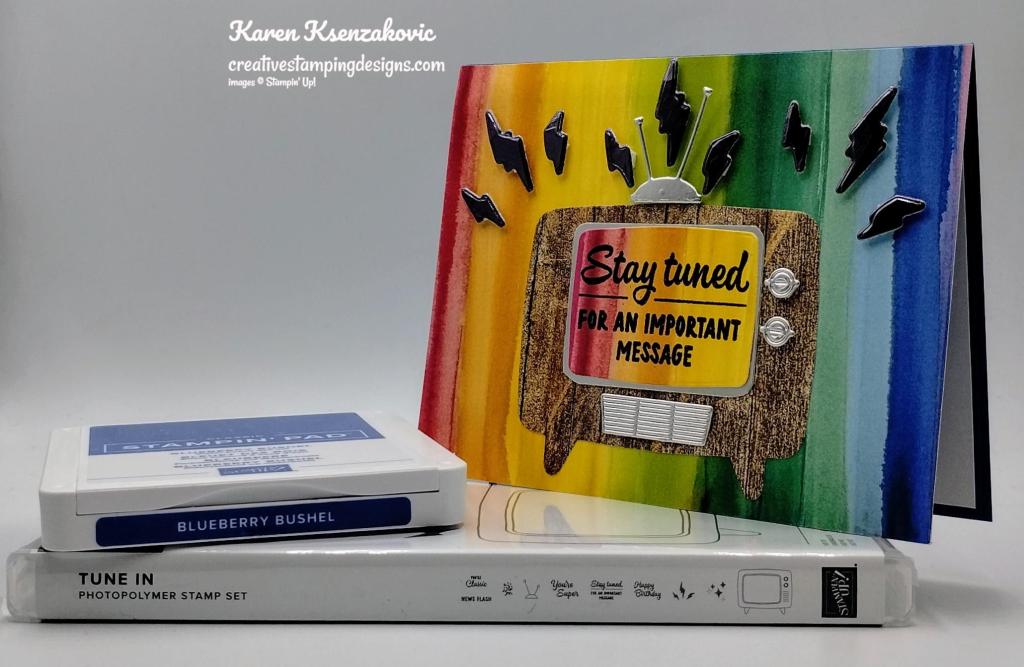
Good Saturday morning stamping friends and welcome to the weekend. I hope you are making some plans for the weekend. I’ll be at work all day today and last I heard it’s supposed to be a thunderstorm kind of day.
Today’s card I played with another new bundle that I wasn’t sure if I wanted or not. I was leaning towards I don’t want it, then I saw some cards made and I really liked the set. Once I got it in my hands, I had a lot of fun playing with it and I’m already thinking of other cards to make with it. If you’d like to see a quick video on how I made this card, Click Here to go to my Instagram Reels. Here’s my card for today.
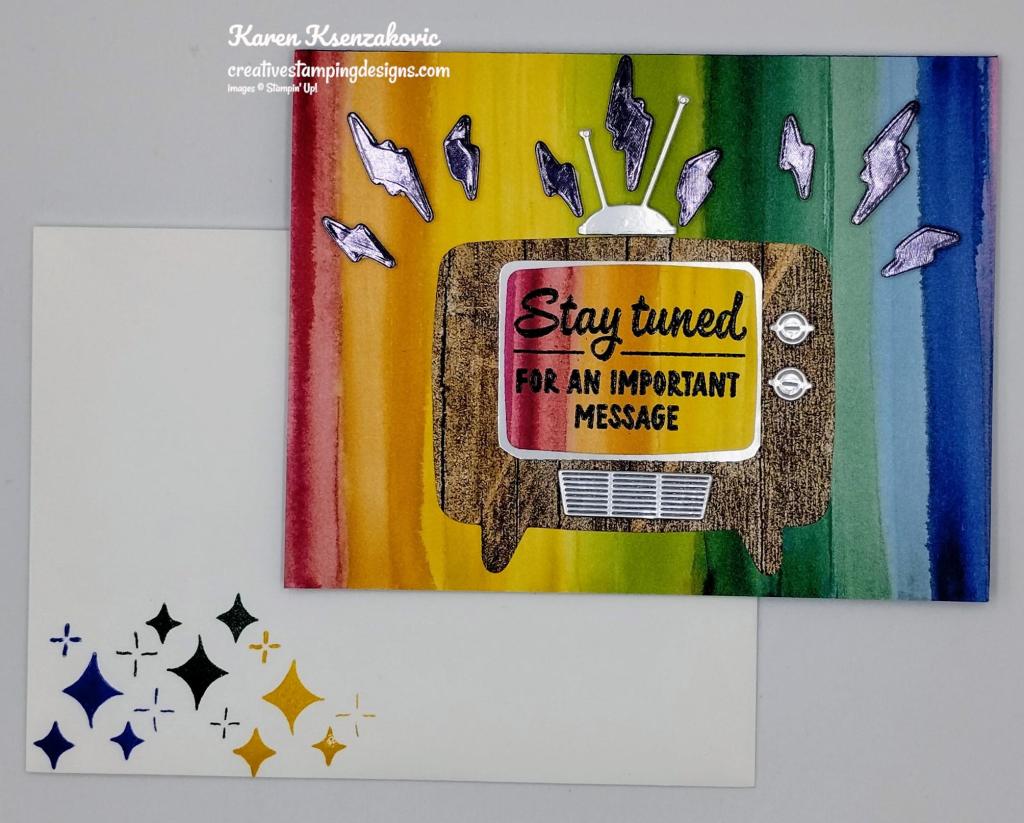
I used the Stampin’ Up! tune In Bundle along with the Full of Life 6 X 6 Designer Series Paper, Silver Foil Paper, Country Woods Designer Series Paper and Textured Metallic Specialty Paper for my card today.
I adhered a panel of Full of Life DSP to a Blueberry Bushel card base using Liquid Glue.
Using the Tune In Dies, I cut the tv from a panel of Country Woods DSP, the mat for the screen, knobs, vent and rabbit ears from Silver Foil Sheets, the tv screen from a panel of Full of Life DSP and the bolts from Textured Metallic Paper. I stamped the sentiment from the Stampin’ Up! Tune In Photopolymer Stamp Set in Versamark Ink on the die cut screen panel. I sprinkled it with Black Embossing Powder and set it using the Heat Tool. I adhered the tv screen to a Silver Foil mat using Stampin’ Seal. I adhered the layered panel to the tv using Liquid Glue.
I adhered the die cut vent under the tv screen using Glue Dots. I adhered the knobs and rabbit ears using Stampin’ Dimensionals. I adhered the tv to the card front using Liquid Glue. I adhered the bolts using Stampin’ Dimensionals.
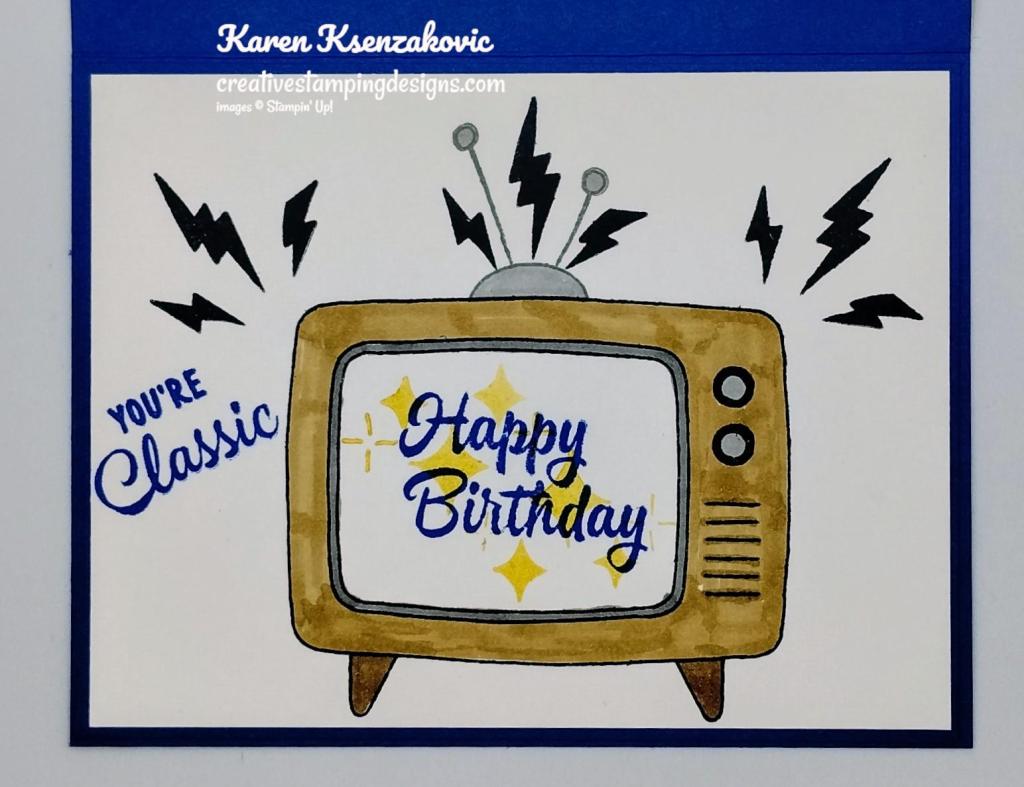
On the inside, I stamped the sentiment from the Tune In stamp set in Blueberry Bushel Ink on a panel of Basic White. I stamped the tv image from the Tune In stamp set in Tuxedo Black Ink on the panel. I stamped the rabbit ears from the Tune In stamp set on top of the tv in Smoky Slate Ink. I colored the images using Pecan Pie and Smoky Slate Stampin’ Blends Markers. I stamped the bolts above the large tv image from the Tune In stamp set in Tuxedo Black Ink. I stamped the other sentiment from the Tune In stamp set in blueberry Bushel Ink next to the tv. I stamped the star image from the Tune In stamp set in Crushed Curry Ink, stamping off on scrap paper once, then over the sentiment.
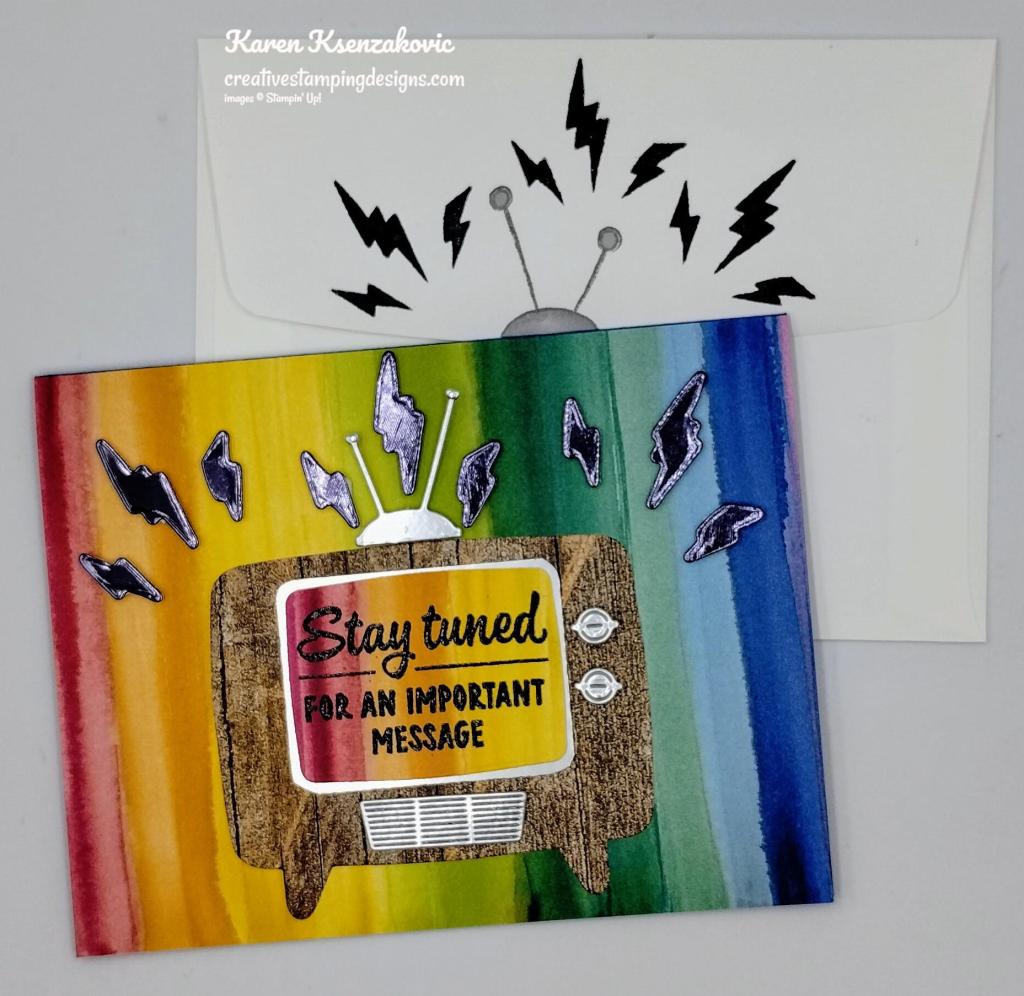
To finish my card, I decorated a Basic White Medium Envelope. I stamped the star image from the Tune In stamp set on the envelope front in Blueberry Bushel, Shaded Spruce and Crushed Curry Inks. I stamped the rabbit ears from the Tune In stamp set in Smoky Slate Ink on the envelope flap and colored them using Smoky Slate Stampin’ Blends Markers. I stamped the bolts around the rabbit ears in Tuxedo Black Ink.
Thank you for stopping by my blog today. I hope you like the card and will give it a try. Happy Stamping!!
If you need any stamping supplies, I’d love to be your Demonstrator. Just click HERE to go directly to my online store or drop me an email if you have any questions.
MY CURRENT HOST CODE IS: D9NW3RJ3
Use this host code when placing an order with me. When you order $50 or greater you will receive a free gift from me! If your order is over $150, please do not use this code, but you’ll still get the free gift. The free gift is your choice of any 1 item valued up to $10.00 from the 2024-2025Annual Catalog, or from the Online Exclusives! Unfortunately, packs of cardstock are no longer an option for a free gift. Shipping has become too expensive to ship and it’s costing me as much to ship as the cardstock costs. For any orders $50 or more I will also send you my monthly class tutorials. Click HERE or go to my Customer Rewards for more details and to see what this month’s tutorials are.
Please remember to use my current Host Code and make sure that you can see my name on the final checkout page listed as your Demonstrator when you order so that you know that you’re ordering with me, and you’ll get my rewards!
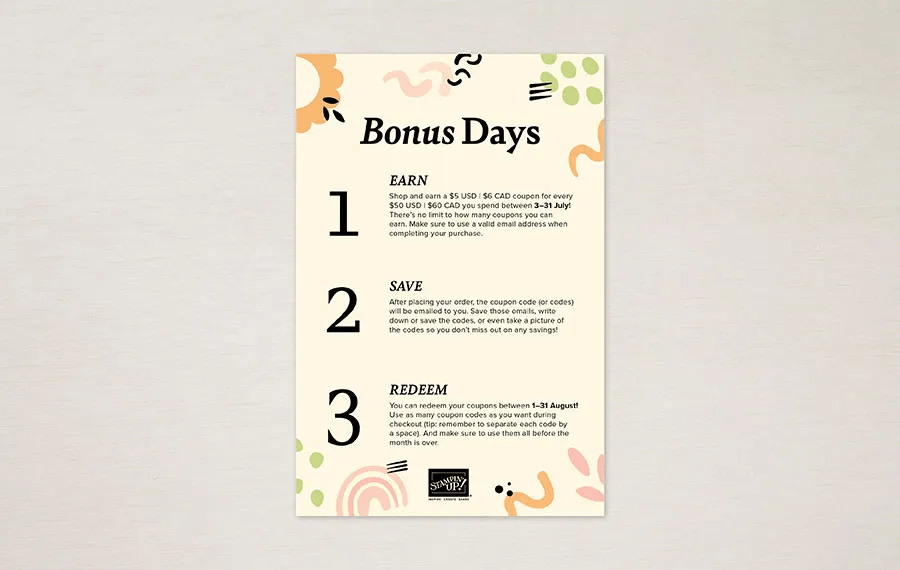
It’s time for one of your favorite promotions—BONUS DAYS! Because getting rewarded for all the crafting supplies you’re already going to buy is awesome! When you shop between July 3-31, for every $50 that you spend in one order, you will earn a $5 coupon! Make sure you save all your coupons because you can redeem them between August 1-31.
There’s no limit to how many coupons you can earn! And, as an added bonus, you’ll earn Creative Stamping Designs Reward points (my personal customer reward program) from me when you order $50+ too!!
Bonus Days Promotion Details:
Earning Period: July 3-31, 2024 Ordering Deadline: July 31, 2024 at 11:59 p.m. (MT)
Earn a $5 coupon for every $50 spent (before shipping and tax).
All coupon codes will be emailed right after a qualifying purchase has been made. You must have a valid email address to earn coupons when you shop.
If you earn multiple codes from a single order, you will receive one email with multiple codes. If you earn multiple codes from multiple orders, you will receive separate emails for each code earned.
All order types qualify for this promotion. Phone and email orders still require an email address.
Orders started before the promotion begins will not count toward earning coupon codes. You must add items to your cart and complete your purchase during the earning period.
There is no limit to the number of coupon codes you can earn per order or throughout the duration of the earning period.
Starter Kit orders are excluded from this offer.
For workshop orders, each customer who reaches a qualifying amount will receive a coupon code to their provided email address.
Redemption Period: August 1-31, 2024 Ordering Deadline: August 31, 2024 at 11:59 p.m. (MT)
Get your wish lists ready and earn those coupon codes in July! Then redeem them on your orders in August! Let me know if you have any questions.
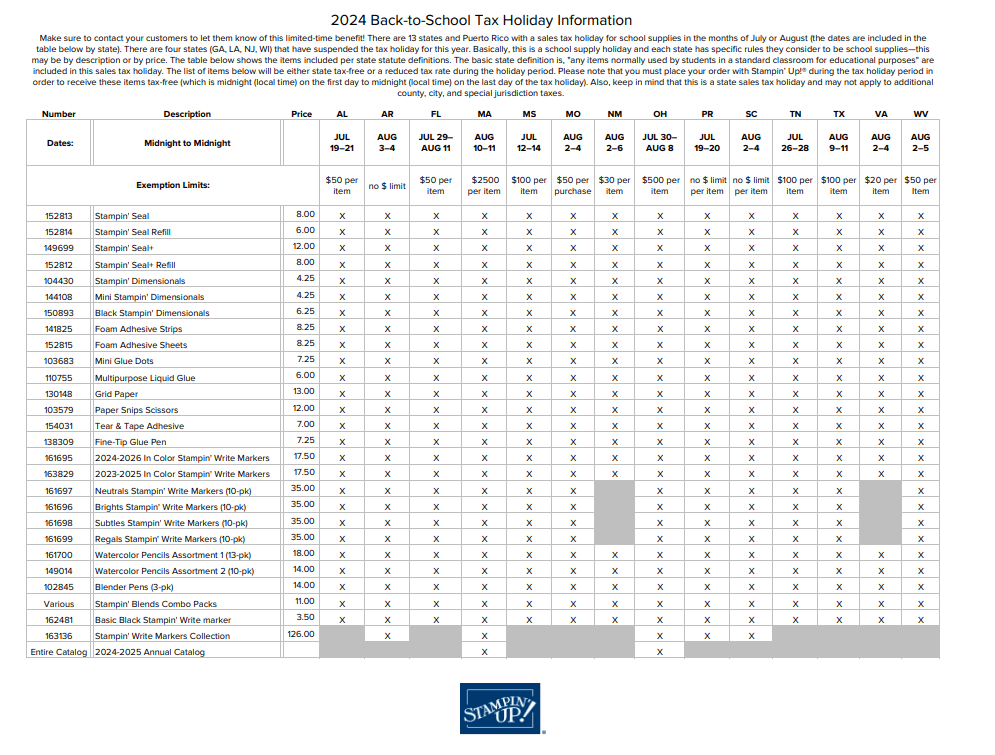
Thirteen states and Puerto Rico are having Back-to-School Sales Tax Holidays this year and some Stampin’ Up! items qualify for the tax break in those states!
The states with upcoming tax holidays are: Alabama, Arkansas, Florida, Massachusetts, Mississippi, Missouri, New Mexico, Ohio, South Carolina, Tennessee, Texas, Virginia and West Virginia. So if you live in one of those states or Puerto Rico, take a second to download the spreadsheet below and mark your calendar!
Here is the list of states having sales tax holidays, what the dates are and what supplies will be tax free during the holiday (click on the image to download a full-size printable page):
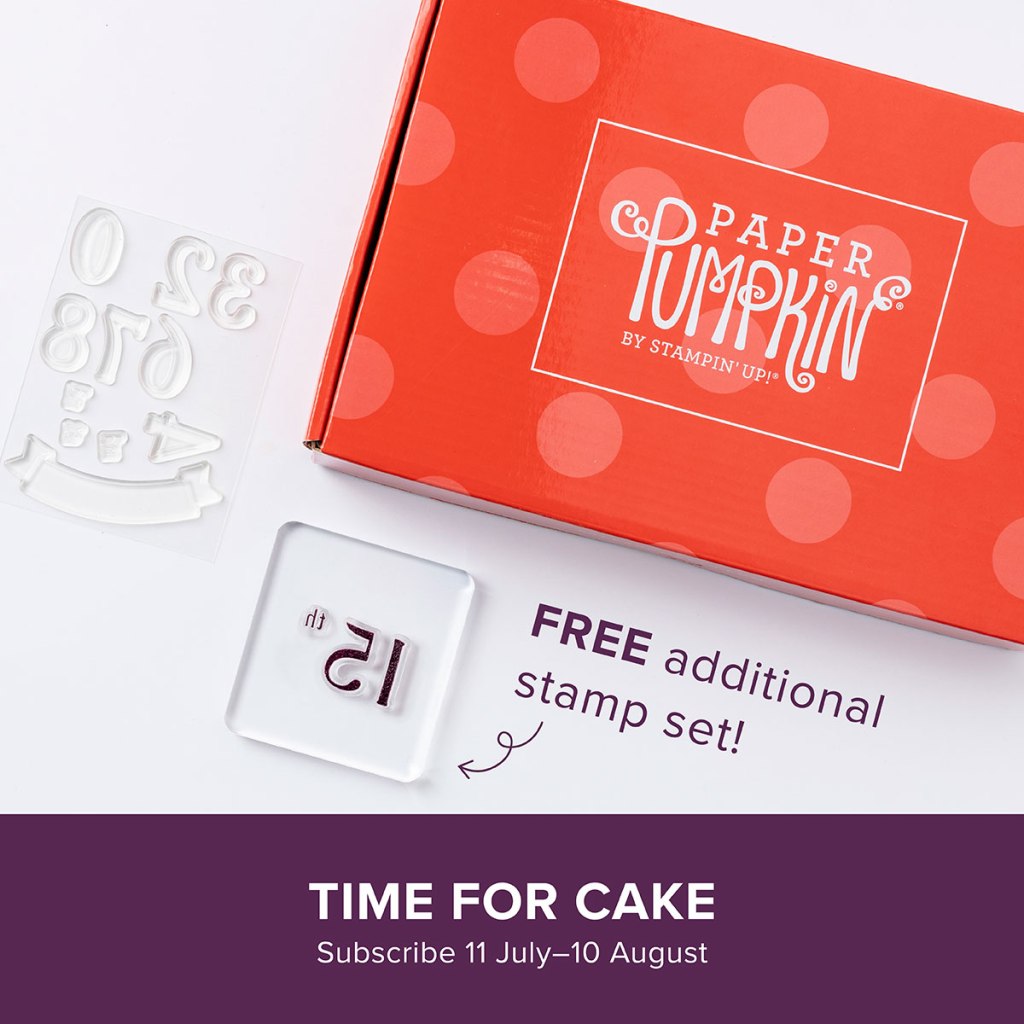
Subscribe to Paper Pumpkin for a monthly, all-inclusive crafting kit that’s a fun surprise! Each kit includes a photopolymer stamp set, Classic Stampin’ Spot, and step by step instructions to complete exclusive paper craft projects, including cards, tags, and gift packaging. And don’t miss the special add-on that coordinates with the next three months!
With the August Paper Pumpkin, Time for Cake, bring on a birthday bash with elegant birthday cards made with rose gold details!
• Makes 9 cards, 3 each of 3 designs • Project includes printed card bases, coordinating envelopes, and labels • Embellishments and rose gold cord • Coordinating colors: Moody Mauve, Night of Navy (Classic Stampin’ Spot), Petal Pink, Pecan Pie, Pretty in Pink, Wild Wheat
Don’t miss the coordinating Every Celebration Dies Add-On!
This exclusive add-on (item 164991) coordinates with the three upcoming kits! Paper Pumpkin subscribers can purchase it beginning 11 July. The add-on is available only while supplies last, so it’s best to shop early!
Subscribe to the August Paper Pumpkin Kit between 11 Julu and 10 August by clicking here!
Note: Supplies may be limited toward the end of the subscription period.
Good Sunday morning stamping friends. I hope your weekend is going well. I’ll be at work all day today. I do have a team meeting via zoom today that I am planning on hoping onto while I’m at work. Hopefully it won’t be too busy so I can.
I have another card that we made at the retreat last weekend. Today’s card was designed by our team leader Amy Koenders. Here’s my card for today.
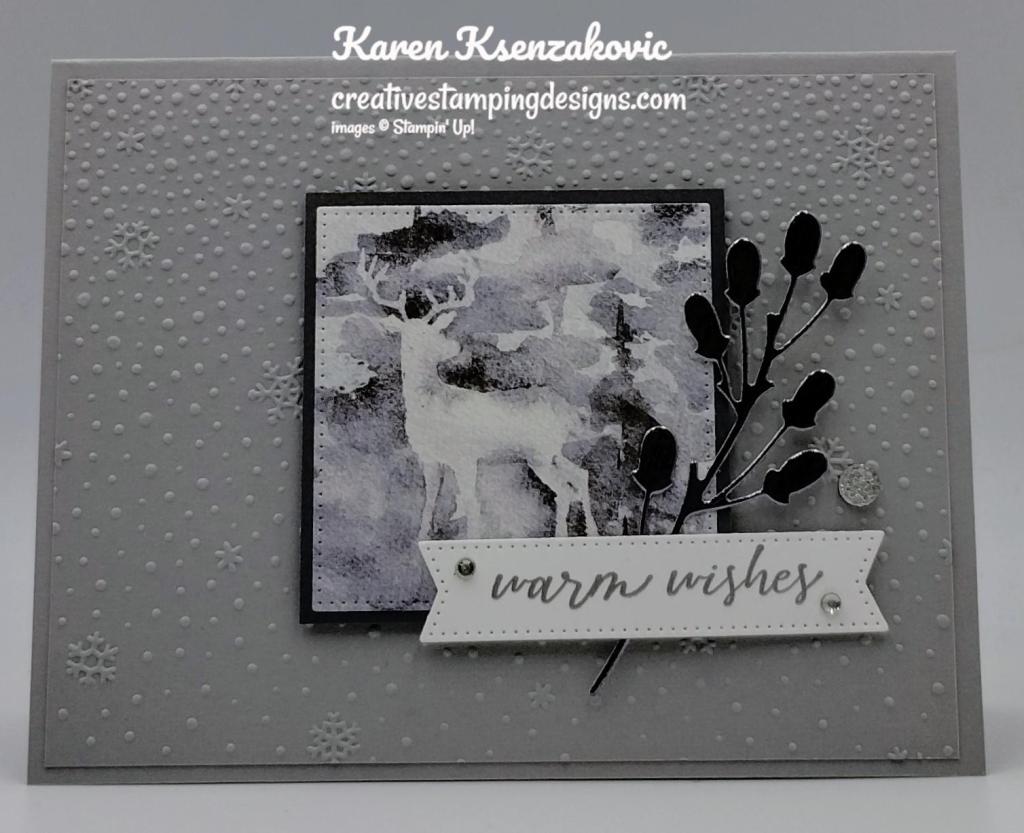
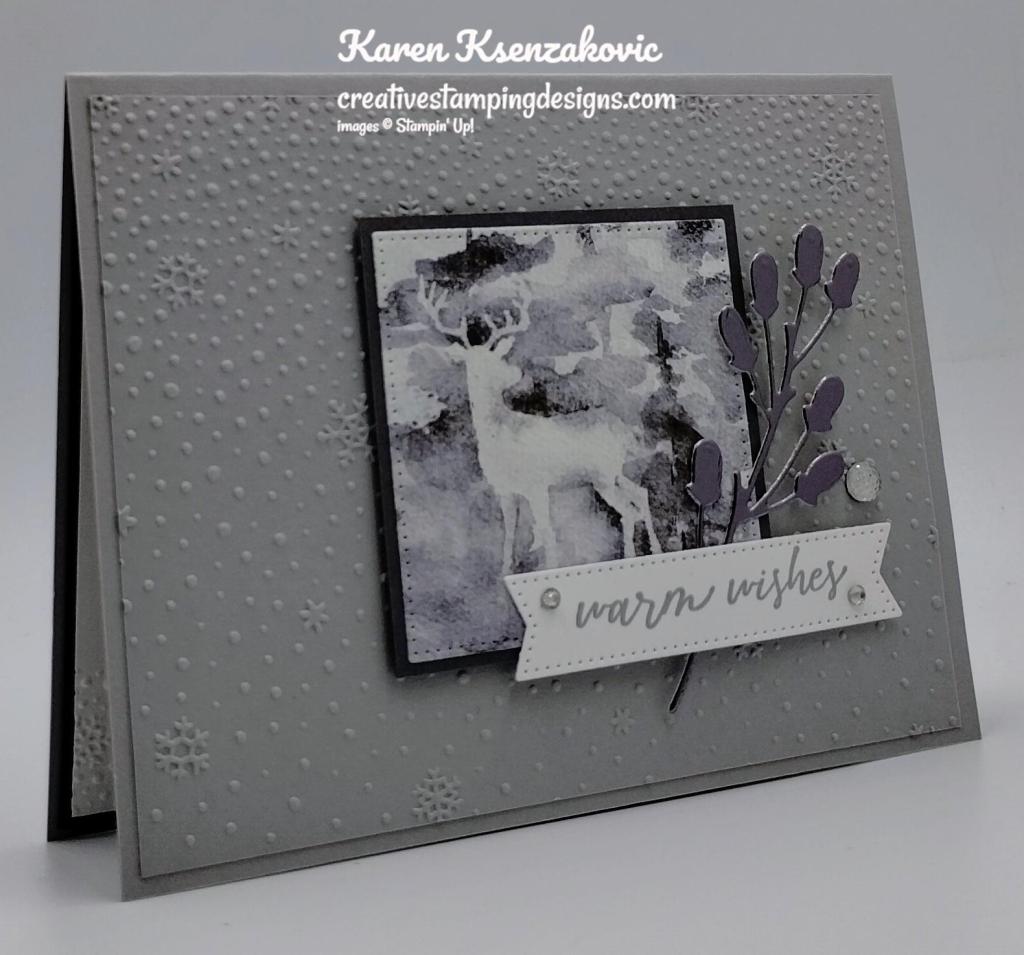
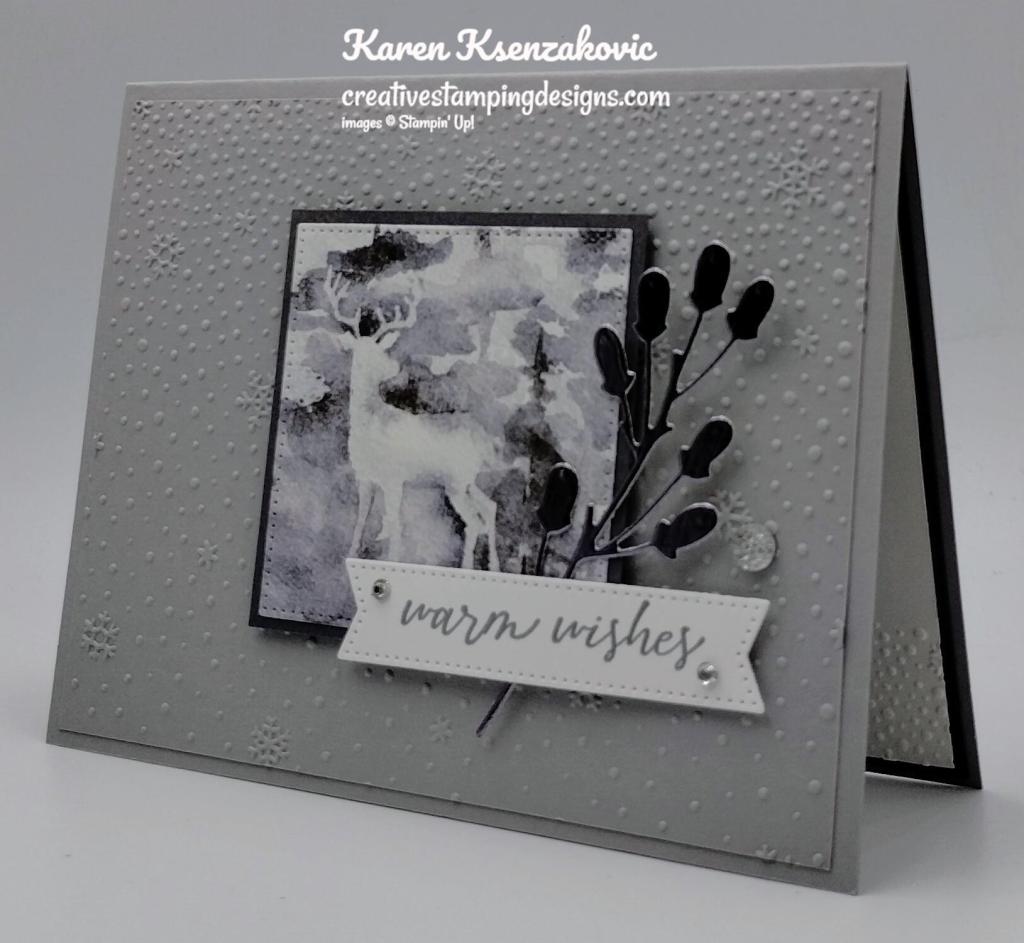
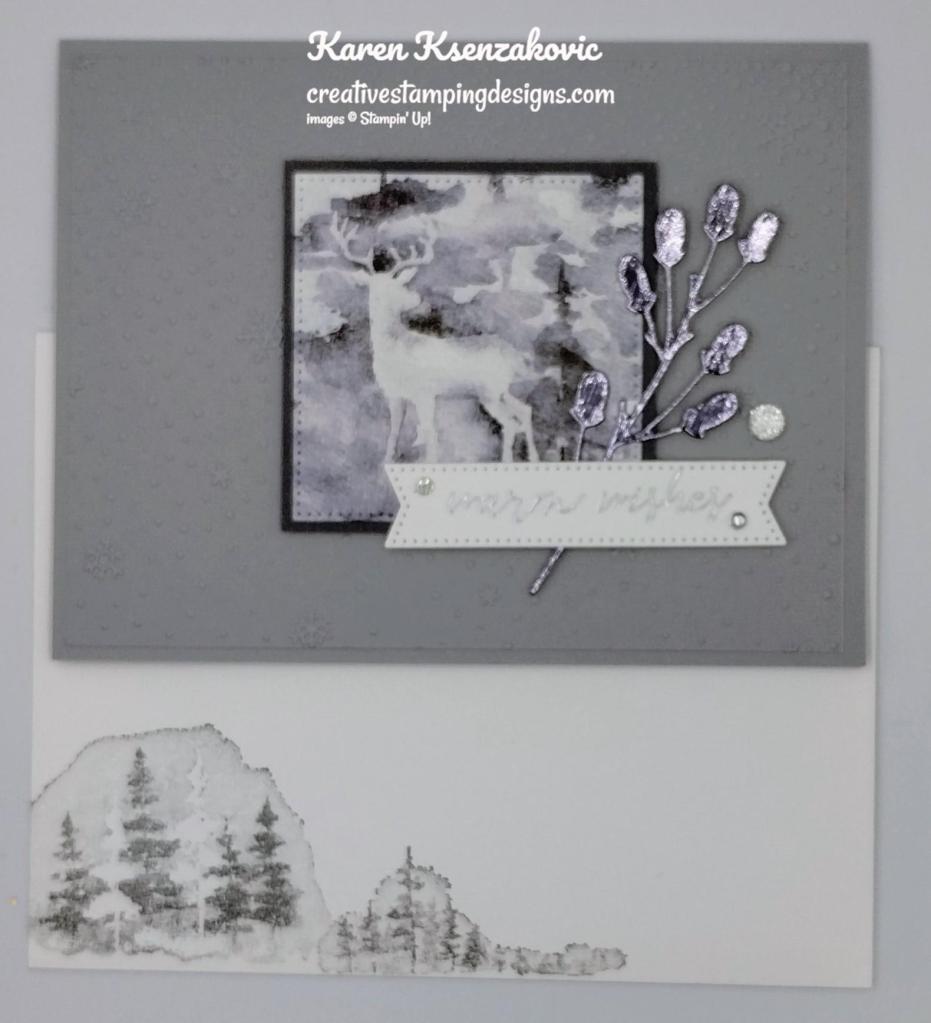
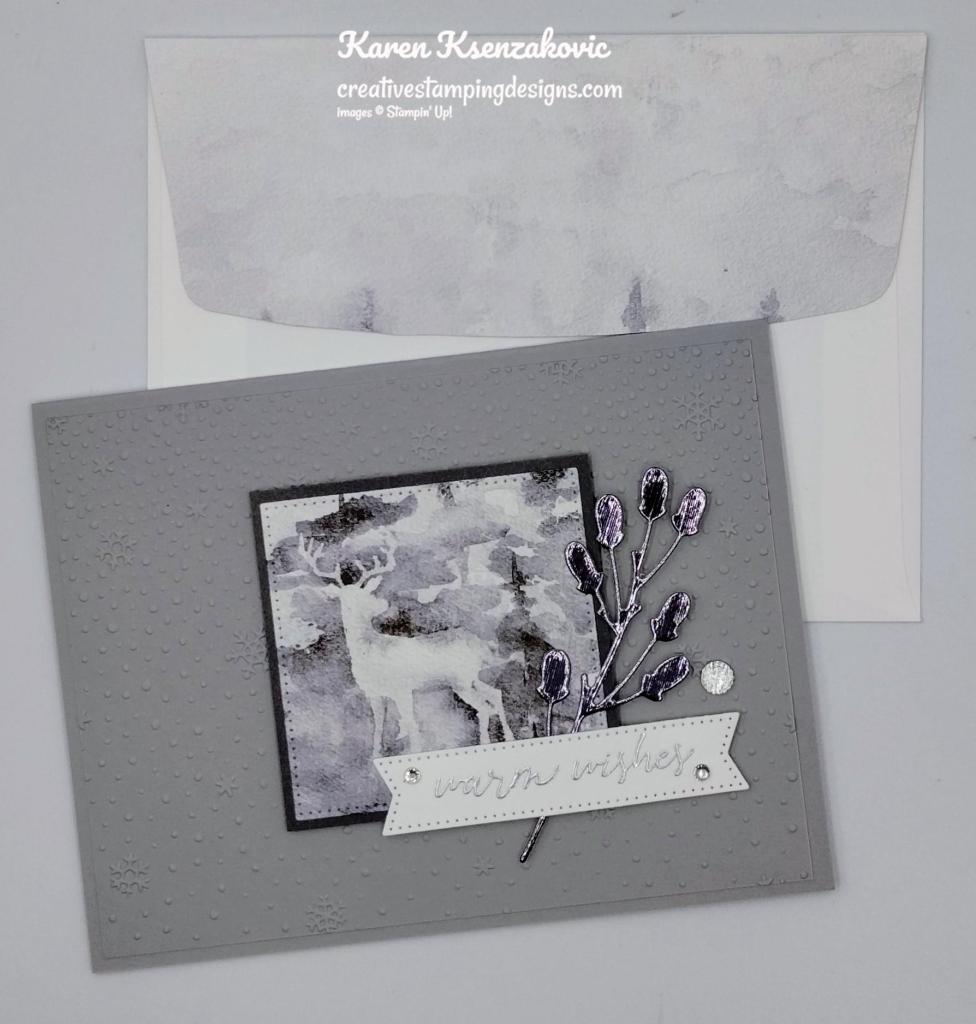
The sentiments used for today’s card are from the Stampin’ Up! Winter Owl Cling Stamp Set. This is another set that I haven’t purchased yet but I may be seeing it in the very near future. I also used the Stampin’ Up! Magical Meadow Bundle along with the Winter Magic Designer Series Paper and Snowflake Sky 3D Embossing Folder.
I started by embossing a Smoky Slate card front using the Snowflake Sky EF. I adhered the embossed panel to a Smoky Slate card base using Liquid Glue. I cut a panel of Winter Meadow DSP using the 2nd largest square from the Stylish Shapes Dies. I adhered the die cut panel to a Basic Gray mat using Stampin’ Seal. I adhered the layered panel to the card front using Stampin’ Dimensionals.
I stamped the sentiment from the Winter Owl stamp set in Versamark Ink on a panel of Basic White. I sprinkled it with Silver Embossing Powder and set it using the Heat Tool. I cut the sentiment out using the longer narrow Stylish Shapes Dies. I cut the sprig from a panel of Silver Foil using the Magical Meadow Dies. I adhered the sprig using a Glue Dot to the card front. I adhered the sentiment over the artwork and sprig using Stampin’ Dimensionals. I added a Faceted Gem Trio Pack to the card front and Rhinestone Basic Jewels to the sentiment.
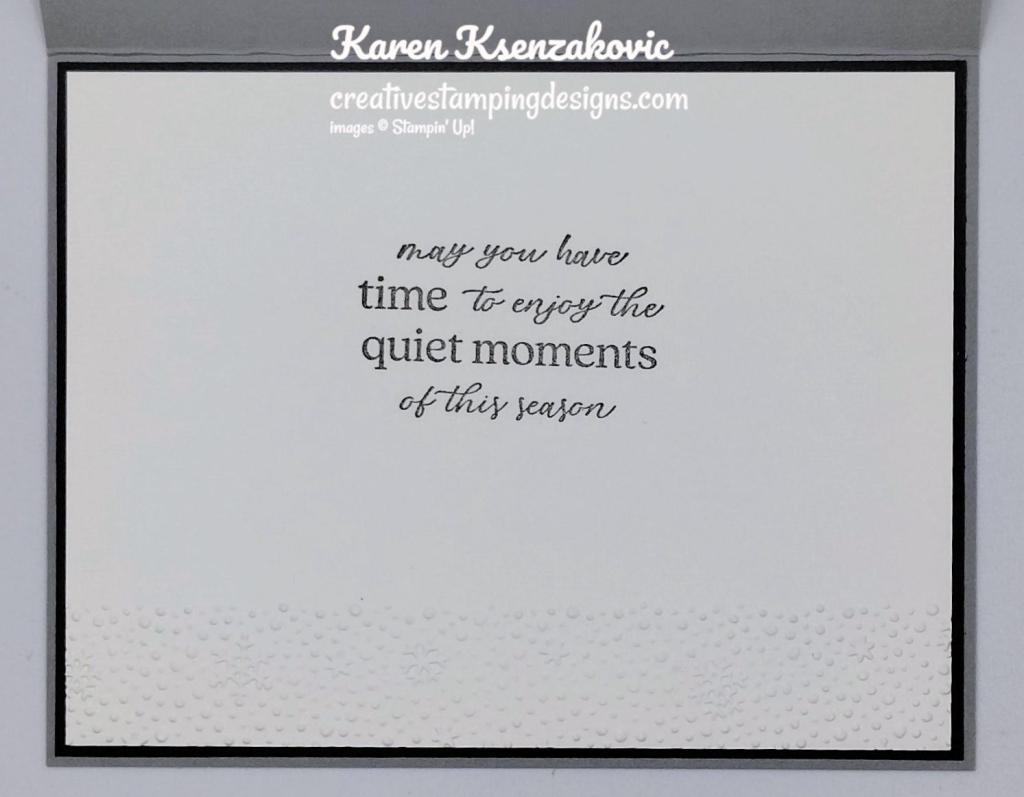
On the inside I stamped the sentiment from the Winter Owl stamp set in Smoky Slate Ink on a panel of Basic White. I embossed the bottom of the panel using the Snowflake Sky EF. I adhered the Basic white panel to a Baic Gray mat then to the inside of the Smoky Slate card base.
To finish my card, I decorated a Basic White Medium Envelope. I stamped the images from the Stampin’ Up! Magical Meadow Cling Stamp Set in Smoky Slate Ink on the envelope front. I adhered a panel of Winter Meadow DSP to the envelope flap.
Thank you for stopping by my blog today. I hope you like the card and will give it a try. Happy Stamping!!
If you need any stamping supplies, I’d love to be your Demonstrator. Just click HERE to go directly to my online store or drop me an email if you have any questions.
MY CURRENT HOST CODE IS: BX4UV6HE
Use this host code when placing an order with me. When you order $50 or greater you will receive a free gift from me! If your order is over $150, please do not use this code, but you’ll still get the free gift. The free gift is your choice of any 1 item valued up to $10.00 from the 2023-2024 Annual Catalog! Unfortunately, packs of cardstock are no longer an option for a free gift. Shipping has become too expensive to ship and it’s costing me as much to ship as the cardstock costs. For any orders $50 or more I will also send you my monthly class tutorials. Click HERE or go to my Customer Rewards for more details and to see what this month’s tutorials are.
Please remember to use my current Host Code and make sure that you can see my name on the final checkout page listed as your Demonstrator when you order so that you know that you’re ordering with me, and you’ll get my rewards!
In response to changing policies at Stampin’ Up – I’m adjusting my Ordering Gift policy as well. I’m having to get a little more tough on the adding of Host codes when you place your order thru my Online Store.
Not to worry – you’re still going to get that $10 ordering gift for orders of $50 (before shipping & tax) or greater. And the gift is still any 1 SU! product up to that $10 value – which includes some of our fun Host Sets!
But – if you DO NOT use the Host code for your orders of less than $150 (this is the RETAIL total before Shipping & Handling), then you’ll have two options:
You’ll need to call Stampin’ Up! (1-800-Stamp-Up) and ask them to add it for you. They’re very helpful and will get it done quickly! OR….
If your order was over the $50 threshold but under $150, then…you’ll forfeit that $10 ordering gift and rewards – this is the Bummer Option – and I REALLY don’t want to do this, SO please remember to add my Current Host Code.
Stampin’ Up! let us know about the upcoming sale starting Tuesday November 14th through Thursday November 16th. Take advantage of this sale by stocking up on items that you use for every handmade craft!
Create more by spending less during the Seasonal Sale! Between 14–16 November, you can get select products from the 2023–2024 Annual Catalog up to 20% off. Have your eye on something from our new color collection? Don’t miss your opportunity to shop the colors you’ve been craving during this phenomenal sale!
You can stock up on supplies for all your upcoming handmade projects or embrace the season of giving and buy something for your fellow crafting enthusiasts. Make sure to act quickly on this limited time only deal!
Sales Period: November 14 – 16 2023
10% off ribbons and trims.
15% off inks, including pads, refills, markers, and Blends. Bundles are not included.
20% off papers, including cardstock, specialty paper, and Designer Series Paper.
Shop online to see the full selection of discounted products available. This is a limited time offer.
Discounts are automatically applied when sale items are added to any order, including Starter Kits.
Please keep in mind that due to the high volume of orders, the distribution center may fall behind our typical shipping timeframes. We will do everything we can to return to our regular service levels as quickly as possible.
Please note: Some items may sell out due to high demand. The discount will automatically be applied to qualifying items that are in stock. Per our updated policy, backorders are not available.
Go check out my Online Store for the NEW Online Exclusive products available. Get those orders placed early so you don’t miss out on the pretty new suite and new bundles.
Plan a crafting getaway today with the all-inclusive The Best Destination Kit! This kit lets you make nine tri-fold cards with a colorful, nostalgic, travel vibe. Resort-hopping was never so easy!
This month’s kit includes:
Enough supplies to create 9 cards—3 each of 3 designs
9 coordinating envelopes
Best Destination Photopolymer Stamp Set
One Gorgeous Grape Ink Spot
Printed card bases, printed die cuts, adhesive, embellishments, and a clear block
Finished card size: 5-1/2″ x 4-1/4″ (14 x 10.8 cm)
Send a wish to all your loved ones with the December Paper Pumpkin Kit! It comes with nine card fronts, three each of three designs, and nine coordinating envelopes. It has paper pieces detailed with gold foil, embellishments, an all-occasion stamp set, and an acetate box where you can store your finished cards! You can gift the kit itself or the finished product in the acetate box; either way, it’s the perfect last-minute gift for any occasion.
The paper pieces in the December Paper Pumpkin kit have gold foil detailing. Whether it’s an elegant boarder, or woven into the floral artwork, it’s a detail that will surely catch your recipient’s eye! It’s the perfect way to take any paper craft to the next level.
The beauty of the December Paper Pumpkin Kit lies in the hand drawn artwork. The bright blue skies and elegant yellow flowers compliment the different design elements perfectly. It’s a simple yet sophisticated design that will catch any recipient’s eye!
This kit includes:
9 cards; 3 each of 3 designs.
9 coordinating envelopes.
1 Acetate box to fit cards and envelopes from the kit.
1 Pebbled Path Stampin’ Spot.
1 photopolymer stamp set.
Embellishments.
Specialty gold foil die cuts.
Enough adhesive to finish the project.
Finished card size: 4-1/4″ x 5-1/2″ (10.8 x 14 cm)
Good Saturday morning stamping friends and welcome to the weekend. does anyone have plans for the weekend? It’s supposed to be rainy and chilly today here in NJ and warm up to the 60’s Sunday. I’ll be at work all day today and maybe my daughter and I will watch a movie tonight since my husband is away for a gaming weekend with his friends.
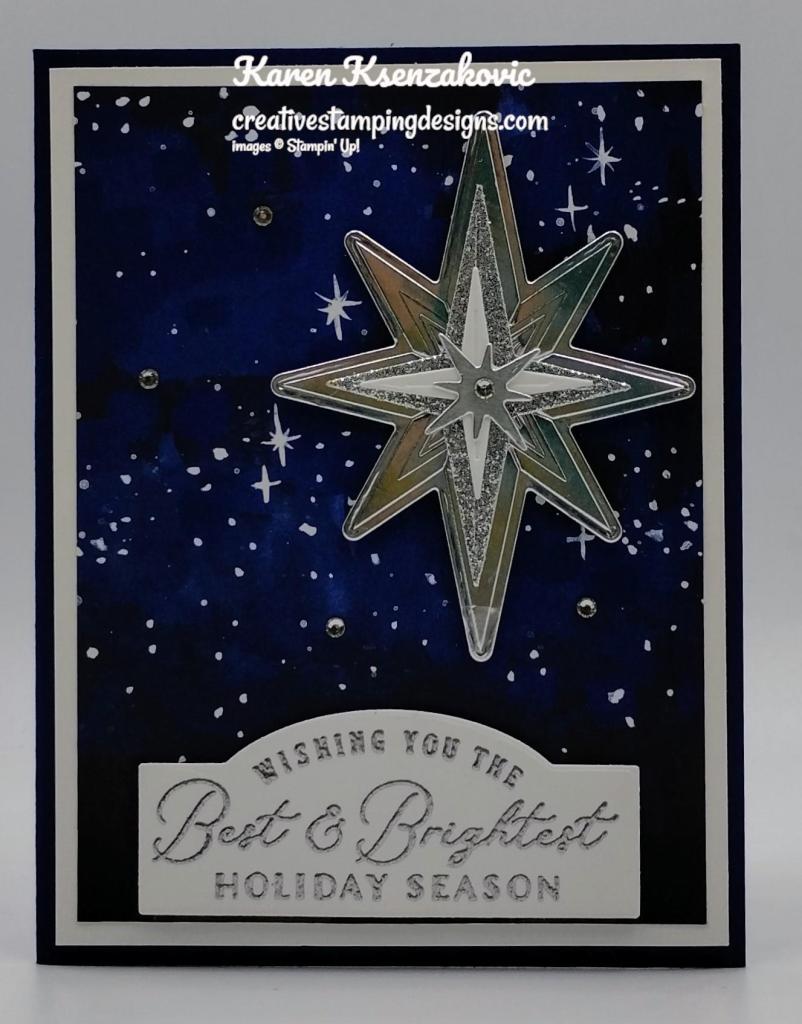
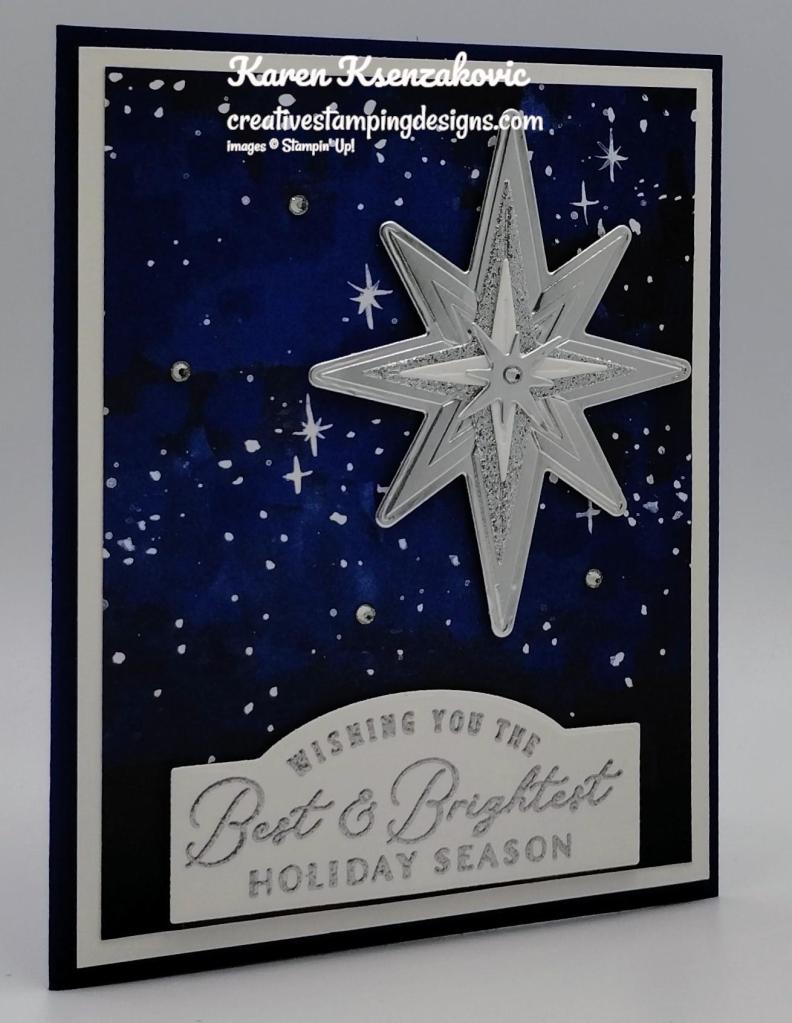
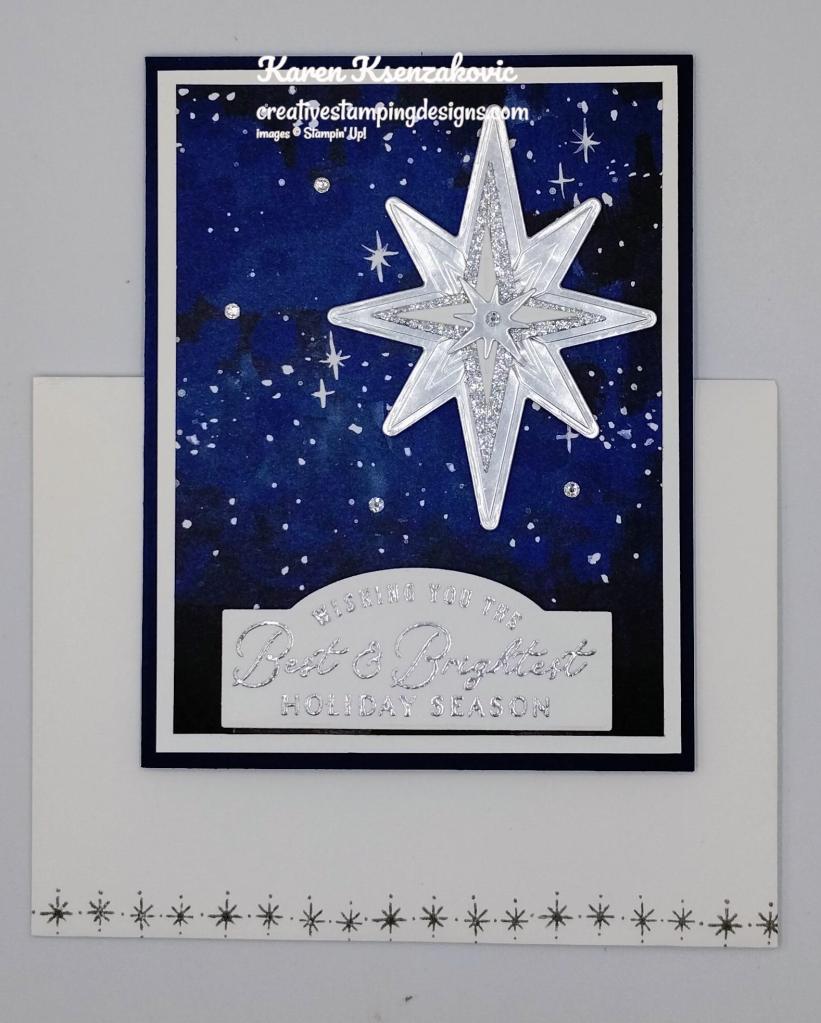
I have a quick Christmas card for you today. I’ve seen this card made using gold and I thought I’d make it with silver to be different. If you’d like to see a quick video on how I made my card, Click Here for my Instagram Reels. Here’s my card for today.
I used the Stampin’ Up! Stars At Night Bundle along with the O Holy Night Designer Series Paper and Online Exclusives Silver Foil Specialty Paper and Silver & Gold Adhesive Back Glimmer Paper for my card today.
I started by adhering a panel of O Holy Night DSP to a Basic White Mat using Stampin’ Seal. I adhered the layered panel to a Night of Navy card base using Stampin’ Dimensionals.
I stamped the sentiment from the Stampin’ Up! Stars At Night Photopolymer Stamp Set in Versamark Ink on a panel of Basic White. I sprinkled it with Silver Embossing Powder and set it using my Heat Tool. I cut the sentiment out using the Stars At Night Dies. I adhered the sentiment to the bottom of the card front using Stampin’ Dimensionals.
Using the Stars At Night Dies and Stars At Night Hybrid Embossing Folder I cut the largest star from a panel of Silver Foil Paper. Using just the Stars At Night Dies, I cut the medium star from a panel of Silver Glimmer Paper, the next small one from a panel of Basic White and the small star from a panel of Silver Foil Paper. I adhered the glimmer star to the large silver star. I adhered the other 2 stars to the layered star using Glue Dots. I adhered the layered stars to the card front using Stampin’ Dimensionals. I added Rhinestone Basic Jewels to the card front and center of the star.
On the inside, I stamped the sentiment from the Stars At Night stamp set in Night of Navy Ink on a panel of Basic White. I stamped the star image from the Stars At Night stamp set on either side of the sentiment in Smoky Slate Ink. I adhered the Basic White panel to a Night of Navy mat then to the inside of the Night of Navy card base.
To finish my card, I decorated a Basic White Medium Envelope. I stamped the star image from the Stars At Night stamp set in Smoky Slate Ink on the bottom front of the envelope. I embossed a panel of Smoky Slate using the Stars At Night Hybrid Embossing Folder and adhered it to the envelope flap.
Thank you for stopping by my blog today. I ho9pe you like the card and will give it a try. Hapy Stamping!!
If you need any stamping supplies, I’d love to be your Demonstrator. Just click HERE to go directly to my online store or drop me an email if you have any questions.
MY CURRENT HOST CODE IS: WRAGYZRS
Use this host code when placing an order with me. When you order $50 or greater you will receive a free gift from me! If your order is over $150, please do not use this code, but you’ll still get the free gift. The free gift is your choice of any 1 item valued up to $10.00 from the 2023-2024 Annual Catalog! Unfortunately, packs of cardstock are no longer an option for a free gift. Shipping has become too expensive to ship and it’s costing me as much to ship as the cardstock costs. For any orders $50 or more I will also send you my monthly class tutorials. Click HERE or go to my Customer Rewards for more details and to see what this month’s tutorials are.
Please remember to use my current Host Code and make sure that you can see my name on the final checkout page listed as your Demonstrator when you order so that you know that you’re ordering with me, and you’ll get my rewards!
In response to changing policies at Stampin’ Up – I’m adjusting my Ordering Gift policy as well. I’m having to get a little more tough on the adding of Host codes when you place your order thru my Online Store.
Not to worry – you’re still going to get that $10 ordering gift for orders of $50 (before shipping & tax) or greater. And the gift is still any 1 SU! product up to that $10 value – which includes some of our fun Host Sets!
But – if you DO NOT use the Host code for your orders of less than $150 (this is the RETAIL total before Shipping & Handling), then you’ll have two options:
You’ll need to call Stampin’ Up! (1-800-Stamp-Up) and ask them to add it for you. They’re very helpful and will get it done quickly! OR….
If your order was over the $50 threshold but under $150, then…you’ll forfeit that $10 ordering gift and rewards – this is the Bummer Option – and I REALLY don’t want to do this, SO please remember to add my Current Host Code.
If you’ve been thinking about joining the Stampin’ Up! community October is the perfect time. If you saw my card from World Card Making Day (you can see it Here), I used some new Online Exclusive products and products from the new January-April 2024 Mini Catalog. You can add those Online Exclusive products to your Starter Kit, and still have more money to spend. This is really an awesome deal and I’d love to have you on my team. The added free registration to OnStage is a great bonus and then you can order the Be Mine Suite collection for your 1st order.
We want to celebrate our 35th anniversary in style! From October 3 – October 31, anyone who joins our fun crafting community as a new demonstrator can choose either 35% OFF the cost of their Starter Kit or get 35% MORE product with their Starter Kit! What a deal!
Promotion Period: 3–31 October
New demonstrators can choose one of the following options for your Starter Kit:
Option 1: Get 35% OFF the normal cost of a Stampin’ Up! Starter Kit. Those who select this option will receive $125 USD worth of product for only $64.35 USD!
Option 2: Get 35% MORE product with their Starter Kit. Those who select this option will receive $168.75 USD worth of product by spending $99 USD!
No matter which option you choose for your Starter Kit, both provide free business supplies and free shipping on your Starter Kit—not to mention all the fun that comes with being part of Stampin’ Up!
FREE OnStage @Home Registration
It gets better! Those who sign up for a Starter Kit during this offer will also be automatically registered for FREE* to our virtual OnStage event on 11 November—a $77 USD value!
Those who sign up for this offer have the opportunity to watch the event independently, gathered together with other demonstrators, or with their Team Leader.
Demonstrators who join during this promotion will be automatically added to the OnStage attendees; they do not need to register separately.
Demonstrators who join during this promotion will also receive an email with all the information about this event.
*Please note that free registration will not include the gift box.
Stampin’ Up! events are always SO much fun!! Bonus that you can join and attend your first even for free!!
Come join my team.
We welcome all types of Demonstrators from those only purchasing to get the discount for themselves to those who want to run a business and anywhere in between! There’s never any pressure to sell! We’re a group that loves to stamp and share what you create. Demonstrators get lots of perks including at least a 20% discount on all orders that you place as a Demonstrator, invitations to Stampin’ Up! Demonstrator events and preordering from upcoming catalogs and promotions (like the new Online Exclusives coming in November!!)! The new Online Exclusive items ARE available to pick as part of your Starter Kit (or you can order them later and get your 20% discount!).
I broke it down a little for you. If you choose the 35% off, you get $125 in product for $64.35. If you add the Meandering Meadows Suite for $82.50 you still get to add another $42.50 in product of your choice to pick.
If you choose to get an additional 35% of product, you get $168.75 of product for $99. If you choose the Meandering Meadows Suite for $82.50 and the Fluffiest Friends Bundle for $54, you will still have another $32.50 in product of your choice to pick.
Then Stampin’ Up is adding FREE registration to our OnStage@Home Event in November, a $77 value, you can preorder the Bee Mine Suite Collection in a Demonstrator order and get 20% off the suite!!
What are you waiting for? If you have been back and forth about joining, drop me a note at creativestampingdesigns@gmail.com and we can talk about you joining. This is an awesome deal that you won’t want to pass up.
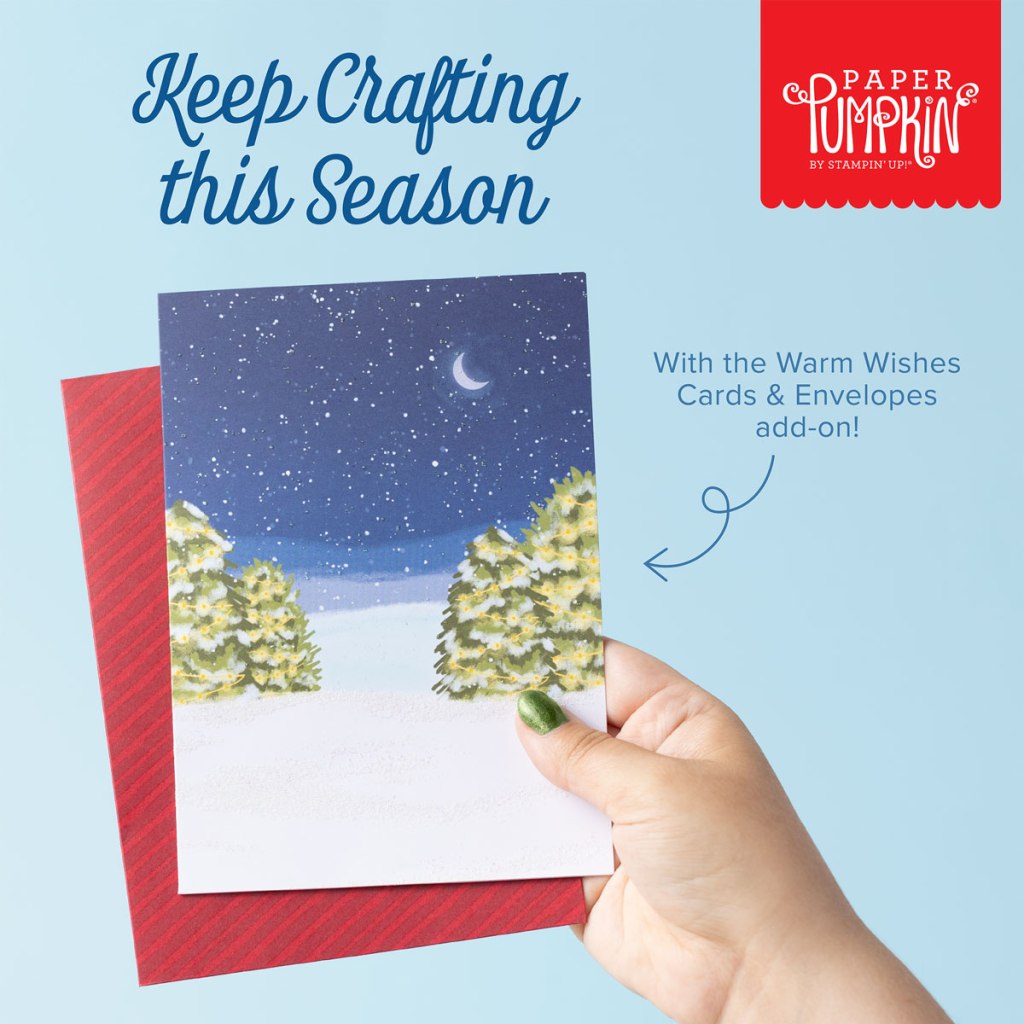
Light up the Christmas season with this month’s Paper Pumpkin kit! With traditional Christmas home designs and warm Christmas wishes, spread the light of Christmas with a gift box. Plus, you can get the Warm Wishes Cards & Envelopes Add-On to take your Christmas crafting even further (available while supplies last). This month’s kit coordinates with the October Home for the Holidays Paper Pumpkin Kit! If you can’t get enough of this traditional Christmas scene and need more cozy crafts, then make sure to check the October Refill’s availability and spend more time crafting this holiday season!
This month’s kit comes with everything you need to make traditional Christmas treat packaging boxes that you can fill up with all sorts of small goodies, treats, gifts, and more. Subscribe today so you can take part in spreading the light of Christmas around you!
This kit includes:
8 boxes; 4 each of 2 designs
1 Mossy Meadow Stampin’ Spot
Iridescent glitter accents on paper
Precut paper pieces
Linen thread
Treat bags
Warm Wishes photopolymer stamp set
Completed box size: 4-1/4″ x 4-1/2″ x 1-1/2″ (10.8 x 11.4 x 3.8 cm) and 4/1/4″ x 3-3/4″ x 1-1/2″ (10.8 x 9.5 x 3.8 cm)
Coordinating Stampin’ Up! colors: Balmy Blue, Blueberry Bushel, Cherry Cobbler, Crushed Curry, Daffodil Delight, Lemon Lolly, Mossy Meadow, Night of Navy, Old Olive, Pecan Pie, Real Red
ADD-ON DETAILS
Warm Wishes Cards & Envelopes Available for purchase starting 11 October; only while supplies last. Item number: 163985 $14.00 USD
This add-on includes: • 20 Cards & Envelopes • Iridescent glitter accents on paper • Folded card size: 5″ x 7″ (12.7 x 17.8 cm)
Subscribe to the November Paper Pumpkin Kit between 11 October and 10 November by clicking here!
Note: Supplies may be limited toward the end of the subscription period.
Good Tuesday morning my stamping friends. How has everyone’s week started out? I hope you are having a productive one.
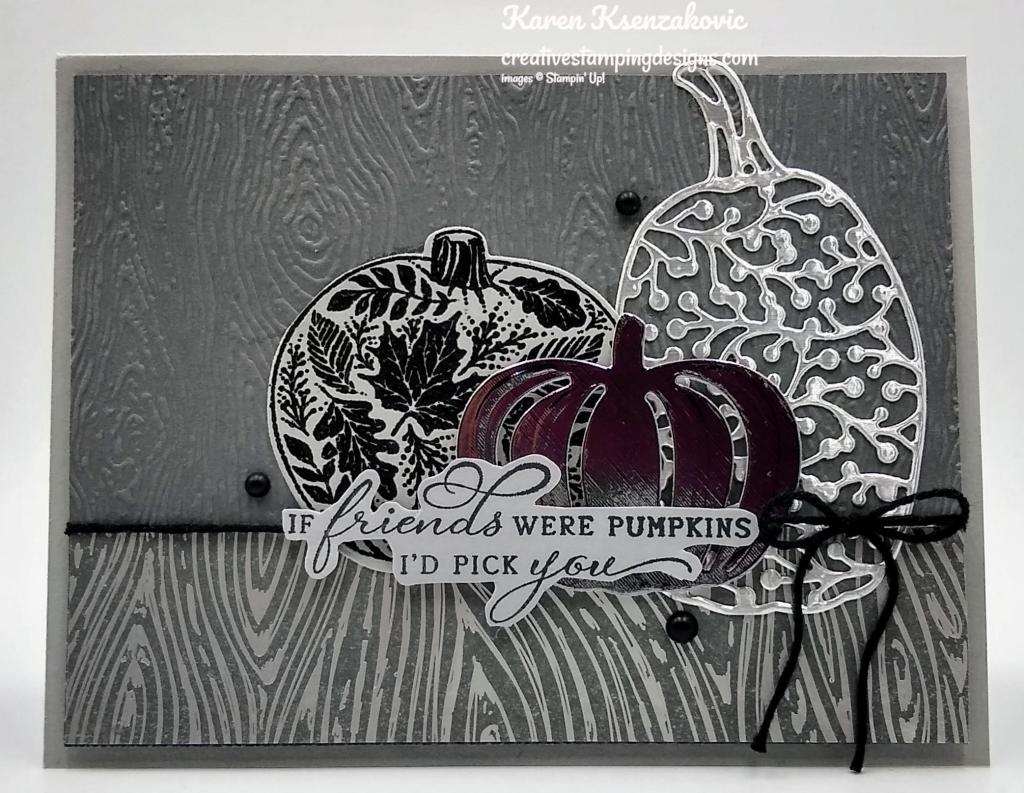
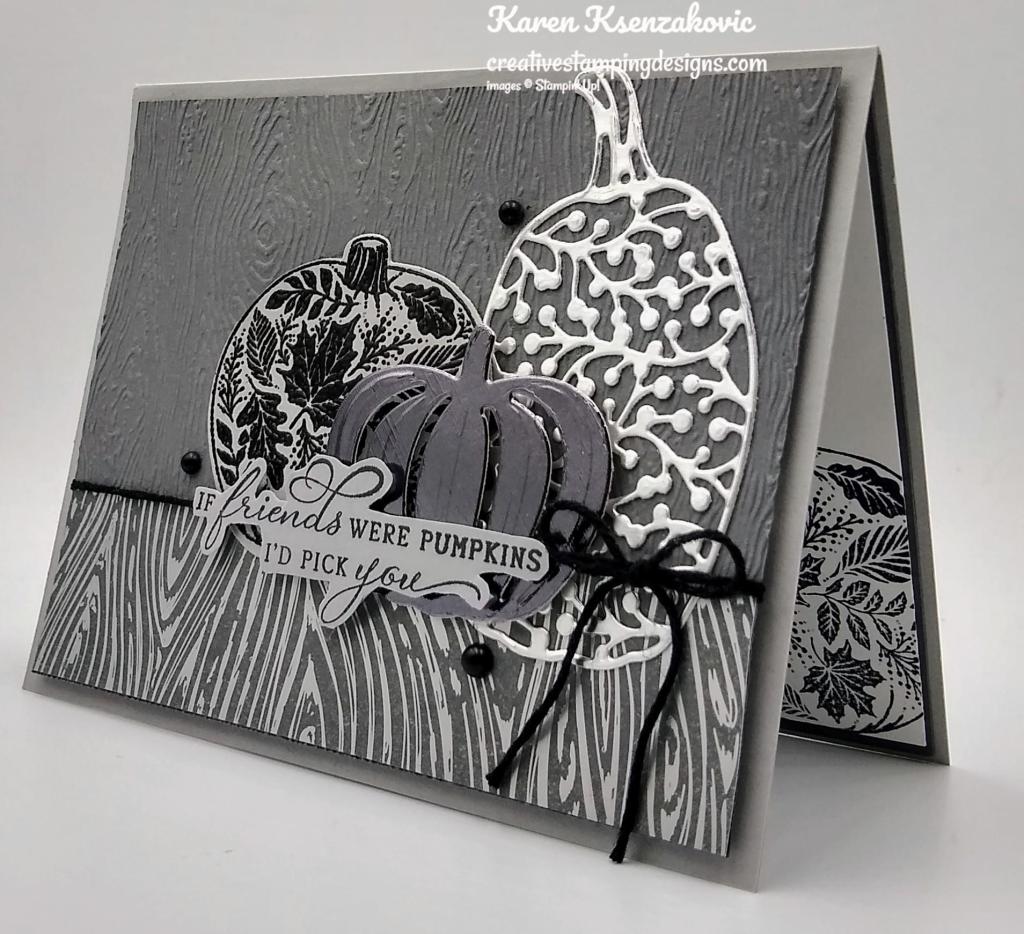
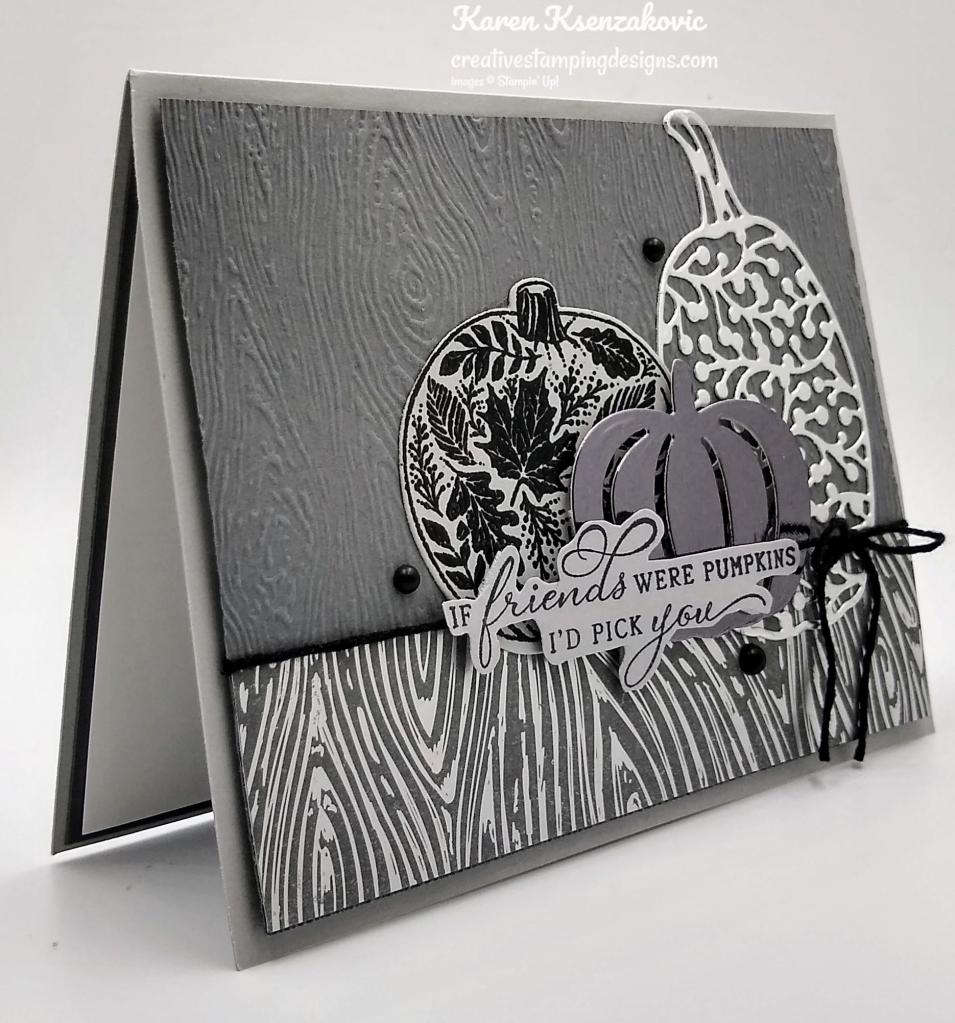
I have a monochromatic card for you today. It’s a little different from my multicolor cards that I usually make, but I really like the way it came out. My team leader Amy made a black and white card last week using these pumpkins and I really liked the way it looked, so I thought I’d give it a try. Here’s my card for today.
I used the Stampin’ Up! Pretty Pumpkins Bundle along with the Peaceful Place Specialty Designer Series Paper for my card today.
I started by embossing a Basic Gray card front using the Timber 3D Embossing Folder. I adhered a panel of Peaceful Place Specialty DSP to the bottom of the panel using Multipurpose Liquid Glue. I wrapped a piece of Black Bakers Twine from the Bakers Twine Essential Pack around the card front and tied a bow.
Stampin’ Up! has this beautiful new Silver Foil Specialty Pack of paper with 3 different finishes in it. I cut the tall detailed pumpkin from the shiny piece using my Detailed Pumpkin Dies. I cut the smaller pumpkin from the darker panel using my Detailed Pumpkin Dies. On a panel of Smoky Slate cardstock I stamped the leafy pumpkin image from the Stampin’ Up! Pretty Pumpkins Cling Stamp Set in Versamark Ink. I immediately sprinkled it with Black Embossing Powder from the Basic Embossing Powders and set it using my Heat Tool. I cut the embossed image out using my Detailed Pumpkin Dies. I adhered the pumpkins to the card front using Multipurpose Liquid Glue and Stampin’ Dimensionals under the bakers twine.
On a panel of Smoky Slate cardstock I stamped the sentiment from the Pretty Pumpkins stamp set in Tuxedo Black Ink. I fussy cut the sentiment using my Paper Snips and adhered it to the card front, over the bakers twine, using Stampin’ Dimensionals. I added a few Matte Black Dots to the card front. I adhered the card front to a Smoky Slate card base using Stampin’ Dimensionals.
On the inside I stamped the sentiment from the Pretty Pumpkins stamp set in Tuxedo Black Ink on a Basic White panel. I stamped the pumpkin image from the Pretty Pumpkins stamp set in Tuxedo Black Ink on the bottom of the panel. I adhered the Basic White panel to a Basic Gray mat using Stampin’ Seal and then to the inside of the Smoky Slate card base using Multipurpose Liquid Glue.
To finish my card I decorated a Basic White Medium Envelope. I stamped the pumpkin image from the Pretty Pumpkins stamp set in Tuxedo Black Ink on the envelope front. I adhered a panel of Peaceful Place Specialty DSP to the envelope flap.
Thank you for stopping by my blog today. I hope you liked my card and will give it a try. Happy Stamping!!
If you need any stamping supplies, I’d love to be your Demonstrator. Just click HERE to go directly to my online store or drop me an email if you have any questions.
MY CURRENT HOST CODE IS: US3JFJ62
Use this host code when you order $50 or greater and receive a free gift from me! If your order is over $150, please do not use this code, but you’ll still get the free gift. The free gift is your choice of any 1 item valued up to $10.00 from the 2020-2021 Annual Catalog or the January-June 2021 Mini Catalog!For any orders $50 or more I will also send you my monthly class tutorials. Click HERE or go to my Customer Rewards for more details and to see what this months tutorials are.
Please remember to use my current Host Code and make sure that you can see my name on the final checkout page listed as your Demonstrator when you order so that you know that you’re ordering with me and you’ll get my rewards!
Awesome Joining Promotions Until September 30, 2021
There is an AWESOME joining promotion happening! If you purchase the Starter Kit between August 3 and September 30, you’ll get to pick a FREE bundle from this list!
Frosted Gingerbread
Christmas Season
Christmas To Remember
Whimsical Trees
Peaceful Deer
Sweet Little Stockings
Penguin Place
Peaceful Cabin
Arctic Bears
Beauty Of Tomorrow
Gorgeous Leaves
Nature’s Harvest
When you purchase the Starter Kit for $99 + taxes (if applicable), the kit ships for FREE and YOU get to pick $125 in Stampin’ Up! merchandise OF YOUR CHOICE. If you purchase the kit during Sale-a-bration, you’ll get an additional FREE bundle from the select twelve listed above (with a value up to $60.25!!) with your kit! A free bundle in addition to $125 in merchandise for $99, YES PLEASE!!You will also get a past Paper Pumpkin Kit and other supplies free in your kit.
If you are planning on placing an order of $100, you might really want to consider joining. This is such an awesome joining deal, you don’t want to pass it up. There is no obligation to sell, have workshops or do Facebook lives. You can join strictly to be a ‘hobby demonstrator’ and enjoy the 20% discount. I would love to have you on my team!!!You also get to enjoy all the demonstrator perks like early ordering, sneak peeks at what’s coming and best of all the events. Why wait, this is such a great sign up promotions, join now and be a part of our awesome Stampin’ Up! family!!!
If you have any questions about joining, please drop me a note at creativestampingdesigns@gmail.com, I’d love to talk with you about it! You can find more information about joining on my blog @ creativestampingdesigns.com
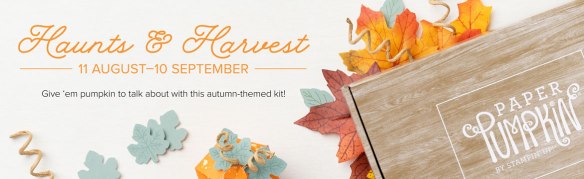
Hay, there! Experience everything the autumn season has to offer with the Haunts & Harvest Paper Pumpkin Kit! This month’s kit includes enough supplies to create 12 treat boxes—4 each of 3 designs. That means you can take your pick of apple, pumpkins, or jack-o-lantern treat boxes! Plus, the Paper Pumpkin box is designed to easily transform into a vintage wheelbarrow for you to display your harvest!
Whether you’re thinking about crisp red apples or you’re ready to carve some spooky jack-o-lanterns (or both!), the Haunts & Harvest Paper Pumpkin Kit—designed in a vivid fall palette—is a hands-on crafting experience for all autumn lovers!
Details:
Kit contains enough supplies to create 12 treat packages—4 each of 3 designs. The all-inclusive kit includes printed die-cut boxes, die-cut sheets, adhesive, and more!
Finished treat box size: 2-1/2″ x 2″ (6.4 x 5.1 cm)
Includes an exclusive stamp set and a Classic Stampin’ Spot


![Words For The Season Bundle (English) [ 165798 ]](https://assets1.tamsnetwork.com/images/EC042017NF/165798s.jpg "Words For The Season Bundle (English) [ 165798 ]")
![Words For The Season Cling Stamp Set (English) [ 165716 ]](https://assets1.tamsnetwork.com/images/EC042017NF/165716s.jpg "Words For The Season Cling Stamp Set (English) [ 165716 ]")
![Words For The Season Dies (English) [ 165797 ]](https://assets1.tamsnetwork.com/images/EC042017NF/165797s.jpg "Words For The Season Dies (English) [ 165797 ]")
![Basic White 8 1/2" X 11" Cardstock [ 166780 ]](https://assets1.tamsnetwork.com/images/EC042017NF/166780s.jpg "Basic White 8 1/2\" X 11\" Cardstock [ 166780 ]")
![Cloud Cover 8 1/2" X 11" Cardstock [ 165621 ]](https://assets1.tamsnetwork.com/images/EC042017NF/165621s.jpg "Cloud Cover 8 1/2\" X 11\" Cardstock [ 165621 ]")
![Secret Sea 8 1/2" X 11" Cardstock [ 165624 ]](https://assets1.tamsnetwork.com/images/EC042017NF/165624s.jpg "Secret Sea 8 1/2\" X 11\" Cardstock [ 165624 ]")
![Peaceful Garden 12" X 12" (30.5 X 30.5 Cm) Designer Series Paper [ 165917 ]](https://assets1.tamsnetwork.com/images/EC042017NF/165917s.jpg "Peaceful Garden 12\" X 12\" (30.5 X 30.5 Cm) Designer Series Paper [ 165917 ]")
![Silver 12" X 12" (30.5 X 30.5 Cm) Foil Sheets [ 163387 ]](https://assets1.tamsnetwork.com/images/EC042017NF/163387s.jpg "Silver 12\" X 12\" (30.5 X 30.5 Cm) Foil Sheets [ 163387 ]")
![Secret Sea Classic Stampin' Pad [ 165285 ]](https://assets1.tamsnetwork.com/images/EC042017NF/165285s.jpg "Secret Sea Classic Stampin' Pad [ 165285 ]")
![Versamark Pad [ 102283 ]](https://assets1.tamsnetwork.com/images/EC042017NF/102283s.jpg "Versamark Pad [ 102283 ]")
![Metallics Wow! Embossing Powder [ 165678 ]](https://assets1.tamsnetwork.com/images/EC042017NF/165678s.jpg "Metallics Wow! Embossing Powder [ 165678 ]")
![Heat Tool (Us And Canada) [ 129053 ]](https://assets1.tamsnetwork.com/images/EC042017NF/129053s.jpg "Heat Tool (Us And Canada) [ 129053 ]")
![Rhinestone Basic Jewels [ 144220 ]](https://assets1.tamsnetwork.com/images/EC042017NF/144220s.jpg "Rhinestone Basic Jewels [ 144220 ]")
![Basic White Medium Envelopes [ 159236 ]](https://assets1.tamsnetwork.com/images/EC042017NF/159236s.jpg "Basic White Medium Envelopes [ 159236 ]")

![Adhesive Sheets [ 152334 ]](https://assets1.tamsnetwork.com/images/EC042017NF/152334s.jpg "Adhesive Sheets [ 152334 ]")


![Take Your Pick [ 144107 ]](https://assets1.tamsnetwork.com/images/EC042017NF/144107s.jpg "Take Your Pick [ 144107 ]")


![Peace On Earth Photopolymer Stamp Set (English) [ 165918 ]](https://assets1.tamsnetwork.com/images/EC042017NF/165918s.jpg "Peace On Earth Photopolymer Stamp Set (English) [ 165918 ]")
![Textured Notes Cling Stamp Set (English) [ 165548 ]](https://assets1.tamsnetwork.com/images/EC042017NF/165548s.jpg "Textured Notes Cling Stamp Set (English) [ 165548 ]")
![Basic White 8 1/2" X 11" Thick Cardstock [ 159229 ]](https://assets1.tamsnetwork.com/images/EC042017NF/159229s.jpg "Basic White 8 1/2\" X 11\" Thick Cardstock [ 159229 ]")
![Peaceful Garden 12" X 12" (30.5 X 30.5 Cm) Glimmer Paper [ 165929 ]](https://assets1.tamsnetwork.com/images/EC042017NF/165929s.jpg "Peaceful Garden 12\" X 12\" (30.5 X 30.5 Cm) Glimmer Paper [ 165929 ]")
![Drusy Adhesive Backed Embellishments [ 164223 ]](https://assets1.tamsnetwork.com/images/EC042017NF/164223s.jpg "Drusy Adhesive Backed Embellishments [ 164223 ]")


")
")


 Designer Series Paper")
 Designer Series Paper")
 Specialty Paper")


")
")
")


 Designer Series Paper")


")


")
")


 Designer Series Paper")
 Specialty Pack")
 Adhesive Backed Glimmer Paper")


 Specialty Designer Series Paper")


