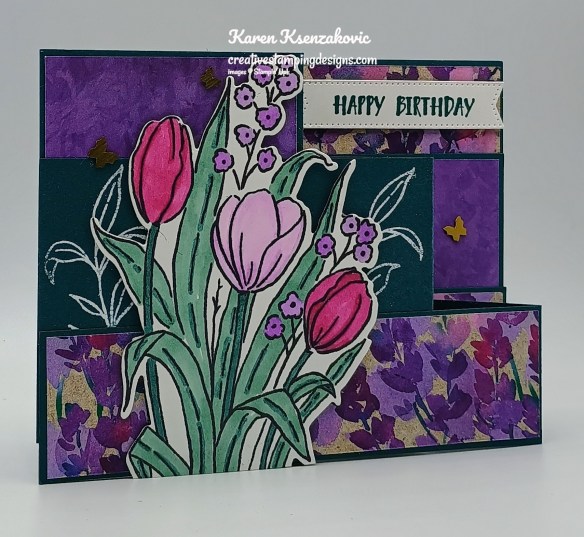
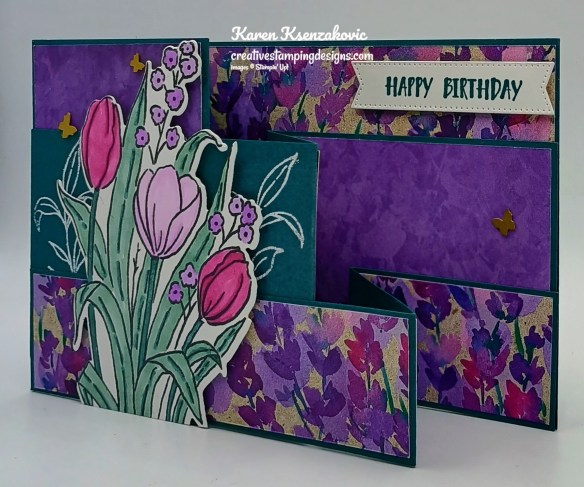
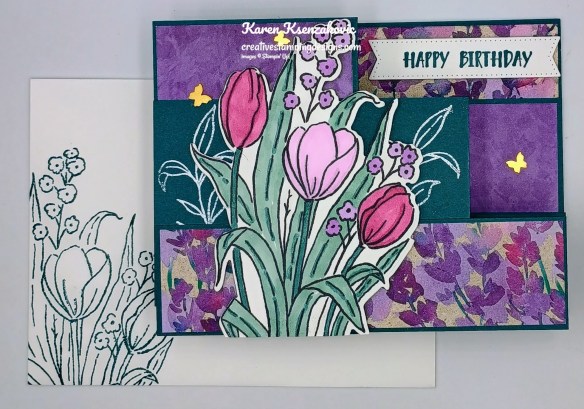
Good Thursday morning stamping friends and welcome to our Happy Inkin’ Thursday Blog Hop. If you are starting with me, thank you. I hope you will stop by everyone’s blog to see what they have created this week. If you are hopping over from Akiko’s blog, thank you for stopping by. This week we have Theme Challenge. If you’d like to see a quick video of how I made this card, Click Here to go to my Instagram Reels. Here is my card using this week’s theme.
I used the Stampin’ Up! Online Exclusive Mixed Florals Bundle along with the Perennial Lavender Designer Series Paper, Stylish Shapes Dies and New Stampin’ Up! The Right Word Cling Stamp Set (available May 6th), for my fun fold card today.
We have a Fun Fold Theme this week.
Score and fold the 3 Pretty Peacock card bases as listed in the measurements below. On a panel of Basic White, stamp the tulip image from the Stampin’ Up! Mixed Florals Photopolymer Stamp Set in Tuxedo Black Ink. Color the image using Berry Burst, Fresh Freesia, Highland Heather, Lost Lagoon and Pretty Peacock Stampin’ Blends Markers. Cut the image out using the Mixed Florals Dies.
Adhere the panels of Perennial Lavender DSP to the Pretty Peacock card bases. I listed below which piece goes on which part of the card bases. On the front of the center card base panel (4 1/4″ side), stamp the leaf image from the Mixed Florals stamp set in Versamark Ink 3 times. Sprinkle the image with White Embossing Powder, set it using the Heat Tool. Adhere the center card base to the large card base with the 4 1/4″ side in the front, about 1/4″ up from the bottom. Adhere the bottom card base with the 5 1/2″ side in the front, to the large card base on top of the center, lining up the bottom edge
Adhere the die cut flowers to the front panel using Stampin’ Dimensionals, keeping top flowers below the top of the card base. Trim off the bottom of the flower stems/leaves using Paper Snips.
Stamp the sentiment from The Right Word stamp set in Pretty Peacock Ink on a panel of Basic White. Cut the sentiment out using the Stylish Shapes Dies. Adhere the sentiment to the top back panel using Stampin’ Dimensionals. Add a few Brushed Brass Butterflies to the card front.
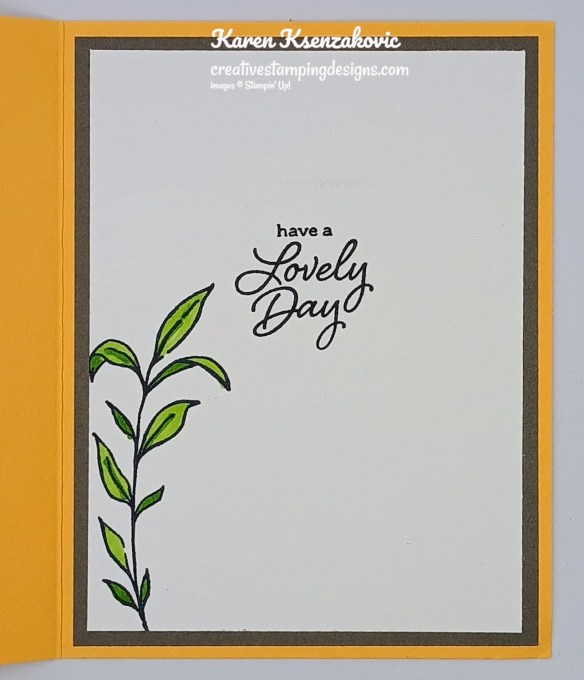
On a panel of Basic White panel stamp the sentiment from The Right Word stamp set in Pretty Peacock Ink. Stamp the leaf image from the Mixed Florals stamp set in Pretty Peacock Ink multiple times on the side of the panel. Adhere a strip of Perennial Lavender DSP to the side of the panel. Adhere the Basic White panel to a Highland Heather mat then to the back of the Pretty Peacock card base.
Decorate a Basic White Medium Envelope to complete the card. Stamp the tulip image from the Mixed Florals stamp set in Pretty Peacock Ink on the envelope front. Adhere a panel of Perennial Lavender DSP to the envelope flap.
Thank you for stopping by my blog today. Now that you’ve seen my card, let’s get on with the hop! Click the button below to hop over to see what Tara has created. Happy Hopping!
Don’t miss the coordinating Hugs Abloom Dies Add-On!
Make the most of your Paper Pumpkin kits with the Hugs Abloom Dies add-on! Quickly and cleanly cut out a flower, leaf sprig, sentiment label, or Hugs sentiment to elevate your crafting projects. These additional dies are designed to work with THREE Paper Pumpkin Kits: the Inked Occasions Paper Pumpkin Kit, the Mountain Majesties Paper Pumpkin Kit, and the Full of Charm Paper Pumpkin Kit. Pair these dies with other Stampin’ Up! products for even more creative options!
DETAILS – 4 dies – Largest die: 2-1/2″ x 1-1/4″ (6.4 x 3.2 cm) – Use with a Stampin’ Cut & Emboss Machine (sold separately)
You must be a current Paper Pumpkin subscriber to purchase this item. To become a subscriber, visit www.stampinup.com/paperpumpkin.
Note: Supplies may be limited toward the end of the subscription period.
Basic White Cardstock 2 – 4″ x 5 1/4″ (flowers & inner liner), 1″ x 4″ (sentiment)
Highland Heather Cardstock 4 1/8″ X 5 3/8″(back panel mat)
Pretty Peacock Cardstock 4 1/4″ X 11″(large card base scored & folded at 2 3/4″& 5 1/2″), 2 3/4″ x 11″(center card base scored & folded at 4 1/4″ & 7″), 1 1/2″ X 11″(bottom card base scored & folded at 5 1/2″ & 8 1/4″)
Perennial Lavender Designer Series Paper 2 5/8″ x 4 1/8″(front of large card base), 4 1/8″ X 5 3/8″(back of large card base), 2 5/8″ X 2 5/8″ (center of center card base), 2 5/8″ x 3 7/8″(back of center card base), 1 3/8″ X 5 3/8″(front of bottom card base), 1 3/8″ X 2 5/8″(center of bottom card base), 1 3/8″ X 2 5/8″(back of bottom card base), 1/2″ X 4″(back panel), 2 1/4″ x 6″(envelope flap)
Good Tuesday morning my stamping friends welcome to Amy’s Inkin’ Krew Team Blog Hop. It’s the 2nd Tuesday of the month so that means Blog Hop Day!! If you are starting with me, be sure to hop around to see everyone’s beautiful projects. If you’ve hopped over from Ann Louise’s blog, welcome to my blog and thank you for stopping by. The theme this month is “Celebrate Spring”. We can interpret this however we want. Tulips said spring to me since they all bloom in my front yard in the spring. If you’d like to see a quick video on how I made this card, Click Here to go to my Instagram Reels. Here’s my card for today.
I used the Stampin’ Up! Online Exclusive Mixed Florals Bundle along with the Stampin’ Up! Flower Cart Photopolymer Stamp Set, Distressed Tile 3D Embossing Folder, Exposed Brick 3D Embossing Folder, Unbounded Love Dies and Textured Metallic Specialty Paper for my card today.
Emboss the 3 1/4″ X 4 1/2″ panel of Basic White using the Exposed Brick EF. Emboss the panel of Peach Pie using the Distressed Tile EF. Adhere the embossed Peach Pie panel to a Peach Pie card base using Liquid Glue. Adhere the embossed Basic White panel to the Textured Metallic mat using Liquid Glue. Adhere the layered panel to the card front using Liquid Glue.
Stamp the tulip image from the Stampin’ Up! Mixed Florals Photopolymer Stamp Set in Tuxedo Black Ink on a panel of Basic White. Color the image using Granny Apple Green, Peach Pie and Poppy Parade Stampin’ Blends Markers. Cut the image out using the Mixed Florals Dies. Adhere the floral image to the card front using Stampin’ Dimensionals.
On the panel of Basic White, stamp the sentiment from the Flower Cart stamp set in Tuxedo Black Ink. Cut the sentiment out using the Unbounded Love Dies. Adhere the sentiment to the card front using Stampin’ Dimensionals. Add a few Antique Pearls to the card front.
Stamp the sentiment from the Flower Cart stamp set in Tuxedo Black Ink on a panel of Basic White. Stamp the leaf image from the Mixed Florals stamp set in Tuxedo Black Ink on the bottom of the panel. Color the image using Granny Apple Green Stampin’ Blends Markers. Adhere the Basic White panel to a Pebbled Path mat then to the inside of the Peach Pie card base.
Decorate a Basic White Medium Envelope to complete the card. Stamp the leaf and small floral images from the Mixed Florals stamp set in Tuxedo Black Ink on the envelope front. Color the images using Granny Apple Green and Peach Pie Stampin’ Blends Markers. Emboss a panel of Peach Pie using the Distressed Tile EF. Adhere the panel to the envelope flap.
Thank you for stopping by my blog today. Now that you’ve seen my card, let’s get on with the hop! Click on the Next Blog button to move on to Karen’s project or click the Previous Blog button to go back to see the project that Ann Louise created. Happy Hopping.
Just in case you get lost along the way, here is a list of the team members involved in the hop today.
If you need any stamping supplies, I’d love to be your Demonstrator. Just click HERE to go directly to my online store or drop me an email if you have any questions.
MY CURRENT HOST CODE IS: RSQGVJPH
Use this host code when placing an order with me. When you order $50 or greater you will receive a free gift from me! If your order is over $150, please do not use this code, but you’ll still get the free gift. The free gift is your choice of any 1 item valued up to $10.00 from the 2024 – 2025 Annual Catalog, January – April 2025 Mini Catalog or from the Online Exclusives! For any orders $50 or more I will also send you my monthly class tutorials. Click HERE or go to my Customer Rewards for more details and to see what this month’s tutorials are.
Please remember to use my current Host Code and make sure that you can see my name on the final checkout page listed as your Demonstrator when you order so that you know that you’re ordering with me, and you’ll get my rewards!
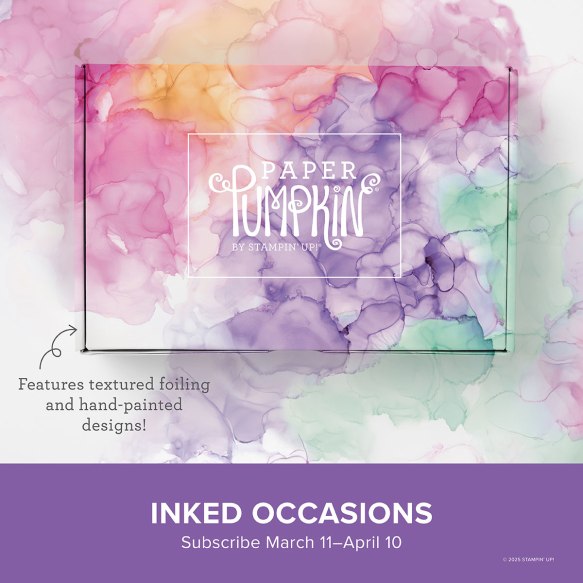
Craft stunning cards with hand-painted, alcohol ink designs! • Makes 9 cards: 3 each of 3 designs with 9 coordinating envelopes • Textured gold foil on the card bases and sentiments • Precut paper pieces and butterfly embellishments • Coordinating colors: Berry Burst (Classic Stampin’ Spot), Flirty Flamingo, Fresh Freesia, Gorgeous Grape, Peach Pie, Pool Party
Cards come in a beautiful coordinating box!
Subscribe to the April Paper Pumpkin Kit between 11 March and 10 April by clicking here!
Don’t miss the coordinating Hugs Abloom Dies Add-On!
Make the most of your Paper Pumpkin kits with the Hugs Abloom Dies add-on! Quickly and cleanly cut out a flower, leaf sprig, sentiment label, or Hugs sentiment to elevate your crafting projects. These additional dies are designed to work with THREE Paper Pumpkin Kits: the Inked Occasions Paper Pumpkin Kit, the Mountain Majesties Paper Pumpkin Kit, and the Full of Charm Paper Pumpkin Kit. Pair these dies with other Stampin’ Up! products for even more creative options!
DETAILS – 4 dies – Largest die: 2-1/2″ x 1-1/4″ (6.4 x 3.2 cm) – Use with a Stampin’ Cut & Emboss Machine (sold separately)
You must be a current Paper Pumpkin subscriber to purchase this item. To become a subscriber, visit www.stampinup.com/paperpumpkin.
Note: Supplies may be limited toward the end of the subscription period.
Good Tuesday morning stamping friends. How has your week started off? This is going to be a busy week for me since it’s the end of the month and beginning of a new one.
Today I made one of my favorite kinds of cards with lots of layers. If you’d like to see a quick video of how I made this card, Click Here to go to my Instagram Reels. Here is my card for today.
I used the Stampin’ Up! Online Exclusives Mixed Labels Bundle, Mixed Florals Bundle and the Mixed Media Florals Designer Series Paper for my card today.
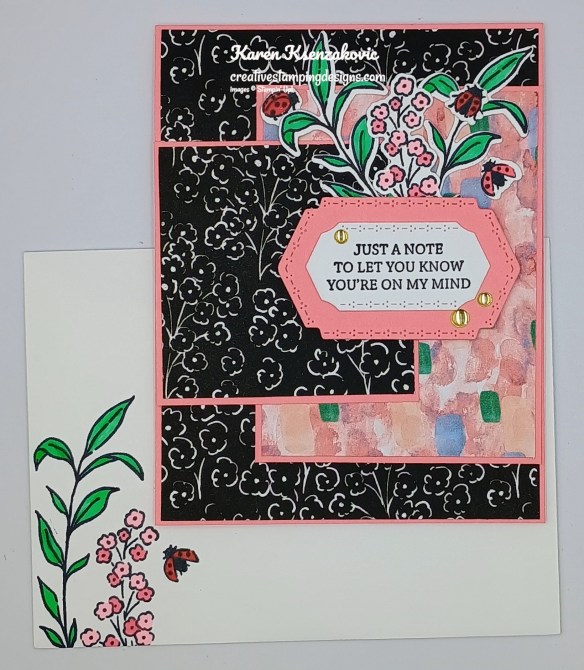
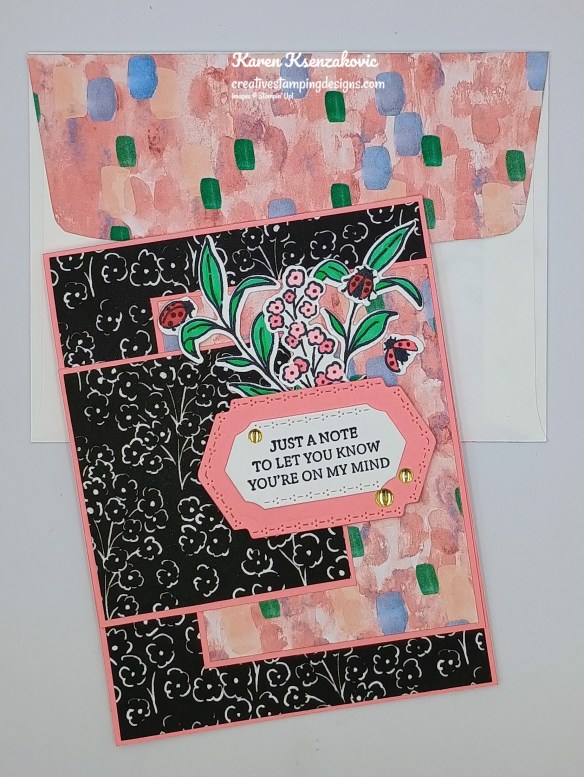
Adhere a panel of Mixed Media Florals DSP to a Flirty Flamingo card base using Liquid Glue. Adhere 2 panels of Mixed Media Florals DSP to Flirty Flamingo mats using Stampin’ Seal. Adhere the layered panels to the card front using Liquid Glue.
On a panel of Basic White, stamp the sentiment from the Stampin’ Up! Mixed Labels Cling Stamp Set in Tuxedo Black Ink. Cut the sentiment out using the Mixed Labels Dies. Cut a panel of Flirty Flamingo using the larger Mixed Labels Dies for the mat. Adhere the sentiment to the Flirty Flamingo mat using Stampin’ Seal. Adhere the sentiment to the card front using Stampin’ Dimensionals.
On a panel of Basic White, stamp the leaf image, small floral image and the ladybug images from the Stampin’ Up! Mixed Florals Photopolymer Stamp Set in tuxedo Black Ink. Color the images using Flirty Flamingo, Poppy Parade and Shy Shamrock Stampin’ Blends Markers. Cut the images out using the Mixed Florals Dies. Adhere the die cut images behind the sentiment using Glue Dots. Add a few Low-Profile Dots to the card front.
On a panel of Basic White, stamp the sentiment from the Mixed Labels stamp set in Tuxedo Black Ink. Stamp the ladybug images from the Mixed Florals stamp set in Tuxedo Black Ink on the panel. Color the images using Poppy Parade Stampin’ Blends Markers. Adhere the Basic White panel to a panel of Mixed Media Florals DSP then to the inside of the Flirty Flamingo card base.
Decorate a Basic White Medium Envelope to finish the card. Stamp the leaf, small floral and ladybug images from the Mixed Florals stamp set in Tuxedo Black Ink on the envelope front. Color the images using Flirty Flamingo, Poppy Parade and Shy Shamrock Stampin’ Blends Markers. Adhere a panel of Mixed Media Florals DSP to the envelope flap.
Thank you for stopping by my blog today. I hope you like my card and will give it a try. Happy Stamping!!
If you need any stamping supplies, I’d love to be your Demonstrator. Just click HERE to go directly to my online store or drop me an email if you have any questions.
MY CURRENT HOST CODE IS: ZZDPZRSF
Use this host code when placing an order with me. When you order $50 or greater you will receive a free gift from me! If your order is over $150, please do not use this code, but you’ll still get the free gift. The free gift is your choice of any 1 item valued up to $10.00 from the 2024 – 2025 Annual Catalog, January – April 2025 Mini Catalog or from the Online Exclusives! For any orders $50 or more I will also send you my monthly class tutorials. Click HERE or go to my Customer Rewards for more details and to see what this month’s tutorials are.
Please remember to use my current Host Code and make sure that you can see my name on the final checkout page listed as your Demonstrator when you order so that you know that you’re ordering with me, and you’ll get my rewards!
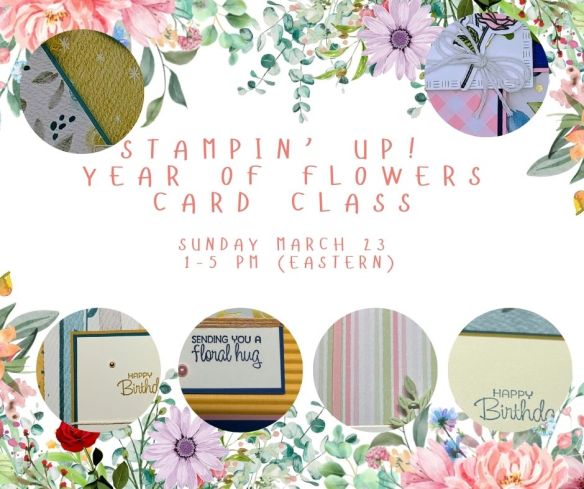
Tara Carpenter and I have teamed up again for another fun Online Zoom Class!! We are offering a fun Online Class using the new Online Exclusive Year of Flowers bundle (which will be available March 4th). We’ll be making 6 different cards, 2 which will be fun folds, using this Bundle.
The class will be held on Zoom on Sunday March 23rd from 1pm – 5pm ET.
The class fee includes:
6 complete Pre-Cut card kits with envelopes so they are ready to mail when you’re done.
Full pack of Stampin’ Up! Blooming Pearls
Full pack of Baker’s Twine Essential Pack
Zoom class with complete step by step instructions to complete each card as we go.
PDF with detailed directions and photos
A Link to the recorded class after we are done so you can watch it again and make more cards.
When you sign up for the class, you will see that you can add additional items needed to make the cards in the class if you do not already have them. These items are optional to add on, but we will be using the items to create the cards. We are offering the Stampin’ Up! Online Exclusive Year of Flowers Bundle at an additional 10% discount when you order it through me during sign up.
The class will be held on Zoom and anyone in the United States is welcome to purchase the class and join us! If you are unable to join us for the live event, but would still like to participate in the class, we will be recording the session so you can watch the replay any time and make the cards. We will also be emailing written tutorials with instructions and cardstock cuts so that you will have a reference too.
Class Cost: $35.00 + $9.00 priority shipping (additional products will be added to the cost for the products) and invoices will be sent out by March 3rd.
Class Signup Deadline: Sunday March 2nd at 5pm ET (this is so we have time to order all the bundles, embellishments and DSP being used on March 23rd)
Click Here to register for the class now!! Let me know if you have any questions.
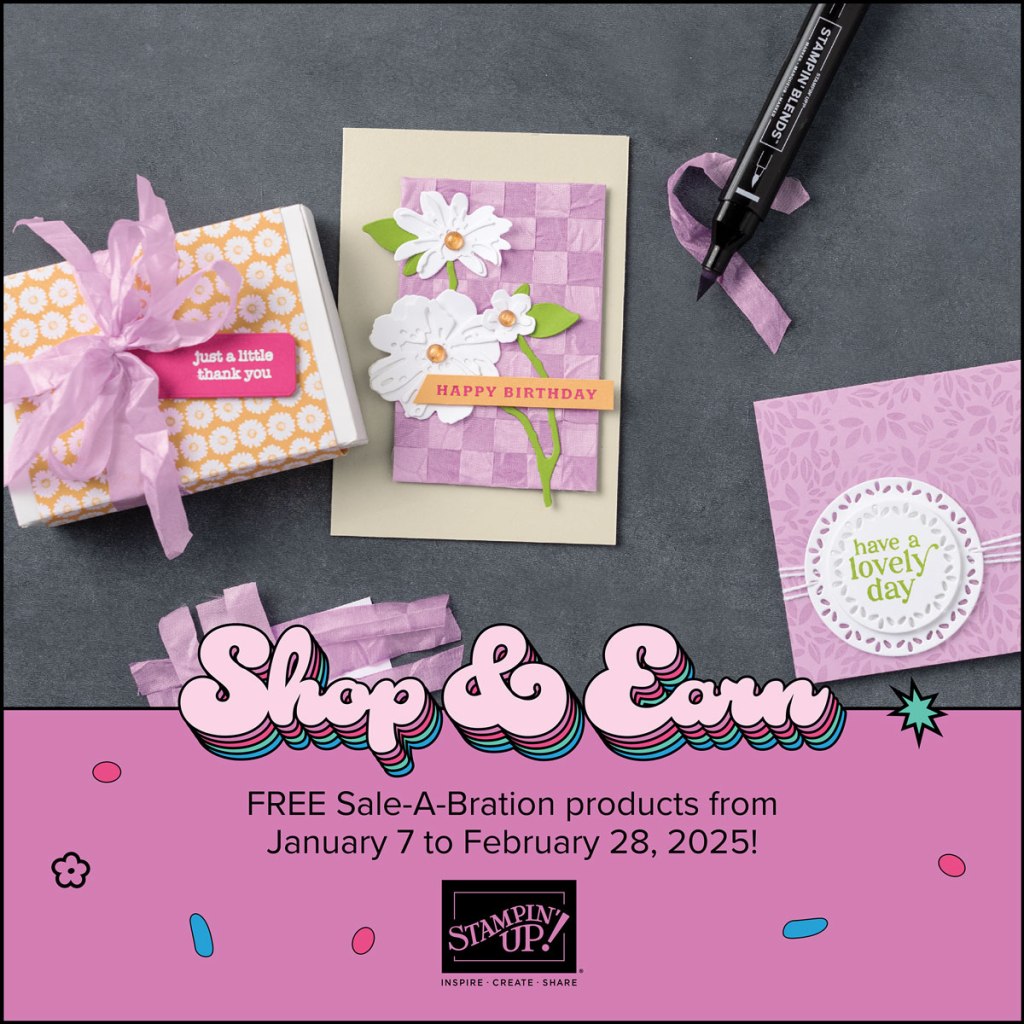
Sale-A-Bration is an excellent time you to join Stampin’ Up! In addition to the already great value of the Starter Kit, if you sign up as a Stampin’ Up! demonstrator during Sale-a-bration, you can choose from two incredible options:
Option 1: Join Stampin’ Up! during Sale-a-bration as a new demonstrator and get $125 worth of products PLUS a choice of 2 Stampin’ Write Marker Assortments AND the Handmade Designs Cling Stamp Set, an exclusive stamp set designed to work with the markers. That’s a $216 value all for just $99!
Option 2: Join Stampin’ Up! during Sale-A-Bration and get $125 worth of product PLUS an additional $30 worth of product of your choice for just $99. That’s a $155 value!
Two joining options so you can pick the one that you like the best!!
There is never an obligation to sell. You can join just to enjoy the discount for yourself along with all the other Demonstrator benefits. Once you join, you’ll get at least a 20% discount on all of your Stampin’ Up! merchandise purchases and you get to order early from the upcoming catalogs! You will also be able to attend the OnStage Events and any other events Stampin’ Up! has and you get to be a part of our Stampin’ Up! team!
Unsure about this and want to talk? Contact me at creativestampingdesigns@gmail.com and we can talk. You can also find additional information Here at Join My Team. Being a part of the Stampin’ Up! Community is one of the best decisions I’ve ever made. I have made many friends along the way while doing what I love, Paper Crafting. This Joining offer is only good during Sale-a-bration which starts January 7 and ends on February 28. Why not give it a try? I’d love to have you on my team.
Final Days for Sale-a-bration
Ready for more? There are EVEN MORE PRODUCTS available to shop, earn, and redeem during Sale-A-Bration. We don’t want you to miss out on these great products and incredible deals, Click HERE for the Sale-A-Bration Additional Products Flyer.
Remember, you must use the item numbers in the flyer in order to redeem these products as Sale-A-Bration items. These products have different item numbers in the catalog, which won’t register as part of Sale-A-Bration.
We’ve included two kits as part of our Sale-A-Bration newly added products. Once the kits sell out, they will be discontinued. If they do not sell out during Sale-A-Bration, they may be discounted at a later date.
Note: The newly added products that are now redeemable during Sale-A-Bration are part of Stampin’ Up!’s existing product offering.
Sale-a-bration 2025 runs through Friday, February 28! There are some awesome new products that you can earn for FREE with orders of $60+ and orders of $120+ placed during Sale-a-bration as well as a great host bonus and a joining special!
SHOP
Spend $60 or more and pick from 12 new products (5 stamp sets,3 designer series paper packs, 1 embossing folder, 1 kit, 1 pack of embellishments and 1 spool of ribbon!) that are available as free items!
Spend $120 or more and pick from 2 new items (1 stamp bundle and 1 stamp set) that are available as free items!
HOST
Get an additional $30 in FREE Stampin’ Rewards with any party or individual order of $300 or greater during Sale-a-bration! You can spend your Stampin’ Rewards on any items currently available from Stampin’ Up! including (but not limited to) the host exclusive stamp sets!
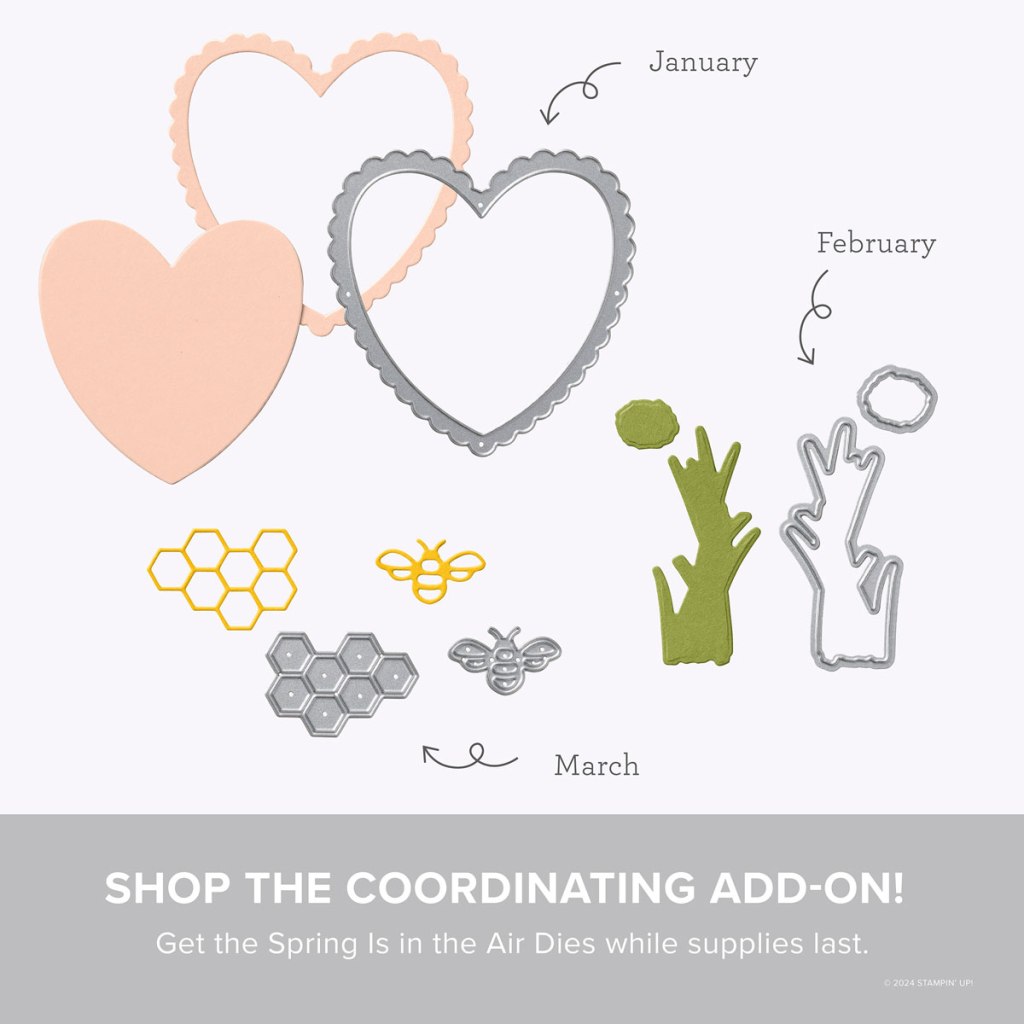
Don’t miss the coordinating Spring is in The Air Dies Add-On!
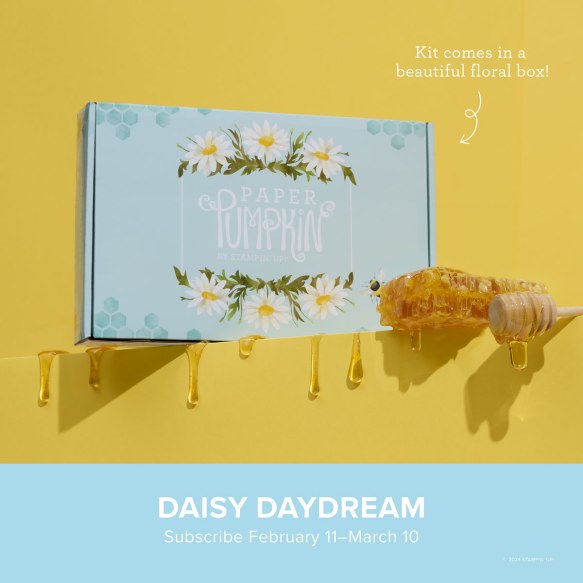
Make the most of your Paper Pumpkin kits with the Spring Is in the Air Dies add-on! Quickly and cleanly cut out a heart frame, flowering chive, honeycomb, or tiny bumblebee to elevate your crafting projects. These additional dies are designed to work with THREE Paper Pumpkin Kits: the Hearts for You Paper Pumpkin Kit, the Spring Is in the Air Paper Pumpkin Kit, and the Daisy Daydream Paper Pumpkin Kit. Pair these dies with other Stampin’ Up! products for even more creative options!
DETAILS – 5 dies – Largest die: 3″ x 3″ (7.6 x 7.6 cm) – Use with a Stampin’ Cut & Emboss Machine (sold separately)
You must be a current Paper Pumpkin subscriber to purchase this item. To become a subscriber, visit paperpumpkin.com.
#166237 $12
Note: Supplies may be limited toward the end of the subscription period.
Basic White Cardstock 1 1/4″ X 2 1/2″(sentiment), 2″ X 6″ (artwork), 3″ X 4 1/4″(inner liner)
Flirty Flamingo Cardstock 4 1/4″ X 11″(card base scored & folded at 5 1/2″), 3 1/8″ x 4 1/8″ & 2 7/8″ x 2 7/8″(card front panel mats), 2″ X 3″(sentiment mat)
Mixed Media Florals Designer Series Paper 2 – 4 1/8″ X 5 3/8″ (card front & inner liner), 3″ X 4″ & 2 3/4″ X 2 3/4″(card front panels), 2 1/4″ X 6″(envelope flap)
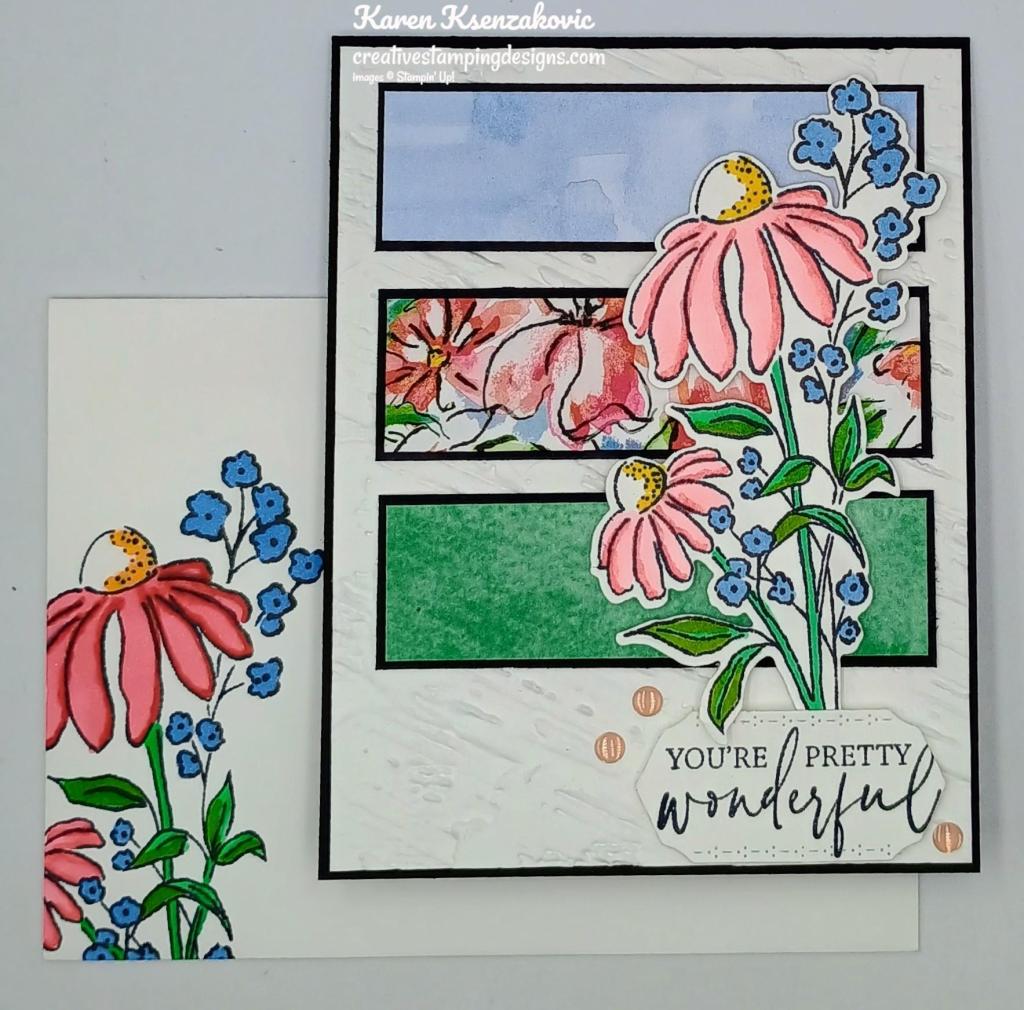
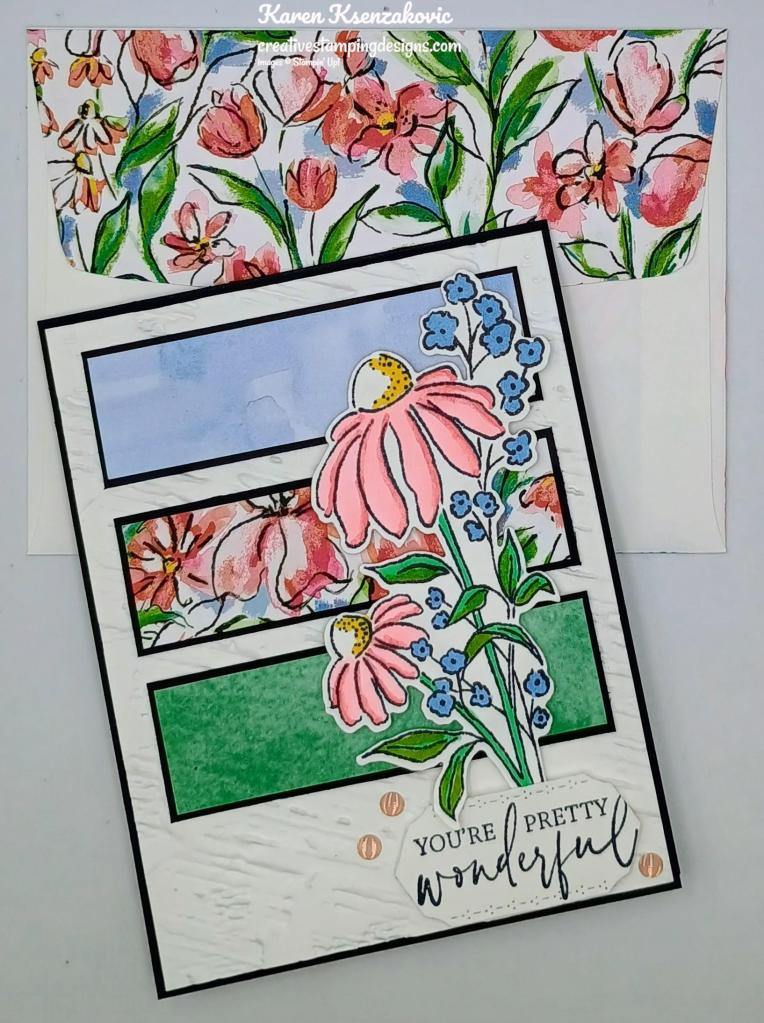
Good Thursday morning stamping friends and welcome to our Happy Inkin’ Thursday Blog Hop. If you are starting with me, thank you, I hope you will stop by everyone’s blog to see what they have created this week. If you are hopping over from Akiko’s blog, thank you for stopping by. This week we have Sketch Challenge. If you’d like to see a quick video of how I made this card, Click Here to go to my Instagram Reels. Here is my card using this week’s sketch.
I have a sneak peek for you today using the Stampin’ Up! Online Exclusives Mixed Media Floral Suite Collection along with the Stampin’ Up! Sketched Butterflies Cling Stamp Set.
This is our sketch for this week.
Emboss a Basic White card front using the Plaster Painting 3D Embossing Folder. Adhere the embossed panel to a Basic Black card base using Liquid Glue.
Adhere 3 panels of Mixed Media Floral Designer Series Paper to Basic Black mats using Stampin’ Seal. Adhere the 3 layered panels to the card front using Liquid Glue. On a panel of Basic White, stamp the smaller flower image from the Stampin’ Up! Mixed Florals Photopolymer Stamp Set in Tuxedo Black Ink. Color the image using Boho Blue, Daffodil Delight, Flirty Flamingo, Granny Apple Green, Poppy Parade and Shy Shamrock Stampin’ Blends Markers. Cut the image out using the Mixed Florals Dies.
Adhere the floral image to the side of the card front using Stampin’ Dimensionals. On the Basic White panel stamp the sentiment from the Stampin’ Up! Mixed Labels Cling Stamp Set in Tuxedo Black Ink. Cut the sentiment out using the Mixed Labels Dies. Adhere the sentiment to the bottom of the card front using Stampin’ Dimensionals. Add a few Low-Profile Dots to the card front.
On a panel of Basic White, stamp the sentiment from the Sketched Butterflies stamp set in Tuxedo Black Ink. Stamp the flower image from the Mixed Florals stamp set in Tuxedo Black Ink on the top and bottom of the panel. Stamp the ladybug images from the Mixed Florals stamp set on the flowers in Tuxedo Black Ink. Color the images using Poppy Parade Stampin’ Blends Markers. Adhere the Basic White panel to a Flirty Flamingo mat then to the inside of the Basic Black card base.
Complete the card by decorating a Basic White Medium Envelope. Stamp the floral image from the Mixed Florals stamp set in Tuxedo Black Ink on the envelope front. Color the image using Boho Blue, Daffodil Delight, Flirty Flamingo, Granny Apple Green, Poppy Parade and Shy Shamrock Stampin’ Blends Markers. Adhere a panel of Mixed Media Florals DSP to the envelope flap.
Thank you for stopping by my blog today. Now that you’ve seen my card, let’s get on with the hop! Click the button below to hop over to see what Tara has created. Happy Hopping!
Just in case you get lost along the way, here is a list of the team members involved in the hop today.
If you need any stamping supplies, I’d love to be your Demonstrator. Just click HERE to go directly to my online store or drop me an email if you have any questions.
MY CURRENT HOST CODE IS: VNGF49FJ
Use this host code when placing an order with me. When you order $50 or greater you will receive a free gift from me! If your order is over $150, please do not use this code, but you’ll still get the free gift. The free gift is your choice of any 1 item valued up to $10.00 from the 2024 – 2025 Annual Catalog, September – December 2024 Mini Catalog or from the Online Exclusives! For any orders $50 or more I will also send you my monthly class tutorials. Click HERE or go to my Customer Rewards for more details and to see what this month’s tutorials are.
Please remember to use my current Host Code and make sure that you can see my name on the final checkout page listed as your Demonstrator when you order so that you know that you’re ordering with me, and you’ll get my rewards!
Create cards with hand-sketched botanical designs. • Makes 9 projects: 3 each of 3 designs • Precut vellum pieces and sparkling gems • Scalloped card bases and coordinating envelopes • Coordinating colors: Blackberry Bliss (Classic Stampin’ Spot), Flirty Flamingo, Old Olive, Pecan Pie, Pretty in Pink, Very Vanilla
Subscribe to Paper Pumpkin for a monthly, all-inclusive crafting kit that’s a fun surprise! Each kit includes a photopolymer stamp set, Classic Stampin’ Spot, and step by step instructions to complete exclusive paper craft projects, including cards, tags, and gift packaging. And don’t miss the special add-on that coordinates with the next three months!
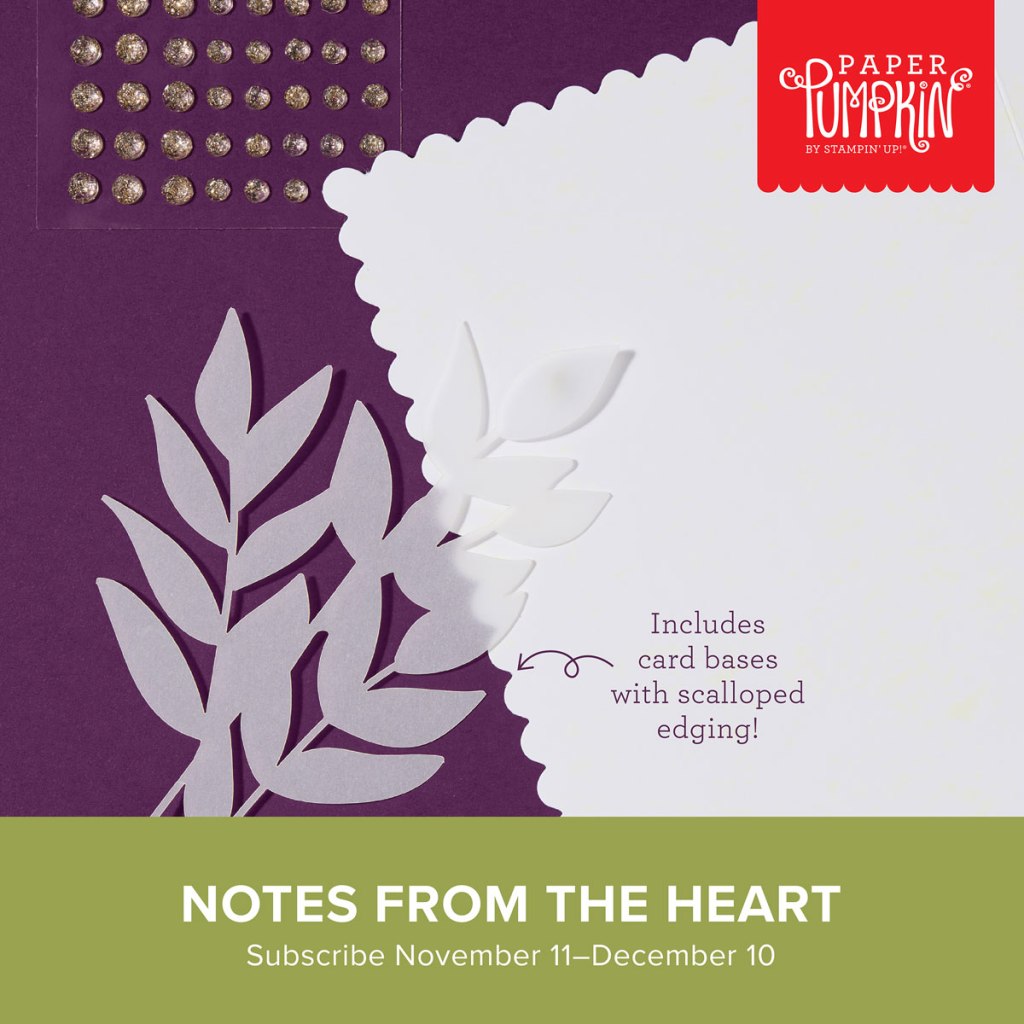
Subscribe to the December Paper Pumpkin Kit between 11 November and 10 December by clicking here!
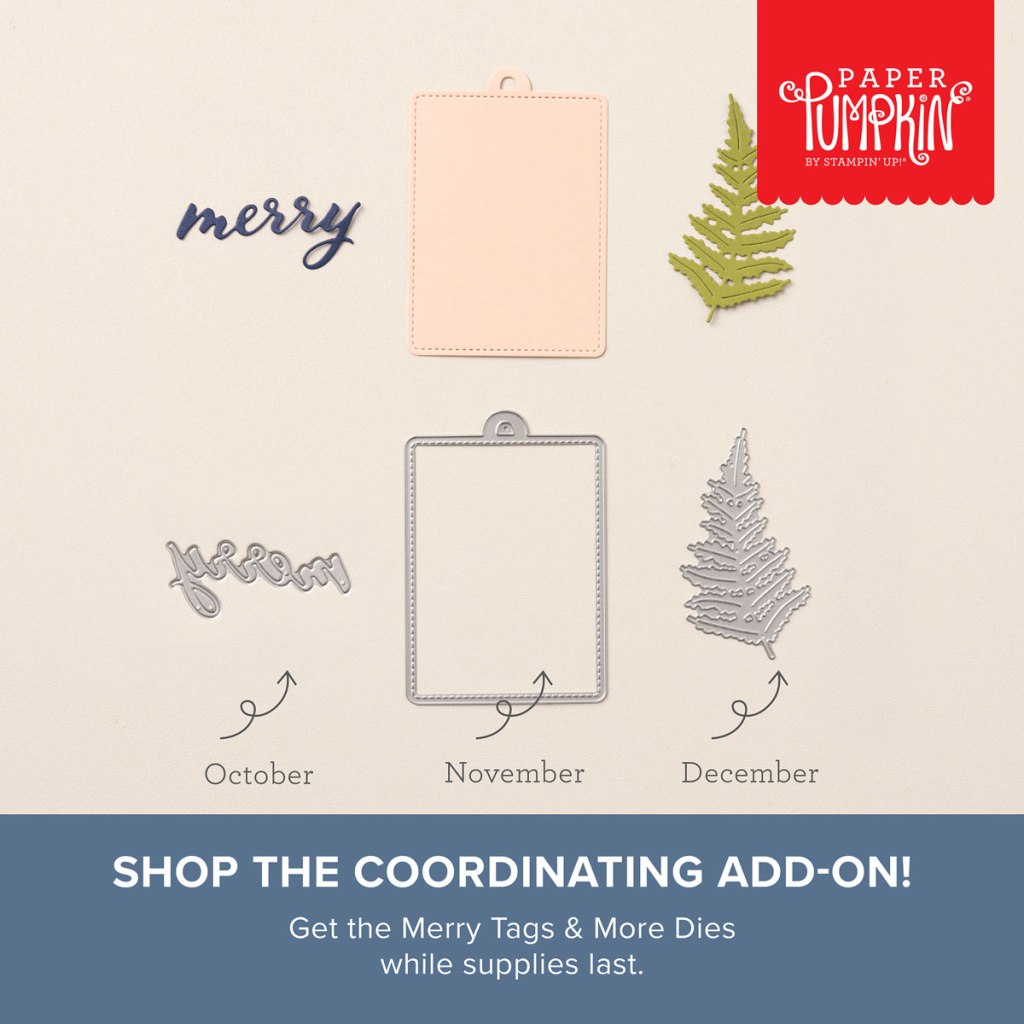
Don’t miss the coordinating Merry Tags & More Dies Add-On!
Add dimension and detail to your cards, scrapbook pages, and gift tags with the Merry Tags & More Dies! With a leaf and tag shape and Merry sentiment, these dies are a great way to expand your crafting experience. They even coordinate with three Paper Pumpkin Kits: Nests of Christmas, Filled with Joy, and Notes from the Heart. Such easy coordination makes these dies a must-have for any paper craft. Paper Pumpkin subscribers can purchase it beginning 11 September. The add-on is available only while supplies last, so it’s best to shop early! Please note that the Stampin’ Cut and Emboss Machine is not included and can be purchased separately.
#165639 $12
Note: Supplies may be limited toward the end of the subscription period.


![Mixed Florals Bundle [ 164642 ]](https://assets1.tamsnetwork.com/images/EC042017NF/164642s.jpg "Mixed Florals Bundle [ 164642 ]")
![Mixed Florals Photopolymer Stamp Set [ 164639 ]](https://assets1.tamsnetwork.com/images/EC042017NF/164639s.jpg "Mixed Florals Photopolymer Stamp Set [ 164639 ]")
![Mixed Florals Dies [ 164641 ]](https://assets1.tamsnetwork.com/images/EC042017NF/164641s.jpg "Mixed Florals Dies [ 164641 ]")
![Basic White 8 1/2" X 11" Cardstock [ 166780 ]](https://assets1.tamsnetwork.com/images/EC042017NF/166780s.jpg "Basic White 8 1/2\" X 11\" Cardstock [ 166780 ]")
![Highland Heather 8-1/2" X 11" Cardstock [ 146986 ]](https://assets1.tamsnetwork.com/images/EC042017NF/146986s.jpg "Highland Heather 8-1/2\" X 11\" Cardstock [ 146986 ]")
![Pretty Peacock 8-1/2" X 11" Cardstock [ 150880 ]](https://assets1.tamsnetwork.com/images/EC042017NF/150880s.jpg "Pretty Peacock 8-1/2\" X 11\" Cardstock [ 150880 ]")
![Perennial Lavender 12" X 12" (30.5 X 30.5 Cm) Designer Series Paper [ 162593 ]](https://assets1.tamsnetwork.com/images/EC042017NF/162593s.jpg "Perennial Lavender 12\" X 12\" (30.5 X 30.5 Cm) Designer Series Paper [ 162593 ]")
![Pretty Peacock Classic Stampin’ Pad [ 150083 ]](https://assets1.tamsnetwork.com/images/EC042017NF/150083s.jpg "Pretty Peacock Classic Stampin’ Pad [ 150083 ]")
![Tuxedo Black Memento Ink Pad [ 132708 ]](https://assets1.tamsnetwork.com/images/EC042017NF/132708s.jpg "Tuxedo Black Memento Ink Pad [ 132708 ]")
![Berry Burst Stampin’ Blends Combo Pack [ 161681 ]](https://assets1.tamsnetwork.com/images/EC042017NF/161681s.jpg "Berry Burst Stampin’ Blends Combo Pack [ 161681 ]")
![Fresh Freesia Stampin' Blends Combo Pack [ 155518 ]](https://assets1.tamsnetwork.com/images/EC042017NF/155518s.jpg "Fresh Freesia Stampin' Blends Combo Pack [ 155518 ]")
![Highland Heather Stampin' Blends Combo Pack [ 154887 ]](https://assets1.tamsnetwork.com/images/EC042017NF/154887s.jpg "Highland Heather Stampin' Blends Combo Pack [ 154887 ]")
![Lost Lagoon Stampin’ Blends Combo Pack [ 161680 ]](https://assets1.tamsnetwork.com/images/EC042017NF/161680s.jpg "Lost Lagoon Stampin’ Blends Combo Pack [ 161680 ]")
![Pretty Peacock Stampin’ Blends Combo Pack [ 161676 ]](https://assets1.tamsnetwork.com/images/EC042017NF/161676s.jpg "Pretty Peacock Stampin’ Blends Combo Pack [ 161676 ]")
![Versamark Pad [ 102283 ]](https://assets1.tamsnetwork.com/images/EC042017NF/102283s.jpg "Versamark Pad [ 102283 ]")
![Basics Wow! Embossing Powder [ 165679 ]](https://assets1.tamsnetwork.com/images/EC042017NF/165679s.jpg "Basics Wow! Embossing Powder [ 165679 ]")
![Heat Tool (Us And Canada) [ 129053 ]](https://assets1.tamsnetwork.com/images/EC042017NF/129053s.jpg "Heat Tool (Us And Canada) [ 129053 ]")
![Stylish Shapes Dies [ 159183 ]](https://assets1.tamsnetwork.com/images/EC042017NF/159183s.jpg "Stylish Shapes Dies [ 159183 ]")
![Brushed Brass Butterflies [ 158136 ]](https://assets1.tamsnetwork.com/images/EC042017NF/158136s.jpg "Brushed Brass Butterflies [ 158136 ]")


")


 Specialty Paper")


")
")


 Designer Series Paper")


")


