Stampin’ Up! Cheers & Sips for Amy’s Inkin’ Krew Team Blog Hop

Good Tuesday morning my stamping friends welcome to Amy’s Inkin’ Krew Team Blog Hop. It’s the 2nd Tuesday of the month so that means Blog Hop Day!! If you are starting with me, be sure to hop around to see everyone’s beautiful projects. If you’ve hopped over from Karen’s blog, welcome to my blog and thank you for stopping by. The theme this month is “Fun Fold”. If you’d like to see a quick video on how I made this card, Click Here to go to my Instagram Reels. Here’s my card for today.

Stampin' Up! Cheers & Sips Double Easel Fold 1 creativestampingdesigns.com

I used the Stampin’ Up! Cheers & Sips Bundle along with the Glass & Garden Embossing Folder and Mediterranean Blooms Designer Series Paper for my Double Easel Card today.

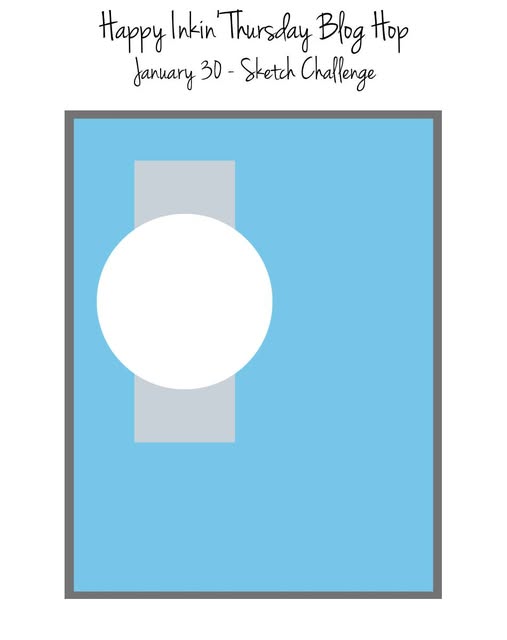
I played along with Inspire. Create. Stamping Challenge #196

Stampin' Up! Cheers & Sips Double Easel Fold 2 creativestampingdesigns.com

Adhere the 2 panels of Mediterranean Blooms DSP to the Garden Green easel folded panel with Stampin’ Seal. Adhere the layered panel to the front of the Lemon Lolly card base with Liquid Glue.

Stampin' Up! Cheers & Sips Double Easel Fold 3 creativestampingdesigns.com

Stamp the sentiment from the Stampin’ Up! Cheers & Sips Photopolymer Stamp Set in Garden Green Ink on the top of the Basic White panel. Emboss the Basic White panel using the Glass & Garden EF. Adhere the embossed panel to a Lemon Lolly mat with Liquid Glue. Adhere the layered embossed panel to the bottom front section of the card front with Liquid Glue.

Stampin' Up! Cheers & Sips Double Easel Fold 4 creativestampingdesigns.com

On a panel of Basic White, stamp the tall glass image, the citrus image and cherry image from the Cheers & Sips Photopolymer stamp set in Tuxedo Black Ink. Stamp the pick image from the Cheers & Sips stamp set in Garden Green Ink. Using the Blending Brushes, add Pumpkin Pie and Peach Pie Inks to one of the glasses. Add Lemon Lolly Ink to the other glass using the Blending Brush. Stamp the ice cube image from the Cheers & Sips stamp set in Versamark Ink to the inside of both of the glasses. Sprinkle the images with Clear Embossing Powder and set them with the Heat Tool. Color one of the citrus images with Pumpkin Pie and Peach Pie Stampin’ Blends Markers. Color the other citrus with Daffodil Delight and Lemon Lolly Stampin’ Blends Markers. Color the cherry with Poppy Parade Stampin’ Blends Markers. Cut ll the images out with the Cheers & Sips Dies. Adhere the citrus, cherry and pick die cuts to the top of the glasses with Glue Dots. Adhere the glasses to the embossed Basic White panel with Stampin’ Dimensionals. Add a few Holographic Resin Dots to the card front.

Stampin' Up! Cheers & Sips Double Easel Fold 5 creativestampingdesigns.com

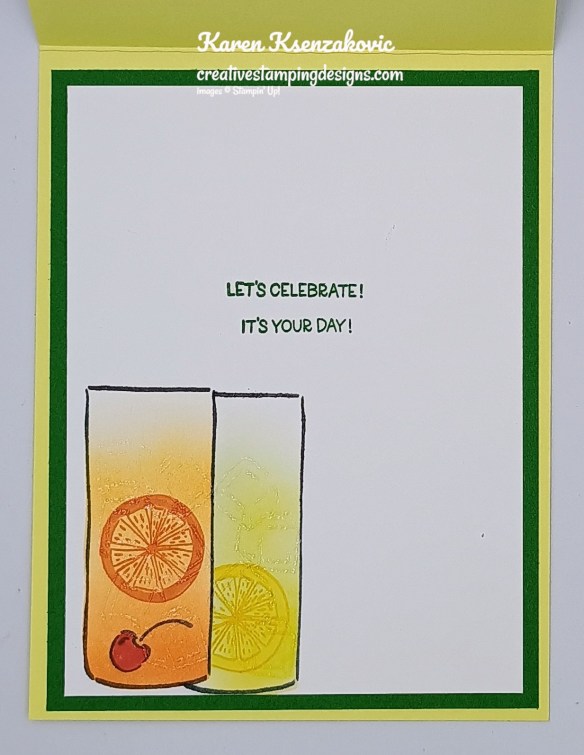
On a panel of Basic White, stamp the sentiments from the Cheers & Sips stamp set in Garden Green Ink. Stamp the glass image from the Cheers & Sips stamp set in Tuxedo Black Ink on the bottom of the panel. Using the Blending Brushes add Pumpkin Pie and Peach Pie Inks to one glass and Lemon Lolly Ink to the other. Stamp the ice cube image in Versamark Ink inside the glasses, sprinkle it with Clear Embossing Powder and set it with the Heat Tool. Stamp the citrus images in the glasses in Pumpkin Pie Ink and Daffodil Delight Ink. Stamp the cherry image from Cheers & Sips stamp set in Tuxedo Black Ink in the glass. color the images with Pumpkin Pie, Daffodil Delight and Poppy Parade Stampin’ Blends Markers. Adhere the Basic White panel to a Garden Green mat then to the inside of the Lemon Lolly card base.

Stampin' Up! Cheers & Sips Double Easel Fold 6 creativestampingdesigns.com

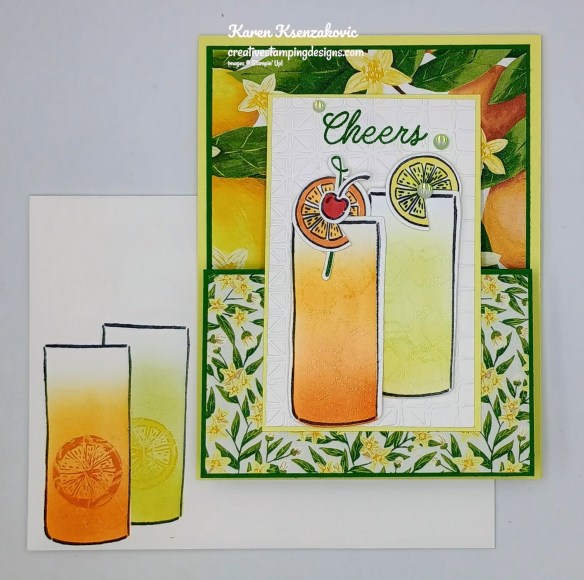
Decorate a Basic White Medium Envelope to complete your card. Stamp the glass image from the Cheers & Sips stamp set in Tuxedo Black Ink on the envelope front. Color and emboss the images the same as you did for the card. Adhere a panel of Mediterranean Blooms DSP to the envelope flap.

Stampin' Up! Cheers & Sips Double Easel Fold 7 creativestampingdesigns.com

Thank you for stopping by my blog today.  Now that you’ve seen my card, let’s get on with the hop!  Click on the Next Blog button to move on to Tara’s project or click the Previous Blog button to go back to see the project that Karen created. Happy Hopping.

Just in case you get lost along the way, here is a list of the team members involved in the hop today.

  1. Karen Finkle
  2. Karen Ksenzakovic You Are Here
  3. Tara Carpenter
  4. Ann Louise Fodgaard
  5. Mary Deathearge
  6. Christie King
  7. Nicole Bloxom
  8. Amy Koenders

*********************************************************************************************************

If you need any stamping supplies, I’d love to be your Demonstrator. Just click HERE to go directly to my online store or drop me an email if you have any questions. 

*********************************************************************************************************

This three-day sale is the perfect opportunity to stock up on every color of two-tone cardstock. Whether you’re making cards or a scrapbook spread, two-tone cardstock is a must-have crafting staple. Each piece of cardstock has a smooth texture for stamping and a white core that works great for techniques like tearing, sanding, crumpling, embossing, etc. Some colors may sell out faster than others, so don’t wait to start shopping when this sale starts on July 9! Hurry over to my Online Store on the 9th and SAVE 20% on that paper.

  • Sales Period: July 9–11
  • Single-pack and multipack two-tone cardstock is 20% off.
  • Some colors might sell out sooner than others.
  • Available while supplies last.
  • See and shop all two-tone cardstock in the online store.

*********************************************************************************************************

Sweeter With You

Subscribe June 11 – July 10

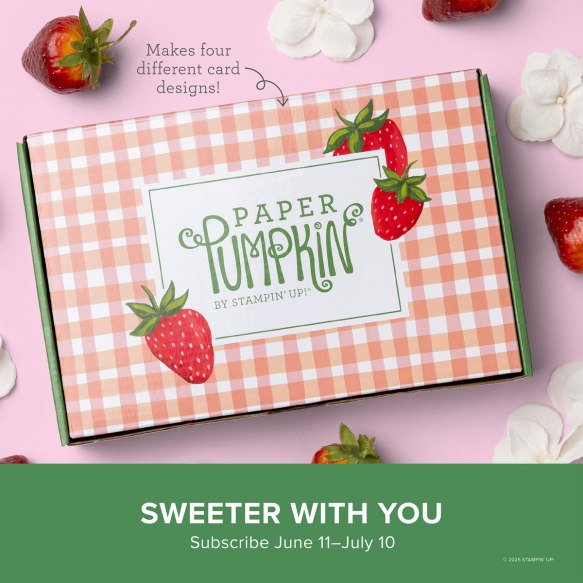
Craft sweet handmade cards featuring sun-kissed strawberries and breezy gingham.
• Makes 8 cards: 2 each of 4 designs with 8 coordinating envelopes
• Precut paper pieces and vellum accents
• Hand-painted card base designs
• Coordinating colors: Garden Green (Classic Stampin’ Spot), Granny Apple Green,
Pool Party, Poppy Parade, Strawberry Slush, Timid Tiger

Subscribe to the June Paper Pumpkin Kit between 11 June and 10 July by clicking here!

*********************************************************************************************************

Don’t miss the coordinating
Circle of Seasons Dies Add-On!

Make the most of your Paper Pumpkin kits with the Circle of Seasons Dies add-on! Quickly and cleanly cut out a strawberry with a blossom, a circle, a leaf, or an acorn to elevate your crafting projects. These additional dies are designed to work with THREE Paper Pumpkin Kits: the Sweeter with You Paper Pumpkin Kit, the Farmhouse Florals Paper Pumpkin Kit, and the Fall for Toile Paper Pumpkin Kit. Pair these dies with other Stampin’ Up! products for even more creative options! This exclusive add-on (item 167277) coordinates with the three upcoming kits! Paper Pumpkin subscribers can purchase it beginning June 11. Add-on is available only while supplies last, so it’s best to shop early!

DETAILS
– 4 dies
– Largest die: 2-1/2″ x 1-1/4″ (6.4 x 3.2 cm)
– Use with a Stampin’ Cut & Emboss Machine (sold separately)

You must be a current Paper Pumpkin subscriber to purchase this item. To become a subscriber, visit www.stampinup.com/paperpumpkin.

Note: Supplies may be limited toward the end of the subscription period.

#167277 $12

*********************************************************************************************************

Card stock cuts for this project:

  • Basic White Cardstock (2) – 4″ x 5 1/4″(artwork & inner liner), 2 1/2″ x 4″(embossed panel)
  • Garden Green Cardstock 4″ x 10 1/4″(easel card front scored & folded at 5 1/4″ & 7 3/4″), 4 1/8″ x 5 3/8″(inner liner mat)
  • Lemon Lolly Cardstock 4 1/4″ x 11″(card base scored & folded at 5 1/2″), 2 5/8″ x 4 1/8″(embossed panel mat)
  • Mediterranean Blooms Designer Series Paper 3 7/8″ x 5 1/8″ & 2 3/8″ x 3 7/8″(card front panels), 2 1/4″ x 6″(envelope flap)

*********************************************************************************************************

Product List

Paper Snips

[103579]
$12.00

Stampin’ Up! Memorable Blooms for The Happy Inkin’ Thursday Blog Hop

Good Thursday morning stamping friends and welcome to our Happy Inkin’ Thursday Blog Hop. If you are starting with me, thank you, I hope you will stop by everyone’s blog to see what they have created this week. If you are hopping over from Akiko’s blog, thank you for stopping by. This week we have Sketch Challenge. If you’d like to see a quick video of how I made this card, Click Here to go to my Instagram Reels. Here is my card using this week’s sketch.

Stampin' Up! Memorable Blooms Love & Thanks 1 creativestampingdesigns.com

I used the Stampin’ Up! Memorable Blooms Bundle along with the Mediterranean Blooms Designer Series Paper, Spotlight on Nature Dies and 2 3/8″ Circle Punch for my card today.

This is our sketch for this week.

Stampin' Up! Memorable Blooms Love & Thanks 2 creativestampingdesigns.com

Adhere a panel of Mediterranean Blooms DSP to a Highland Heather card base using Liquid Glue. Cut the 3rd largest die from the Spotlight on Nature Dies and the 2 3/8″ Circle Punch from one of the panels of Basic White.

Stampin' Up! Memorable Blooms Love & Thanks 3 creativestampingdesigns.com

On a panel of Basic White, stamp the leaf image and the small flower image from the Stampin’ Up! Memorable Blooms Cling Stamp Set 2 times each in Tuxedo Black Ink. Color the images using Highland Heather and Shy Shamrock Stampin’ Blends Markers. Cut the images out using the Memorable Blooms Dies. From a panel of Shy Shamrock, cut the leaf die cut from the Memorable Blooms Dies 2 times. On the 2 3/8″ Circle stamp the leaf image from the Memorable Blooms stamp set in Tuxedo Black Ink. Color the image using Shy Shamrock Stampin’ Blends Markers. Adhere the stamped circle to the die cut circle using Stampin’ Dimensionals.

Stampin' Up! Memorable Blooms Love & Thanks 4 creativestampingdesigns.com

Adhere the die cut flowers to the circle using Glue Dots and Stampin’ Dimensionals. Snip the leaf die cut using Paper Snips and adhere the leaves under the flowers using Glue Dots. Adhere the stamped die cut leaf images to the card front using Glue Dots. Adhere the circle artwork over the leaves using Stampin’ Dimensionals. Adhere a couple more snipped leaves under the circle using Glue Dots. On a strip of Basic White, stamp the sentiment from the Memorable Blooms stamp set in Highland Heather Ink. Cut the ends of the sentiment on an angle using Paper Snips. Adhere the sentiment to the artwork using Stampin’ Dimensionals. Add a few Purple Fine Shimmer Gems to the card front.

Stampin' Up! Memorable Blooms Love & Thanks 5 creativestampingdesigns.com

On a panel of Basic White, stamp the sentiment form the Memorable Blooms stamp set in Highland Heather Ink. Stamp the small flower image from Memorable Blooms stamp set in Highland Heather Ink, stamping off 2 times on scrap paper, over the sentiment. Adhere a strip of Mediterranean Blooms DSP to the bottom of the panel. Adhere the Basic White panel to a Night of Navy mat then to the inside of the Highland Heather card base.

Stampin' Up! Memorable Blooms Love & Thanks 6 creativestampingdesigns.com

Complete the card by decorating a Basic White Medium Envelope. Stamp the small flower image from Memorable Blooms stamp set in Tuxedo Black Ink on the envelope front. Color the image using Highland Heather and Shy Shamrock Stampin’ Blends Markers. Adhere a panel of Mediterranean Blooms DSP to the envelope flap.

Stampin' Up! Memorable Blooms Love & Thanks 7 creativestampingdesigns.com

Thank you for stopping by my blog today.  Now that you’ve seen my card, let’s get on with the hop!  Click the button below to hop over to see what Tara has created. Happy Hopping!!

Just in case you get lost along the way, here is a list of the team members involved in the hop today.

Amy Koenders

Mary Deatherage

Karen Finkle

Akiko Sudano

Karen Ksenzakovic You Are Here

Tara Carpenter

Terry Lynn Bright

*********************************************************************************************************

If you need any stamping supplies, I’d love to be your Demonstrator. Just click HERE to go directly to my online store or drop me an email if you have any questions. 

MY CURRENT HOST CODE IS:   ZZDPZRSF

Use this host code when placing an order with me. When you order $50 or greater you will receive a free gift from me! If your order is over $150, please do not use this code, but you’ll still get the free gift. The free gift is your choice of any 1 item valued up to $10.00 from the 2024 – 2025 Annual Catalog, January – April 2025 Mini Catalog or from the Online Exclusives!  For any orders $50 or more I will also send you my monthly class tutorials.  Click HERE or go to my Customer Rewards for more details and to see what this month’s tutorials are.

Please remember to use my current Host Code and make sure that you can see my name on the final checkout page listed as your Demonstrator when you order so that you know that you’re ordering with me, and you’ll get my rewards! 

Happy Stamping, Karen

*********************************************************************************************************

In response to changing policies at Stampin’ Up – I’m adjusting my Ordering Gift policy as well.  I’m having to get a little more tough on the adding of Host codes when you place your order thru my Online Store.

Not to worry – you’re still going to get that $10 ordering gift for orders of $50 (before shipping & tax) or greater.  And the gift is still any 1 SU! product up to that $10 value.

But – if you DO NOT use the Host code for your orders of less than $150 (this is the RETAIL total before Shipping & Handling), then you’ll have two options:

  1. You’ll need to call Stampin’ Up! (1-800-Stamp-Up) and ask them to add it for you. They’re very helpful and will get it done quickly!  OR….
  2. If your order was over the $50 threshold but under $150, then…you’ll forfeit that $10 ordering gift and rewards – this is the Bummer Option – and I REALLY don’t want to do this, SO please remember to add my Current Host Code.

*********************************************************************************************************

Sale-a-bration Going On Now

Sale-a-bration 2025 begins today Tuesday, January 7 and runs through Friday, February 28!  There are some awesome new products that you can earn for FREE with orders of $60+ and orders of $120+ placed during Sale-a-bration as well as a great host bonus and a joining special!

SHOP

  • Spend $60 or more and pick from 12 new products (5 stamp sets,3 designer series paper packs, 1 embossing folder, 1 kit, 1 pack of embellishments and 1 spool of ribbon!) that are available as free items!
  • Spend $120 or more and pick from 2 new items (1 stamp bundle and 1 stamp set) that are available as free items!

HOST

  • Get an additional $30 in FREE Stampin’ Rewards with any party or individual order of $300 or greater during Sale-a-bration!  You can spend your Stampin’ Rewards on any items currently available from Stampin’ Up! including (but not limited to) the host exclusive stamp sets!

JOIN

Sale-A-Bration is an excellent time you to join Stampin’ Up!  In addition to the already great value of the Starter Kit, if you sign up as a Stampin’ Up! demonstrator during Sale-a-bration, you can choose from two incredible options:

Option 1: Join Stampin’ Up! during Sale-a-bration as a new demonstrator and get $125 worth of products PLUS a choice of 2 Stampin’ Write Marker Assortments AND the Handmade Designs Cling Stamp Set, an exclusive stamp set designed to work with the markers. That’s a $216 value all for just $99!

Option 2: Join Stampin’ Up! during Sale-A-Bration and get $125 worth of product PLUS an additional $30 worth of product of your choice for just $99. That’s a $155 value!

Two joining options so you can pick the one that you like the best!! 

There is never an obligation to sell. You can join just to enjoy the discount for yourself along with all the other Demonstrator benefits. Once you join, you’ll get at least a 20% discount on all of your Stampin’ Up! merchandise purchases and you get to order early from the upcoming catalogs!  You will also be able to attend the OnStage Events and any other events Stampin’ Up! has and you get to be a part of our Stampin’ Up! team!  

Unsure about this and want to talk? Contact me at creativestampingdesigns@gmail.com and we can talk. You can also find additional information Here at Join My Team. Being a part of the Stampin’ Up! Community is one of the best decisions I’ve ever made. I have made many friends along the way while doing what I love, Paper Crafting. This Joining offer is only good during Sale-a-bration which starts January 7 and ends on February 28. Why not give it a try? I’d love to have you on my team.

*********************************************************************************************************

Hello Spring

Subscribe January 11 – February 10

Plant the seeds of happiness with these lovely garden-inspired cards.
• Makes 9 cards: 3 each of 3 designs
• Precut pieces with bronze foil
• Unique spring-themed envelopes
• Coordinating colors: Basic Beige, Bubble Bath, Lemon Lime Twist, Lost Lagoon, Old
Olive, Petunia Pop (Classic Stampin’ Spot)

Subscribe to the February Paper Pumpkin Kit between 11 January and 10 February by clicking here!

*********************************************************************************************************

Don’t miss the coordinating
Spring is in The Air Dies Add-On!

Make the most of your Paper Pumpkin kits with the Spring Is in the Air Dies add-on! Quickly and cleanly cut out a heart frame, flowering chive, honeycomb, or tiny bumblebee to elevate your crafting projects. These additional dies are designed to work with THREE Paper Pumpkin Kits: the Hearts for You Paper Pumpkin Kit, the Spring Is in the Air Paper Pumpkin Kit, and the Daisy Daydream Paper Pumpkin Kit. Pair these dies with other Stampin’ Up! products for even more creative options!

DETAILS
– 5 dies
– Largest die: 3″ x 3″ (7.6 x 7.6 cm)
– Use with a Stampin’ Cut & Emboss Machine (sold separately)

You must be a current Paper Pumpkin subscriber to purchase this item. To become a subscriber, visit paperpumpkin.com.

#166237 $12

Note: Supplies may be limited toward the end of the subscription period.

*********************************************************************************************************

Card stock cuts for this project:

  • Basic White Cardstock 3 – 4″ X 5 1/4″(die cuts & inner liner)
  • Highland Heather Cardstock 4 1/4″ X 11″(card base scored & folded at 5 1/2″)
  • Night of Navy Cardstock 4 1/8″ X 5 3/8″(inner liner mat)
  • Shy Shamrock Cardstock 3″X4″(die cuts)
  • Mediterranean Blooms Designer Series Paper 4″X 5 1/4″(card front), 5/8″ X 4″(inner liner), 2 1/4″ X 6″(envelope flap)

*********************************************************************************************************

Product List

Stampin’ Up! Citrus Blooms for The Happy Inkin’ Thursday Blog Hop

Good Thursday morning my stamping friends and welcome to our Happy Inkin’ Thursday Blog Hop. If you are starting with me, thank you, I hope you will stop by everyone’s blog to see what they have created this week. If you are hopping over from Karen’s blog, thank you for stopping by. This week we have Color Challenge. If you’d like to see a quick video of how I made this card, Click Here to go to my Instagram Reels. Here is my card using this week’s colors.

Stampin' Up! citrus Blooms Hello 1 creativestampingdesigns.com

I used the Stampin’ Up! Citrus Blooms Bundle along with the Mediterranean Blooms Designer Series Paper and Distressed Tile 3D Embossing Folder for my card today.

These are our colors for this week

Stampin' Up! citrus Blooms Hello 2 creativestampingdesigns.com

I started by adhering a Mediterranean Blooms DSP card front to a Night of Navy mat using Stampin’ Seal. I adhered the layered panel to a Garden Green card base using Stampin’ Seal.

Stampin' Up! citrus Blooms Hello 3 creativestampingdesigns.com

Using the Blending Brush, I added Balmy Blue Ink to a panel of Basic White. I stamped the sentiment from the Stampin’ Up! Citrus Blooms Cling Stamp Set in Night of Navy Ink on the bottom of the panel. I embossed the panel using the Distressed Tile EF. I adhered the embossed panel to a Night of Navy mat using Liquid glue. I adhered the layered panel to a Garden Green mat using Stampin’ Seal. I adhered the layered panel to the card front using Stampin’ Dimensionals

Stampin' Up! citrus Blooms Hello 4 creativestampingdesigns.com

On a panel of Basic White, I stamped the single orange image from the Citrus Bloms stamp set in Tuxedo Black Ink. I colored the image using Daffodil Delight, Old Olive and Pumpkin Pie Stampin’ Blends Markers. I cut the image out using the Citrus Blooms Dies. I adhered the die cut image to the embossed panel using Stampin’ Dimensionals. I tied a small bow with Linen Thread and adhered it to the stem using a Glue Dot. I added a few Opal Rounds Assortment.

Stampin' Up! citrus Blooms Hello 5 creativestampingdesigns.com

On the inside, I stamped the sentiment from the Citrus Blooms stamp set in Night of Navy Ink on a panel of Basic White. I stamped the flower images by the sentiment in Tuxedo Black Ink. I colored the images using Daffodil Delight Stampin’ Blends Markers. I adhered a strip of Mediterranean Blooms DSP to the bottom of the panel. I adhered the Basic Whtie panel to a Night of Navy mat then to the inside of the Garden Green card base.

Stampin' Up! citrus Blooms Hello 6 creativestampingdesigns.com

To complete my card, I decorated a Basic White Medium Envelope. I stamped the orange image from the Citrus Blooms stamp set in Tuxedo Black Ink on the envelope front. I colored the image using Daffodil Delight, Old Olive and Pumpkin Pie Stampin’ Blends Markers. I adhered a panel of Mediterranean Blooms DSP to the envelope flap.

Stampin' Up! citrus Blooms Hello 7 creativestampingdesigns.com

Thank you for stopping by my blog today.  Now that you’ve seen my card, let’s get on with the hop!  Click the button below to hop over to see what Tara has created today. Happy Hopping!

Just in case you get lost along the way, here is a list of the team members involved in the hop today:

Amy Koenders

Mary Deatherage

Jaimie Babarczy

Karen Finkle

Karen Ksenzakovic You Are Here

Tara Carpenter

Terry Lynn Bright

Carol Buckalew

Nel Thames

*********************************************************************************************************

If you need any stamping supplies, I’d love to be your Demonstrator. Just click HERE to go directly to my online store or drop me an email if you have any questions. 

MY CURRENT HOST CODE IS:   6C44QBJA

Use this host code when placing an order with me. When you order $50 or greater you will receive a free gift from me! If your order is over $150, please do not use this code, but you’ll still get the free gift. The free gift is your choice of any 1 item valued up to $10.00 from the 2023-2024 Annual Catalog, the January-April 2024 Mini Catalog or from the Online Exclusives!  Unfortunately, packs of cardstock are no longer an option for a free gift. Shipping has become too expensive to ship and it’s costing me as much to ship as the cardstock costs. For any orders $50 or more I will also send you my monthly class tutorials.  Click HERE or go to my Customer Rewards for more details and to see what this month’s tutorials are.

Please remember to use my current Host Code and make sure that you can see my name on the final checkout page listed as your Demonstrator when you order so that you know that you’re ordering with me, and you’ll get my rewards! 

Happy Stamping, Karen

*********************************************************************************************************

In response to changing policies at Stampin’ Up – I’m adjusting my Ordering Gift policy as well.  I’m having to get a little more tough on the adding of Host codes when you place your order thru my Online Store.

Not to worry – you’re still going to get that $10 ordering gift for orders of $50 (before shipping & tax) or greater.  And the gift is still any 1 SU! product up to that $10 value – which includes some of our fun Host Sets!

But – if you DO NOT use the Host code for your orders of less than $150 (this is the RETAIL total before Shipping & Handling), then you’ll have two options:

  1. You’ll need to call Stampin’ Up! (1-800-Stamp-Up) and ask them to add it for you. They’re very helpful and will get it done quickly!  OR….
  2. If your order was over the $50 threshold but under $150, then…you’ll forfeit that $10 ordering gift and rewards – this is the Bummer Option – and I REALLY don’t want to do this, SO please remember to add my Current Host Code.

*********************************************************************************************************

Tomorrow is the LAST DAY for the Starter Kit Special

Exciting News! Between 1–31 May, anyone who becomes a Stampin’ Up! demonstrator will receive four 2024–2026 In Color products in their Starter Kit for FREE!

In addition to the 2024-2026 In-Color products, new demonstrators will pick $125 USD worth of products of their choice. That’s $207 in products for only $99 and it all ships for FREE. You will also receive free business supplies in case you want to make this a business. Not to mention all the fun that comes with being a part of our wonderful crafting community.

When you join as a new demonstrator, all In Color products will be automatically added to their Starter Kit. Click Here for a PDF printable flyer of all the products you’ll get.

STARTER KIT SPECIAL DETAILS

  • Promotion Start Date:  May 1, 2024
  • Deadline to Join:  May 31, 2024 at 11:59 PM MT
  • In addition to the regular $125 worth of products of your choice for just $99, new demonstrators will receive the following products (an $82 value!!) in their Starter Kit at no additional cost:
    • 2024–2026 In Color Classic Stampin’ Pad Bundle
    • 2024–2026 In Color 8-1/2″ x 11″ Card Stock
    • 2024–2026 In Color 6″ x 6″ Designer Series Paper
    • 2024–2026 In Color Stampin’ Write Markers
  • All Starter Kits ship for FREE!!

If you’d like to join our team, we’d love to have you!  Once you join, you’ll get at least a 20% discount on all of your Stampin’ Up! purchases and you can preorder from the upcoming catalogs!

We welcome all types of Demonstrators from those only purchasing to get the discount for themselves to those who want to run a business and those anywhere in between!  We’re a relaxed group that loves to stamp with no pressure to sell!

Demonstrators get lots of perks including at least a 20% discount on all orders that you place as a Demonstrator, invitations to Stampin’ Up! Demonstrator events and preordering from upcoming catalogs and promotions!

There is no commitment and no penalty if you decide that being a Demonstrator isn’t right for you.  Why not give it a try?  We have a fun Facebook page where we chat a lot and we do virtual meetings monthly and in-person meetings quarterly.

What a great time to join and get all the new 2024-2026 In-Color products. Contact me @ creativestampingdesigns@gmail.com. I would love to have you on my team. Contact me today about joining May 1st.

*********************************************************************************************************

Life Is Sweet

Subscribe May 11 – June 10

Subscribe to Paper Pumpkin for a monthly, all-inclusive crafting kit that’s a fun surprise! Each kit includes a photopolymer stamp set, Classic Stampin’ Spot, and step by step instructions to complete exclusive paper craft projects, including cards, tags, and gift
packaging. And don’t miss the special add-on that coordinates with the next three months!

Celebrate the sweet things in life with textured, artistic cards. Featuring the new 2024–2026 In Colors!

  • Makes 9 cards: 3 each of 3 designs with 9 coordinating envelopes
  • Iridescent glimmer sentiments and precut paper pieces
  • Vellum accents, iridescent pearls, and linen thread
  • Coordinating colors: Poppy Parade, Peach Pie, Lemon Lolly, Shy Shamrock
    (Classic Stampin’ Spot), Pool Party, Pretty In Pink

Thanks and Beyond Add On Dies

Dies #164397 Price $12.00

This exclusive add-on coordinates with the three upcoming kits! Paper Pumpkin subscribers can purchase it beginning 11 March. The add-on is available only while supplies last, so it’s best to shop early!

Subscribe to the April Paper Pumpkin Kit between 11 March and 10 April by clicking here!

Note: Supplies may be limited toward the end of the subscription period.

*********************************************************************************************************

Card stock cuts for this project:

  • Basic White Cardstock 2 3/4″ X 4″ (card front panel), 3 1/4″ X 3 1/4″ (artwork), 4″ X 5 1/4″(inner liner)
  • Garden Green Cardstock 4 1/4″ X 11″(card base scored & folded at 5 1/2″), 3″ X 4 1/4″ (card front panel mat)
  • Night of Navy Cardstock 2 – 4 1/8″ x 5 3/8″ (card front & inner liner mats), 2 7/8″ X 4 1/8″ (card front panel mat)
  • Mediterranean Blooms Designer Series Paper 4″ X 5 1/4″ (card front), 5/8″ X 4″ (inner liner), 2 1/4″ X 6″ (envelope flap)

*********************************************************************************************************

Product List

Citrus Blooms Bundle (English)

$62.00

Citrus Blooms Cling Stamp Set (English)

$26.00

Citrus Blooms Dies

$43.00

Basic White 8 1/2" X 11" Cardstock

$13.00

Garden Green 8-1/2" X 11" Cardstock

$11.50

Night Of Navy 8-1/2" X 11" Cardstock

$11.50

Mediterranean Blooms 12" X 12" (30.5 X 30.5 Cm) Designer Series Paper

$12.50

Balmy Blue Classic Stampin' Pad

$9.00

Night Of Navy Classic Stampin' Pad

$9.00

Tuxedo Black Memento Ink Pad

$8.00

Daffodil Delight Stampin' Blends Combo Pack

$11.00

Old Olive Stampin' Blends Combo Pack

$11.00

Pumpkin Pie Stampin' Blends Combo Pack

$11.00

Small Blending Brushes

$14.00

Distressed Tile 3 D Embossing Folder

$10.00

Linen Thread

$5.00

Opal Rounds Assortment

$8.50

Basic White Medium Envelopes

$11.00

Stampin' Cut & Emboss Machine

$130.00

Adhesive Sheets

$11.50

Mini Glue Dots

$7.25

Multipurpose Liquid Glue

$6.00

Mini Stampin' Dimensionals

$4.25

Stampin' Dimensionals

$4.25

Stampin' Seal

$8.00

Bone Folder

$8.00

Paper Snips

$12.00

Paper Trimmer

$28.00

Stampin’ Up! Citrus Blooms for The Happy Inkin’ Thursday Blog Hop

Good Thursday morning my stamping friends and welcome to our Happy Inkin’ Thursday Blog Hop. If you are starting with me, thank you, I hope you will stop by everyone’s blog to see what they have created this week. If you are hopping over from Akiko’s blog, thank you for stopping by. This week we have Sketch Challenge. If you’d like to see a quick video of how I made this card, Click Here to go to my Instagram Reels. Here is my card using this week’s sketch.

Stampin' Up! Citrus Blooms Hello 1 creativestampingdesigns.com

I used the Stampin’ Up! Citrus Blooms Cling Stamp Set along with the Stylish Shapes Dies and Mediterranean Blooms Designer Series Paper for my card today.

This is our sketch for this week.

Stampin' Up! Citrus Blooms Hello 2 creativestampingdesigns.com

I started by adhering a panel of Mediterranean Blooms DSP to a Basic Whtie Thick card base using Liquid Glue.

Stampin' Up! Citrus Blooms Hello 3 creativestampingdesigns.com

On a panel of Basic White, I stamped the single orange image from the Citrus Blooms stamp set in Tuxedo Black Ink. I colored the image using Daffodil Delight, Granny Apple Green, Lemon Lolly and Pumpkin Pie Stampin’ Blends Markers. I cut the image out using the largest circle from the Stylish Shapes Dies. I cut a panel of Garden Green using the largest banner die from the Stylish Shapes Dies.

Stampin' Up! Citrus Blooms Hello 4 creativestampingdesigns.com

I cut the banner in half using Paper Snips. On the top of the banner, I stamped the sentiment from the Citrus Blooms stamp set in Versamark Ink. I sprinkled it with White Embossing Powder and set it using the Heat Tool. I adhered the 2 banner pieces to the card front using Liquid Glue. I adhered the artwork to the center of the card front using Stampin’ Dimemsionals. I added a few Opal Rounds Assortment.

Stampin' Up! Citrus Blooms Hello 5 creativestampingdesigns.com

On the inside, I stamped the sentiment from the Citrus Blooms stamp set in Garden Green Ink on a panel of Basic White. I stamped the flower images from the Citrus Blooms stamp set in Tuxedo Black Ink on either side of the sentiment. I colored the images using Daffodil Delight and Lemon Lolly Stampin’ Blends Markers. I adhered a strip of the Mediterranean Blooms DSP to the bottom of the panel. I adhered the Basic White panel to a Lemon Lolly mat then to the inside of the Basic White Thick card base.

Stampin' Up! Citrus Blooms Hello 6 creativestampingdesigns.com

To complete my card, I decorated a Basic White Medium Envelope. I stamped the single orange image from the Citrus Blooms stamp set on the envelope front in Tuxedo Black Ink. I colored the image the same as I did for the card. I adhered a panel of Mediterranean Blooms DSP to the envelope flap.

Stampin' Up! Citrus Blooms Hello 7 creativestampingdesigns.com

Now that you’ve seen my card, let’s get on with the hop!  Click the button below to hop over to see what Terry Lynn has created today. Happy Hopping!

Just in case you get lost along the way, here is a list of the team members involved in the hop today:

Amy Koenders

Mary Deatherage

Jaimie Babarczy

Karen Finkle

Akiko Sudano

Karen Ksenzakovic You Are Here

Terry Lynn Bright

Carol Buckalew

Nel Thames

*********************************************************************************************************

If you need any stamping supplies, I’d love to be your Demonstrator. Just click HERE to go directly to my online store or drop me an email if you have any questions. 

MY CURRENT HOST CODE IS:   6C44QBJA

Use this host code when placing an order with me. When you order $50 or greater you will receive a free gift from me! If your order is over $150, please do not use this code, but you’ll still get the free gift. The free gift is your choice of any 1 item valued up to $10.00 from the 2023-2024 Annual Catalog, the January-April 2024 Mini Catalog or from the Online Exclusives!  Unfortunately, packs of cardstock are no longer an option for a free gift. Shipping has become too expensive to ship and it’s costing me as much to ship as the cardstock costs. For any orders $50 or more I will also send you my monthly class tutorials.  Click HERE or go to my Customer Rewards for more details and to see what this month’s tutorials are.

Please remember to use my current Host Code and make sure that you can see my name on the final checkout page listed as your Demonstrator when you order so that you know that you’re ordering with me, and you’ll get my rewards! 

Happy Stamping, Karen

*********************************************************************************************************

In response to changing policies at Stampin’ Up – I’m adjusting my Ordering Gift policy as well.  I’m having to get a little more tough on the adding of Host codes when you place your order thru my Online Store.

Not to worry – you’re still going to get that $10 ordering gift for orders of $50 (before shipping & tax) or greater.  And the gift is still any 1 SU! product up to that $10 value – which includes some of our fun Host Sets!

But – if you DO NOT use the Host code for your orders of less than $150 (this is the RETAIL total before Shipping & Handling), then you’ll have two options:

  1. You’ll need to call Stampin’ Up! (1-800-Stamp-Up) and ask them to add it for you. They’re very helpful and will get it done quickly!  OR….
  2. If your order was over the $50 threshold but under $150, then…you’ll forfeit that $10 ordering gift and rewards – this is the Bummer Option – and I REALLY don’t want to do this, SO please remember to add my Current Host Code.

*********************************************************************************************************

New Starter Kit Special May 1st – May 31st

Exciting News! Between 1–31 May, anyone who becomes a Stampin’ Up! demonstrator will receive four 2024–2026 In Color products in their Starter Kit for FREE!

In addition to the 2024-2026 In-Color products, new demonstrators will pick $125 USD worth of products of their choice. That’s $207 in products for only $99 and it all ships for FREE. You will also receive free business supplies in case you want to make this a business. Not to mention all the fun that comes with being a part of our wonderful crafting community.

When you join as a new demonstrator, all In Color products will be automatically added to their Starter Kit. Click Here for a PDF printable flyer of all the products you’ll get.

STARTER KIT SPECIAL DETAILS

  • Promotion Start Date:  May 1, 2024
  • Deadline to Join:  May 31, 2024 at 11:59 PM MT
  • In addition to the regular $125 worth of products of your choice for just $99, new demonstrators will receive the following products (an $82 value!!) in their Starter Kit at no additional cost:
    • 2024–2026 In Color Classic Stampin’ Pad Bundle
    • 2024–2026 In Color 8-1/2″ x 11″ Card Stock
    • 2024–2026 In Color 6″ x 6″ Designer Series Paper
    • 2024–2026 In Color Stampin’ Write Markers
  • All Starter Kits ship for FREE!!

If you’d like to join our team, we’d love to have you!  Once you join, you’ll get at least a 20% discount on all of your Stampin’ Up! purchases and you can preorder from the upcoming catalogs!

We welcome all types of Demonstrators from those only purchasing to get the discount for themselves to those who want to run a business and those anywhere in between!  We’re a relaxed group that loves to stamp with no pressure to sell!

Demonstrators get lots of perks including at least a 20% discount on all orders that you place as a Demonstrator, invitations to Stampin’ Up! Demonstrator events and preordering from upcoming catalogs and promotions!

There is no commitment and no penalty if you decide that being a Demonstrator isn’t right for you.  Why not give it a try?  We have a fun Facebook page where we chat a lot and we do virtual meetings monthly and in-person meetings quarterly.

What a great time to join and get all the new 2024-2026 In-Color products. Contact me @ creativestampingdesigns@gmail.com. I would love to have you on my team. Contact me today about joining May 1st.

*********************************************************************************************************

The Best There Is

Subscribe April 11 – May 10

Subscribe to Paper Pumpkin for a monthly, all-inclusive crafting kit that’s a fun surprise! Each kit includes a photopolymer stamp set, Classic Stampin’ Spot, and step by step instructions to complete exclusive paper craft projects, including cards, tags, and gift
packaging. And don’t miss the special add-on that coordinates with the next three months!

Make cards for Father’s Day and more to express your gratitude and admiration!

  • Makes 9 cards: 3 each of 3 designs with 9 coordinating envelopes
  • Precut paper accent pieces and labels
  • Woodgrain textures and masculine earthy tones
  • Coordinating colors: Wild Wheat, Pool Party, Misty Moonlight (Classic Stampin’ Spot),
    Early Espresso, Crumb Cake, Basic Beige
    Thanks & Beyond Dies Add-On—available only while supplies last!
    Partial pop-ups to make your cards shine!

    Coordinates with the Country Woods Designer Series Paper (item 163393)

Thanks and Beyond Add On Dies

Dies #164397 Price $12.00

This exclusive add-on coordinates with the three upcoming kits! Paper Pumpkin subscribers can purchase it beginning 11 March. The add-on is available only while supplies last, so it’s best to shop early!

Subscribe to the April Paper Pumpkin Kit between 11 March and 10 April by clicking here!

Note: Supplies may be limited toward the end of the subscription period.

*********************************************************************************************************

Card stock cuts for this project:

  • Basic White Cardstock 3 1/2″ X 3 1/2″ (artwork), 4″ X 5 1/4″(inner liner)
  • Basic White Thick Cardstock 4 1/4″ X 11″ (card base scored & folded at 5 1/2″)
  • Garden Green Cardstock 1 1/2″ X 3 3/4″ (banner)
  • Lemon Lolly Cardstock 4 1/8″ X 5 3/8″ (inner liner mat)
  • Mediterranean Blooms Designer Series Paper 4 1/4″ X 5 1/2″ (card front), 1/2″X 4″*(inner liner strip), 2 1/4″ X 6″(envelope flap)

*********************************************************************************************************

Product List
Citrus Blooms Cling Stamp Set (English)
$26.00
Basic White 8 1/2" X 11" Cardstock
$13.00
Basic White 8 1/2" X 11" Thick Cardstock
$11.25
Garden Green 8-1/2" X 11" Cardstock
$11.50
Lemon Lolly 8 1/2" X 11" Cardstock
$11.50
Mediterranean Blooms 12" X 12" (30.5 X 30.5 Cm) Designer Series Paper
$12.50
Garden Green Classic Stampin' Pad
$9.00
Lemon Lolly Classic Stampin' Pad
$9.00
Tuxedo Black Memento Ink Pad
$8.00
Daffodil Delight Stampin' Blends Combo Pack
$11.00
Granny Apple Green Stampin' Blends Combo Pack
$11.00
Lemon Lolly Stampin’ Blends Combo Pack
$11.00
Pumpkin Pie Stampin' Blends Combo Pack
$11.00
Stylish Shapes Dies
$30.00
Opal Rounds Assortment
$8.50
Basic White Medium Envelopes
$11.00
Stampin' Cut & Emboss Machine
$130.00
Mini Glue Dots
$7.25
Multipurpose Liquid Glue
$6.00
Mini Stampin' Dimensionals
$4.25
Stampin' Dimensionals
$4.25
Stampin' Seal
$8.00
Bone Folder
$8.00
Paper Snips
$12.00
Paper Trimmer
$28.00