
Good Wednesday morning my stamping friends. How is everyone doing today? We’re halfway through the week and on our way to the weekend already.
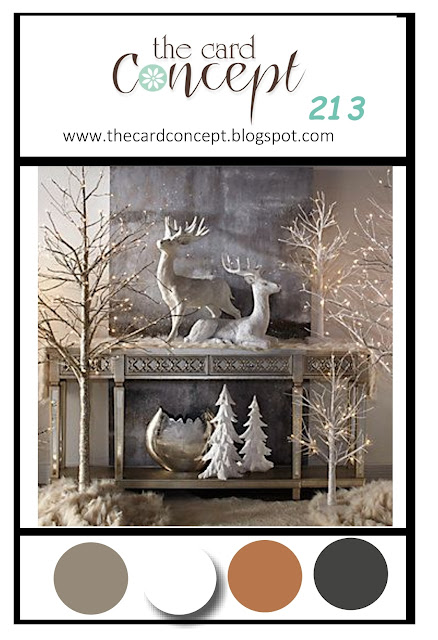
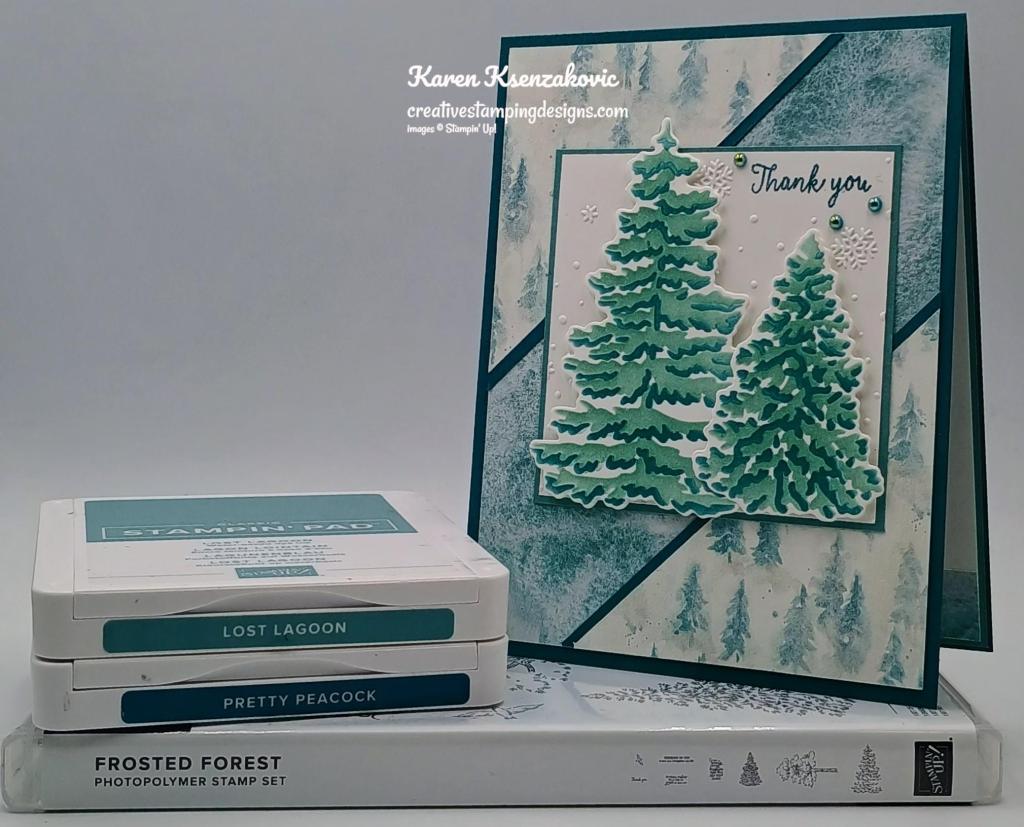
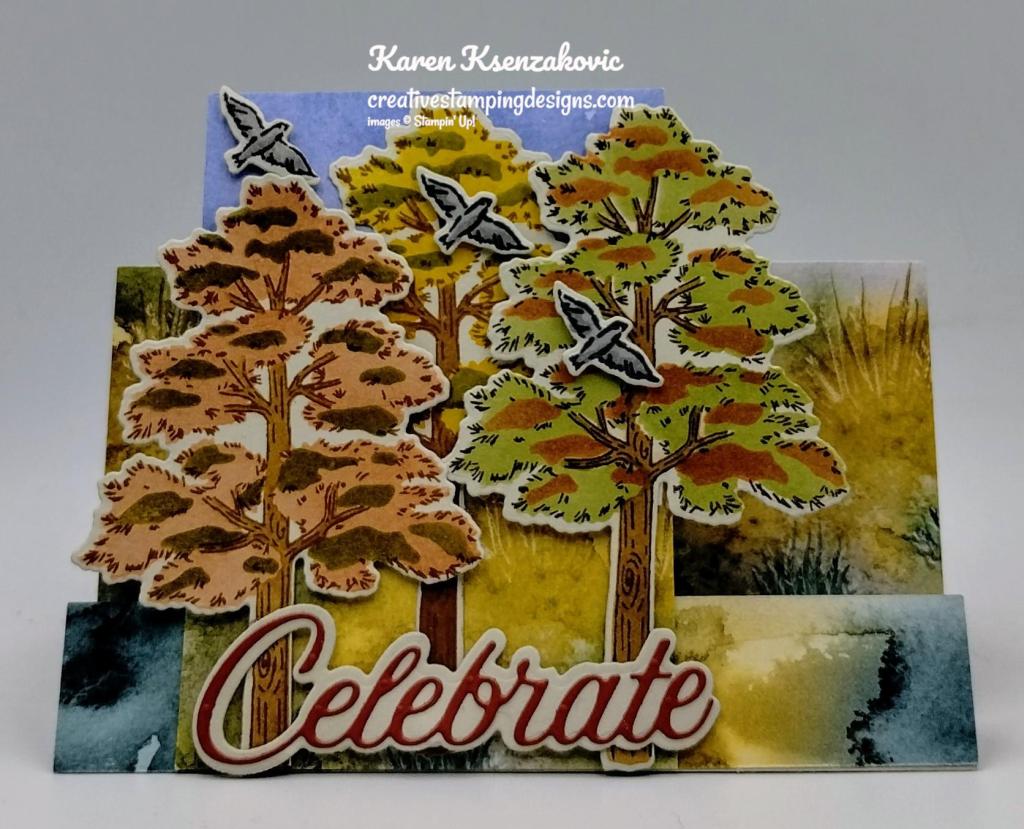
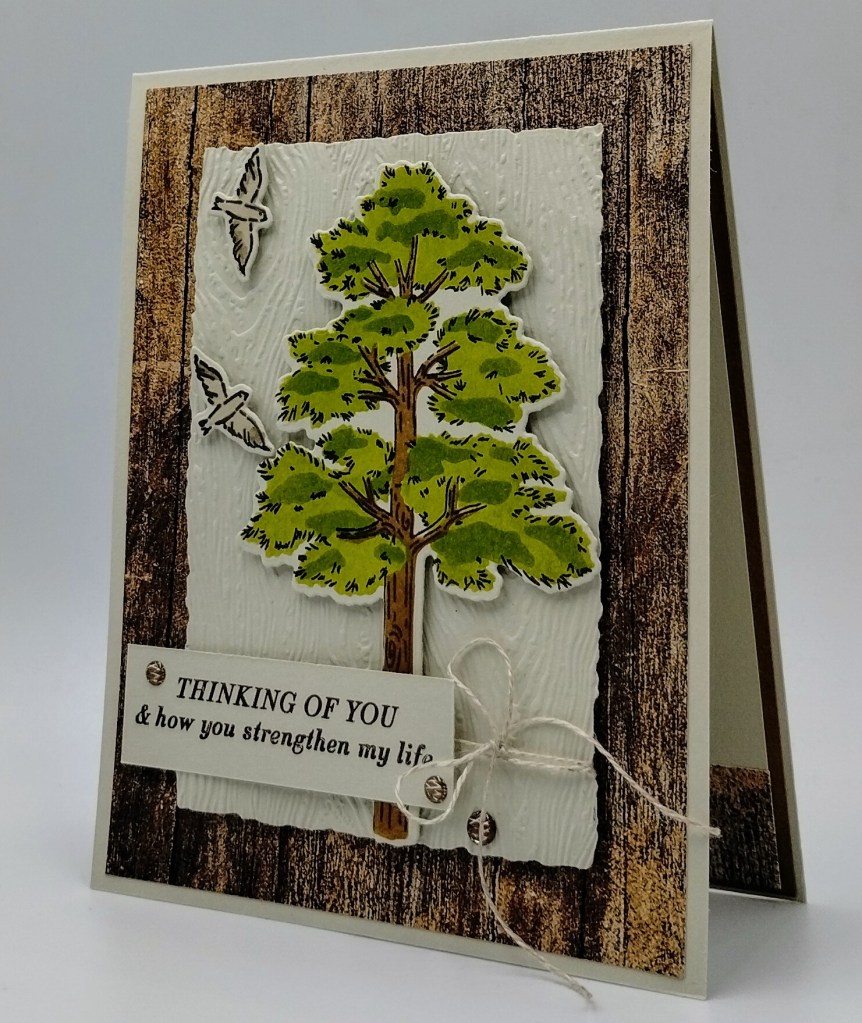
Today’s card is for the inspiration challenge from The Card Concepts. We do a month-long challenge, so you have all month to enter multiple times. The inspiration photo #213 is Winter Solace. If you’d like to see a quick video on how I made this card, Click Here for my Instagram Reels. Here is my card that was inspired from the challenge photo.
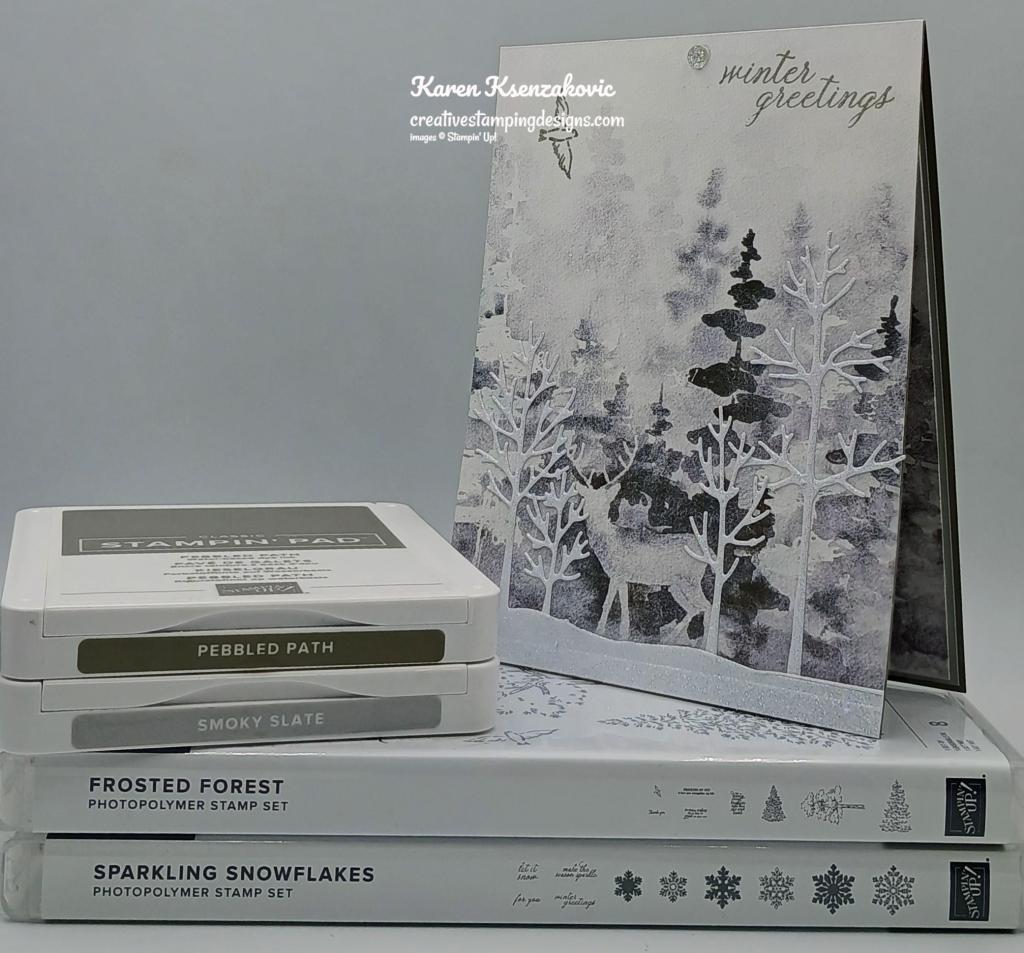
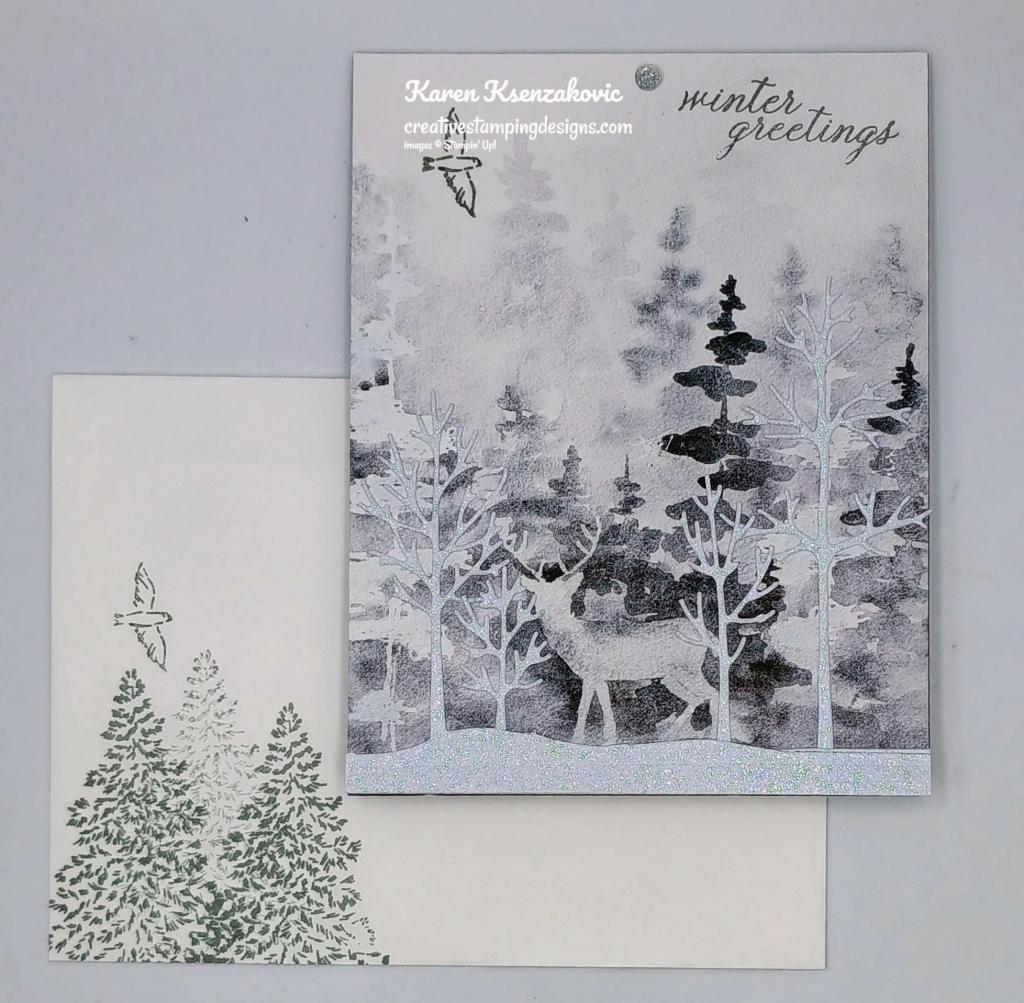
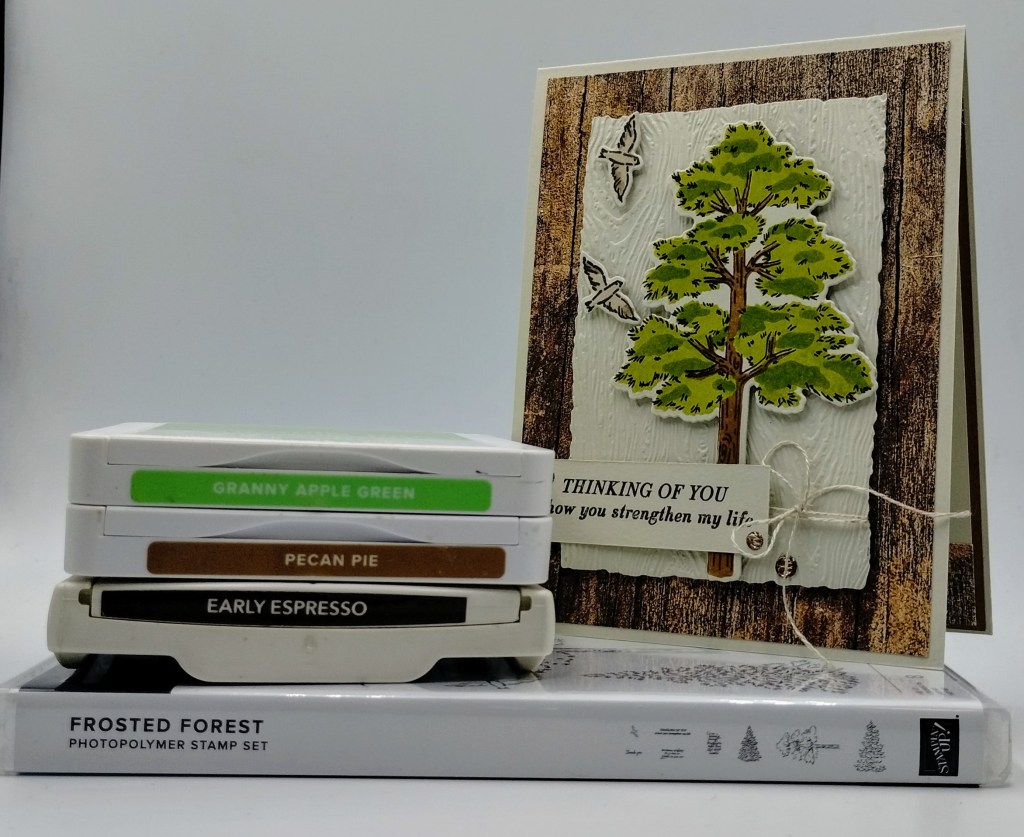
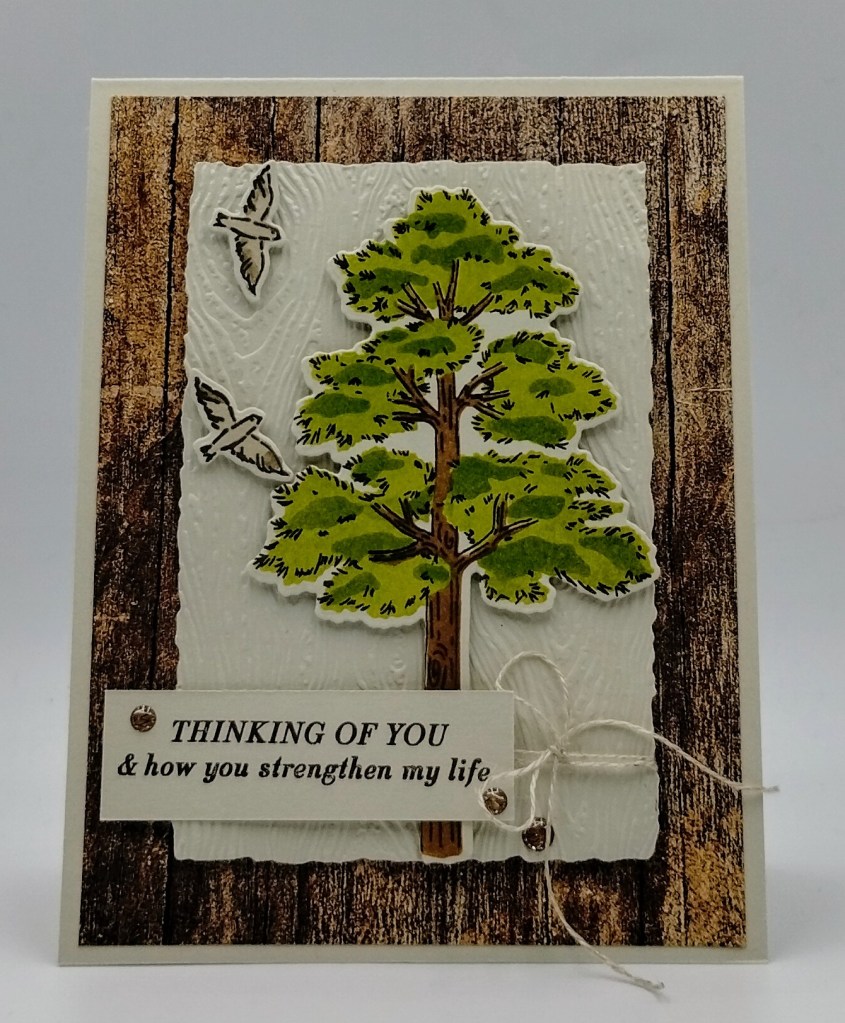
I used the Stampin’ Up! Sparkling Snowflakes Photopolymer Stamp Set along with the Winter Meadow Designer Series Paper and Stampin’ Up! Online Exclusive Frosted Forest Bundle for my clean and layered card. I was inspired by the sparkly trees and the deer in the photo.
I hope you will take a moment to visit The Card Concepts and join us for our challenge 213. How are you inspired by the photos?
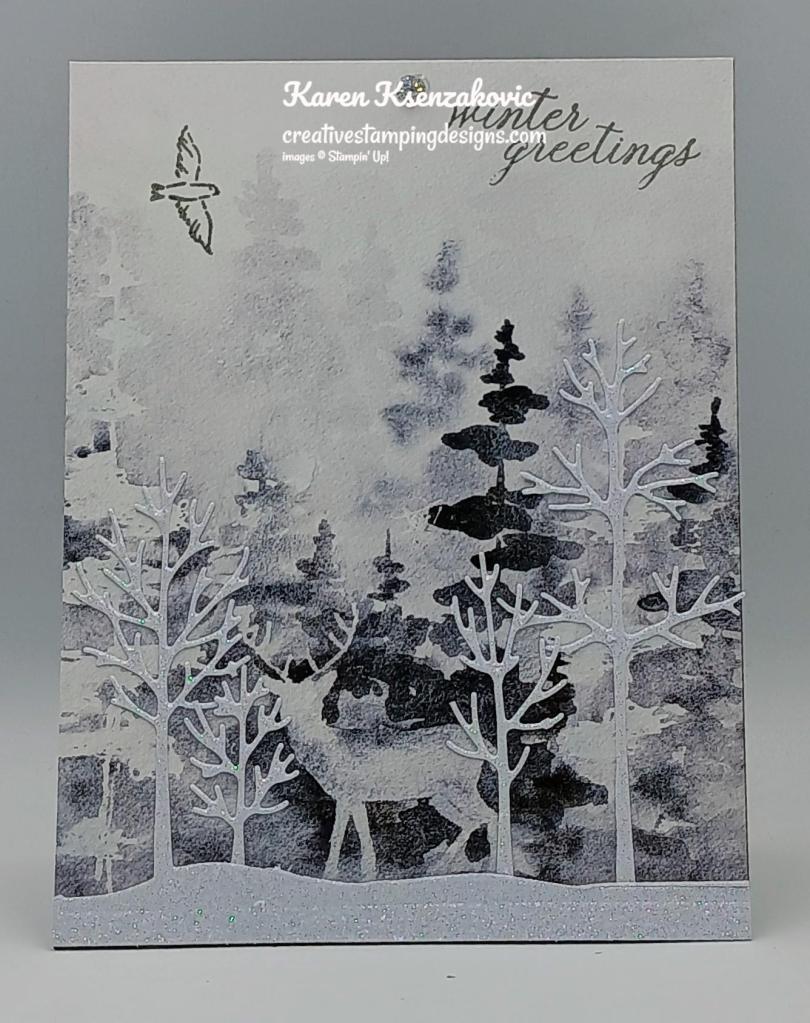
Adhere a panel of Winter Meadow DSP to a Pebbled Path card base using Liquid Glue. Stamp the sentiment from the Sparkling Snowflakes stamp set in Smoky Slate Ink on the top of the panel. Stamp the bird image from the Stampin’ Up! Frosted Forest Photopolymer Stamp Set in Pebbled Path Ink on the top of the card front.
From a panel of White Glimmer Paper, cut the tree dies using the Frosted Forest Dies. Using Paper Snips, snip off 2 of the trees from the 3 tree die cut. Adhere the tree with the snow drift to the bottom of the card front. Adhere the 2 snipped trees to either side of the deer image on the card front.
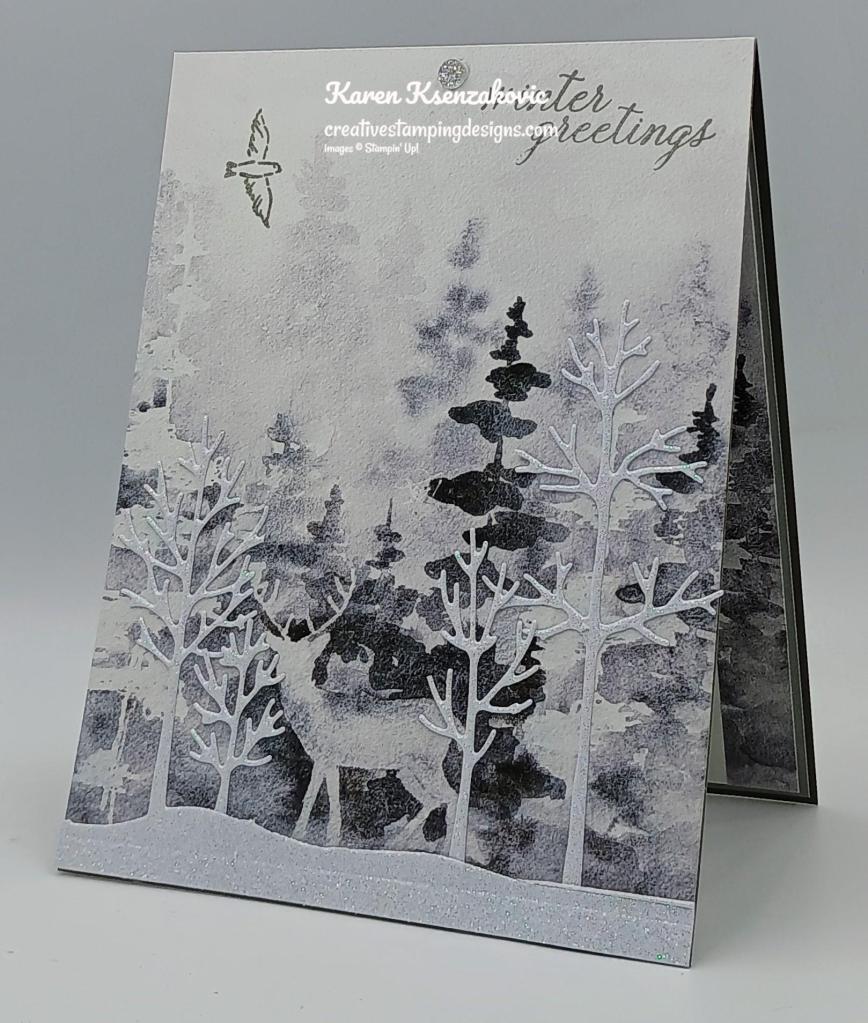
Adhere the tall tree to the right side of the card front. Add an Adhesive-Backed Sparkle Gem to the card front by the sentiment.
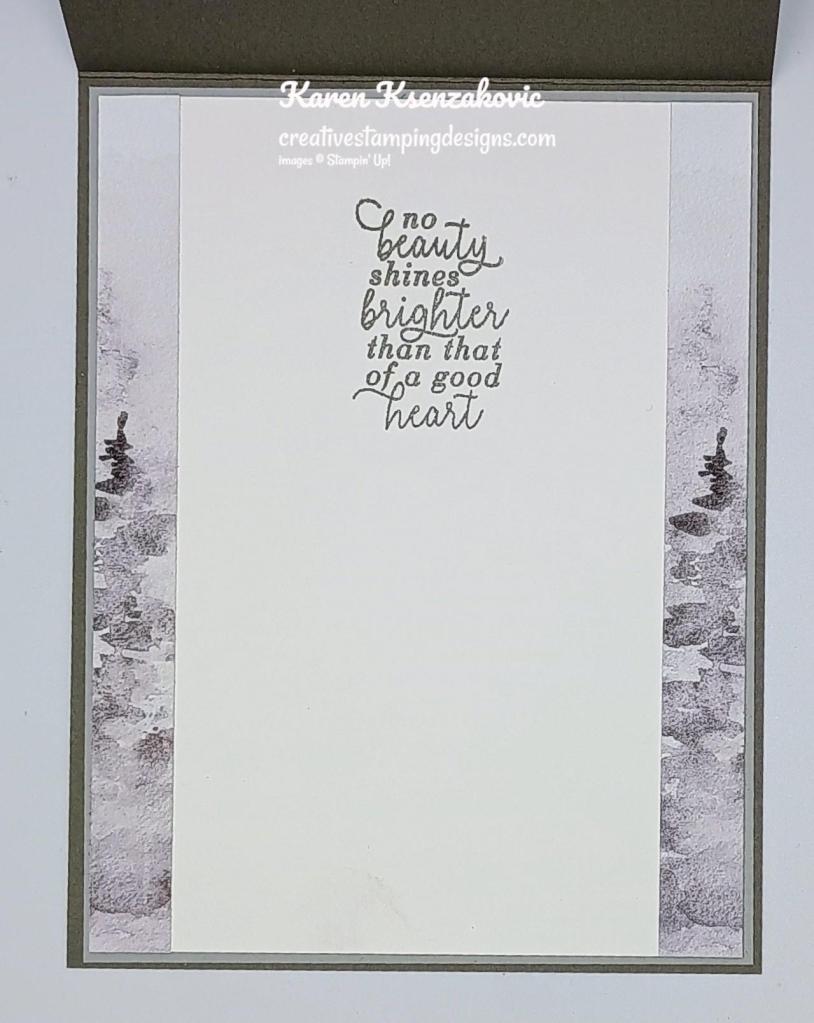
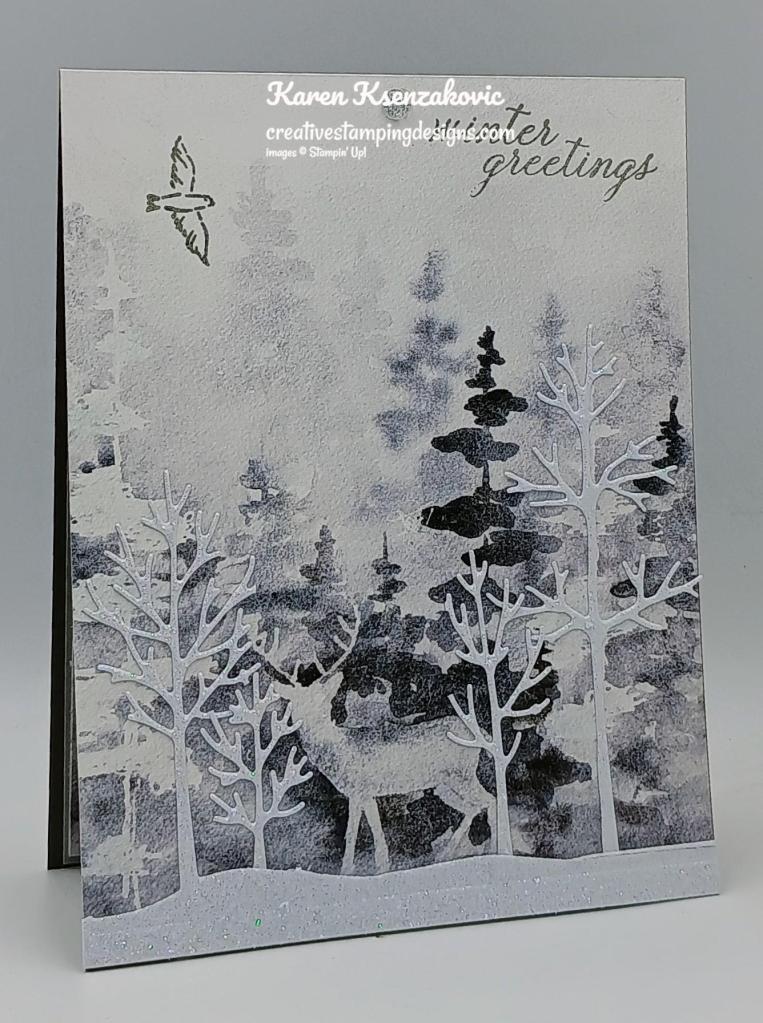
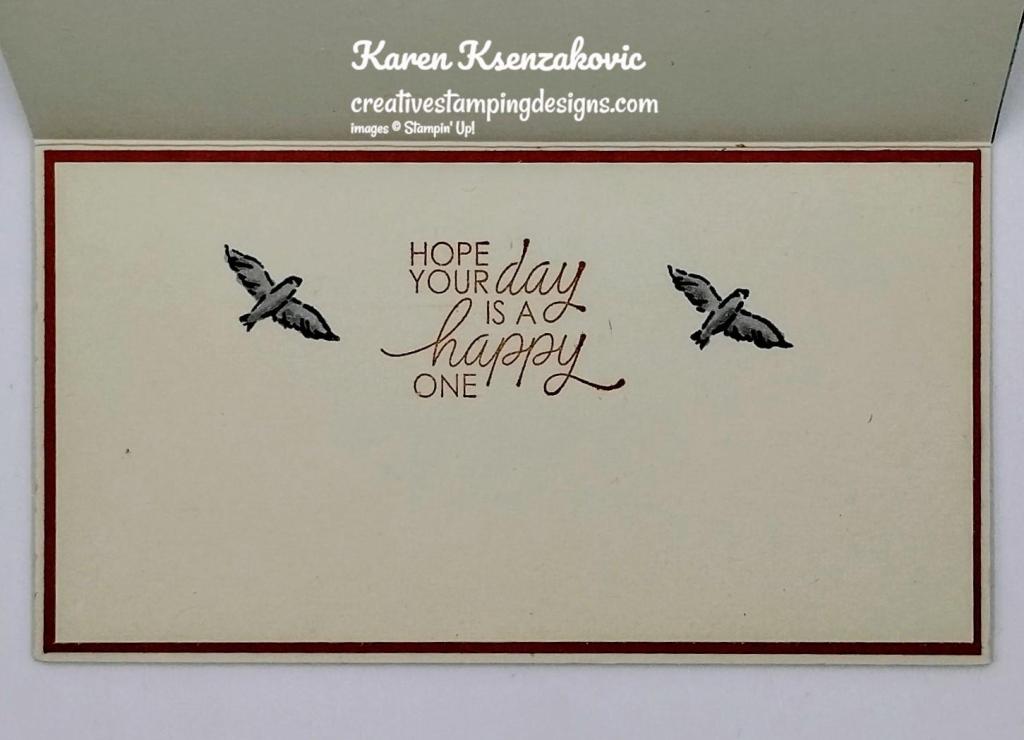
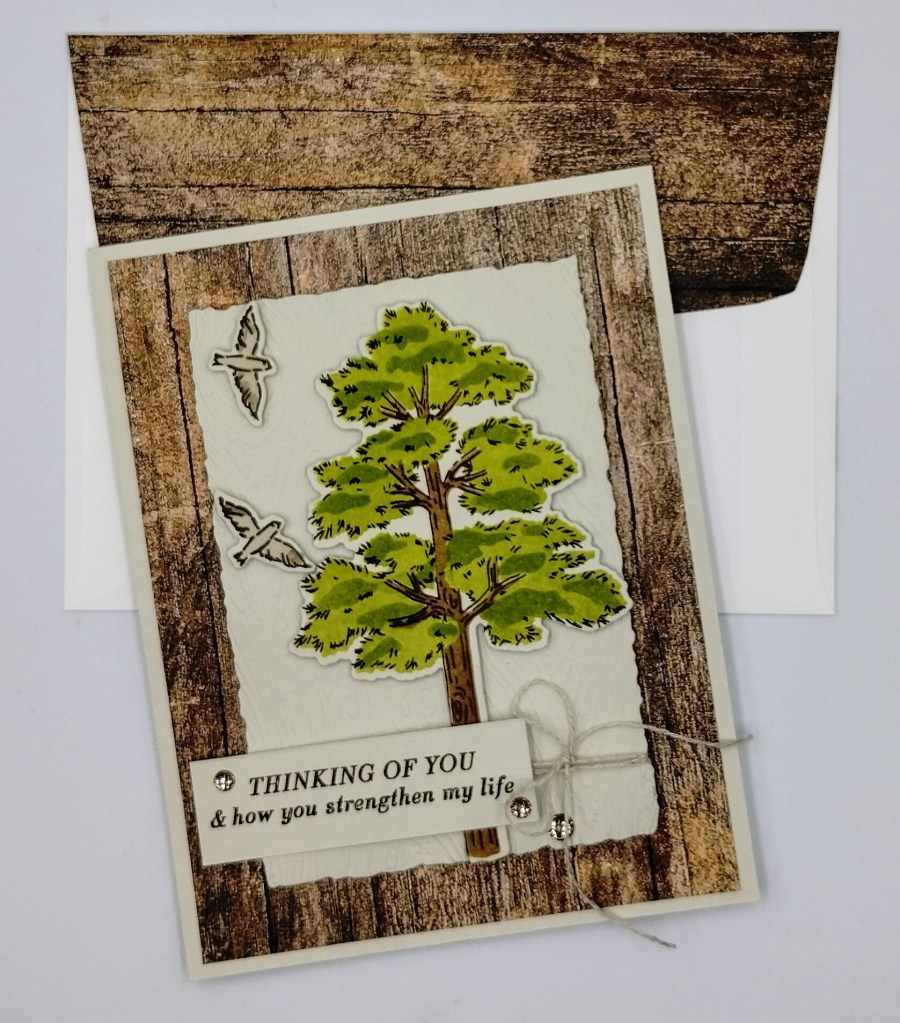
On a panel of Basic White, stamp the sentiment from the Frosted Forest stamp set in Smoky Slate Ink. Adhere 2 strips of the Winter Meadow DSP to either side of the Basic White panel. Adhere the Basic White panel to a Smoky Slate mat then to the inside of the Pebbled Path card base.
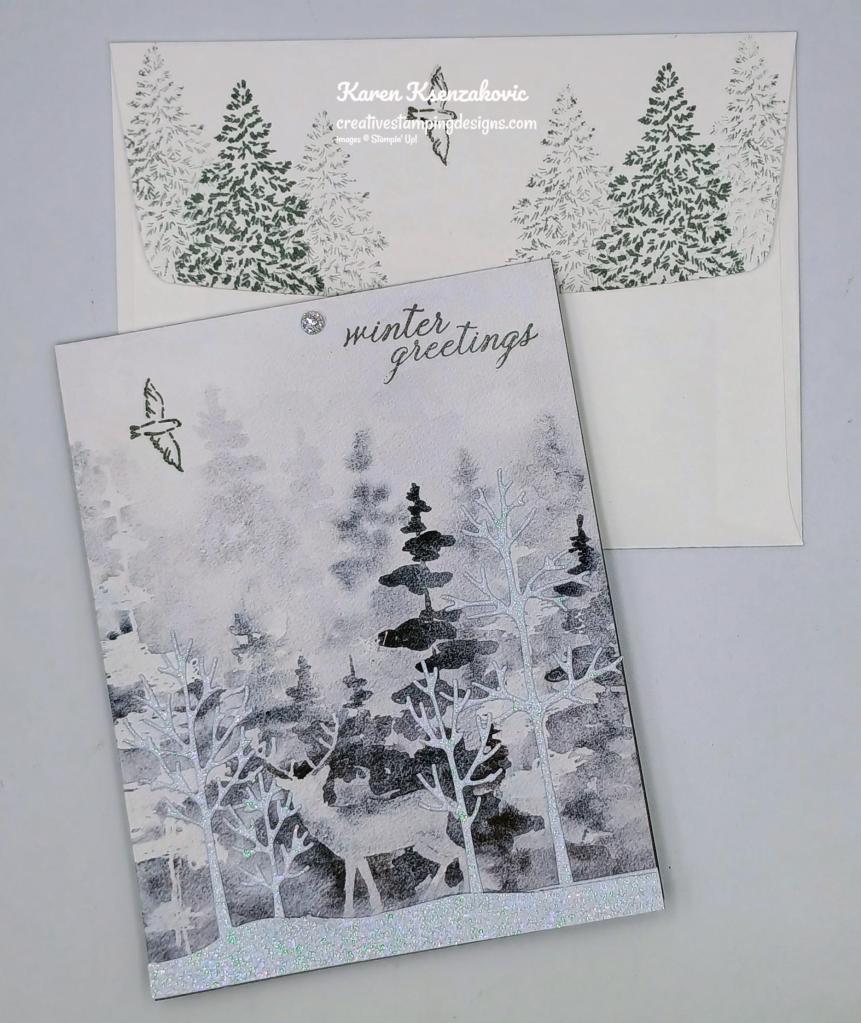
Complete the card by decorating a Basic White Medium Envelope. Stamp the smaller tree image from the Frosted Forest stamp set in Smoky Slate Ink on the envelope front and flap, some in full strength ink and some stamped off once. Stamp the bird image from the Frosted Forest stamp set in Pebbled Path Ink by the trees.
Thank you for stopping by my blog today. I hope you like my card and will give it a try. Happy Stamping!!
*********************************************************************************************************
If you need any stamping supplies, I’d love to be your Demonstrator. Just click HERE to go directly to my online store or drop me an email if you have any questions.
MY CURRENT HOST CODE IS: YUDYEUVM
Use this host code when placing an order with me. When you order $50 or greater you will receive a free gift from me! If your order is over $150, please do not use this code, but you’ll still get the free gift. The free gift is your choice of any 1 item valued up to $10.00 from the 2024 – 2025 Annual Catalog, September – December 2024 Mini Catalog or from the Online Exclusives! For any orders $50 or more I will also send you my monthly class tutorials. Click HERE or go to my Customer Rewards for more details and to see what this month’s tutorials are.
Please remember to use my current Host Code and make sure that you can see my name on the final checkout page listed as your Demonstrator when you order so that you know that you’re ordering with me, and you’ll get my rewards!
Happy Stamping, Karen
*********************************************************************************************************
In response to changing policies at Stampin’ Up – I’m adjusting my Ordering Gift policy as well. I’m having to get a little more tough on the adding of Host codes when you place your order thru my Online Store.
Not to worry – you’re still going to get that $10 ordering gift for orders of $50 (before shipping & tax) or greater. And the gift is still any 1 SU! product up to that $10 value.
But – if you DO NOT use the Host code for your orders of less than $150 (this is the RETAIL total before Shipping & Handling), then you’ll have two options:
- You’ll need to call Stampin’ Up! (1-800-Stamp-Up) and ask them to add it for you. They’re very helpful and will get it done quickly! OR….
- If your order was over the $50 threshold but under $150, then…you’ll forfeit that $10 ordering gift and rewards – this is the Bummer Option – and I REALLY don’t want to do this, SO please remember to add my Current Host Code.
*********************************************************************************************************
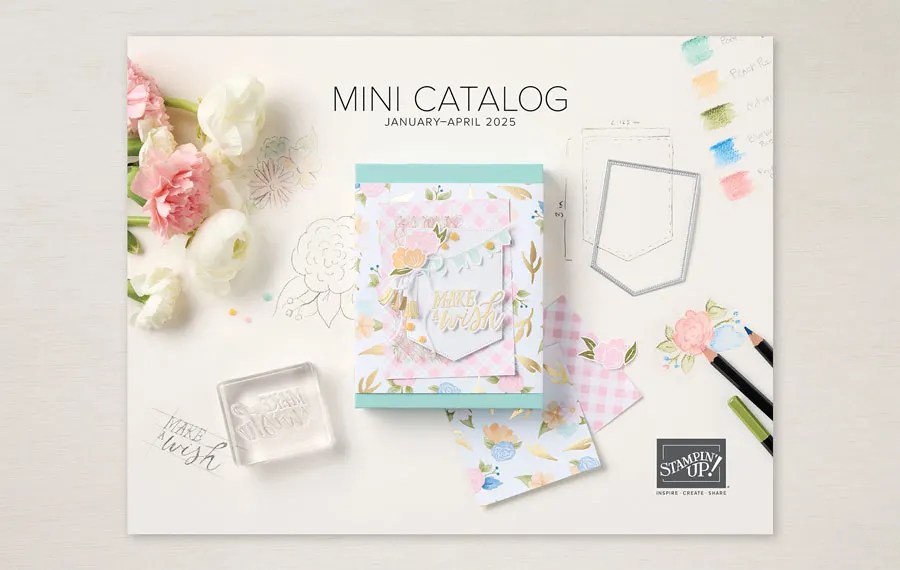
The January – April 2025 Mini Catalog is now live for ordering. What better way to kick off the new catalog than Double Creative Stamping Designs Rewards from me. I’m offering Double Rewards for all orders over $50 starting today through Sunday January 12th. How does this work? For a $50 you’ll earn 2 rewards, $100 you’ll earn 4 rewards, $150 you’ll earn 6 rewards, etc. Plus with all orders of $60 or more you will also earn Sale-a-bration items. Head over to my Online Store and get those orders in early and don’t forget you MUST use my Current Host Code YUDYEUVM to qualify for your rewards and free gift.
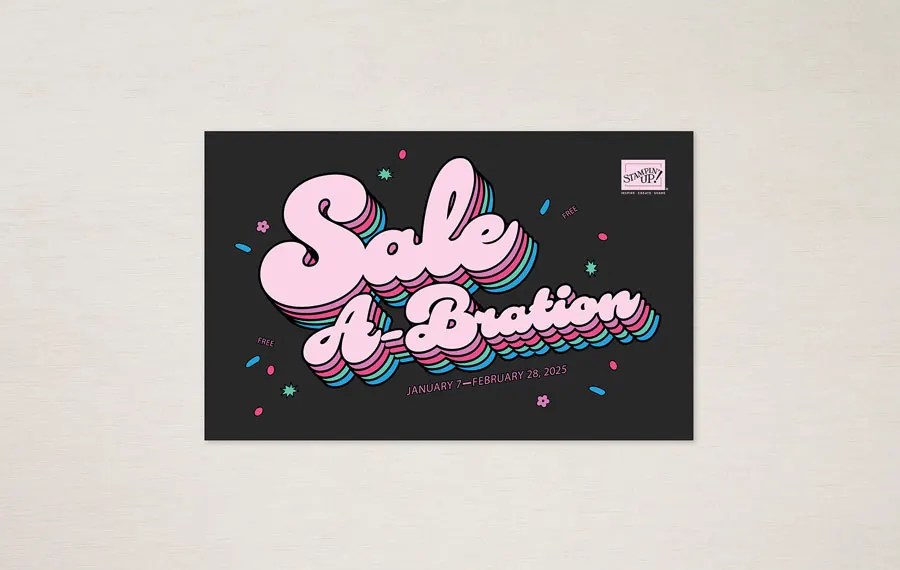
Sale-a-bration 2025 begins today Tuesday, January 7 and runs through Friday, February 28! There are some awesome new products that you can earn for FREE with orders of $60+ and orders of $120+ placed during Sale-a-bration as well as a great host bonus and a joining special!
SHOP
- Spend $60 or more and pick from 12 new products (5 stamp sets,3 designer series paper packs, 1 embossing folder, 1 kit, 1 pack of embellishments and 1 spool of ribbon!) that are available as free items!
- Spend $120 or more and pick from 2 new items (1 stamp bundle and 1 stamp set) that are available as free items!
HOST
- Get an additional $30 in FREE Stampin’ Rewards with any party or individual order of $300 or greater during Sale-a-bration! You can spend your Stampin’ Rewards on any items currently available from Stampin’ Up! including (but not limited to) the host exclusive stamp sets!
JOIN
Sale-A-Bration is an excellent time you to join Stampin’ Up! In addition to the already great value of the Starter Kit, if you sign up as a Stampin’ Up! demonstrator during Sale-a-bration, you can choose from two incredible options:
Option 1: Join Stampin’ Up! during Sale-a-bration as a new demonstrator and get $125 worth of products PLUS a choice of 2 Stampin’ Write Marker Assortments AND the Handmade Designs Cling Stamp Set, an exclusive stamp set designed to work with the markers. That’s a $216 value all for just $99!
Option 2: Join Stampin’ Up! during Sale-A-Bration and get $125 worth of product PLUS an additional $30 worth of product of your choice for just $99. That’s a $155 value!
Two joining options so you can pick the one that you like the best!!
There is never an obligation to sell. You can join just to enjoy the discount for yourself along with all the other Demonstrator benefits. Once you join, you’ll get at least a 20% discount on all of your Stampin’ Up! merchandise purchases and you get to order early from the upcoming catalogs! You will also be able to attend the OnStage Events and any other events Stampin’ Up! has and you get to be a part of our Stampin’ Up! team!
Unsure about this and want to talk? Contact me at creativestampingdesigns@gmail.com and we can talk. You can also find additional information Here at Join My Team. Being a part of the Stampin’ Up! Community is one of the best decisions I’ve ever made. I have made many friends along the way while doing what I love, Paper Crafting. This Joining offer is only good during Sale-a-bration which starts January 7 and ends on February 28. Why not give it a try? I’d love to have you on my team.
*********************************************************************************************************
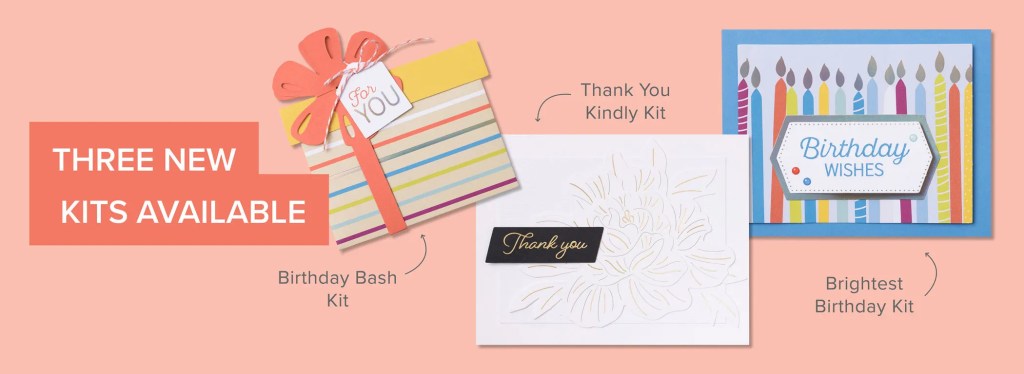
3 New Kits Available
KITS COLLECTION
– Are pre-designed projects that come in a range of project types.
– Perfect for new crafters, busy crafters, or crafters who want quick and easy projects.
Brightest Birthday
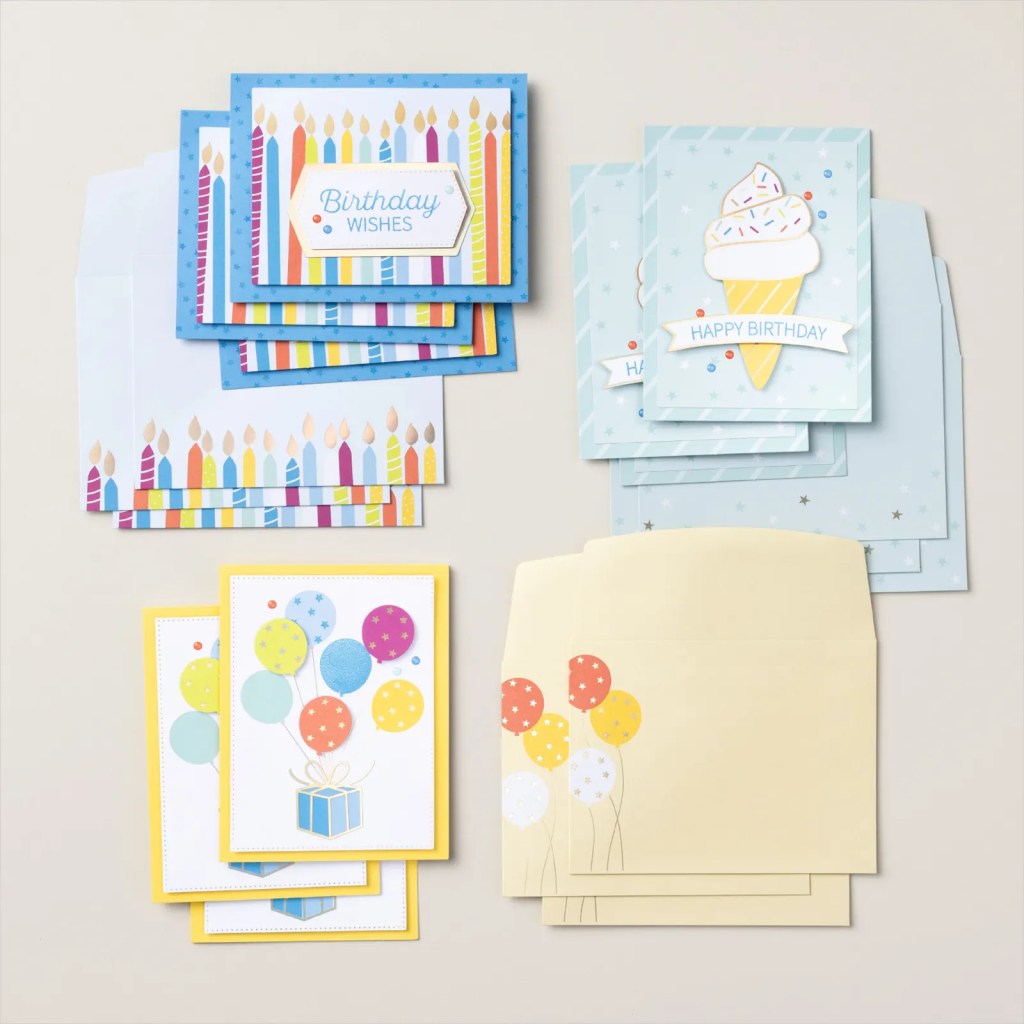
Celebrate every birthday with cards made from the Brightest Birthday Kit. As you craft the perfect birthday card, stamp out a happy sentiment using the included stamp set and add some shine with holographic gold foil elements. With coordinating envelopes and bright embellishments, these cards will surely brighten up any birthday celebration.

DETAILS
– Makes 9 cards: 3 each of 3 designs
– Folded card size: 4-1/4″ x 5-1/2″
– Colors: Azure Afternoon, Berry Burst, Calypso Coral, Daffodil Delight, Lemon Lime Twist, and Pool Party
Kit includes one of each item listed below.
– Brightest Birthday Photopolymer Stamp Set
– Clear stamp block
– Azure Afternoon Classic Stampin’ Spot
– Pre-designed project
– Step-by-step instructions
– 9 printed envelopes
– Adhesive
– Holographic gold foil elements
– Embellishments
A 9-7/8″ x 6-1/2″ x 2-3/4″ printed box for storage or crafting on the go

#165004 $33.00
++++++++++++++++++++++++++++++++++++++++++++++++++++++++++++++++++++++
Birthday Bash
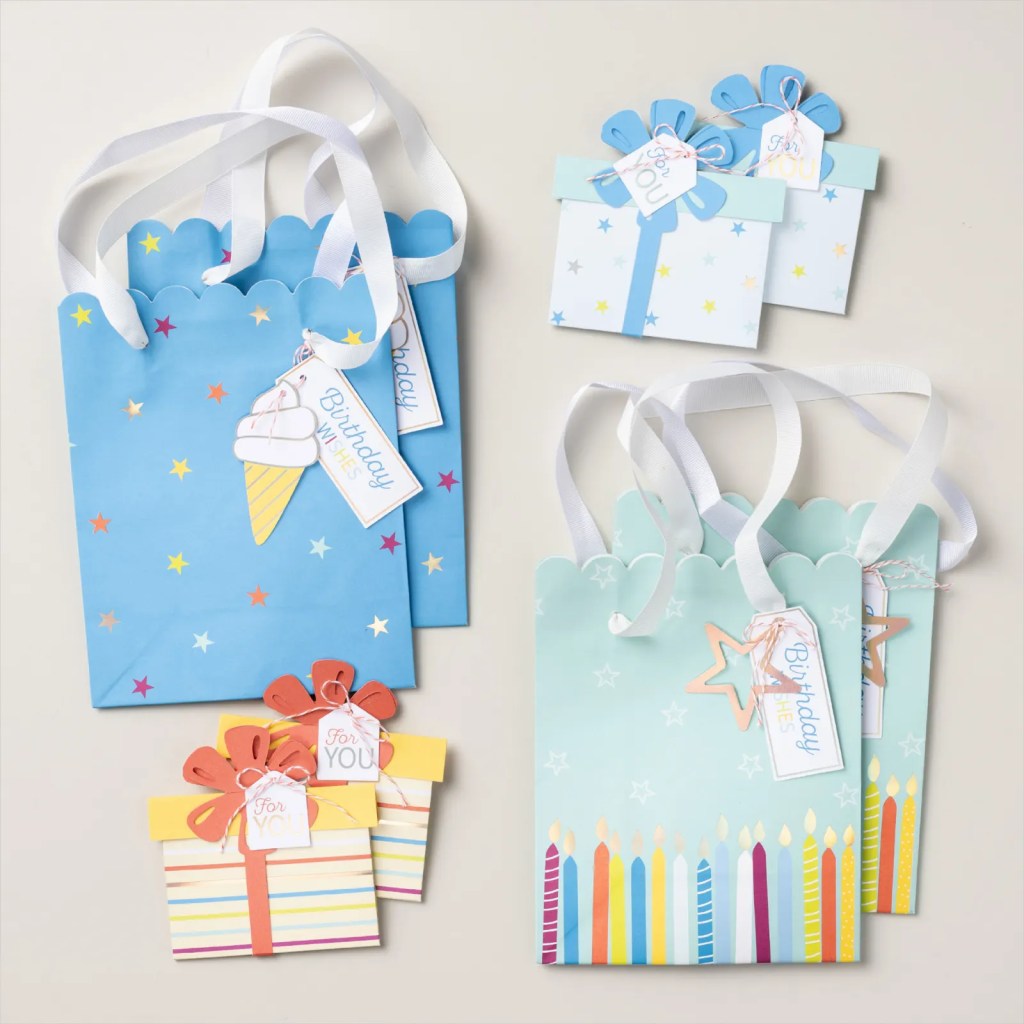
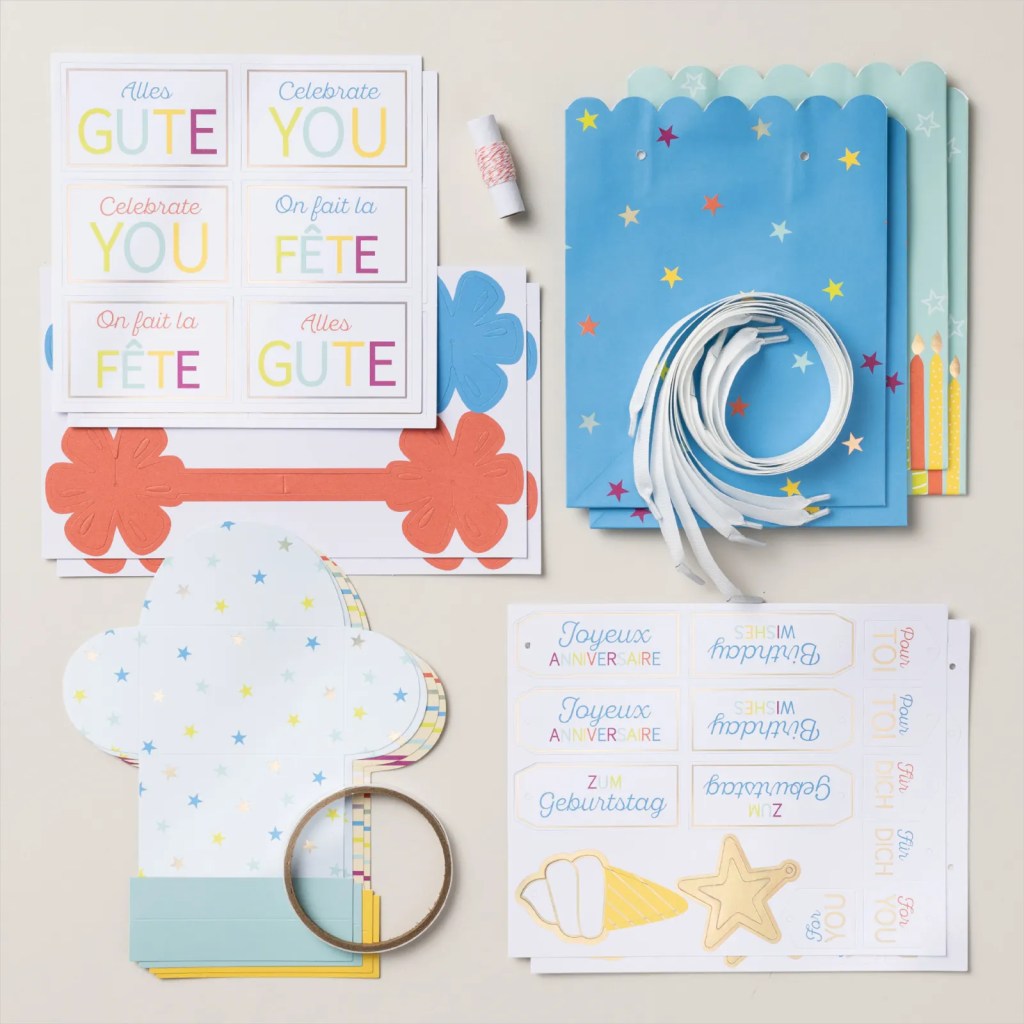
If it’s time to celebrate a birthday, you’ll want to have the Birthday Bash Kit! This kit includes four gift bags and four gift card holders with special gift tags and coordinates with the Brightest Birthday Kit. The cheerful, bright gift packaging in this kit will make any birthday a celebration! Sentiments come printed in English, French, and German.
DETAILS
– Makes 4 gift bags: 2 each of 2 designs
– Gift bag size: 6-1/4″ x 3-1/2″ x 8″
– Makes 4 gift card holders: 2 each of 2 designs
– Gift card size: 3-1/2″ x 4-1/2″
– Colors: Azure Afternoon, Berry Burst, Calypso Coral, Daffodil Delight, Lemon Lime Twist, Pool Party
Kit includes one of each item listed below.
– Predesigned project
– Step-by-step instructions
– Adhesive
– Coral and White Bakers Twine
– Gift Tags
– Pre-cut paper with holographic gold foil
– A 9-7/8″ x 6-1/2″ x 2-3/4″ printed box for storage or crafting on the go
#165010 $14
++++++++++++++++++++++++++++++++++++++++++++++++++++++++++++++++++++++
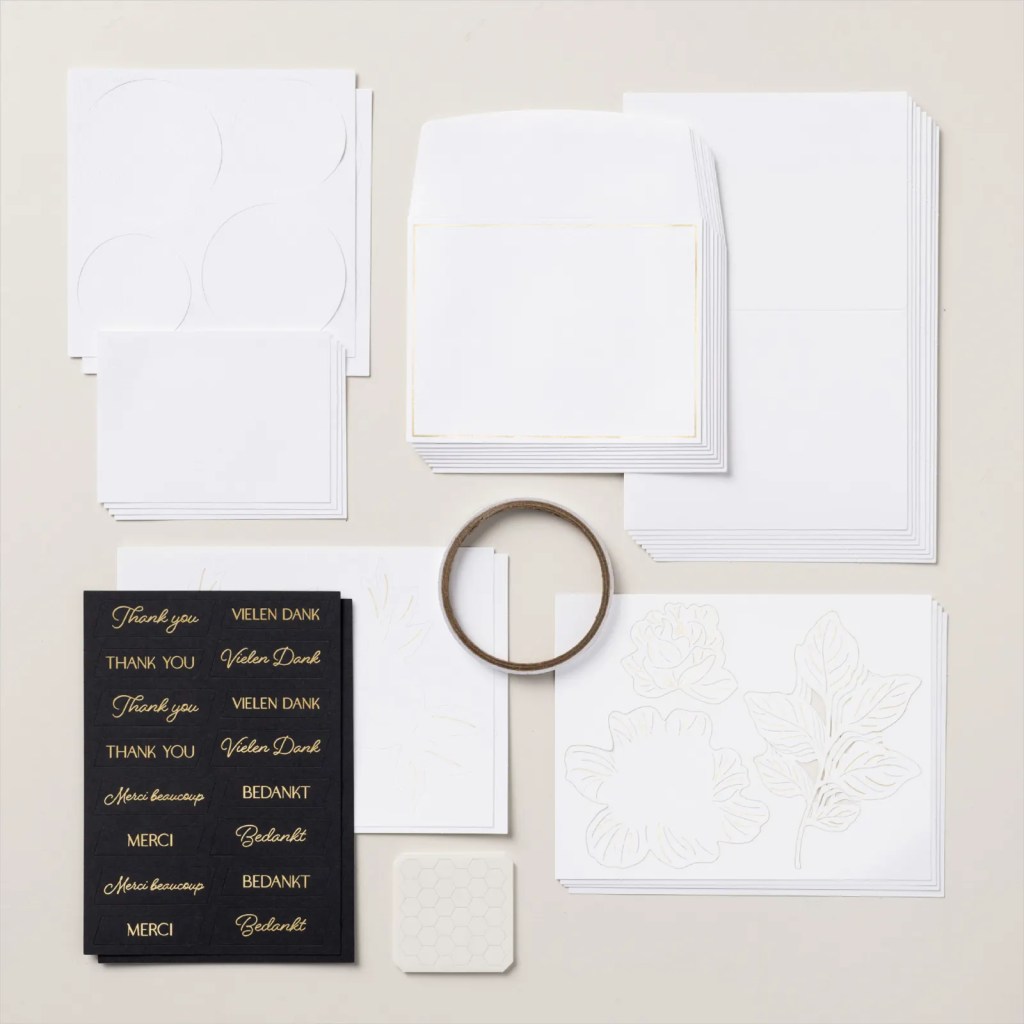
Thank You Kindly
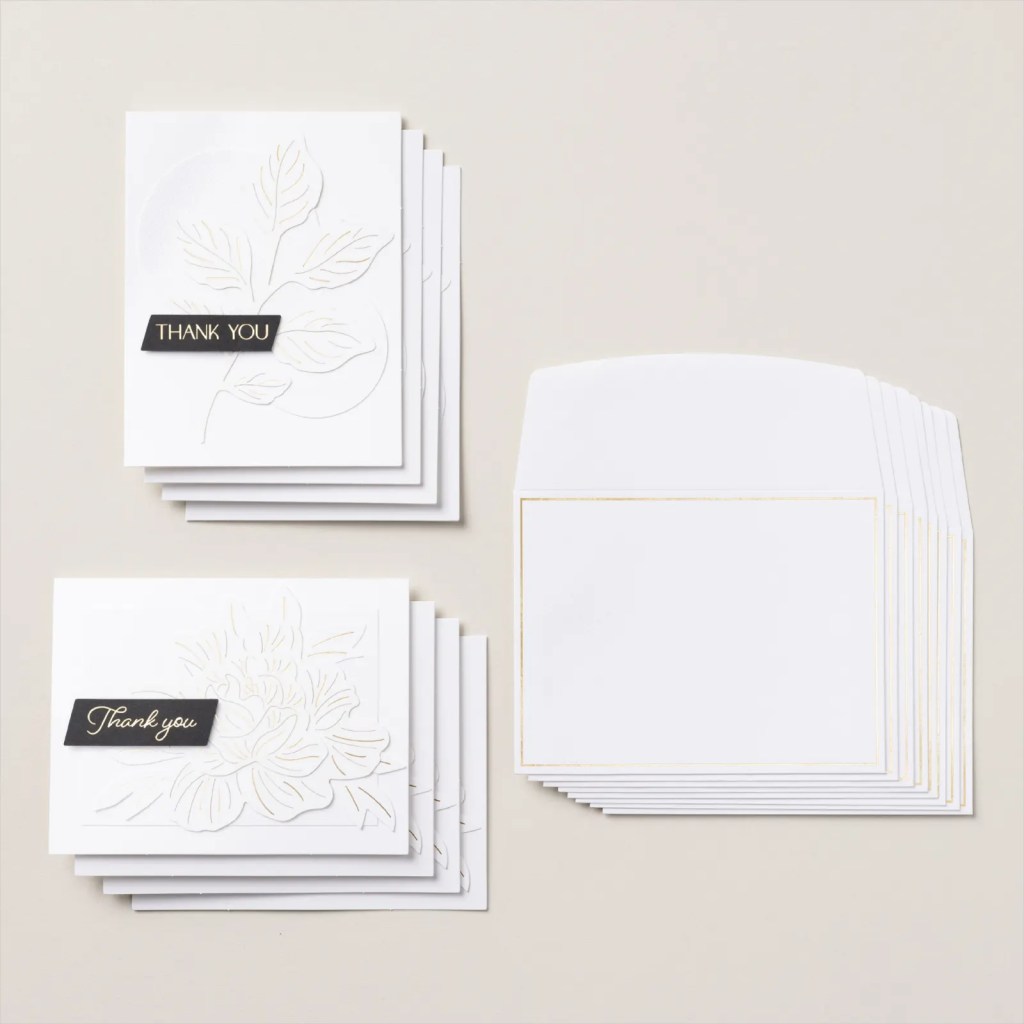
The Thank You Kindly Kit showcases the beauty of simplicity. It includes two elegant card designs with textured layering pieces, which are both perfect for crafters who are just starting out. Use these cards and coordinating envelopes to send gratitude after a big event or to send a friend a simple thank you note. Sentiments come printed in Dutch, English, French, and German.
DETAILS
– Makes 8 cards: 4 each of 2 designs
– Folded card size: 4-1/4″ x 5-1/2″
– Colors: Basic Black, Whisper White, Gold Foil
Kit includes one of each item listed below.
– Pre-designed project
– Step-by-step instructions
– 8 printed envelopes
– Adhesive
– Pre-cut paper with gold foil
– A 9-7/8″ x 6-1/2″ x 2-3/4″ printed box for storage or crafting on the go
#166258 $14
*********************************************************************************************************
New Online Exclusives now Available
Go check out my Online Store for the NEW Online Exclusive products available. Get those orders placed early so you don’t miss out on the pretty new suite and new bundles.
*********************************************************************************************************
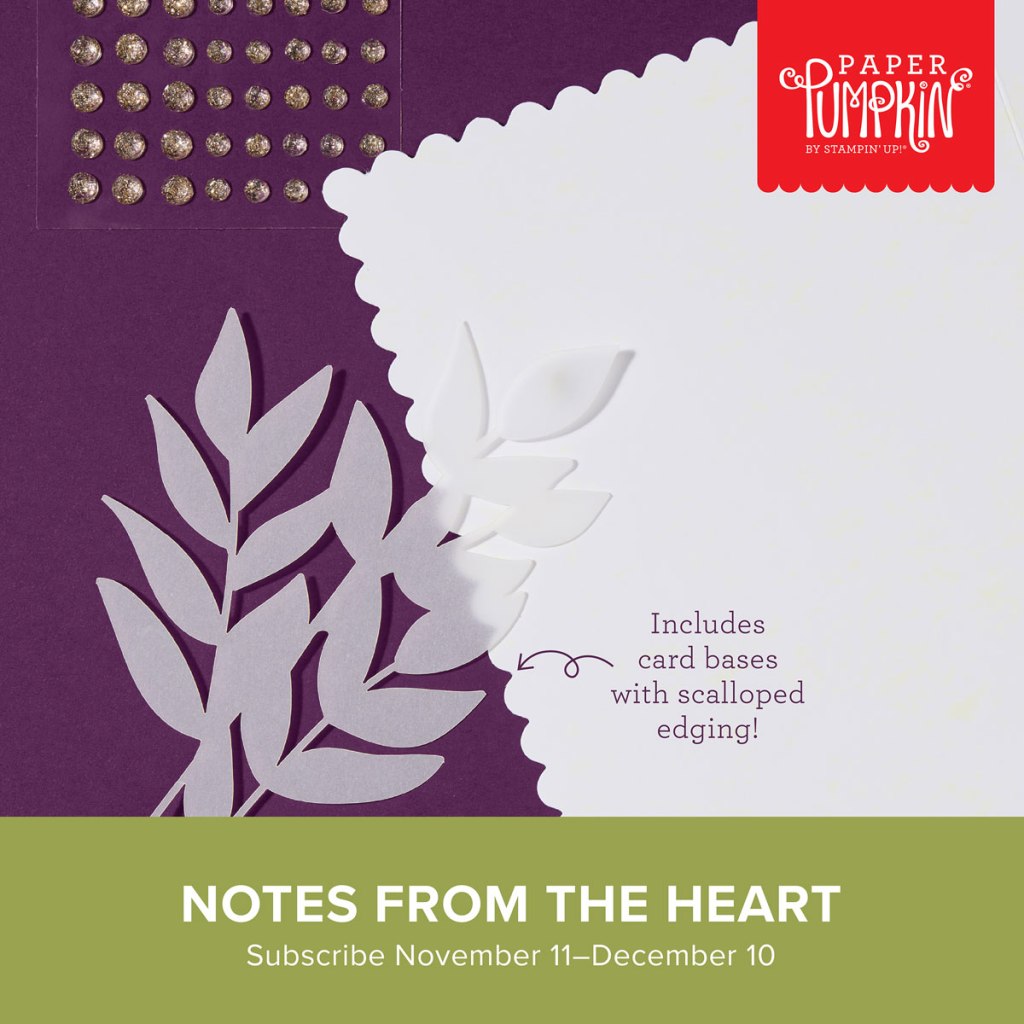
Hearts for You
Subscribe December 11 – January 10

Create heartfelt cards for Valentine’s Day, Galentine’s Day, and beyond!
• Makes 9 cards: 3 each of 3 designs with 9 envelopes
• Heart-shaped precut pieces and stickers
• Twine and heart gem embellishments
• Coordinating colors: Flirty Flamingo, Petal Pink, Real Red (Classic Stampin’ Spot)
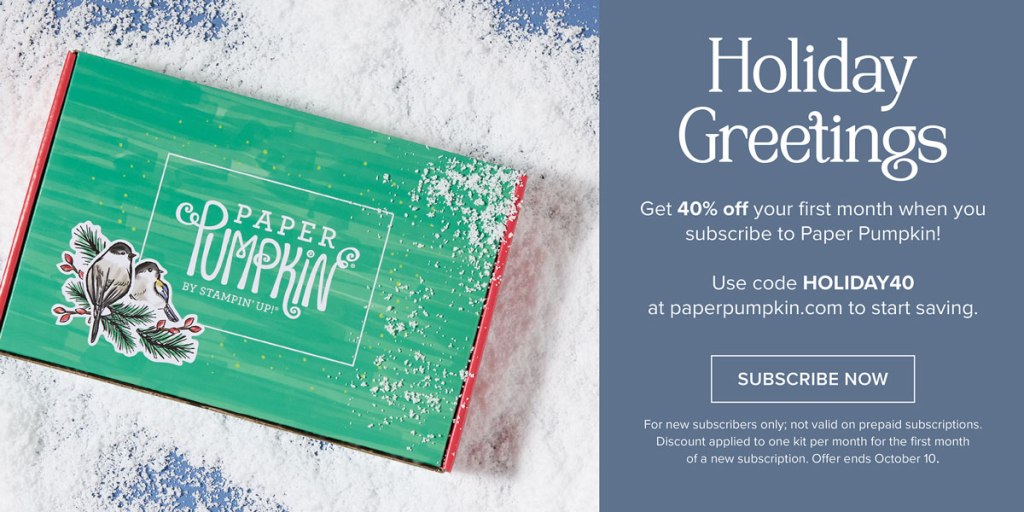
Subscribe to Paper Pumpkin for a monthly, all-inclusive crafting kit that’s a fun surprise! Each kit includes a photopolymer stamp set, Classic Stampin’ Spot, and step by step instructions to complete exclusive paper craft projects, including cards, tags, and gift
packaging. And don’t miss the special add-on that coordinates with the next three months!
Subscribe to the January Paper Pumpkin Kit between 11 December and 10 January by clicking here!
*********************************************************************************************************
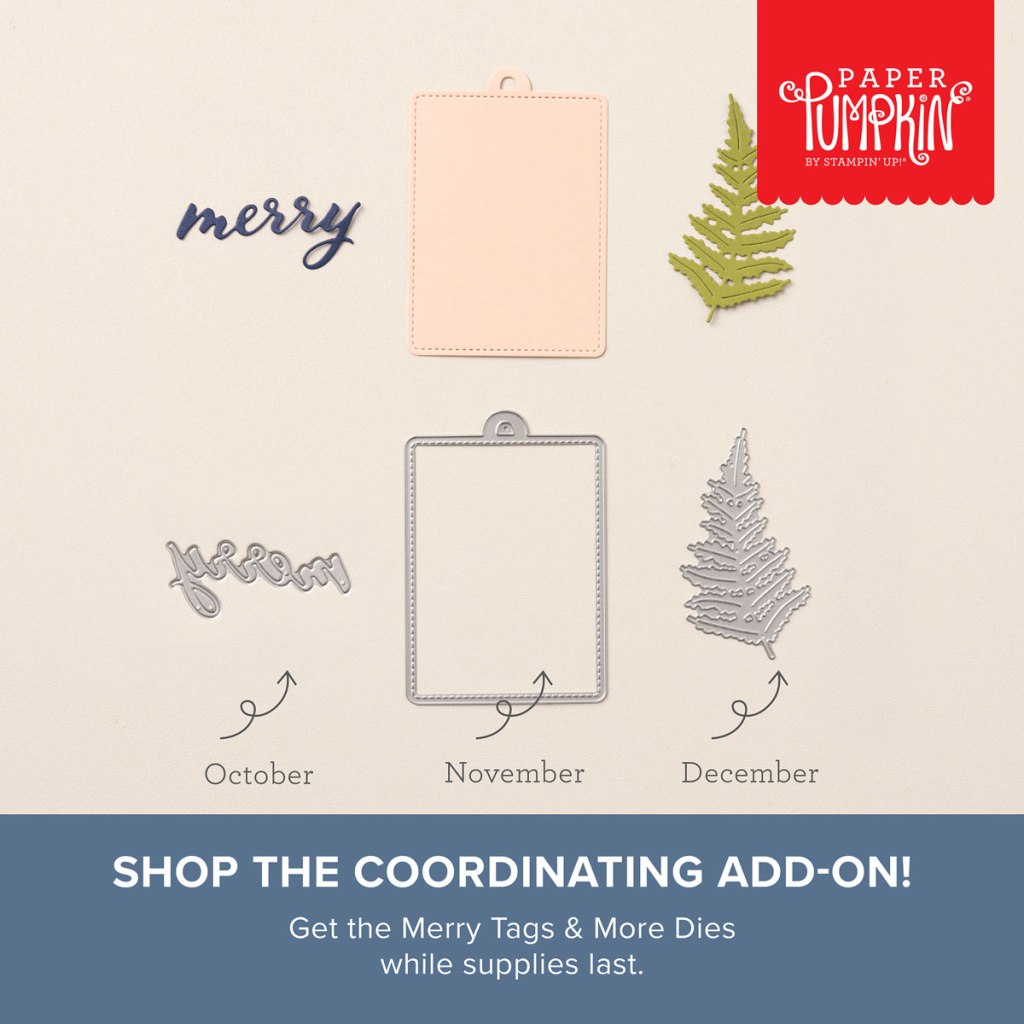
Don’t miss the coordinating
Spring is in The Air Dies Add-On!
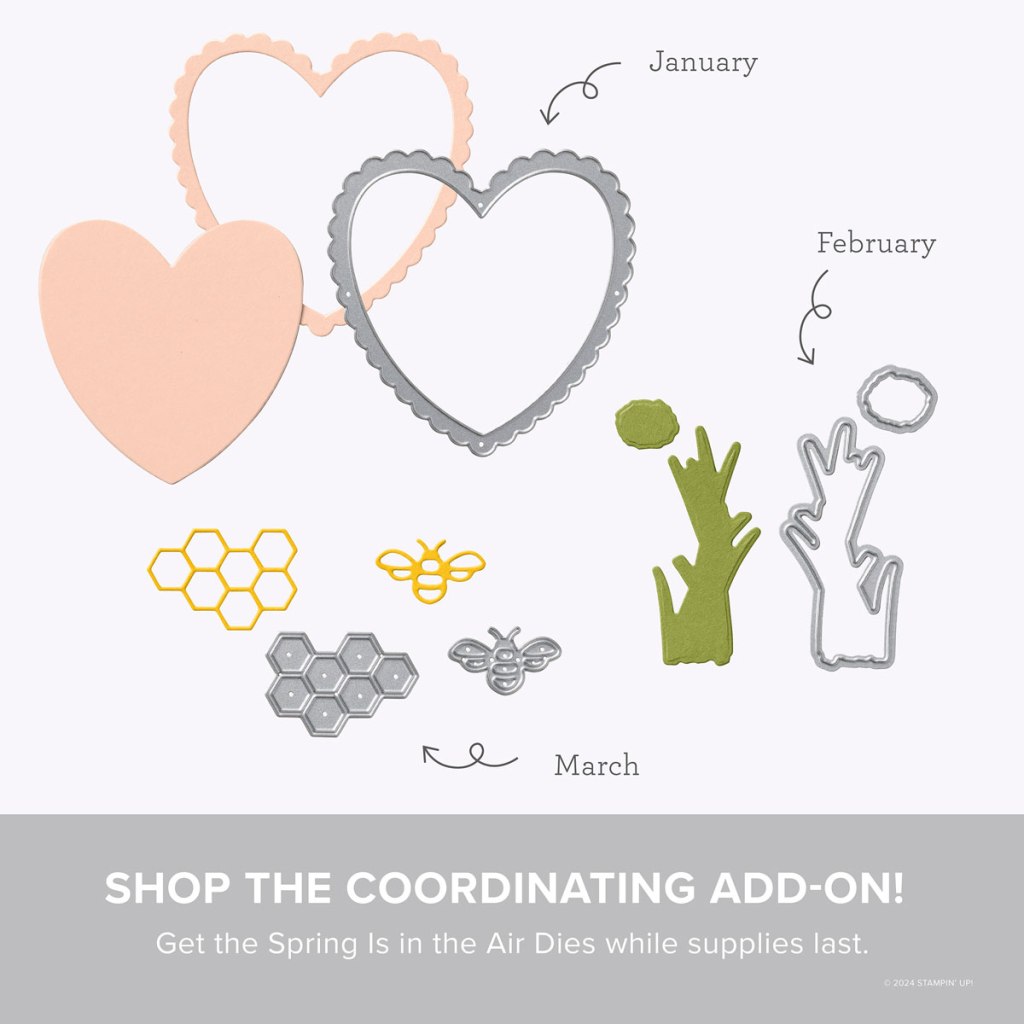
Make the most of your Paper Pumpkin kits with the Spring Is in the Air Dies add-on! Quickly and cleanly cut out a heart frame, flowering chive, honeycomb, or tiny bumblebee to elevate your crafting projects. These additional dies are designed to work with THREE Paper Pumpkin Kits: the Hearts for You Paper Pumpkin Kit, the Spring Is in the Air Paper Pumpkin Kit, and the Daisy Daydream Paper Pumpkin Kit. Pair these dies with other Stampin’ Up! products for even more creative options!
DETAILS
– 5 dies
– Largest die: 3″ x 3″ (7.6 x 7.6 cm)
– Use with a Stampin’ Cut & Emboss Machine (sold separately)
You must be a current Paper Pumpkin subscriber to purchase this item. To become a subscriber, visit paperpumpkin.com.
#166237 $12
Note: Supplies may be limited toward the end of the subscription period.
*********************************************************************************************************
Card stock cuts for this project:
- Basic White Cardstock 4″ X 5 1/4″(inner liner)
- Pebbled Path Cardstock 4 1/4″ X 11″(card base scored & folded at 5 1/2″)
- Smoky Slate Cardstock 4 1/8″ X 5 3/8″(inner liner mat)
- Berry Burst, Old Olive & White Glimmer Specialty Paper – 3″ X 4 1/2″(trees)
- Winter Meadow Designer Series Paper 4 1/4″ X 5 1/2″(card front), 2 – 1/2″ X 5 1/4″(inner liner)
*********************************************************************************************************
Product List
")
")
")


 Designer Series Paper")


")


 Designer Series Paper")


 Designer Series Paper")


