Stampin’ Up! The Right Words Triple ‘Z’ Fold Card

Good Monday morning stamping friends and welcome to a new week and the 1st week of March!! I hope you all had a great weekend. We had a bit of a tease here in NJ, it was in the 50’s on Saturday but then only the 30’s on Sunday.

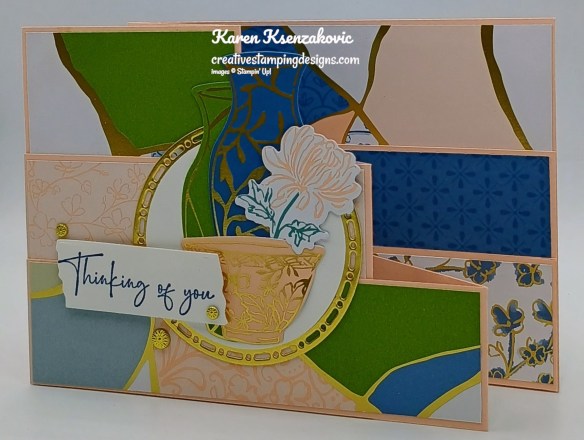
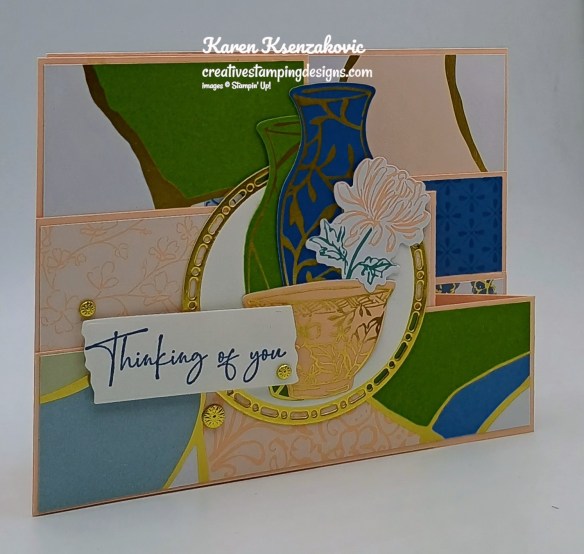
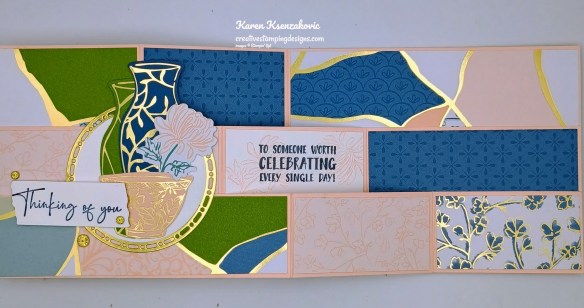
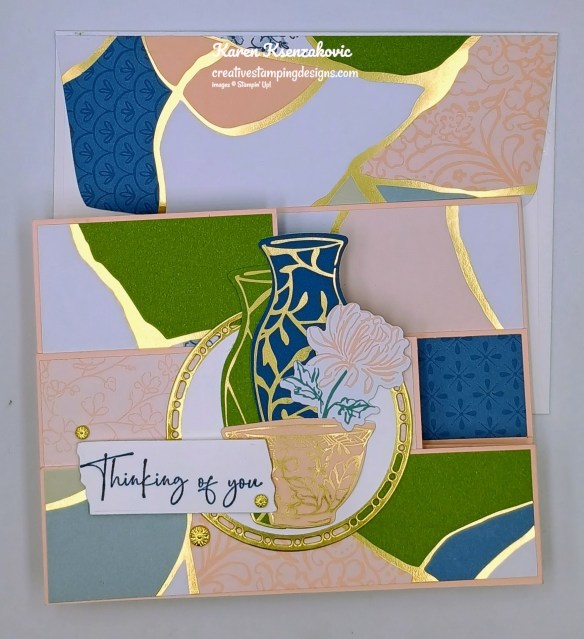
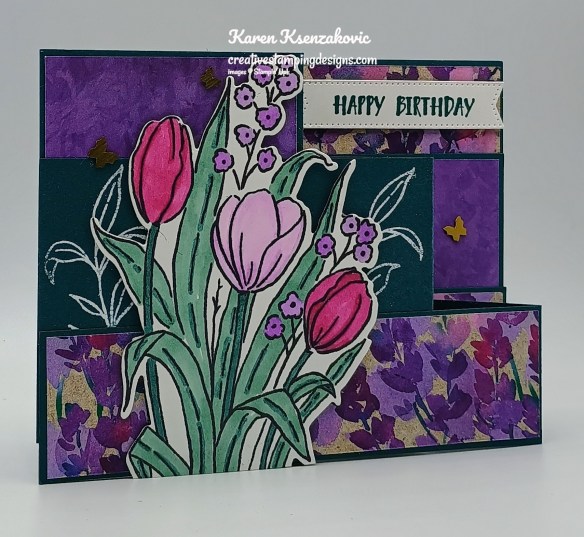
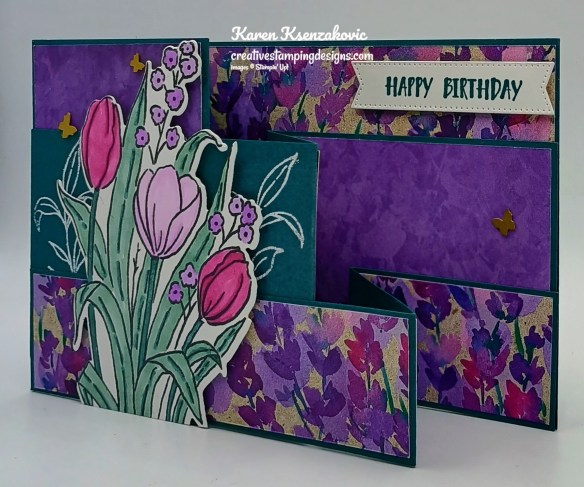
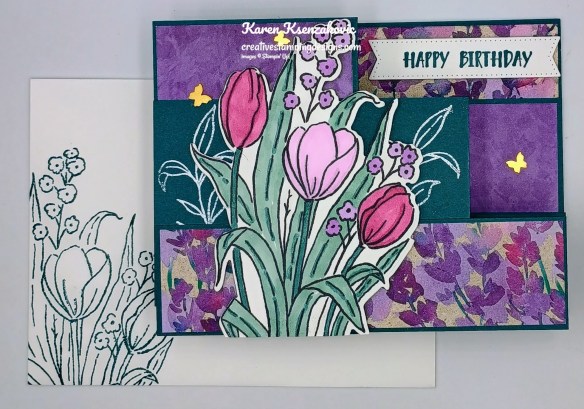
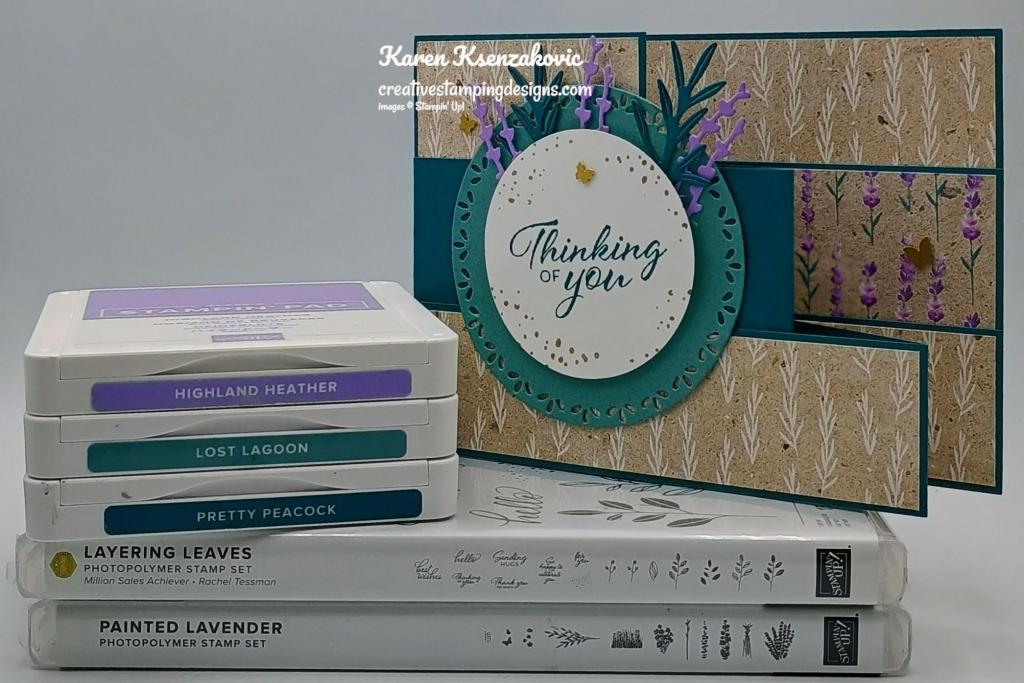
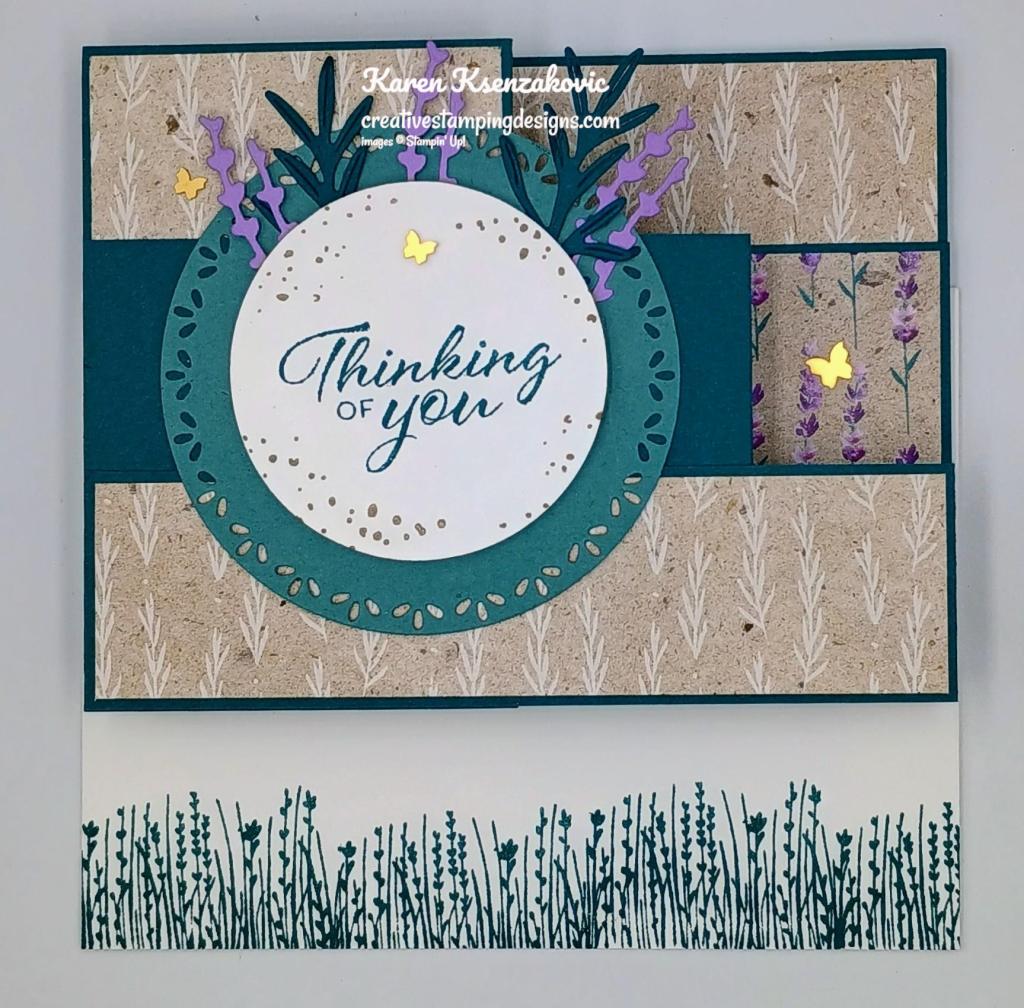
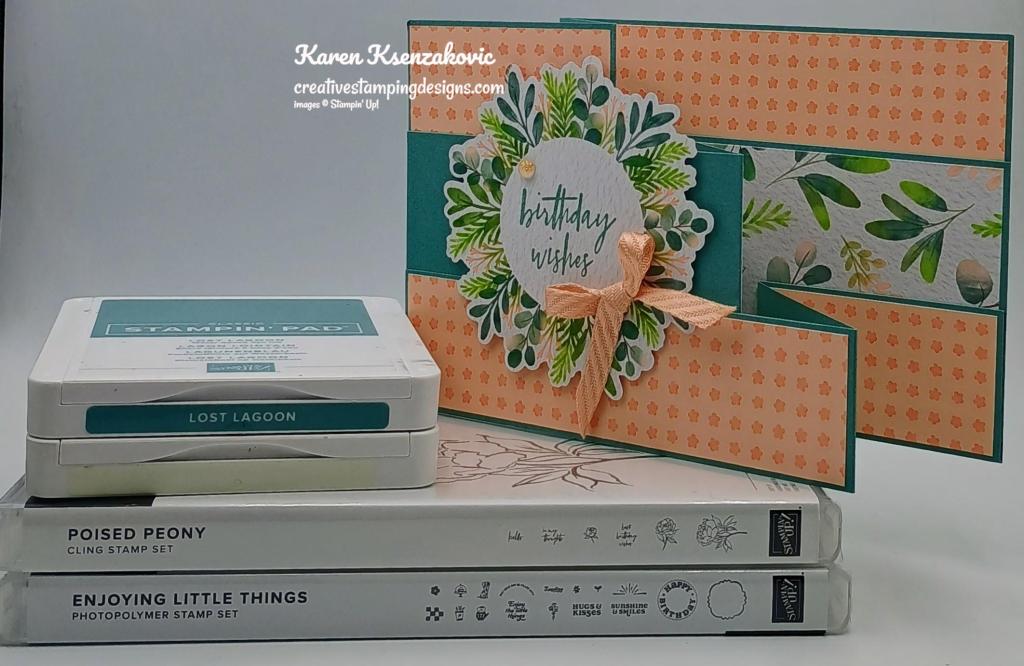
I have a triple ‘Z’ fold card for you today. “Z” fold cards are the easiest fun fold, but when you add 2 more folds in, it could be a little tricky. Here’s my card for today.

Stampin' Up! The Right Words Fun Fold 1 creativestampingdesigns.com

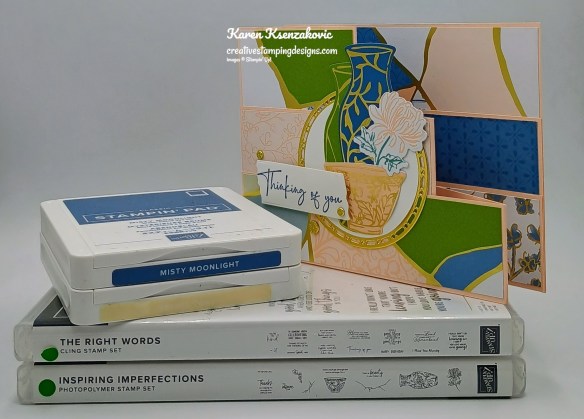
I used the Stampin’ Up! the Right Words Stamp Set along with the Stampin’ Up! Inspiring Imperfections Bundle, Kintsugi Inspirations Specialty Designer Series Paper, Spotlight on Nature Dies and 2 3/8″ Circle Punch for my card today.

Stampin' Up! The Right Words Fun Fold 2 creativestampingdesigns.com

Adhere the panels of Kintsugi Inspirations DSP to the coordinating Petal Pink card bases. Do not put any DSP on the center panel of the 2nd card base.

Stampin' Up! The Right Words Fun Fold 3 creativestampingdesigns.com

You can mix up and use however many different patterns of DSP that you would like.

Stampin' Up! The Right Words Fun Fold 4 creativestampingdesigns.com

From a panel of Basic Whtie, using the 2 3/8″ Circle Punch, cut the circle. Stamp the sentiment from The Right Words stamp set in Misty Moonlight Ink on the panel of Basic White. Cut the sentiment out using the Inspiring Imperfections Dies. On the top of the small square of Basic Whtie, stamp the sentiment from The Right Words stamp set in Misty Moonlight Ink. Stamp the flower image from the Inspiring Imperfections stamp set in Petal Pink Ink over the sentiment, stamping off once on scrap paper. Using the Spotlight on Nature Dies, cut the Gold Foil Paper. From a panel of Kintsugi Inspirations DSP, cut the vases and flower using the Inspiring Imperfections Dies.

Stampin' Up! The Right Words Fun Fold 5 creativestampingdesigns.com

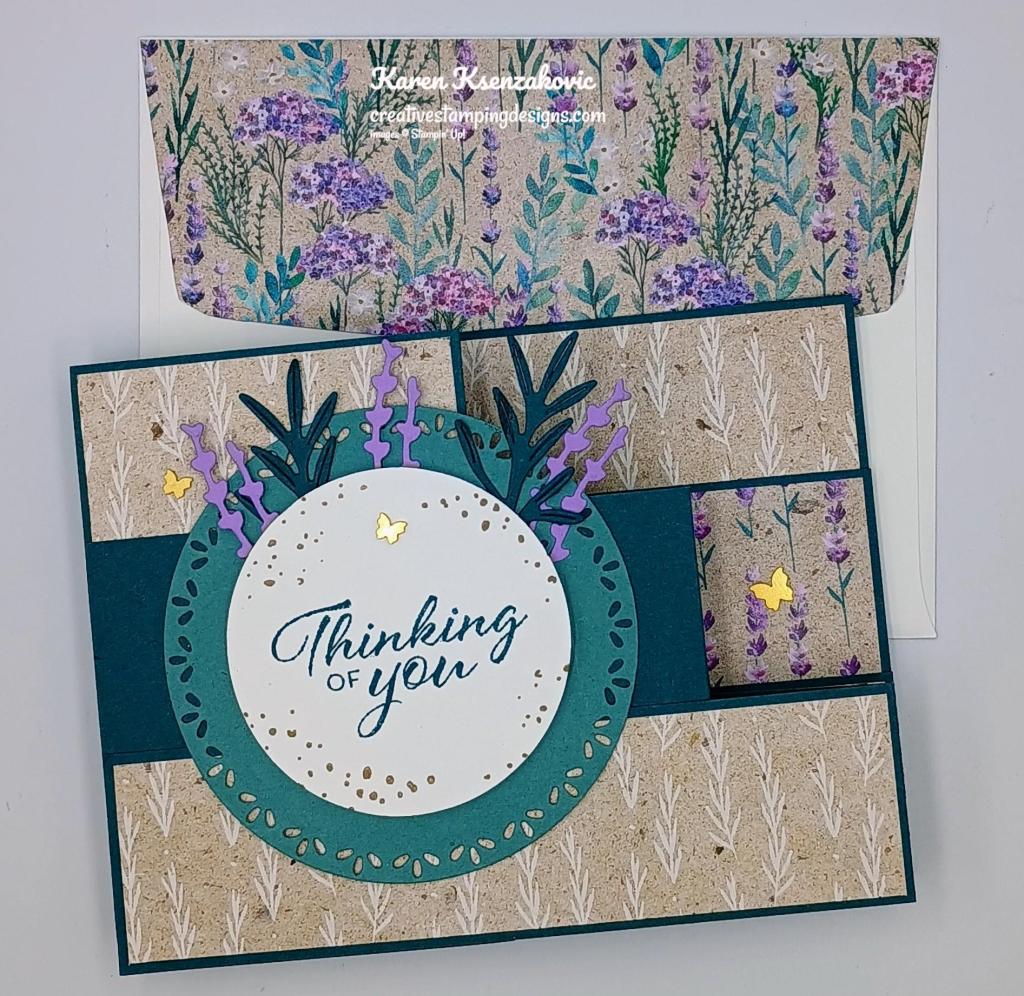
Adhere the small sentiment square to the center of the 2nd card base panel. Adhere the 2nd card base panel to the large card base, with the 4 1/8″ side to the left, lining up the bottom corners on both sides. Adhere the small 3rd card base to the large card base, with the 5 1/2″ side to the left, lining up the bottom corners on both sides. Adhere the punched circle to the center of the die cut gold foil circle. Adhere the vases and flower to the circle. Adhere the layered circle to the card front. Adhere the die cut sentiment to the card front. Add a few Flower Accents to the card front.

Stampin' Up! The Right Words Fun Fold 6 creativestampingdesigns.com

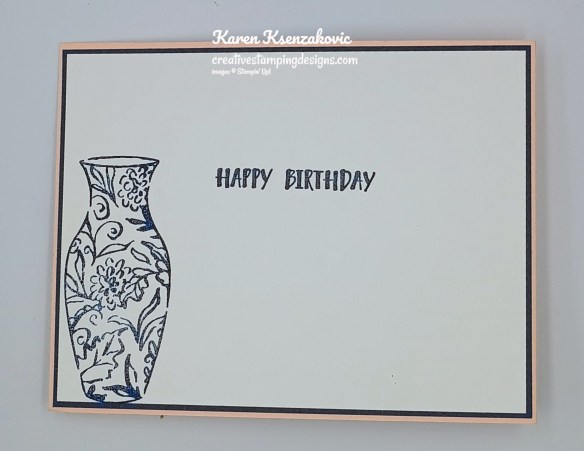
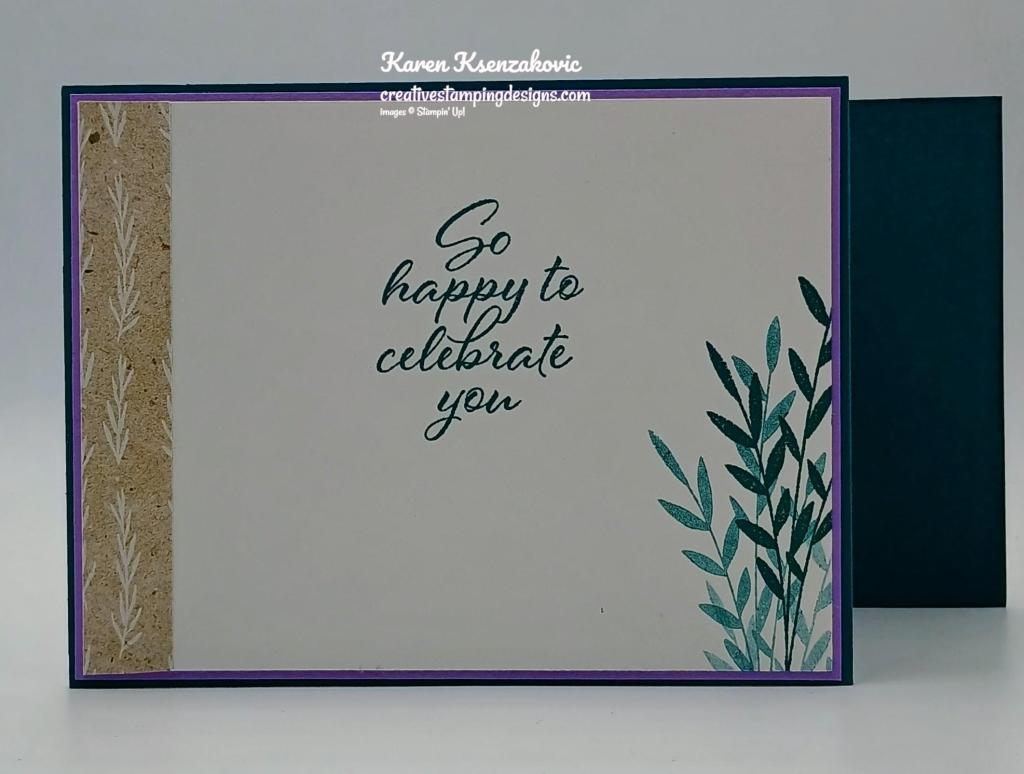
Stamp the sentiment from The Right Words stamp set in Misty Moonlight Ink on a panel of Basic White. Stamp the tall vase image from the Inspiring Imperfections stamp set in Misty Moonlight Ink on the side of the panel. Adhere the Basic White panel to a Misty Moonlight mat then to the back of the Petal Pink card base.

Stampin' Up! The Right Words Fun Fold 7 creativestampingdesigns.com

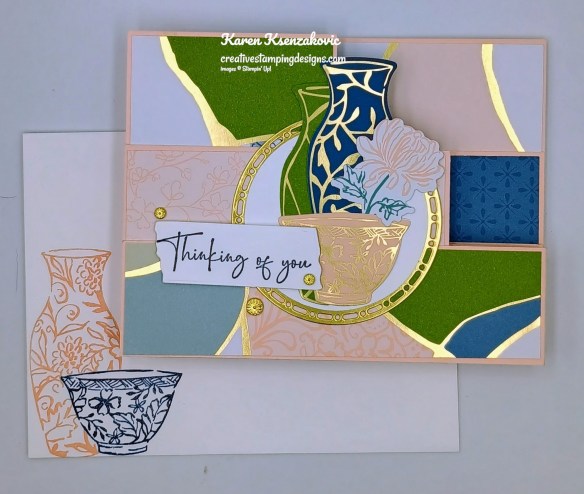
Finish your card by decorating a Basic White Medium Envelope. Stamp the vase images from the Inspiring Imperfections stamp set in Misty Moonlight and Petal Pink Inks on the envelope front. Adhere a panel of Kintsugi Inspirations DSP to the envelope flap.

Stampin' Up! The Right Words Fun Fold 8 creativestampingdesigns.com

Thank you for stopping by my blog today. I hope you like the card and will give it a try. Happy Stamping!!

*********************************************************************************************************

If you need any stamping supplies, I’d love to be your Demonstrator. Just click HERE to go directly to my online store or drop me an email if you have any questions. 

*********************************************************************************************************

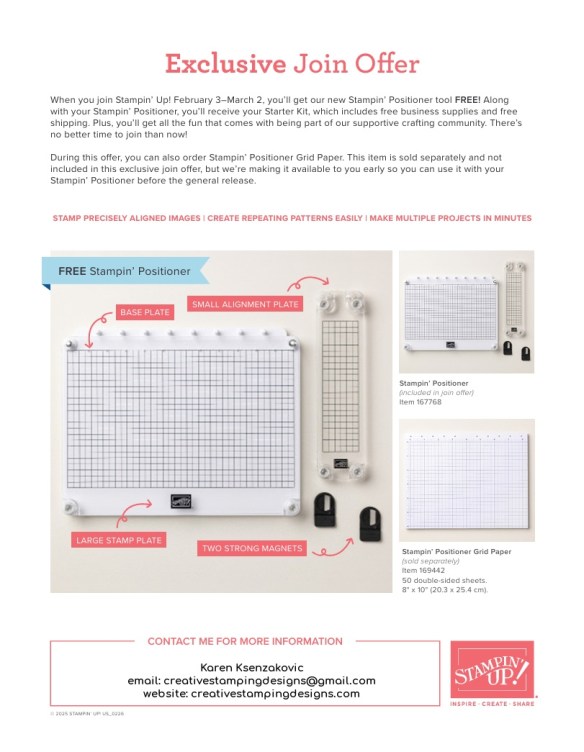
TODAY is the Last Day for Stampin’ Up! Joining Special – Free Positioning Tool

Stampin’ Up! has an amazing new tool that will be available for FREE with the purchase of a Starter Kit between February 3-March 2!!  Anyone that purchases the Starter Kit during the promotion will get the awesome new Stampin’ Positioner with their Starter Kit absolutely FREE!! As a bonus for joining my team, you get to attend all my monthly Online Classes absolutely FREE. Contact me today and we can talk about getting you signed up.

Here are the Starter Kit promotion details:

  • Promotion Period: February 3–March 2
  • New team members who purchase their Starter Kit February 3–March 2 will also receive our new Stampin’ Positioner*.
  • New demonstrators who submit their Independent Demonstrator Agreement (IDA) before February 3 or after March 2 will not be eligible for this offer.
  • Joining deadline:  March 2, 2026, at 11:59 p.m. (MT)

*What’s the Stampin’ Positioner?

It’s Stampin’ Up!’s new stamping alignment tool that makes stamping easier and more accurate. It allows you to stamp precisely aligned images, create repeating patterns and Two-Step Stampin’ images easily, and make multiple projects in minutes.

Stampin’ Positioner Grid Paper will also be available for to order but it is not included as part of this exclusive join offer.

A few other things to know:

  • The Stampin’ Positioner WILL be available for purchase by everyone at a later date.  We have not been given any details on when that will be.
  • The Stampin’ Positioner is available for a limited time for current Demonstrators to purchase.

You can read more details about the joining offer on this PDF (click the image to open a full-size printable PDF):

We’d love to have you join our team!!  Once you join, you get at least a 20% discount on all of your Stampin’ Up! purchases and you get to preorder from the upcoming catalogs and promotions!! You can attend the Stampin’ Up! events too. There’s never an obligation to sell, you can join to enjoy the discount for yourself. Contact me if you have any questions and we can talk. I’d love to have you on my team. I’d be more than happy to answer any of your questions, contact me at creativestampingdesigns@gmail.com

You can read a bit more information about the benefits of being a Demonstrator and a part of our team here.  When you’re ready to join, you can get started here.  Let me know if you have any questions.

*********************************************************************************************************

Card stock cuts for this project:

  • Basic White Cardstock 3 3/4″ x 5″ (punch, sentiment & die cut), 2 5/8″ x 2 5/8″ panel, 4″ x 5 1/4″(back panel)
  • Misty Moonlight Cardstock 4 1/8″ x 5 3/8″(back panel mat)
  • Petal Pink Cardstock 4 1/4″ x 11″(card base scored & folded at 2 3/4″ & 5 1/2″), 2 3/4″ x 11″(2nd card base scored & folded at 4 1/4″ & 7″), 1 1/2″ x 11″(3rd card base scored & folded at 5 1/2″ & 8 1/4″)
  • Kintsugi Inspirations Specialty Designer Series Paper (2) – 2 5/8″ x 4 1/8″ & 4 1/8″ x 5 3/8″ panels, 2 5/8″ x 3 7/8″ panel, 1 3/8″ x 5 3/8″ & (2) – 1 3/8″ x 2 5/8″ panels, 2 1/4″ x 6″ panel
  • Gold Foil Sheet – 3″ x 3″ panel

*********************************************************************************************************

Product List

Stampin’ Up! Mixed Florals for The Happy Inkin’ Thursday Blog Hop

Good Thursday morning stamping friends and welcome to our Happy Inkin’ Thursday Blog Hop. If you are starting with me, thank you. I hope you will stop by everyone’s blog to see what they have created this week. If you are hopping over from Akiko’s blog, thank you for stopping by. This week we have Theme Challenge. If you’d like to see a quick video of how I made this card, Click Here to go to my Instagram Reels. Here is my card using this week’s theme.

Stampin' Up! Mixed Florals Fun Fold 1 cretivestampingdesigns.com

I used the Stampin’ Up! Online Exclusive Mixed Florals Bundle along with the Perennial Lavender Designer Series Paper, Stylish Shapes Dies and New Stampin’ Up! The Right Word Cling Stamp Set (available May 6th), for my fun fold card today.

We have a Fun Fold Theme this week.

Stampin' Up! Mixed Florals Fun Fold 2 cretivestampingdesigns.com

Score and fold the 3 Pretty Peacock card bases as listed in the measurements below. On a panel of Basic White, stamp the tulip image from the Stampin’ Up! Mixed Florals Photopolymer Stamp Set in Tuxedo Black Ink. Color the image using Berry Burst, Fresh Freesia, Highland Heather, Lost Lagoon and Pretty Peacock Stampin’ Blends Markers. Cut the image out using the Mixed Florals Dies.

Stampin' Up! Mixed Florals Fun Fold 3 cretivestampingdesigns.com

Adhere the panels of Perennial Lavender DSP to the Pretty Peacock card bases. I listed below which piece goes on which part of the card bases. On the front of the center card base panel (4 1/4″ side), stamp the leaf image from the Mixed Florals stamp set in Versamark Ink 3 times. Sprinkle the image with White Embossing Powder, set it using the Heat Tool. Adhere the center card base to the large card base with the 4 1/4″ side in the front, about 1/4″ up from the bottom. Adhere the bottom card base with the 5 1/2″ side in the front, to the large card base on top of the center, lining up the bottom edge

Stampin' Up! Mixed Florals Fun Fold 4 cretivestampingdesigns.com

Adhere the die cut flowers to the front panel using Stampin’ Dimensionals, keeping top flowers below the top of the card base. Trim off the bottom of the flower stems/leaves using Paper Snips.

Stampin' Up! Mixed Florals Fun Fold 5 cretivestampingdesigns.com

Stamp the sentiment from The Right Word stamp set in Pretty Peacock Ink on a panel of Basic White. Cut the sentiment out using the Stylish Shapes Dies. Adhere the sentiment to the top back panel using Stampin’ Dimensionals. Add a few Brushed Brass Butterflies to the card front.

Stampin' Up! Mixed Florals Fun Fold 6 cretivestampingdesigns.com

On a panel of Basic White panel stamp the sentiment from The Right Word stamp set in Pretty Peacock Ink. Stamp the leaf image from the Mixed Florals stamp set in Pretty Peacock Ink multiple times on the side of the panel. Adhere a strip of Perennial Lavender DSP to the side of the panel. Adhere the Basic White panel to a Highland Heather mat then to the back of the Pretty Peacock card base.

Stampin' Up! Mixed Florals Fun Fold 7 cretivestampingdesigns.com

Decorate a Basic White Medium Envelope to complete the card. Stamp the tulip image from the Mixed Florals stamp set in Pretty Peacock Ink on the envelope front. Adhere a panel of Perennial Lavender DSP to the envelope flap.

Stampin' Up! Mixed Florals Fun Fold 8 cretivestampingdesigns.com

Thank you for stopping by my blog today.  Now that you’ve seen my card, let’s get on with the hop!  Click the button below to hop over to see what Tara has created. Happy Hopping!

Amy Koenders

Mary Deatherage

Karen Finkle

Akiko Sudano

Karen Ksenzakovic You Are Here

Tara Carpenter

Terry Lynn Bright

*********************************************************************************************************

Mountain Majesties

Subscribe April 11 – May 10

Create Father’s Day cards with layered mountain landscapes!
• Makes 9 cards: 3 each of 3 designs with 9 coordinating envelopes
• Precut vellum and paper pieces
• Watercolor card bases and coordinating envelopes
• Coordinating colors: Basic Black, Lost Lagoon, Misty Moonlight
(Classic Stampin’ Spot), Mossy Meadow, Pecan Pie, Petal Pink

Includes vellum pieces for layering and sentiments tailored to men!

Subscribe to the April Paper Pumpkin Kit between 11 April and 10 May by clicking here!

*********************************************************************************************************

Don’t miss the coordinating
Hugs Abloom Dies Add-On!

Make the most of your Paper Pumpkin kits with the Hugs Abloom Dies add-on! Quickly and cleanly cut out a flower, leaf sprig, sentiment label, or Hugs sentiment to elevate your crafting projects. These additional dies are designed to work with THREE Paper Pumpkin Kits: the Inked Occasions Paper Pumpkin Kit, the Mountain Majesties Paper Pumpkin Kit, and the Full of Charm Paper Pumpkin Kit. Pair these dies with other Stampin’ Up! products for even more creative options!

DETAILS
– 4 dies
– Largest die: 2-1/2″ x 1-1/4″ (6.4 x 3.2 cm)
– Use with a Stampin’ Cut & Emboss Machine (sold separately)

You must be a current Paper Pumpkin subscriber to purchase this item. To become a subscriber, visit www.stampinup.com/paperpumpkin.

Note: Supplies may be limited toward the end of the subscription period.

#166238 $12

*********************************************************************************************************

Card stock cuts for this project:

  • Basic White Cardstock 2 – 4″ x 5 1/4″ (flowers & inner liner), 1″ x 4″ (sentiment)
  • Highland Heather Cardstock 4 1/8″ X 5 3/8″(back panel mat)
  • Pretty Peacock Cardstock 4 1/4″ X 11″(large card base scored & folded at 2 3/4″& 5 1/2″), 2 3/4″ x 11″(center card base scored & folded at 4 1/4″ & 7″), 1 1/2″ X 11″(bottom card base scored & folded at 5 1/2″ & 8 1/4″)
  • Perennial Lavender Designer Series Paper 2 5/8″ x 4 1/8″(front of large card base), 4 1/8″ X 5 3/8″(back of large card base), 2 5/8″ X 2 5/8″ (center of center card base), 2 5/8″ x 3 7/8″(back of center card base), 1 3/8″ X 5 3/8″(front of bottom card base), 1 3/8″ X 2 5/8″(center of bottom card base), 1 3/8″ X 2 5/8″(back of bottom card base), 1/2″ X 4″(back panel), 2 1/4″ x 6″(envelope flap)

*********************************************************************************************************

Product List

Stampin’ Up! Layering Leaves Triple Z Fold for Fun Fold Friday

Good Friday morning stamping friends and welcome to my Fun Fold Friday. I hope you all had a good week and are looking forward to the weekend. We arrived safely in Georgia yesterday morning for the start of our 4-day crafting retreat. Amy and I picked up Mary’s supplies and headed up to the retreat, Unfortunately, Mary who plans this whole retreat, had to miss it this year. Of course, we were welcomed with open arms and started right in with having a good time. We had a delicious dinner last night to kick off the weekend with chicken, roasted zucchini and broccoli and an amazing carrot soufflé. Desert was a delicious chocolate fudge cake with black satin raspberry ganache that was made for Tara and me for our birthdays by Judi. Today’s all about crafting, laughing, chatting and eating, and that’s what we’ll be doing for the next 3 days. I look so forward to this weekend away with my friends and team members.

Today’s card is the one I brought for everyone to make at our retreat this weekend. You can watch my video making this card with other DSP and stamp set, on my YouTube Channel Here. Here’s my card for today.

Stampin' Up! Layering Leaves Triple Z Fold 1 creativestampingdesigns.com

I used the Stampin’ Up! Layering Leaves Photopolymer Stamp Set along with the Perennial Lavender Designer Series Paper, Stampin’ Up! Painted Lavender Photopolymer Stamp Set, Painted Lavender Dies, Spotlight on Nature Dies and 2 3/8″ Circle Punch for my card today.

Stampin' Up! Layering Leaves Triple Z Fold 2 creativestampingdesigns.com

Score and fold the 3 Pretty Peacock card bases as listed in the measurements below.

Stampin' Up! Layering Leaves Triple Z Fold 3 creativestampingdesigns.com

Adhere the panels of Perennial Lavender DSP to the Pretty Peacock card bases. I listed below which piece goes on which part of the card bases. Adhere the center card base to the large card base with the 4 1/4″ side in the front, about 1/4″ up from the bottom. Adhere the bottom card base with the 5 1/2″ side in the front, to the large card base on top of the center, lining up the bottom edge.

Stampin' Up! Layering Leaves Triple Z Fold 4 creativestampingdesigns.com

On a panel of Basic White, stamp the sentiment from the Layering Leaves stamp set in Pretty Peacock Ink. Cut the sentiment out using the 2 3/8″ Circle Punch. Stamp the splatter image from the Painted Lavender stamp set in Crumb Cake Ink around the circle. Using the Spotlight on Nature Dies, cut the 3 1/4″ circle from a panel of Lost Lagoon. Using the Painted Lavender Dies, cut 2 of the leaf die from a panel of Pretty Peacock and 3 of the flower die from a panel of Highland Heather. Adhere the die cut pieces to the Lost Lagoon Circle. Adhere the sentiment over the die cut pieces using Stampin’ Dimensionals. Adhere the layered circle to the card front using Stampin’ Dimensionals. Add a few Brushed Brass Butterflies to the card front.

Stampin' Up! Layering Leaves Triple Z Fold 5 creativestampingdesigns.com

On a panel of Basic White panel stamp the sentiment from Layering Leaves stamp set in Pretty Peacock Ink. Stamp the leaf image from the Painted Lavender stamp set in Pretty Peacock Ink multiple times on the side of the panel. Adhere a strip of Perennial Lavender DSP to the side of the panel. Adhere the Basic White panel to a Highland Heather mat then to the back of the Pretty Peacock card base.

Stampin' Up! Layering Leaves Triple Z Fold 6 creativestampingdesigns.com

Finish the card by decorating a Basic White Medium Envelope. Stamp the grassy floral image from the Painted Lavender stamp set in Pretty Peacock Ink across the bottom front of the envelope. Adhere a panel of Perennial Lavender DSP to the envelope flap.

Stampin' Up! Layering Leaves Triple Z Fold 7 creativestampingdesigns.com

Thank you for stopping by my blog today. I hope you like the card and will give it a try. Happy Stamping!!

*********************************************************************************************************

If you need any stamping supplies, I’d love to be your Demonstrator. Just click HERE to go directly to my online store or drop me an email if you have any questions. 

MY CURRENT HOST CODE IS:   4RTJCBH2

Use this host code when placing an order with me. When you order $50 or greater you will receive a free gift from me! If your order is over $150, please do not use this code, but you’ll still get the free gift. The free gift is your choice of any 1 item valued up to $10.00 from the 2024 – 2025 Annual Catalog, September-December 2024 Mini Catalog or from the Online Exclusives!  For any orders $50 or more I will also send you my monthly class tutorials.  Click HERE or go to my Customer Rewards for more details and to see what this month’s tutorials are.

Please remember to use my current Host Code and make sure that you can see my name on the final checkout page listed as your Demonstrator when you order so that you know that you’re ordering with me, and you’ll get my rewards! 

Happy Stamping, Karen

*********************************************************************************************************

Last Day of Seasonal Sale and Double Creative Stamping Designs Rewards

Just a reminder that today is the last day of my Double Creative Stamping Designs Rewards and it’s also the last day of the Seasonal Sale. If you haven’t gotten those orders in, don’t wait any longer. Even though I’m away, I’m checking my emails and I’m here to help you.

*********************************************************************************************************

2 New Kits Now Available

Kits by Stampin’ Up! are perfect for new crafters, busy crafters, or crafters who want quick and easy projects. All-inclusive project kits have everything you need in one box! Give as a gift or try them yourself. Kits are while supplies last. Order today!

Nature’s Paintings Kits

Embrace your creative side with the Nature’s Paintings Kit. This unique kit includes everything you need for a fun creative experience: a coloring book, watercolor pencils, and a water painter. All you need is some imagination and water! Create lovely, picturesque images using advanced coloring techniques with this craft kit. Or make something that’s never been seen before—like green flowers with purple leaves. Keep it realistic or color outside the lines—it’s up to you. And once you’re done, you can use your finished artwork to create a one-of-a-kind card front!

Kit includes:
* Predesigned projects
* Line art illustrations
* Step-by-step instructions
* 24 watercolor paper pages, 2 each of 12 designs
* 8 Watercolor Pencils
* 1 Water Painter
* Coloring Book: 4-1/2″ x 6″ x 1/2″ (11.4 x 15.2 x 1.3 cm)
* A 9-7/8″ x 6-1/2″ x 1-3/4″ (25.1 x 16.5 x 4.4 cm) printed designer box for storage or crafting on the go

Product colors: Berry Burst, Coastal Cabana, Daffodil Delight, Early Espresso, Flirty Flamingo, Garden Green, Pumpkin Pie, Red

164982 $25.00

+++++++++++++++++++++++++++++++++++++++++++++++++++++++++++++++++++++

Layered Landscapes Kit

Do you long for the great outdoors but don’t actually want to go outdoors? Then the Layered Landscapes Kit is perfect for you! DIY lovely home decor with this unique kit that includes four 7-1/8″ x 7-1/8″ x 3/4″ (18.1 x 18.1 x 1.9 cm) frames and precut paper pieces. You can either stand the frames up on their included easels or hang them on your wall. Either way, your houseguests are sure to love your new artwork!

Kit includes:
* Predesigned projects
* Step-by-step instructions
* Precut pieces (No prep work! Get right to crafting)
* 4 white frames
* Frame size: 7-1/8″ x 7-1/8″ x 3/4″ (18.1 x 18.1 x 1.9 cm)
* Enough adhesive to complete projects
* A 9-7/8″ x 6-1/2″ x 2-3/4″ (25.1 x 16.5 x 7 cm) printed designer box for storage or crafting on the go

Product colors: Balmy Blue, Basic Beige, Basic Gray, Berry Burst, Cajun Craze, Crumb Cake, Early Espresso, Gray Granite, Lemon Lime Twist, Misty Moonlight, Mossy Meadow, Night of Navy, Old Olive, Pecan Pie, Soft Sea Foam

164981 $25

*********************************************************************************************************

New Online Exclusive Products Now Available

A new line of products for Online Exclusives are now available! You won’t find these items in any catalog. This is a great opportunity to spark creativity, expand a crafting collection, and discover new opportunities—all from the convenience of the online store.

*********************************************************************************************************

Notes From The Heart

Subscribe November 11 – December 10

Create cards with hand-sketched botanical designs.
• Makes 9 projects: 3 each of 3 designs
• Precut vellum pieces and sparkling gems
• Scalloped card bases and coordinating envelopes
• Coordinating colors: Blackberry Bliss (Classic Stampin’ Spot), Flirty Flamingo,
Old Olive, Pecan Pie, Pretty in Pink, Very Vanilla

Subscribe to Paper Pumpkin for a monthly, all-inclusive crafting kit that’s a fun surprise! Each kit includes a photopolymer stamp set, Classic Stampin’ Spot, and step by step instructions to complete exclusive paper craft projects, including cards, tags, and gift
packaging. And don’t miss the special add-on that coordinates with the next three months!

Subscribe to the December Paper Pumpkin Kit between 11 November and 10 December by clicking here!

*********************************************************************************************************

Don’t miss the coordinating
Merry Tags & More Dies Add-On!

Add dimension and detail to your cards, scrapbook pages, and gift tags with the Merry Tags & More Dies! With a leaf and tag shape and Merry sentiment, these dies are a great way to expand your crafting experience. They even coordinate with three Paper Pumpkin Kits: Nests of Christmas, Filled with Joy, and Notes from the Heart. Such easy coordination makes these dies a must-have for any paper craft. Paper Pumpkin subscribers can purchase it beginning 11 September. The add-on is available only while supplies last, so it’s best to shop early! Please note that the Stampin’ Cut and Emboss Machine is not included and can be purchased separately.

#165639 $12

Note: Supplies may be limited toward the end of the subscription period.

*********************************************************************************************************

Card stock cuts for this project:

  • Basic White Cardstock 3″ X 3″(sentiment), 4″ X 5 1/4″(back panel)
  • Highland Heather Cardstock 4 1/8″ X 5 3/8″(back panel mat), 1″ X 3″(flower die cuts)
  • Lost Lagoon Cardstock 3 1/2″ X 3 1/2″(sentiment mat)
  • Pretty Peacock Cardstock 4 1/4″ X 11″(large card base scored & folded at 2 3/4″& 5 1/2″), 2 3/4″ x 1″(center card base scored & folded at 4 1/4″ & 7″), 1 1/2″ X 11″(bottom card base scored & folded at 5 1/2″ & 8 1/4″), 2 1/4″ X 4 1/4″(leave die cuts)
  • Perennial Lavender Designer Series Paper 1 1/4″ x 2 5/8″ (top front of large card base), 2 5/8″ x 4 1/8″(center of large card base), 4 1/8″ X 5 3/8″(back of large card base), 2 5/8″ X 2 5/8″ (center of center card base), 2 5/8″ x 3 7/8″(back of center card base), 1 3/8″ X 5 3/8″(front of bottom card base), 1 3/8″ X 2 5/8″(center of bottom card base), 1 3/8″ X 2 5/8″(back of bottom card base), 1/2″ X 4″(back panel), 2 1/4″ x 6″(envelope flap)

*********************************************************************************************************

Product List

Stampin’ Up! Poised Peony for Fun Fold Friday

Good Friday morning stamping friends Happy November and welcome to my Fun Fold Friday. How was everyone’s Halloween? Did you get a lot of trick or treaters? We had an all-time high in years, we had 16 this year. Since my kids have grown, there aren’t many kids that like to come down out block.   Are you ready for the weekend? Is anyone starting to make plans yet?

Today’s card I made on YouTube Live on Wednesday. If you were able to join me or watched the replay, thank you. If you’d like to watch my video and stamp along, the measurements are below, just above the supply list, along with the link to my YouTube channel. Here’s my card for today.

Stampin' Up1 Poised Peony Fun Fold 1 creativestampingdesigns.com

I used the Stampin’ Up! Poised Peony Cling Stamp Set along with the Frames & Flowers Specialty Designer Series Paper and Stampin’ Up! Enjoying Little Things Photopolymer Stamp Set for my Triple Z Fold card today.

Stampin' Up1 Poised Peony Fun Fold 2 creativestampingdesigns.com

Start by scoring and folding all the Lost Lagoon card base panels.

Stampin' Up1 Poised Peony Fun Fold 3 creativestampingdesigns.com

Adhere the Frames & Flowers DSP to each of the card base panels using Liquid Glue. Adhere the center 2 3/4″ X 11″ card base panel to the 4 1/4″ X 11″ card base panel using Tear & Tape. Adhere the bottom 1 1/2″ x 11″ card base panel to the top of the other panels using Tear & Tape.

Stampin' Up1 Poised Peony Fun Fold 4 creativestampingdesigns.com

On 1 of the wreaths from the Frames & Flowers DSP, stamp the sentiment from the Poised Peony stamp set in Lost Lagoon Ink. Adhere the wreath to the card front using Stampin’ Dimensionals. Tie a small bow using the Petal Pink 1/4″ Diagonal Trim. Adhere the bow on the wreath using a Glue Dot. Add a Petal Pink Foiled Gem by the sentiment.

Stampin' Up1 Poised Peony Fun Fold 6 creativestampingdesigns.com

On a panel of Basic White, stamp the medium peony image from the Poised Peony stamp set in Early Espresso Ink. Color the image using Lost Lagoon and Petal Pink Stampin’ Blends Markers. Adhere the image to the center section of the center card base panel

Stampin' Up1 Poised Peony Fun Fold 6 creativestampingdesigns.com

On a panel of Basic White, stamp the sentiments from the Enjoying Little Things stamp set in Lost Lagoon Ink. Stamp the medium peony image from the Poised Peony stamp set in Early Espresso Ink on the bottom of the panel. Color the image using Lost Lagoon and Petal Pink Stampin’ Blends Markers. Adhere the Basic White panel to a Petal Pink mat. Adhere the layered panel to the back of the card.

Stampin' Up1 Poised Peony Fun Fold 7 creativestampingdesigns.com

Finish the card by decorating a Basic White Medium Envelope. Stamp the large peony image from the Poised Peony stamp set in Early Espresso Ink on the envelope front. Color the image using Lost Lagoon and Petal Pink Stampin’ Blends Markers. Adhere a panel of Frames & Flowers DSP to the envelope flap.

Stampin' Up1 Poised Peony Fun Fold 8 creativestampingdesigns.com

Thank you for stopping by my blog today. I hope you liked my card and will give it a try. I hope you will CASE this card and please feel free to post it in the comments of my Facebook page under my post. I’d love to see your take it. The list of measurements are below if you’d like to stamp along while watching the video. You can watch my video on my YouTube Channel Here.

If you watch this on my YouTube channel, please remember to subscribe so that you will get notified when a new video goes live. Thank you to those that have subscribed already. Happy Stamping!!

*********************************************************************************************************

If you need any stamping supplies, I’d love to be your Demonstrator. Just click HERE to go directly to my online store or drop me an email if you have any questions. 

MY CURRENT HOST CODE IS:   4RTJCBH2

Use this host code when placing an order with me. When you order $50 or greater you will receive a free gift from me! If your order is over $150, please do not use this code, but you’ll still get the free gift. The free gift is your choice of any 1 item valued up to $10.00 from the 2024 – 2025 Annual Catalog, September-December 2024 Mini Catalog or from the Online Exclusives!  For any orders $50 or more I will also send you my monthly class tutorials.  Click HERE or go to my Customer Rewards for more details and to see what this month’s tutorials are.

Please remember to use my current Host Code and make sure that you can see my name on the final checkout page listed as your Demonstrator when you order so that you know that you’re ordering with me, and you’ll get my rewards! 

Happy Stamping, Karen

*********************************************************************************************************

New Online Exclusive Products Coming Soon

A new line of products for Online Exclusives are coming! You won’t find these items in any catalog. This is a great opportunity to spark creativity, expand a crafting collection, and discover new opportunities—all from the convenience of the online store. These products will be available starting in November. Here’s a little sneak peek of some of the items. Click Here for a sneak peek of what’s coming.

*********************************************************************************************************

Filled With Joy

Subscribe October 11 – November 10

Celebrate Christmas with adorable stockings and gift tags!

Details:
• Makes 8 projects: 8 stockings with 8 gift tags
• Precut paper pieces
• Safety pins and specialty gold foil
• Coordinating colors: Flirty Flamingo, Pool Party, Poppy Parade
(Classic Stampin’ Spot), Shaded Spruce, Very Vanilla

Subscribe to Paper Pumpkin for a monthly, all-inclusive crafting kit that’s a fun surprise! Each kit includes a photopolymer stamp set, Classic Stampin’ Spot, and step by step instructions to complete exclusive paper craft projects, including cards, tags, and gift
packaging. And don’t miss the special add-on that coordinates with the next three months!

Subscribe to the November Paper Pumpkin Kit between 11 October and 10 November by clicking here!

*********************************************************************************************************

Don’t miss the coordinating
Merry Tags & More Dies Add-On!

Add dimension and detail to your cards, scrapbook pages, and gift tags with the Merry Tags & More Dies! With a leaf and tag shape and Merry sentiment, these dies are a great way to expand your crafting experience. They even coordinate with three Paper Pumpkin Kits: Nests of Christmas, Filled with Joy, and Notes from the Heart. Such easy coordination makes these dies a must-have for any paper craft. Paper Pumpkin subscribers can purchase it beginning 11 September. The add-on is available only while supplies last, so it’s best to shop early! Please note that the Stampin’ Cut and Emboss Machine is not included and can be purchased separately.

#165639 $12

Note: Supplies may be limited toward the end of the subscription period.

*********************************************************************************************************

Card stock cuts for this project:

  • Basic White Cardstock 2 5/8″ X 2 5/8″(inside panel), 4″ x 5 1/4″(back panel)
  • Lost Lagoon Cardstock 4 1/4″ X 11″(large card base scored & folded at 2 3/4″ & 5 1/2″), 2 3/4″ x 11″(center card base scored & folded at 4 1/4″ & 7″), 1 1/2″ X 11″(bottom card base scored & folded at 5 1/2″ & 8 1/4″)
  • Petal Pink Cardstock 4 1/8″ X 5 3/8″ (back panel mat)
  • Frames & Flowers Designer Series Paper 2 – 2 5/8″ x 4 1/8″ & 4 1/8″ X 5 3/8″(large card base panels), 2 5/8″ X 3 7/8″(center card base panel), 1 3/8″ X 5 3/8″ & 2 – 1 3/8″ X 2 5/8″ (bottom card base panels), 2 1/4″ x 6″(envelope flap)

*********************************************************************************************************

Product List