Good Friday morning stamping friends and welcome to my Fun Fold Friday. Can you believe it’s the last day of May already? Are you ready for the weekend? Is anyone starting to make plans yet?
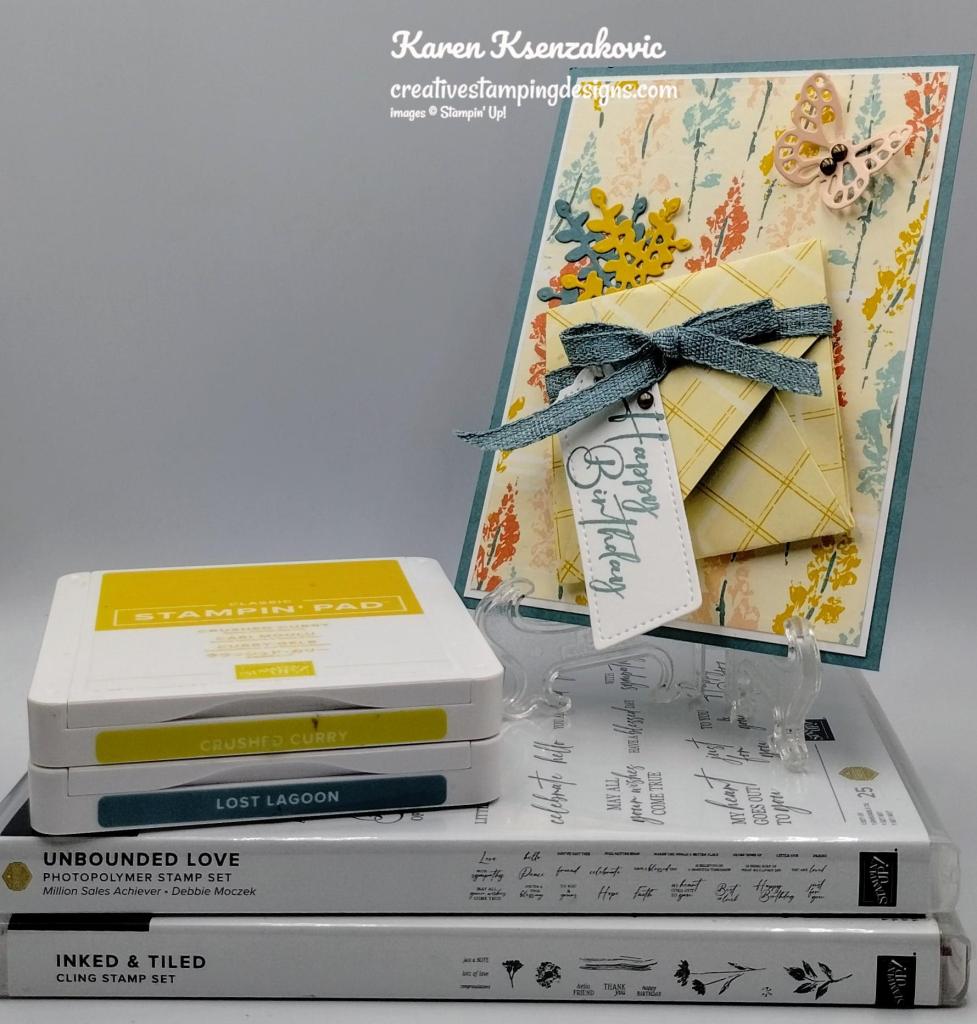
Today’s card I made on YouTube Live on Wednesday. If you were able to join me or watched the replay, thank you. If you’d like to watch my video and stamp along, the measurements are below, just above the supply list, along with the link to my YouTube channel. Here’s my card for today.

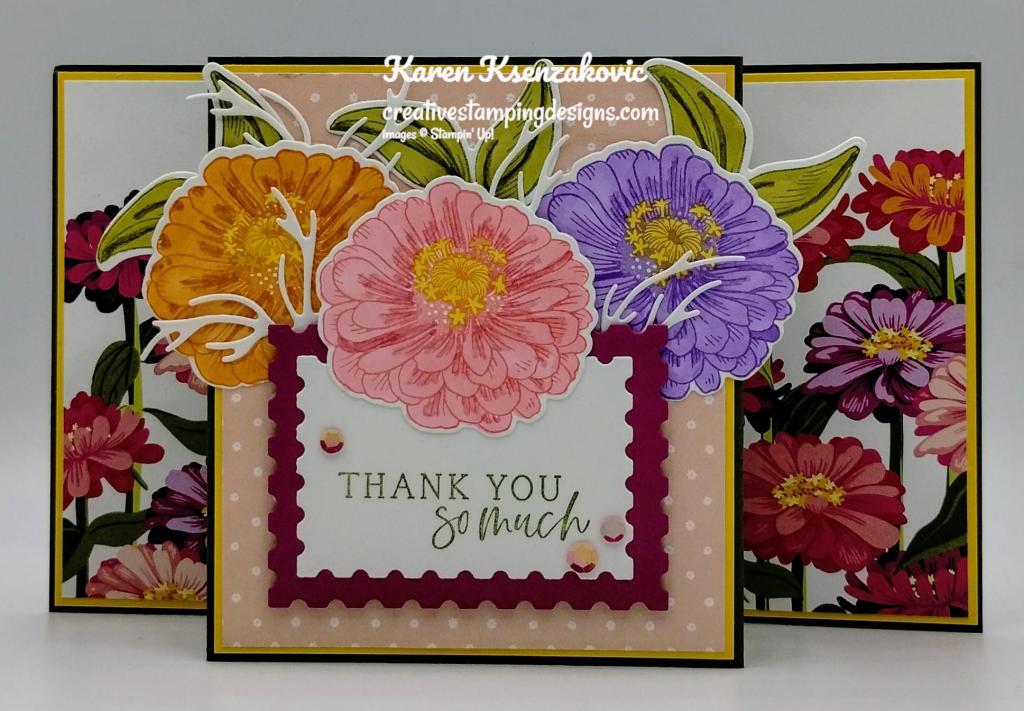
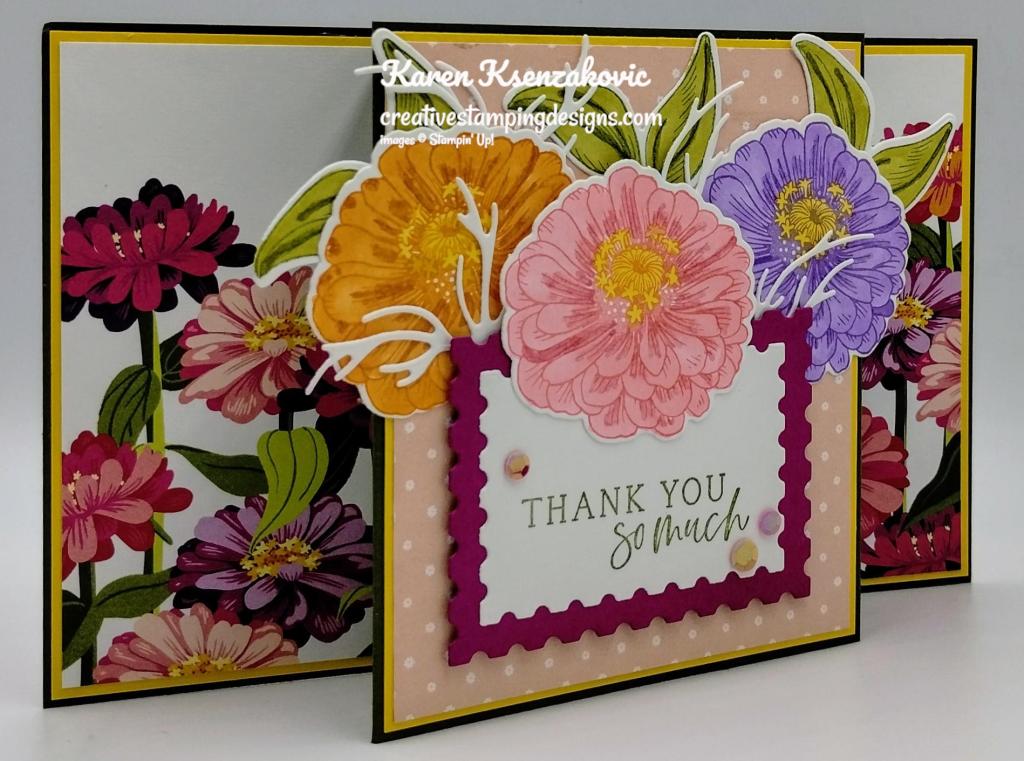
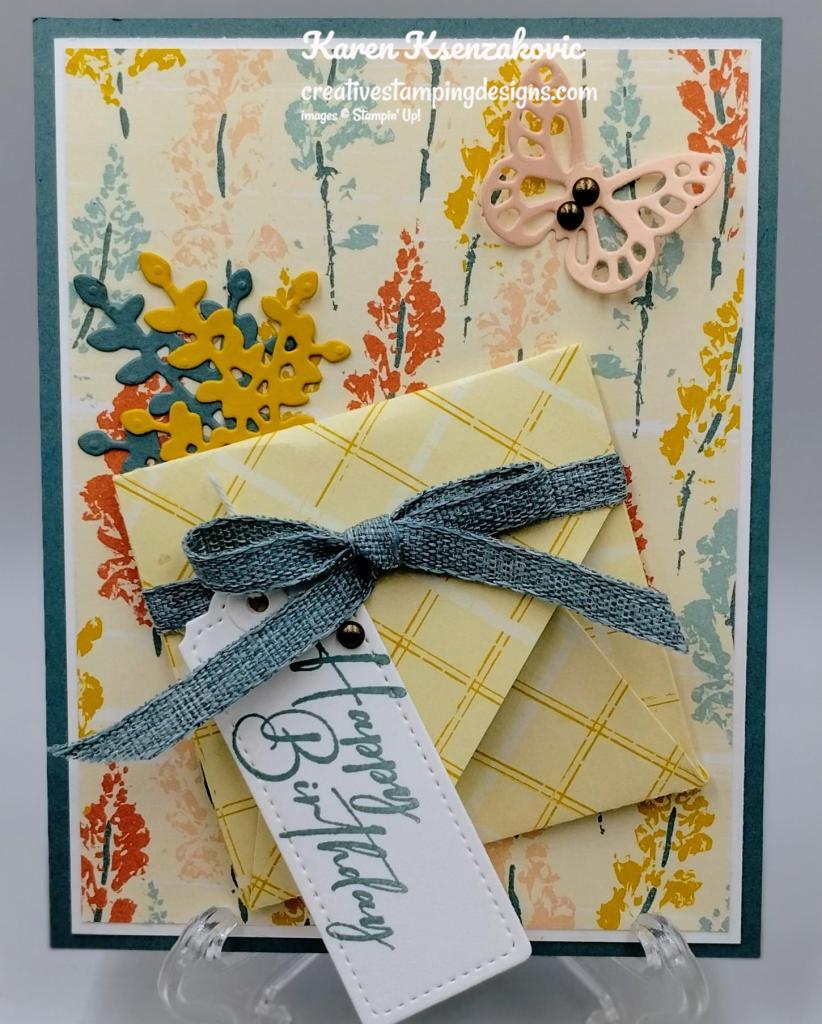
I used the Stampin’ Up! Attention Shoppers Bundle along with the To Market Designer Series Paper and Nested Essentials Dies for today’s card.

I adhered one of the 1″ X 5 1/4″ panels, one of the 3 1/2″ X 5 1/4″ panels and the 1 1/2″ X 5 1/4″ panel of To Market DSP to coordinating Blackberry Bliss mats using Stampin’ Seal. I adhered the layered panels to a Petal Pink card base using Liquid Glue.
On a panel of Basic White, I stamped the sentiment from the Stampin’ Up! Attention Shoppers Photopolymer Stamp Set in Blackberry Bliss Ink. I cut the sentiment out using the 2nd largest banner die from the Nested Essentials Dies. I trimmed the banner to the size I wanted using the Paper Trimmer. I adhered the sentiment to the top of the card front using Stampin’ Dimensionals.

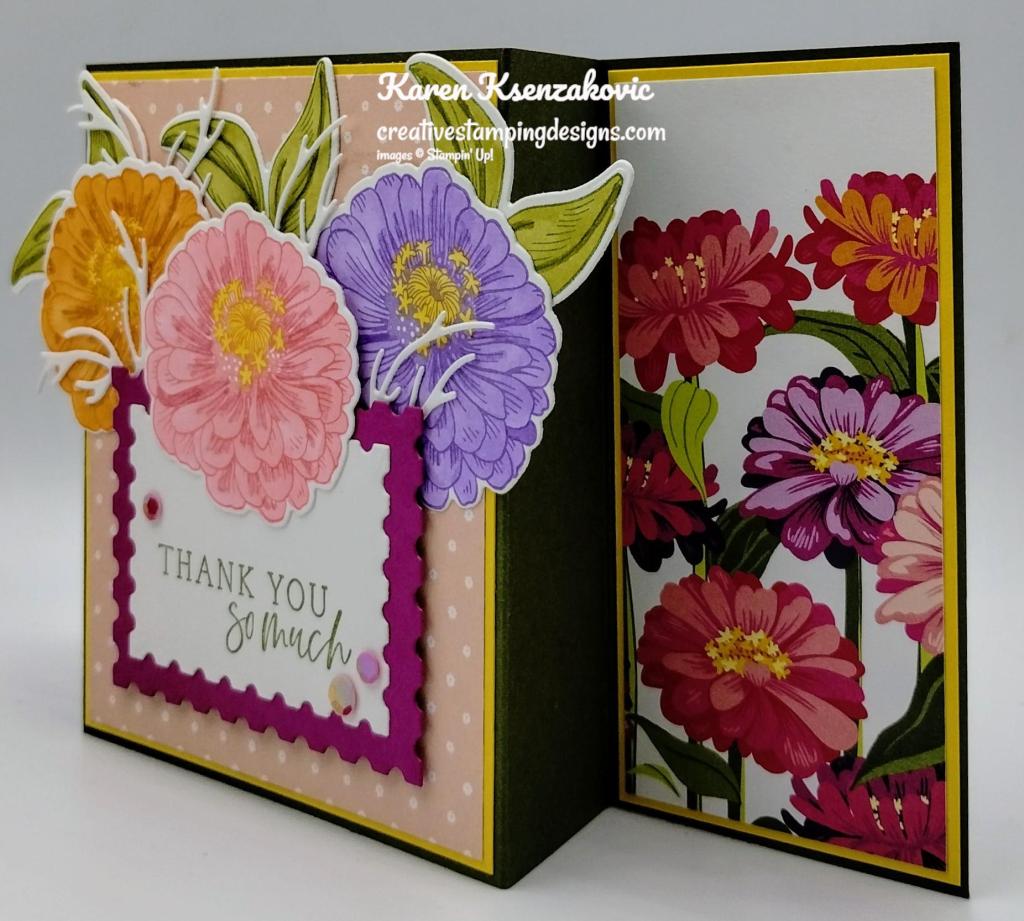
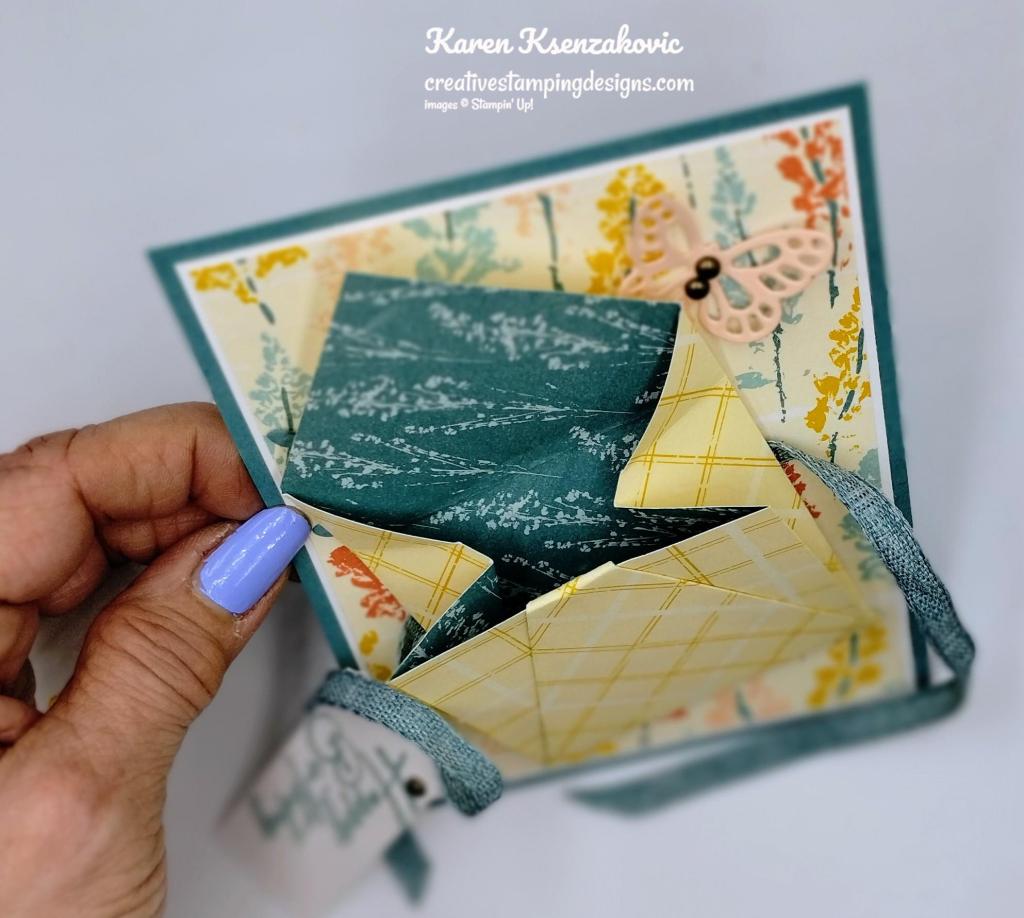
I wrapped the belly band around the card base and adhered it together using Tear & Tape. On a panel of Basic White, I stamped the flowers, bottle and cake images from the Attention Shoppers stamp set in Tuxedo Black Ink. I cut the images out using the Attentions Shoppers Dies. I colored the images using Blackberry Bliss, Crumb Cake, Lemon Lime Twist, Lemon Lolly, Petal Pink and Pumpkin Pie Stampin’ Blends Markers. Using the Attentions Shoppers Dies, I cut the shopping card out from a panel of Silver Foil. I adhered the images to the back of the shopping card using Liquid Glue. I adhered the shopping cart to the belly band using Stampin’ Dimensionals. I added a few Transparent Adhesive-Backed Dots to the card front.

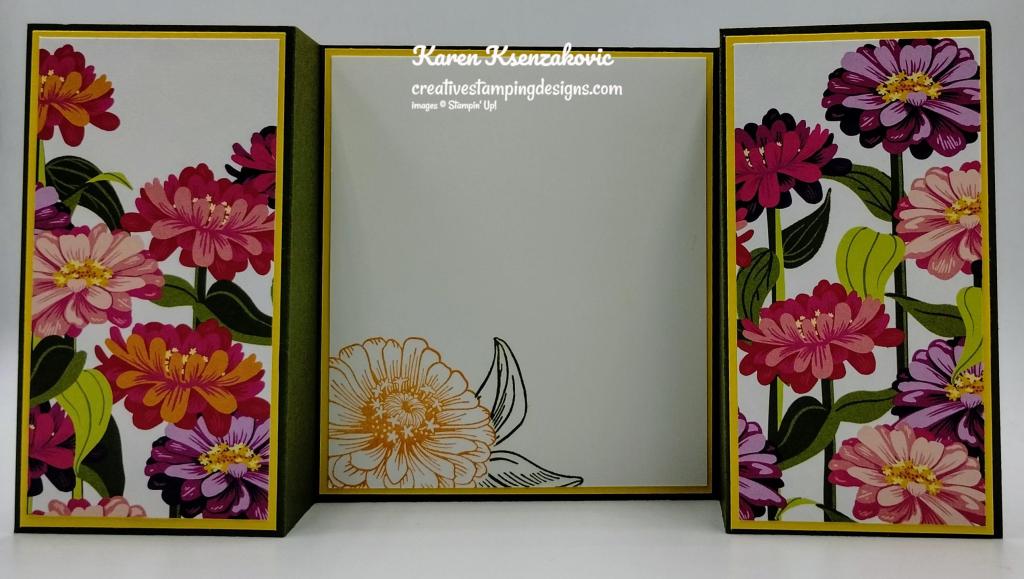
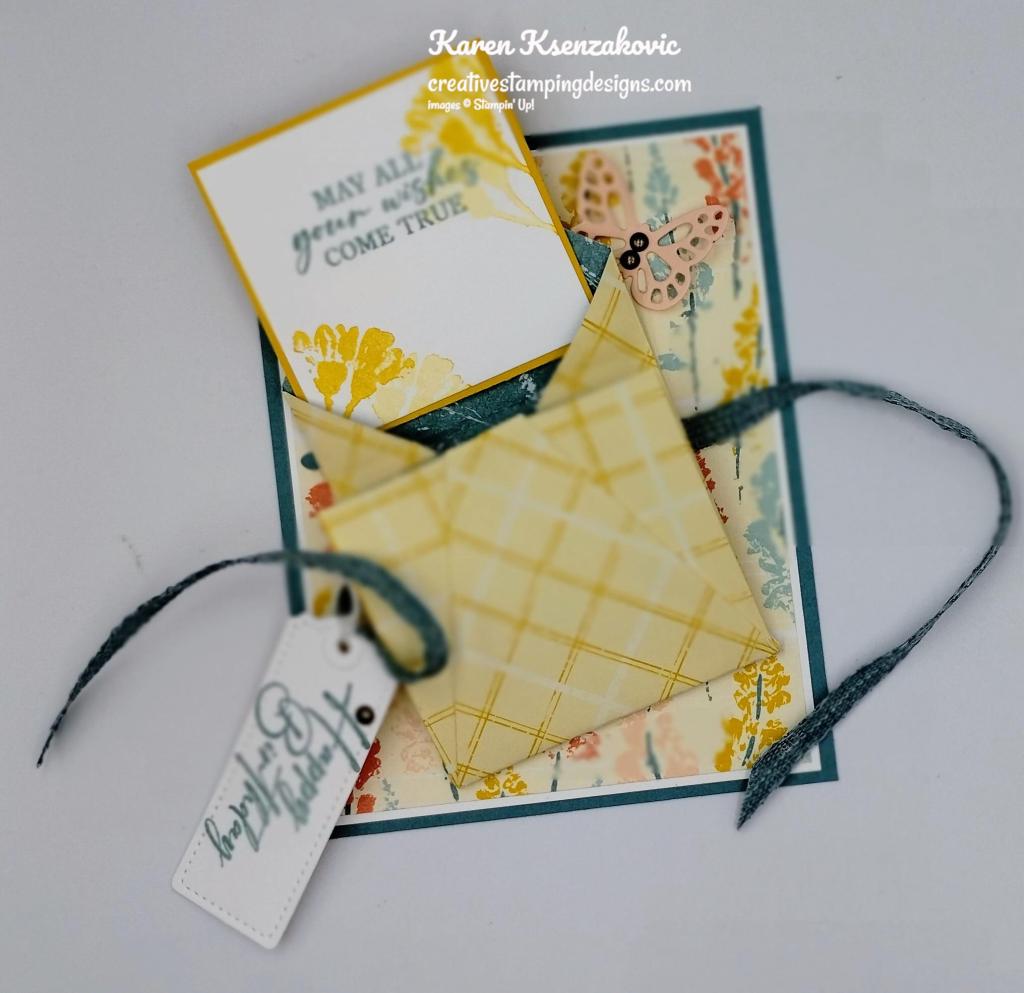
On the inside I adhered the last 2 panels of To Market DSP to Blackberry Bliss mat using Stampin’ Seal. I adhered the layered panels to the Petal Pink card base using Liquid Gue. On a panel of Basic White, I stamped the sentiments from Attention Shoppers stamp set in Blackberry Bliss Ink. I stamped the gift bag image from Attention Shoppers stamp set in Tuxedo Black Ink on the bottom of the panel and colored it using Blackberry Bliss and Petal Pink Stampin’ Blends Markers. I adhered the Basic Whtie panel to a Blackberry Bliss mat then to the inside of the Petal Pink card base.

To finish my card, I decorated a Basic White Medium Envelope. I stamped the gift bag image from the Attention Shoppers stamp set in Tuxedo Black Ink on the envelope front. I colored the image using Blackberry Bliss and Petal Pink Stampin’ Blends Markers. I adhered a panel of To Market DSP to the envelope flap.

Thank you for stopping by my blog today. I hope you liked my sneak peek of my card and will give it a try. I hope you will CASE this card and please feel free to post it in the comments of my Facebook page under my post. I’d love to see your take it. The list of measurements are below if you’d like to stamp along while watching the video. You can watch my video on my YouTube Channel HERE.
If you watch this on my YouTube channel, please remember to subscribe so that you will get notified when a new video goes live. Thank you to those that have subscribed already. Happy Stamping!!
*********************************************************************************************************
If you need any stamping supplies, I’d love to be your Demonstrator. Just click HERE to go directly to my online store or drop me an email if you have any questions.
MY CURRENT HOST CODE IS: PKXMFP73
Use this host code when placing an order with me. When you order $50 or greater you will receive a free gift from me! If your order is over $150, please do not use this code, but you’ll still get the free gift. The free gift is your choice of any 1 item valued up to $10.00 from the 2024-2025Annual Catalog, or from the Online Exclusives! Unfortunately, packs of cardstock are no longer an option for a free gift. Shipping has become too expensive to ship and it’s costing me as much to ship as the cardstock costs. For any orders $50 or more I will also send you my monthly class tutorials. Click HERE or go to my Customer Rewards for more details and to see what this month’s tutorials are.
Please remember to use my current Host Code and make sure that you can see my name on the final checkout page listed as your Demonstrator when you order so that you know that you’re ordering with me, and you’ll get my rewards!
Happy Stamping, Karen
*********************************************************************************************************
In response to changing policies at Stampin’ Up – I’m adjusting my Ordering Gift policy as well. I’m having to get a little more tough on the adding of Host codes when you place your order thru my Online Store.
Not to worry – you’re still going to get that $10 ordering gift for orders of $50 (before shipping & tax) or greater. And the gift is still any 1 SU! product up to that $10 value – which includes some of our fun Host Sets!
But – if you DO NOT use the Host code for your orders of less than $150 (this is the RETAIL total before Shipping & Handling), then you’ll have two options:
- You’ll need to call Stampin’ Up! (1-800-Stamp-Up) and ask them to add it for you. They’re very helpful and will get it done quickly! OR….
- If your order was over the $50 threshold but under $150, then…you’ll forfeit that $10 ordering gift and rewards – this is the Bummer Option – and I REALLY don’t want to do this, SO please remember to add my Current Host Code.
*********************************************************************************************************
LAST DAY for the New Starter Kit Special
Did you know that when you become a demonstrator, you not only get your 20% discount, but when you order a bundle at the 10% discount or maybe a clearance item, you get your 20% on top of the discounted price. With the special coming up in June your bundles are 10% off, you will get an additional 10% off PLUS your 20% OFF. What’s not to LOVE about that? This is another one of the great perks of being a demonstrator. Also coming in June there are new Online Exclusives that demonstrators get to preorder before customers. Am I making you think about joining NOW? You only have 3 days left to join and get the 2024-2026 In-Colors items for free.

Exciting News! Between 1–31 May, anyone who becomes a Stampin’ Up! demonstrator will receive four 2024–2026 In Color products in their Starter Kit for FREE!
In addition to the 2024-2026 In-Color products, new demonstrators will pick $125 USD worth of products of their choice. That’s $207 in products for only $99 and it all ships for FREE. You will also receive free business supplies in case you want to make this a business. Not to mention all the fun that comes with being a part of our wonderful crafting community.
When you join as a new demonstrator, all In Color products will be automatically added to their Starter Kit. Click Here for a PDF printable flyer of all the products you’ll get.
STARTER KIT SPECIAL DETAILS
- Promotion Start Date: May 1, 2024
- Deadline to Join: May 31, 2024 at 11:59 PM MT
- In addition to the regular $125 worth of products of your choice for just $99, new demonstrators will receive the following products (an $82 value!!) in their Starter Kit at no additional cost:
- 2024–2026 In Color Classic Stampin’ Pad Bundle
- 2024–2026 In Color 8-1/2″ x 11″ Card Stock
- 2024–2026 In Color 6″ x 6″ Designer Series Paper
- 2024–2026 In Color Stampin’ Write Markers
- All Starter Kits ship for FREE!!
If you’d like to join our team, we’d love to have you! Once you join, you’ll get at least a 20% discount on all of your Stampin’ Up! purchases and you can preorder from the upcoming catalogs!
We welcome all types of Demonstrators from those only purchasing to get the discount for themselves to those who want to run a business and those anywhere in between! We’re a relaxed group that loves to stamp with no pressure to sell!
Demonstrators get lots of perks including at least a 20% discount on all orders that you place as a Demonstrator, invitations to Stampin’ Up! Demonstrator events and preordering from upcoming catalogs and promotions!
There is no commitment and no penalty if you decide that being a Demonstrator isn’t right for you. Why not give it a try? We have a fun Facebook page where we chat a lot and we do virtual meetings monthly and in-person meetings quarterly.
What a great time to join and get all the new 2024-2026 In-Color products. Contact me @ creativestampingdesigns@gmail.com. I would love to have you on my team. Contact me today about joining May 1st.
*********************************************************************************************************

I have updated my Retirement List. If you missed out on something from the 2023-2024 Annual Catalog, the January – April 2024 Mini Catalog or maybe even something a little older you might want to check out my list. I’m selling my retired items at 1/2the catalog prices. Click Here to go to my Retirement List.
*********************************************************************************************************
Coming in June!! 10% Off Stamp & Die Set Bundles and
Stampin’ Cut & Emboss Machines June 5-30!!

Everyone loves a good deal, which is why Stampin’ Up! is offering an additional 10% off all stamp and die bundles! Between June 5-30, take advantage of the sale and add some new bundles to your collection!! Plus, save 10% on the Stampin’ Cut & Emboss Machine and the Mini Stampin’ Cut & Emboss Machine!! These machines make the perfect crafting partner for stamp and die bundles!

PROMOTION DETAILS
Sales Period: June 5-30, 2024
Ordering Deadline: June 30, 2024 at 11:59 p.m. (MT)
- Get an additional 10% discount on stamp and die bundles only. This excludes suite collections, stamp and punch bundles, bundles not yet released to customers, and any other bundles*.
- Save 10% on Stampin’ Cut & Emboss Machine and Mini Stampin’ Cut & Emboss Machine (white and Boho Blue).
- The 10% discount applies automatically to stamp and die bundles in all orders including Starter Kit orders placed between June 5-30, 2024.
*Please note Close to My Heart products are not included in this promotion.
YAY for a great sale!! You can see the stamp and die set bundles in the online store right Here and the Stampin’ Cut & Emboss Machines Here (note that the machines only will be on sale, the accessories are note included). Get your orders ready and save beginning June 5!
***As an added bonus, Demonstrators get the additional 10% discount on bundles and machines too! So purchase the Starter Kit in May and get the free In Color items (see the details above) and then get the additional 10% discount on top of your Demonstrator discount on bundles and machines from June 5-30!!
*********************************************************************************************************
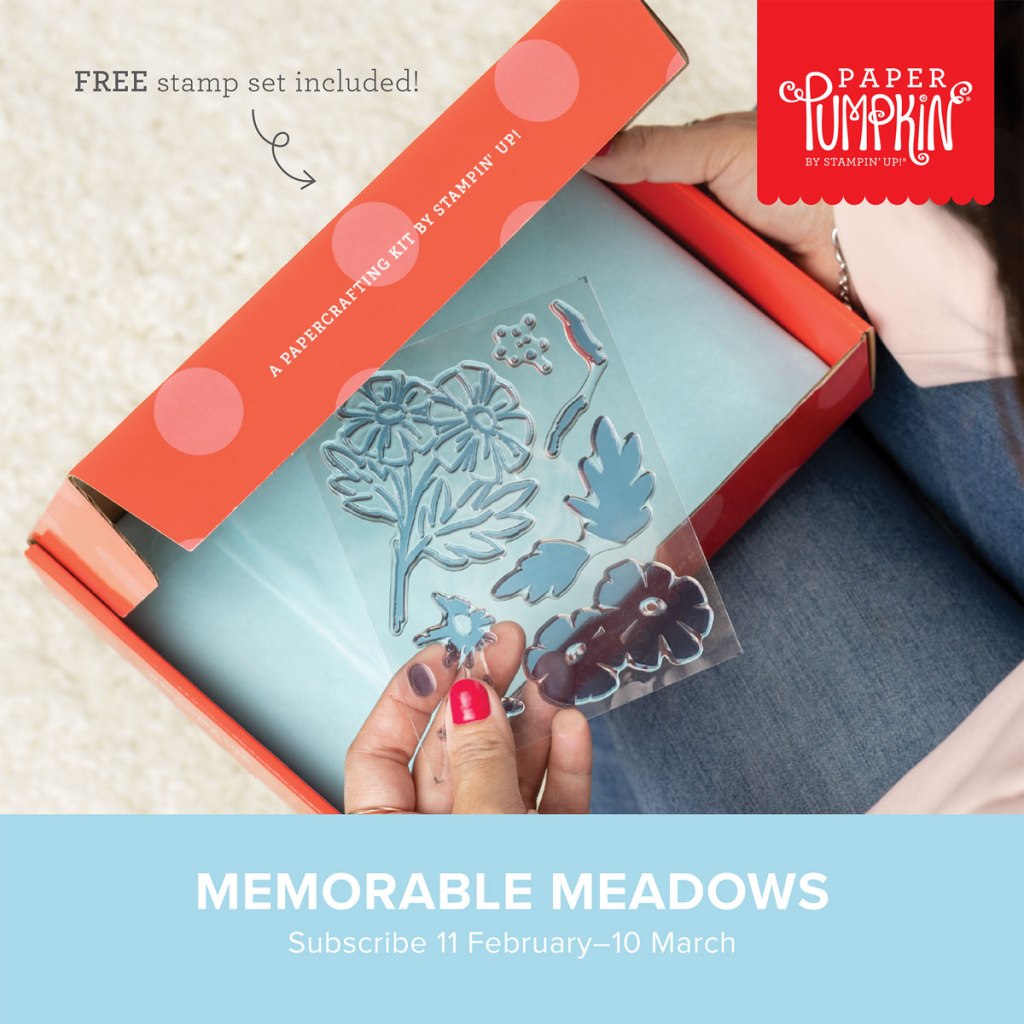
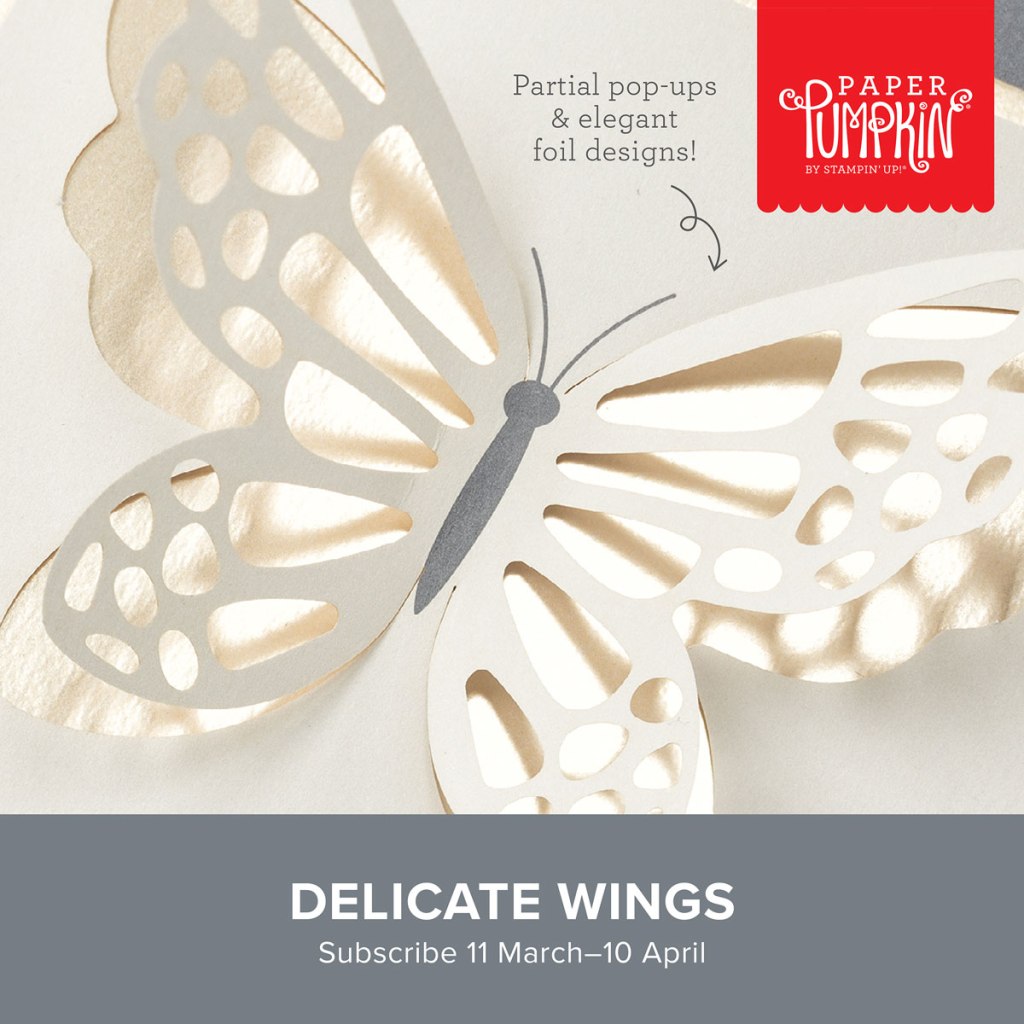
Life Is Sweet
Subscribe May 11 – June 10
Subscribe to Paper Pumpkin for a monthly, all-inclusive crafting kit that’s a fun surprise! Each kit includes a photopolymer stamp set, Classic Stampin’ Spot, and step by step instructions to complete exclusive paper craft projects, including cards, tags, and gift
packaging. And don’t miss the special add-on that coordinates with the next three months!

Celebrate the sweet things in life with textured, artistic cards. Featuring the new 2024–2026 In Colors!
- Makes 9 cards: 3 each of 3 designs with 9 coordinating envelopes
- Iridescent glimmer sentiments and precut paper pieces
- Vellum accents, iridescent pearls, and linen thread
- Coordinating colors: Poppy Parade, Peach Pie, Lemon Lolly, Shy Shamrock
(Classic Stampin’ Spot), Pool Party, Pretty In Pink
Thanks and Beyond Add On Dies

Dies #164397 Price $12.00
This exclusive add-on coordinates with the three upcoming kits! Paper Pumpkin subscribers can purchase it beginning 11 March. The add-on is available only while supplies last, so it’s best to shop early!
Subscribe to the April Paper Pumpkin Kit between 11 March and 10 April by clicking here!
Note: Supplies may be limited toward the end of the subscription period.
*********************************************************************************************************
Card stock cuts for this project:
- Basic White Cardstock 2 1/2″ X 4″ (artwork), 2″ X 2 3/4″ (sentiment), 4″ X 5 1/4″(inner liner)
- Blackberry Bliss Cardstock 2 – 1 1/8″ X 5 3/8″, 2 – 3 5/8″ X 5 3/8″ & 1 5/8″ X 5 3/8″ (dsp mats), 4 1/8″ X 5 3/8″ (inner liner mat)
- Petal Pink Cardstock 5 1/2″ X 11″ (card base scored & folded at 1 3/4″, 5 1/2″ & 9 3/4″)
- To Market Designer Series Paper 2 – 1″ X 5 1/4″, 2 – 3 1/2″ X 5 1/4″ & 1 1/2″ X 5 1/4″ (card base panels), 2 1/4″ X 6″(envelope flap)
- Silver Foil Sheet 2 1/2″ X 2 3/4″(cart)
*********************************************************************************************************
Product List
")
")


 Designer Series Paper")
 Foil Sheets")


")
")
")


 Specialty Designer Series Paper")


")
")


 Specialty Paper")
 Designer Series Paper")


")


 Designer Series Paper")


 Bordered Ribbon")


")
")
")


 Designer Series Paper")


 Polka Dot Trim")
")


")
")

")


 Designer Series Paper")