Good Sunday morning stamping friends Happy St. Patrick’s Day. I don’t have an ounce of Irish in me, but my mom would make corned beef and cabbage every year and serve it with Italian bread on St. Patrick’s Day. We’re Italian so we had Italian bread with everything. How is your weekend going? Our Stampin’ Up! OnStage convention is done and I’ll be heading back to NJ today. I’ve had so much fun with all my team members and I’m already looking forward to next years.
Today’s card is the last one that we made last Sunday at our team meeting. This beautiful card was designed by one of my team members and friend Terry Lynn Bright. Here’s my card for today.
I used the Stampin’ Up! Online Exclusive Simply Zinnia Bundle and Flowering Zinnias Designer Series Paper along with the Stampin’ Up! Hope You Know Cling Stamp Set for my card today.
I started by cutting the Melon Mambo card base. I marked the right front edge of the card base at 2 1/8″ with a small pencil mark. I cut from the pencil mark to the first score line both bottom and top to make the diamond. The card base is folded in half at the 5 1/2″ score line and folded back at the 2 1/8″ score line so the diamond is on the front of the card.
I adhered a panel of Flowering Zinnias DSP to the front of the card base. I adhered the square panel of Flowering Zinnias DSP to the diamond front using Liquid Glue. I stamped the sentiment from the Stampin’ Up! Simply Zinnia Cling Stamp Set in Melon Mambo Ink on the strip of Basic White. I cut the ends on an angle using Paper Snips.
Using the Simply Zinnia Dies, I cut the Daffodil Delight, Flirty Flamingo, Lemon Lolly, Melon Mambo and Petal Pink flower pieces. I adhered them together using Glue Dots. I cut 2 stems from Lemon Lime Twist and Mossy Meadow using the Simply Zinnia Dies and the leaves from Lemon Lime Twist. I adhered the stems together using Liquid Glue and the leaves using a Glue Dot. I adhered the stem and flower to the card front using Stampin’ Dimensionals. I adhered the sentiment across the stem using Stampin’ Dimensionals. I added a few Adhesive-Backed Shiny Sequins to the card front.
On the inside, I adhered a panel of Flowering Zinnias DSP to the left side using Stampin’ Seal. I adhered another panel of Flowering Zinnias DSP to the inside of the card base using Liquid Glue. On a panel of Basic White, I stamped the sentiment from the Hope You Know stamp set in Melon Mambo Ink. I stamped the single flower image from the Simply Zinnia stamp set in Melon Mambo Ink, stamping off 3 times on scrap paper, over the sentiment. I adhered the Basic White panel to the inside of the card base using Stampin’ Seal.
To finish my card, I decorated a Basic White Medium Envelope. I stamped the single flower image from the Simply Zinnia stamp set in Melon Mambo Ink on the envelope front. I stamped the leaf image from the Simply Zinnia stamp set in Lemon Lime Twist. I adhered a panel of Flowering Zinnias DSP to the envelope flap.
Thank you for stopping by my blog today. I hope you like the card and will give it a try. Happy Stamping!!
If you need any stamping supplies, I’d love to be your Demonstrator. Just click HERE to go directly to my online store or drop me an email if you have any questions.
MY CURRENT HOST CODE IS: AHZBFDC4
Use this host code when placing an order with me. When you order $50 or greater you will receive a free gift from me! If your order is over $150, please do not use this code, but you’ll still get the free gift. The free gift is your choice of any 1 item valued up to $10.00 from the 2023-2024 Annual Catalog, the January-April 2024 Mini Catalog or from the Online Exclusives! Unfortunately, packs of cardstock are no longer an option for a free gift. Shipping has become too expensive to ship and it’s costing me as much to ship as the cardstock costs. For any orders $50 or more I will also send you my monthly class tutorials. Click HERE or go to my Customer Rewards for more details and to see what this month’s tutorials are.
Please remember to use my current Host Code and make sure that you can see my name on the final checkout page listed as your Demonstrator when you order so that you know that you’re ordering with me, and you’ll get my rewards!
In response to changing policies at Stampin’ Up – I’m adjusting my Ordering Gift policy as well. I’m having to get a little more tough on the adding of Host codes when you place your order thru my Online Store.
Not to worry – you’re still going to get that $10 ordering gift for orders of $50 (before shipping & tax) or greater. And the gift is still any 1 SU! product up to that $10 value – which includes some of our fun Host Sets!
But – if you DO NOT use the Host code for your orders of less than $150 (this is the RETAIL total before Shipping & Handling), then you’ll have two options:
You’ll need to call Stampin’ Up! (1-800-Stamp-Up) and ask them to add it for you. They’re very helpful and will get it done quickly! OR….
If your order was over the $50 threshold but under $150, then…you’ll forfeit that $10 ordering gift and rewards – this is the Bummer Option – and I REALLY don’t want to do this, SO please remember to add my Current Host Code.
Subscribe to Paper Pumpkin for a monthly, all-inclusive crafting kit that’s a fun surprise! Each kit includes a photopolymer stamp set, Classic Stampin’ Spot, and step by step instructions to complete exclusive paper craft projects, including cards, tags, and gift packaging. And don’t miss the special add-on that coordinates with the next three months!
Send elegant words of encouragement and support to those you love.
Makes 9 cards: 3 each of 3 designs with 9 coordinating envelopes.
This exclusive add-on coordinates with the three upcoming kits! Paper Pumpkin subscribers can purchase it beginning 11 March. The add-on is available only while supplies last, so it’s best to shop early!
Subscribe to the April Paper Pumpkin Kit between 11 March and 10 April by clicking here!
Note: Supplies may be limited toward the end of the subscription period.
Basic White Cardstock 5/8″ X 4″ (sentiment), 3 1/8″ X 4″ (inner liner), 2 3/4″ X 2 3/4″ (back of diamond panel cut in half on an angle)
Daffodil Delight Cardstock 1″ X 1″ (die cut)
Flirty Flamingo Cardstock 2″ X 2 1/4″ (die cut)
Lemon Lime Twist Cardstock 3/4″ X 4″ (stem), 1 1/2″ X 2″ (leaves)
Lemon Lolly Cardstock 1″ x 1″ (die cut)
Melon Mambo Cardstock 4 1/4″ X 11″ (card base scored & folded at 2 1/8″ & 5 1/2″), 2 1/4″ X 2 1/4″ (die cut)
Mossy Meadow Cardstock 3/4″ X 4″ (stem)
Petal Pink Cardstock 2″ X 2 1/4″ (die cut)
Flowering Zinnias Designer Series Paper 2 7/8″ X 2 7/8″ (diamond panel), 2 – 3 1/4″ X 4 1/8″ (card front panel), 4 1/8″ X 5 3/8″ (inside panel), 2 1/4″ X 6″ (envelope flap)
Good Friday morning stamping friends and welcome to my Fun Fold Friday. I hope you are all starting to make plans for the weekend. I’m here in Houston TX for our Stampin’ Up! OnStage Event. Last night was so much fun stamping with friends and getting our 1st new bundle from the 2024-2025 Annual Catalog. I’m so excited to see what they have for us today. Our days here are starting early and ending late, but well worth it.
Today’s card is one that we made at our team meeting on Sunday. This card was designed by Carol Buckelew using Online Exclusive products. Here’s my card for today.
I used the Stampin’ Up! Online Exclusive Simply Zinnia Bundle and Flowering Zinnia Designer Series Paper along with the Perennial Postage Dies for my card today.
I started by adhering panels of Flowering Zinnias DSP to Daffodil Delight mats using Stampin’ Seal. I adhered the layered panels to a Mossy Meadow card base using Liquid Glue.
On a panel of Basic White, I stamped the single zinnia from the Stampin’ Up! Simply Zinnia Cling Stamp Set in Flirty Flamingo, Highland Heather and Pumpkin Pie Inks. I stamped the leaf image from the Simply Zinnia stamp set in Old Olive Ink 3 times. I cut all the images out using the Simply Zinnia Dies. I colored each of the flowers and leaves with the coordinating Stampin’ Blends Markers and the flower centers using Daffodil Delight Stampin’ Blends Markers.
On a panel of Basic White, I stamped the sentiment from the Simply Zinnia stamp set in Old Olive Ink. I cut the sentiment out using the Perennial Postage Dies. I cut a panel of Berry Burst using the next largest Perennial Postage Die. I adhered the sentiment to the Berry Burst mat using Stampin’ Seal. I adhered the sentiment to the card front using Stampin’ Dimensionals. I adhered the flowers and leaves around the sentiment using Liquid Glue and Stampin’ Dimensionals. I added a few Adhesive-Backed Shiny Sequins to the card front.
I adhered the other 2 panels of Flowering Zinnias DSP to Daffodil Delight mats using Stampin’ Seal. I adhered the layered panel to the back panels of the card base using Liquid Glue. I kept the back inner panel very simple by just stamping the single zinnia image from the Simply Zinnia stamp set in Pumpkin Pie Ink on the bottom of a Basic White panel. I stamped the leaf image from the Simply Zinnia stamp set in Old Olive Ink by the flower. I adhered the Basic White panel to a Daffodil Delight mat then to the back of the Mossy Meadow card base.
To finish my card, I decorated a Basic White Medium Envelope. I stamped the single zinnia from the Simply Zinnia stamp set in Pumpkin Pie Ink on the envelope front. I stamped the leaf image from the Simply Zinnia stamp set in Old Olive Ink by the flower. I adhered a panel of Flowering Zinnias DSP to the envelope flap.
Thank you for stopping by my blog today. I hope you like this card and will give it a try. Happy Stamping!!
If you need any stamping supplies, I’d love to be your Demonstrator. Just click HERE to go directly to my online store or drop me an email if you have any questions.
MY CURRENT HOST CODE IS: AHZBFDC4
Use this host code when placing an order with me. When you order $50 or greater you will receive a free gift from me! If your order is over $150, please do not use this code, but you’ll still get the free gift. The free gift is your choice of any 1 item valued up to $10.00 from the 2023-2024 Annual Catalog, the January-April 2024 Mini Catalog or from the Online Exclusives! Unfortunately, packs of cardstock are no longer an option for a free gift. Shipping has become too expensive to ship and it’s costing me as much to ship as the cardstock costs. For any orders $50 or more I will also send you my monthly class tutorials. Click HERE or go to my Customer Rewards for more details and to see what this month’s tutorials are.
Please remember to use my current Host Code and make sure that you can see my name on the final checkout page listed as your Demonstrator when you order so that you know that you’re ordering with me, and you’ll get my rewards!
In response to changing policies at Stampin’ Up – I’m adjusting my Ordering Gift policy as well. I’m having to get a little more tough on the adding of Host codes when you place your order thru my Online Store.
Not to worry – you’re still going to get that $10 ordering gift for orders of $50 (before shipping & tax) or greater. And the gift is still any 1 SU! product up to that $10 value – which includes some of our fun Host Sets!
But – if you DO NOT use the Host code for your orders of less than $150 (this is the RETAIL total before Shipping & Handling), then you’ll have two options:
You’ll need to call Stampin’ Up! (1-800-Stamp-Up) and ask them to add it for you. They’re very helpful and will get it done quickly! OR….
If your order was over the $50 threshold but under $150, then…you’ll forfeit that $10 ordering gift and rewards – this is the Bummer Option – and I REALLY don’t want to do this, SO please remember to add my Current Host Code.
Subscribe to Paper Pumpkin for a monthly, all-inclusive crafting kit that’s a fun surprise! Each kit includes a photopolymer stamp set, Classic Stampin’ Spot, and step by step instructions to complete exclusive paper craft projects, including cards, tags, and gift packaging. And don’t miss the special add-on that coordinates with the next three months!
Send elegant words of encouragement and support to those you love.
Makes 9 cards: 3 each of 3 designs with 9 coordinating envelopes
This exclusive add-on coordinates with the three upcoming kits! Paper Pumpkin subscribers can purchase it beginning 11 March. The add-on is available only while supplies last, so it’s best to shop early!
Subscribe to the April Paper Pumpkin Kit between 11 March and 10 April by clicking here!
Note: Supplies may be limited toward the end of the subscription period.
Good Friday morning stamping friends and welcome to my Fun Fold Friday. Happy March!!! Are you starting to make plans for the weekend yet? Last night I went to a fund raiser with all the ladies I work with from the Hungry Hound Dog Bakery. It’s a lady’s night out and we’ve gone the past few years, it’s for Pediatric Brain Cancer. It’s a silent auction and there’s always a theme. Last night’s theme was Boots and Bling. We all wore different color blingy Cowboy hats that lit up. We laughed and had such a good time. The fund raiser was a huge success too. Here’s a picture of our group that won for the best group category.
Today’s card I made on YouTube Live on Wednesday. If you were able to join me or watched the replay, thank you. If you’d like to watch my video and stamp along, the measurements are below, just above the supply list, along with the link to my YouTube channel. Here’s my card for today.
I used the Stampin’ Up! Online Exclusive Simply Zinnia Bundle along with the Online Exclusive Flowering Zinnias Designer Series Paper for my card today. This suite will be available starting in March.
I started by adhering a panel of Flowering Zinnias DSP to a Basic White mat using Stampin’ Seal. I adhered the layered panel to a Blueberry Bushel mat using Liquid Glue. I adhered the layered card front to a Blueberry Bushel card base using Liquid Glue only on the bottom half of the panel.
I adhered the smaller panel of Flowering Zinnias to a Basic White mat using Liquid Glue. I adhered the card base together using Liquid Glue on the 1 1/4″ section to make a binder look. I adhered the layered panel to the 1 1/4″ section of the card base using Liquid Glue. On a panel of Basic White, I stamped the large zinnia image from the Stampin’ Up! Simply Zinnia Cling Stamp Set in Pebbled Path Ink. I cut the image out using the Simply Zinnia Dies. I colored the image using Azure Afternoon, Flirty Flamingo, Highland Heather, Lemon Lime Twist and Lemon Lolly Stampin’ Blends Markers. I adhered the die cut image to the card front using Stampin’ Dimensionals.
I stamped the sentiment from the Simply Zinnia stamp set in Pebbled Path Ink on a panel of Basic White. Using my Banner Pick A Punch, I cut both ends. I adhered the sentiment to the card front using Stampin’ Dimensionals. I added a few Adfhesive-Back Shining Sequins (available March 5) to the card front.
For the inside, I adhered a Basic White panel to a Mango Melody mat then to the inside of the Blueberry Bushel card base. I stamped the smaller zinnia and the leaf images from the Simply Zinnia stamp set in Pebbled Path Ink on a panel of Basic White. I cut the images out using the Simply Zinnia Dies. I colored the images using Lemon Lime Twist, Lemon Lolly and Mango Melody Stampin’ Blends Markers. I adhered the zinnia to the bottom of the Basic White panel using Stampin’ Dimensionals. I adhered the leaves under the flower using Glue Dots. I added 1 of the Adhesive-Backed Shining Sequins to the center of the zinnia.
To finish my card, I decorated a Basic White Medium Envelope. I stamped the large zinnia image from the Simply Zinnia stamp set in Pebbled Path Ink on the envelope front. I colored the image using Azure Afternoon, Flirty Flamingo, Highland Heather, Lemon Lime Twist and Lemon Lolly Stampin’ Blends Markers. I adhered a panel of Flowering Zinnias DSP to the envelope flap.
Thank you for stopping by my blog today. I hope you liked my trifold card and will give it a try. I hope you will CASE this card and please feel free to post it in the comments of my Facebook page under my post. I’d love to see your take it. The list of measurements are below if you’d like to stamp along while watching the video. You can watch my video on my YouTube Channel Here.
If you watch this on my YouTube channel, please remember to subscribe so that you will get notified when a new video goes live. Thank you to those that have subscribed already. Happy Stamping!!
If you need any stamping supplies, I’d love to be your Demonstrator. Just click HERE to go directly to my online store or drop me an email if you have any questions.
MY CURRENT HOST CODE IS: AHZBFDC4
Use this host code when placing an order with me. When you order $50 or greater you will receive a free gift from me! If your order is over $150, please do not use this code, but you’ll still get the free gift. The free gift is your choice of any 1 item valued up to $10.00 from the 2023-2024 Annual Catalog, the January-April 2024 Mini Catalog or from the Online Exclusives! Unfortunately, packs of cardstock are no longer an option for a free gift. Shipping has become too expensive to ship and it’s costing me as much to ship as the cardstock costs. For any orders $50 or more I will also send you my monthly class tutorials. Click HERE or go to my Customer Rewards for more details and to see what this month’s tutorials are.
Please remember to use my current Host Code and make sure that you can see my name on the final checkout page listed as your Demonstrator when you order so that you know that you’re ordering with me, and you’ll get my rewards!
In response to changing policies at Stampin’ Up – I’m adjusting my Ordering Gift policy as well. I’m having to get a little more tough on the adding of Host codes when you place your order thru my Online Store.
Not to worry – you’re still going to get that $10 ordering gift for orders of $50 (before shipping & tax) or greater. And the gift is still any 1 SU! product up to that $10 value – which includes some of our fun Host Sets!
But – if you DO NOT use the Host code for your orders of less than $150 (this is the RETAIL total before Shipping & Handling), then you’ll have two options:
You’ll need to call Stampin’ Up! (1-800-Stamp-Up) and ask them to add it for you. They’re very helpful and will get it done quickly! OR….
If your order was over the $50 threshold but under $150, then…you’ll forfeit that $10 ordering gift and rewards – this is the Bummer Option – and I REALLY don’t want to do this, SO please remember to add my Current Host Code.
Share nature’s beauty with lovely all-occasion cards! • Makes 9 cards: 3 each of 3 designs with 9 coordinating envelopes • Precut vellum pieces & wood embellishments • Coordinates with the Meandering Meadows Suite Collection (item 162745) • Coordinating colors: Granny Apple Green, Garden Green (Classic Stampin’ Spot), Balmy Blue, Night of Navy, Gorgeous Grape, Fresh Freesia
Don’t miss the coordinatingLove of Spring Dies add-on!
The dies will coordinate with the January, February and March Paper Pumpkin Kit.
The Love of Spring Dies Add-On—available only while supplies last!
Item # 164396 $12.00
This exclusive add-on coordinates with the three upcoming kits! Paper Pumpkin subscribers can purchase it beginning 11 December. The add-on is available only while supplies last, so it’s best to shop early!
Subscribe to the February Paper Pumpkin Kit between 11 January and 10 February by clicking here!
Note: Supplies may be limited toward the end of the subscription period.
Basic White Cardstock 4 1/4″ X 5 1/2″ (flowers & leaves), 2 – 4″ X 4″(card front mat & inner liner), 1 1/8 X 4 1/8″ (side panel mat),3/4″ X 4″ (sentiment)
Blueberry Bushel Cardstock 4 1/4″ x 11″ (card base scored & folded at 5 1/2″, 6 3/4″ & 8 7/8″), 4 1/8″ x 4 1/8″ (card front mat)
Melon Mambo Cardstock 4 189″ x 4 1/8″ (inner liner mat)
Flowering Zinnias Designer Series Paper 3 7/8″ X 3 7/8″ (card front), 1″ X 4″ (side panel), 2 1/4″ X 6″ (envelope flap)
Good Friday morning stamping friends and welcome to my Fun Fold Friday. This week just flew right by it seems. Are you ready for the weekend? Is anyone starting to make plans? I’ll be working all day Saturday and I have a workshop that I’ll be doing on Sunday. I’m pretty excited about doing the workshop, I’m going to get to meet some new stampers and I hope they like the cards that I designed for them to make.
Today’s card uses all Sale-a-bration items again. These items are free with qualifying orders, but only until next Thursday February 29th. If you’d like to see a quick video on how I made this card, Click Here to go to my Instagram Reels. Here’s my card for today.
I used the Stampin’ Up! Softly Sophisticated Photopolymer Stamp Set along with the Flight & Airy Designer Series Paper and Sunny Days Designer Series Paper for my card today.
I started by stamping the leaf image from the Softly Sophisticated stamp set in Granny Apple Green Ink on a panel of Basic White. I stamped the larger flower image from the Softly Sophisticated stamp set in Poppy Parade Ink on the leaf image. I stamped the sentiment from the Softly Sophisticated stamp set in Pecan Pie Ink on the top of the panel. I adhered the artwork to a Pecan Pie mat, a Poppy Parade mat and a Basic White mat using Stampin’ Seal.
I adhered a panel of Flight & Airy DSP to a Basic White mat and a Poppy Parade mat using Liquid Glue. I adhered the layered panel to a Pecan Pie card base using Liquid Glue.
I adhered the layered artwork to the card front using Stampin’ Dimensionals only on the left side of the image. I added a few of the Sale-a-bration Opaque Faceted Gems to the card front.
On the inside, I stamped the sentiment from the Softly Sophisticated stamp set in Pecan Pie Ink on the left side of a panel of Basic White. I adhered a panel of Sunny Days DSP to the right side of the panel. I adhered the layered panel to a Poppy Parade mat then to the inside of the Pecan Pie card base.
To finish my card, I decorated a Basic White Medium Envelope. I stamped the leaf image from the Softly Sophisticated stamp set in Granny Apple Green Ink on the envelope front. I stamped the flower image from the Softly Sophisticated stamp set in Poppy Parade Ink on the leaf image. I adhered a panel of Flight & Airy DSP to the envelope flap.
Thank you for stopping by my blog today. I hope you like the card and will give it a try. Happy Stamping!!
If you need any stamping supplies, I’d love to be your Demonstrator. Just click HERE to go directly to my online store or drop me an email if you have any questions.
MY CURRENT HOST CODE IS: T9JKA3XQ
Use this host code when placing an order with me. When you order $50 or greater you will receive a free gift from me! If your order is over $150, please do not use this code, but you’ll still get the free gift. The free gift is your choice of any 1 item valued up to $10.00 from the 2023-2024 Annual Catalog, the January-April 2024 Mini Catalog or from the Online Exclusives! Unfortunately, packs of cardstock are no longer an option for a free gift. Shipping has become too expensive to ship and it’s costing me as much to ship as the cardstock costs. For any orders $50 or more I will also send you my monthly class tutorials. Click HERE or go to my Customer Rewards for more details and to see what this month’s tutorials are.
Please remember to use my current Host Code and make sure that you can see my name on the final checkout page listed as your Demonstrator when you order so that you know that you’re ordering with me, and you’ll get my rewards!
In response to changing policies at Stampin’ Up – I’m adjusting my Ordering Gift policy as well. I’m having to get a little more tough on the adding of Host codes when you place your order thru my Online Store.
Not to worry – you’re still going to get that $10 ordering gift for orders of $50 (before shipping & tax) or greater. And the gift is still any 1 SU! product up to that $10 value – which includes some of our fun Host Sets!
But – if you DO NOT use the Host code for your orders of less than $150 (this is the RETAIL total before Shipping & Handling), then you’ll have two options:
You’ll need to call Stampin’ Up! (1-800-Stamp-Up) and ask them to add it for you. They’re very helpful and will get it done quickly! OR….
If your order was over the $50 threshold but under $150, then…you’ll forfeit that $10 ordering gift and rewards – this is the Bummer Option – and I REALLY don’t want to do this, SO please remember to add my Current Host Code.
Receiving training information and accessing resources to help you through your first year and beyond
Bonus: Since it’s Sale-A-Bration, now is an excellent time to join and take advantage of the Join offer!
Sale-A-Bration is an excellent time you to join Stampin’ Up! In addition to the already great value of the Starter Kit, if you sign up as a Stampin’ Up! demonstrator during Sale-a-bration, you can choose from two incredible options:
Option 1: Purchase the $99 Starter Kit during Sale-a-bration, pick $125 worth of Stampin’ Up! merchandise of your choice and get the Stampin’ Glass Mat Studio ($60 value!) for FREE with your Starter Kit!
Option 2: Purchase the $99 Starter Kit during Sale-a-bration, pick $155 worth of Stampin’ Up! merchandise of your choice. That’s $30 additional merchandise for FREE when you purchase your Starter Kit!
Two joining options so you can pick the one that you like the best!!
There is never an obligation to sell. You can join just to enjoy the discount for yourself along with all the other Demonstrator benefits. Once you join, you’ll get at least a 20% discount on all of your Stampin’ Up! merchandise purchases and you get to order early from the upcoming catalogs! You will also be able to attend the OnStage Events and any other events Stampin’ Up! has and you get to be a part of our Stampin’ Up! team!
Unsure about this and want to talk? Contact me at creativestampingdesigns@gmail.com and we can talk. You can also find additional information Here at Join My Team. Being a part of the Stampin’ Up! Community is one of the best decisions I’ve ever made. I have made many friends along the way while doing what I love, Paper Crafting. This Joining offer is only good during Sale-a-bration which starts January 4 and ends on February 29.
Share nature’s beauty with lovely all-occasion cards! • Makes 9 cards: 3 each of 3 designs with 9 coordinating envelopes • Precut vellum pieces & wood embellishments • Coordinates with the Meandering Meadows Suite Collection (item 162745) • Coordinating colors: Granny Apple Green, Garden Green (Classic Stampin’ Spot), Balmy Blue, Night of Navy, Gorgeous Grape, Fresh Freesia
Don’t miss the coordinatingLove of Spring Dies add-on!
The dies will coordinate with the January, February and March Paper Pumpkin Kit.
The Love of Spring Dies Add-On—available only while supplies last!
Item # 164396 $12.00
This exclusive add-on coordinates with the three upcoming kits! Paper Pumpkin subscribers can purchase it beginning 11 December. The add-on is available only while supplies last, so it’s best to shop early!
Subscribe to the February Paper Pumpkin Kit between 11 January and 10 February by clicking here!
Note: Supplies may be limited toward the end of the subscription period.
Good Friday morning stamping friends and welcome to my fun fold Friday. Are you ready for the weekend? Anyone starting to make plans? Who has a nice long weekend for Presidents Day? Not me, even though I work in the office, I work in retail.
Sorry I wasn’t able to go live with this card on Wednesday, I’d had a migraine for a couple days and just wasn’t feeling up to it. So, as most of you know, I work in a hardware store. I work in the office and run the register on the weekends. When Sale-a-bration came out with the Trusty Toolbox DSP, I had to make some kind of a card using all the tools. I did not get the Stampin’ Up! Trusty Tools Bundle, so I had to get creative myself. I decided to make my boss a birthday card. Here’s my card for today.
I used the Stampin’ Up! Waves Of Inspiration Cling Stamp Set along with the Sale-a-bration Trusty Toolbox Designer Series Paper for my card today. Surprisingly I only used Stamps, Ink and Paper. There still time to get this DSP FREE with a qualifying order of $50 or more during Sale-a-bration.
I started by fussy cutting a lot of the tools from the Trusty Toolbox DSP using Paper Snips.
I adhered the Basic Black easel card base to the Gray Granite card base using Liquid Glue.
I adhered 2 panels of the Trusty Toolbox DSP to the Basic Black card base using Stampin’ Seal. I stamped the sentiment from the Waves of Inspiration stamp set in Tuxedo Black Ink on the ruler piece of Trusty Toolbox DSP. I adhered the ‘ruler’ to the top of the front panel using Liquid Glue. I adhered some of the tools I fussy cut to the front panel using Liquid Glue and Stampin’ Dimensionals.
I adhered more of the tools I fussy to the inside pegboard panel of Trusty Toolbox DSP card front using Liquid Glue and Stampin’ Dimensionals.
On the inside, I stamped the sentiment from the Waves of Inspiration stamp set in Gray granite Ink on a panel of Basic White. I adhered more of the tools I fussy cut to the panel using Liquid Glue. I adhered the Basic White panel to a Trusty Toolbox DSP mat then to the inside of the Gray Granite card base.
To finish my card, I decorated a Basic White Medium Envelope. I adhered a strip of the Trusty Toolbox DSP to the envelope front and a panel to the envelope flap.
Thank you for stopping by my blog today. I hope you like the card and will give it a try. Happy Stamping!!
If you need any stamping supplies, I’d love to be your Demonstrator. Just click HERE to go directly to my online store or drop me an email if you have any questions.
MY CURRENT HOST CODE IS: T9JKA3XQ
Use this host code when placing an order with me. When you order $50 or greater you will receive a free gift from me! If your order is over $150, please do not use this code, but you’ll still get the free gift. The free gift is your choice of any 1 item valued up to $10.00 from the 2023-2024 Annual Catalog, the January-April 2024 Mini Catalog or from the Online Exclusives! Unfortunately, packs of cardstock are no longer an option for a free gift. Shipping has become too expensive to ship and it’s costing me as much to ship as the cardstock costs. For any orders $50 or more I will also send you my monthly class tutorials. Click HERE or go to my Customer Rewards for more details and to see what this month’s tutorials are.
Please remember to use my current Host Code and make sure that you can see my name on the final checkout page listed as your Demonstrator when you order so that you know that you’re ordering with me, and you’ll get my rewards!
In response to changing policies at Stampin’ Up – I’m adjusting my Ordering Gift policy as well. I’m having to get a little more tough on the adding of Host codes when you place your order thru my Online Store.
Not to worry – you’re still going to get that $10 ordering gift for orders of $50 (before shipping & tax) or greater. And the gift is still any 1 SU! product up to that $10 value – which includes some of our fun Host Sets!
But – if you DO NOT use the Host code for your orders of less than $150 (this is the RETAIL total before Shipping & Handling), then you’ll have two options:
You’ll need to call Stampin’ Up! (1-800-Stamp-Up) and ask them to add it for you. They’re very helpful and will get it done quickly! OR….
If your order was over the $50 threshold but under $150, then…you’ll forfeit that $10 ordering gift and rewards – this is the Bummer Option – and I REALLY don’t want to do this, SO please remember to add my Current Host Code.
Receiving training information and accessing resources to help you through your first year and beyond
Bonus: Since it’s Sale-A-Bration, now is an excellent time to join and take advantage of the Join offer!
Sale-A-Bration is an excellent time you to join Stampin’ Up! In addition to the already great value of the Starter Kit, if you sign up as a Stampin’ Up! demonstrator during Sale-a-bration, you can choose from two incredible options:
Option 1: Purchase the $99 Starter Kit during Sale-a-bration, pick $125 worth of Stampin’ Up! merchandise of your choice and get the Stampin’ Glass Mat Studio ($60 value!) for FREE with your Starter Kit!
Option 2: Purchase the $99 Starter Kit during Sale-a-bration, pick $155 worth of Stampin’ Up! merchandise of your choice. That’s $30 additional merchandise for FREE when you purchase your Starter Kit!
Two joining options so you can pick the one that you like the best!!
There is never an obligation to sell. You can join just to enjoy the discount for yourself along with all the other Demonstrator benefits. Once you join, you’ll get at least a 20% discount on all of your Stampin’ Up! merchandise purchases and you get to order early from the upcoming catalogs! You will also be able to attend the OnStage Events and any other events Stampin’ Up! has and you get to be a part of our Stampin’ Up! team!
Unsure about this and want to talk? Contact me at creativestampingdesigns@gmail.com and we can talk. You can also find additional information Here at Join My Team. Being a part of the Stampin’ Up! Community is one of the best decisions I’ve ever made. I have made many friends along the way while doing what I love, Paper Crafting. This Joining offer is only good during Sale-a-bration which starts January 4 and ends on February 29.
Share nature’s beauty with lovely all-occasion cards! • Makes 9 cards: 3 each of 3 designs with 9 coordinating envelopes • Precut vellum pieces & wood embellishments • Coordinates with the Meandering Meadows Suite Collection (item 162745) • Coordinating colors: Granny Apple Green, Garden Green (Classic Stampin’ Spot), Balmy Blue, Night of Navy, Gorgeous Grape, Fresh Freesia
Don’t miss the coordinatingLove of Spring Dies add-on!
The dies will coordinate with the January, February and March Paper Pumpkin Kit.
The Love of Spring Dies Add-On—available only while supplies last!
Item # 164396 $12.00
This exclusive add-on coordinates with the three upcoming kits! Paper Pumpkin subscribers can purchase it beginning 11 December. The add-on is available only while supplies last, so it’s best to shop early!
Subscribe to the February Paper Pumpkin Kit between 11 January and 10 February by clicking here!
Note: Supplies may be limited toward the end of the subscription period.
Basic White Cardstock3 1/2″ X 4 3/4″ (inner liner)
Basic Black Cardstock 4 1/8″ X 9 3/4″ (easel card base scored & folded at 2 1/4″ & 4 1/2″)
Gray Granite Cardstock 4 1/4″ X 11″ (card base scored & folded at 5 1/2″)
Trusty Toolbox Designer Series Paper 4″ X 5 1/8″ & 2 1/8″ X 4″ (easel panels), 4 1/4″ x 5 1/8″ (inner liner), 1/4″ X 6″ & 2 1/4″ X 6″ (envelope), panels with tools
Good Friday morning stamping friends and welcome to my Fun Fold Friday. Do you have plans in the works for the weekend yet? Who will be watching the Super Bowl Sunday night? I’ll be in my craft studio hopefully.
Today’s card I made on YouTube Live on Wednesday. If you were able to join me or watched the replay, thank you. If you’d like to watch my video and stamp along, the measurements are below, just above the supply list, along with the link to my YouTube channel. Here’s my card for today.
I used the new Stampin’ Up! Online Exclusive Latte Love Bundle along with A Little Latte Designer Series Paper for my card today. These products will be available starting March 5th. Want to get your hands on them early? You can add them to your starter kit. I’d be happy to talk to you about joining my team.
I started by adhering panels of A Little Latte DSP to Petal Pink mats using Stampin’ Seal. I adhered the layered panels to the Pecan Pie card base using Liquid Glue. I adhered the small card base to the larger card base using Tear & Tape.
Using the Latte Love Dies, I cut the coffee carafe and French press holder from panels of Rose Gold Specialty Paper. I cut the ‘glass’ carafes from a Window Sheet and the ‘coffee’ from panels of Early Espresso and Pecan Pie. I adhered the holders to the carafes using Adhesive Sheets before I cut them. I adhered the carafe and French press to the card front using Glue Dots.
On a panel of Basic White, I stamped the coffee cup image from the Stampin’ Up! Latte Love Photopolymer Stamp Set in Early Espresso Ink. I colored the image using Petal Pink Stampin’ Blends Markers. I stamped the heart swirl image from the Latte Love stamp set in Pecan Pie Ink, stamping off twice on scrap paper first, on the panel of Basic White. I stamped the sentiment from the Latte Love stamp set in Pecan Pie Ink over the swirl image. I cut the sentiment, coffee cup images and 2 espresso cups using the Latte Love Dies. I cut the coffee beans from a panel of A Little Latte DSP. I adhered the coffee beans to the card front using Glue Dots. I adhered the cups and sentiment to the card front using Stampin’ Dimensionals. I added an Adhesive-Backed Swirl Dot to the sentiment.
On the inside, I stamped the sentiment from the Latte Love stamp set in Pecan Pie Ink on a panel of Basic White. I stamped the coffee cup image from the Latte Love stamp set on the bottom of the panel in Early Espresso Ink and colored the image in Petal Pink Stampin’ Blends Markers. I stamped the coffee image in the cup in Pecan Pie Ink and the steam image in Pecan Pie Ink, stamping off once on scrap paper. I adhered a few more of the die cut coffee beans to the bottom of the panel using Glue Dots. I adhered the Basic White panel to a Petal Pink mat then to the inside of the Pecan Pie card base.
To finish my card, I decorated a Basic White Medium Envelope. I stamped the coffee cup image form the Latte Love stamp set in Early Espresso Ink on the envelope front and colored it using Petal Pink Stampin’ Blends Markers. I stamped the coffee in the cup in Pecan Pie Ink and the steam image in Pecan Pie Ink, stamping off on scrap paper once. I adhered a panel of A Little Latte DSP to the envelope flap.
Thank you for stopping by my blog today. I hope you liked my card and will give it a try. I hope you will CASE this card and please feel free to post it in the comments of my Facebook page under my post. I’d love to see your take on it. The list of measurements are below if you’d like to stamp along while watching the video. You can watch my video on my YouTube Channel Here.
If you watch this on my YouTube channel, please remember to subscribe so that you will get notified when a new video goes live. Thank you to those that have subscribed already. Happy Stamping!!
If you need any stamping supplies, I’d love to be your Demonstrator. Just click HERE to go directly to my online store or drop me an email if you have any questions.
MY CURRENT HOST CODE IS: T9JKA3XQ
Use this host code when placing an order with me. When you order $50 or greater you will receive a free gift from me! If your order is over $150, please do not use this code, but you’ll still get the free gift. The free gift is your choice of any 1 item valued up to $10.00 from the 2023-2024 Annual Catalog, the January-April 2024 Mini Catalog or from the Online Exclusives! Unfortunately, packs of cardstock are no longer an option for a free gift. Shipping has become too expensive to ship and it’s costing me as much to ship as the cardstock costs. For any orders $50 or more I will also send you my monthly class tutorials. Click HERE or go to my Customer Rewards for more details and to see what this month’s tutorials are.
Please remember to use my current Host Code and make sure that you can see my name on the final checkout page listed as your Demonstrator when you order so that you know that you’re ordering with me, and you’ll get my rewards!
In response to changing policies at Stampin’ Up – I’m adjusting my Ordering Gift policy as well. I’m having to get a little more tough on the adding of Host codes when you place your order thru my Online Store.
Not to worry – you’re still going to get that $10 ordering gift for orders of $50 (before shipping & tax) or greater. And the gift is still any 1 SU! product up to that $10 value – which includes some of our fun Host Sets!
But – if you DO NOT use the Host code for your orders of less than $150 (this is the RETAIL total before Shipping & Handling), then you’ll have two options:
You’ll need to call Stampin’ Up! (1-800-Stamp-Up) and ask them to add it for you. They’re very helpful and will get it done quickly! OR….
If your order was over the $50 threshold but under $150, then…you’ll forfeit that $10 ordering gift and rewards – this is the Bummer Option – and I REALLY don’t want to do this, SO please remember to add my Current Host Code.
You can see a flyer with some of the new Online Exclusives that will be available to order beginning March 5 Here. If you want to get your hands on the Online Exclusives early, the Demonstrator preorder starts on February 1! So if you join as a Demonstrator, you can either add the new products to your Starter Kit beginning February 1 or add them to a Demonstrator order in February!
Go check out my Online Store for the NEW Online Exclusive products available. Get those orders placed early so you don’t miss out on the pretty new suite and new bundles.
Receiving training information and accessing resources to help you through your first year and beyond
Bonus: Since it’s Sale-A-Bration, now is an excellent time to join and take advantage of the Join offer!
Sale-A-Bration is an excellent time you to join Stampin’ Up! In addition to the already great value of the Starter Kit, if you sign up as a Stampin’ Up! demonstrator during Sale-a-bration, you can choose from two incredible options:
Option 1: Purchase the $99 Starter Kit during Sale-a-bration, pick $125 worth of Stampin’ Up! merchandise of your choice and get the Stampin’ Glass Mat Studio ($60 value!) for FREE with your Starter Kit!
Option 2: Purchase the $99 Starter Kit during Sale-a-bration, pick $155 worth of Stampin’ Up! merchandise of your choice. That’s $30 additional merchandise for FREE when you purchase your Starter Kit!
Two joining options so you can pick the one that you like the best!!
There is never an obligation to sell. You can join just to enjoy the discount for yourself along with all the other Demonstrator benefits. Once you join, you’ll get at least a 20% discount on all of your Stampin’ Up! merchandise purchases and you get to order early from the upcoming catalogs! You will also be able to attend the OnStage Events and any other events Stampin’ Up! has and you get to be a part of our Stampin’ Up! team!
Unsure about this and want to talk? Contact me at creativestampingdesigns@gmail.com and we can talk. You can also find additional information Here at Join My Team. Being a part of the Stampin’ Up! Community is one of the best decisions I’ve ever made. I have made many friends along the way while doing what I love, Paper Crafting. This Joining offer is only good during Sale-a-bration which starts January 4 and ends on February 29.
Celebrate Easter and Spring with adorable cards and treat boxes! • Makes 9 projects: 3 each of 3 designs • Projects include printed cards, coordinating envelopes, and gift boxes • Precut paper pieces, baker’s twine, and embellishments • Coordinating colors: Petal Pink, Daffodil Delight, Granny Apple Green, Berry Burst, Early Espresso (Classic Stampin’ Spot), Crumb Cake
Don’t miss the coordinatingLove of Spring Dies add-on!
The dies will coordinate with the January, February and March Paper Pumpkin Kit.
The Love of Spring Dies Add-On—available only while supplies last!
Item # 164396 $12.00
This exclusive add-on coordinates with the three upcoming kits! Paper Pumpkin subscribers can purchase it beginning 11 December. The add-on is available only while supplies last, so it’s best to shop early!
Subscribe to the February Paper Pumpkin Kit between 11 January and 10 February by clicking here!
Note: Supplies may be limited toward the end of the subscription period.
Basic White Cardstock 3″ X 4″ (inner liner), 3 1/2″ X 4″ (cups & sentiment)
Early Espresso Cardstock 1 1/2″ X 1 3/4″
Pecan Pie Cardstock 4 1/4″ X 9″ (card base scored & folded at 1 1/4″, 2 1/2″ & 5 3/4″), 3″ X 8 1/2″ (small card base scored & folded at 5 1/2″), 1 1/2″ X 2″ (coffee)
Petal Pink Cardstock 1 1/8″ X 4 1/8″ , 2 7/8″ X 5 3/8″ (card front mats), 2 – 4 1/8″ X 3 1/8″ (card front & inner liner mats)
Rose Gold Specialty Paper 2″ X 4″ (die cut pieces)
Window Sheet 2 1/4″ X 4 1/2″ (coffee care die cits)
Good Tuesday morning stamping friends. How is everyone doing today? We are expecting another sunny day here in NJ and I am so happy. I just LOVE the sunshine.
I have a Joy Fold card for you today using one of my favorite sets from the catalog. I love stamp sets that look sketched. Here’s my card for today.
I used the Stampin’ Up! Poetic Expressions Suite for my fun fold card today.
I started by stamping the large and small flower images from the Stampin’ Up! Thoughtful Expressions Cling Stamp Set in Tuxedo Black Ink on a panel of Basic White. I colored the images using Blue, Daffodil Delight and Old Olive Watercolor Pencils. I spread the color using the Clear Wink of Stella Glitter Bursh. I cut the images out using the Thoughtful Expressions Dies. From a panel of Mossy Meadow, I cut the leaves using the Thoughtful Expressions Dies. On a panel of Basic White, I stamped the sentiment from the Thoughtful Expressions stamp set in Boho Blue Ink. I cut the sentiment out using the Thoughtful Expressions Dies. I cut the next largest frame from the Thoughtful Expressions Dies from a panel of Boho Blue.
I adhered a panel of Poetic Expressions Designer Series Paper to a Boho Blue mat using Stampin’ Seal. I adhered the layered panel to the front of the large Mossy Meadow card base using Liquid Glue.
I adhered another panel of Poetic Expressions DSP to a Basic White mat using Stampin’ Seal. I adhered the layered panel to the large Mossy Meadow card base using Liquid Glue. I adhered a small Mossy Meadow card base to the inside of the large card base using Liquid Glue. I adhered the die cut sentiment to the Boho Blue mat using Stampin’ Seal. I adhered the layered sentiment to the front of the small card base using Liquid Glue. I adhered the flowers to the corners of the sentiment using Stampin’ Dimensionals. I added the die cut leaves under the flowers using Glue Dots. I added a few of the Champagne Iridescent Dots to the card front using Liquid Glue.
On the inside, I stamped the sentiment from the Thoughtful Expressions stamp set in Boho Blue Ink on a panel of Basic White. I stamped the small flower image form the Thoughtful Expressions stamp set in Tuxedo Black Ink on the bottom of the panel. I colored the image using Blue Daffodil Delight and Old Olive Watercolor Pencils. I spread the color around using the Clear Wink of Stella Glitter Brush. I adhered the Basic Whtie panel to a Boho Blue mat then to the inside of the small Mossy Meadow card base.
To finish my card, I decorated a Basic White Medium Envelope. I stamped the flower image from the Thoughtful Expressions stamp set in Tuxedo Black Ink on the envelope front. I colored the image the same as I did for the card front. I adhered a panel of Poetic Expressions DSP to the envelope flap.
Thank you for stopping by my blog today. I hope you like the card and will give it a try. Happy Stamping!!
If you need any stamping supplies, I’d love to be your Demonstrator. Just click HERE to go directly to my online store or drop me an email if you have any questions.
MY CURRENT HOST CODE IS: T9JKA3XQ
Use this host code when placing an order with me. When you order $50 or greater you will receive a free gift from me! If your order is over $150, please do not use this code, but you’ll still get the free gift. The free gift is your choice of any 1 item valued up to $10.00 from the 2023-2024 Annual Catalog, the January-April 2024 Mini Catalog or from the Online Exclusives! Unfortunately, packs of cardstock are no longer an option for a free gift. Shipping has become too expensive to ship and it’s costing me as much to ship as the cardstock costs. For any orders $50 or more I will also send you my monthly class tutorials. Click HERE or go to my Customer Rewards for more details and to see what this month’s tutorials are.
Please remember to use my current Host Code and make sure that you can see my name on the final checkout page listed as your Demonstrator when you order so that you know that you’re ordering with me, and you’ll get my rewards!
In response to changing policies at Stampin’ Up – I’m adjusting my Ordering Gift policy as well. I’m having to get a little more tough on the adding of Host codes when you place your order thru my Online Store.
Not to worry – you’re still going to get that $10 ordering gift for orders of $50 (before shipping & tax) or greater. And the gift is still any 1 SU! product up to that $10 value – which includes some of our fun Host Sets!
But – if you DO NOT use the Host code for your orders of less than $150 (this is the RETAIL total before Shipping & Handling), then you’ll have two options:
You’ll need to call Stampin’ Up! (1-800-Stamp-Up) and ask them to add it for you. They’re very helpful and will get it done quickly! OR….
If your order was over the $50 threshold but under $150, then…you’ll forfeit that $10 ordering gift and rewards – this is the Bummer Option – and I REALLY don’t want to do this, SO please remember to add my Current Host Code.
Stampin’ Up! has added 2 new kits this month. I’m loving these already!!!
Kits by Stampin’ Up! are perfect for new crafters, busy crafters, or crafters who want quick and easy projects. All-inclusive project kits have everything you need in one box! Give as a gift or try them yourself. Kits are while supplies last. Order today!
BIRTHDAY SPARKLE KIT
Create glittering birthday cards and gift tags with the Birthday Sparkle Kit! This kit includes six cards and six gift tags. Create each project with the included stamp set, die-cut paper pieces, and twine. It also includes other elements such as glitter stickers, pressed wood picks, coordinating envelopes, and gold foil paper pieces! It’s easy to create each project for your recipient or get ahead on your crafting for the year by making quick multiples. Either way, you’ve got a special paper craft that your recipients will love!
Kit includes: *Birthday Sparkle Photopolymer Stamp Set *Clear Stamp Block *Early Espresso Stampin’ Spot *Predesigned projects *Step-by-step instructions *Precut pieces (No prep work! Get right to crafting) *Make 6 cards and 6 gift tags *Cards: 3 each of 2 designs; folded card 5-1/2″ x 4-1/4″ (14 x 10.8 cm) *Gift tags: 3 each of 2 designs; largest tag 2-1/4″ x 3-1/2″ (5.7 x 8.9 cm) * 6 preprinted envelopes *Enough adhesive to complete projects *Gold glitter stickers and pressed wood picks. *Baker’s Twine in Early Espresso and White *A 9-7/8″ x 6-1/2″ x 2-3/4″ (25.1 x 16.5 x 7 cm) printed designer box for storage or crafting on the go
Product colors: Basic White, Crumb Cake, Early Espresso, gold glitter
Calling all plant lovers! The Happy Houseplants Kit is an adorable home decor crafting kit! This kit comes with four 6″ x 6″ (15.2 x 15.2 cm) white frames and precut paper pieces for you to curl and assemble inside the frame. You’ll end up with four coordinated houseplant decor pieces. They can stand by themselves, or you can hang them on your wall. Either way, your houseguests will be amazed that you created it yourself!
Kit includes: * Predesigned projects * Step-by-step instructions * Precut pieces (No prep work! Get right to crafting) * 4 white frames * Frame size: 7-1/8″ x 7-1/8″ x 7/16″ (18.1 x 18.1 x 1.1 cm) * Enough adhesive to complete projects * A 7-3/4″ x 7-1/2″ x 3″ (19.7 x 19 x 7.6 cm) printed designer box for storage or crafting on the go
Product colors: Calypso Coral, Garden Green, Granny Apple Green, Lemon Lime Twist, Pecan Pie
You can see a flyer with some of the new Online Exclusives that will be available to order beginning March 5 Here. If you want to get your hands on the Online Exclusives early, the Demonstrator preorder starts on February 1! So if you join as a Demonstrator, you can either add the new products to your Starter Kit beginning February 1 or add them to a Demonstrator order in February!
Go check out my Online Store for the NEW Online Exclusive products available. Get those orders placed early so you don’t miss out on the pretty new suite and new bundles.
Receiving training information and accessing resources to help you through your first year and beyond
Bonus: Since it’s Sale-A-Bration, now is an excellent time to join and take advantage of the Join offer!
Sale-A-Bration is an excellent time you to join Stampin’ Up! In addition to the already great value of the Starter Kit, if you sign up as a Stampin’ Up! demonstrator during Sale-a-bration, you can choose from two incredible options:
Option 1: Purchase the $99 Starter Kit during Sale-a-bration, pick $125 worth of Stampin’ Up! merchandise of your choice and get the Stampin’ Glass Mat Studio ($60 value!) for FREE with your Starter Kit!
Option 2: Purchase the $99 Starter Kit during Sale-a-bration, pick $155 worth of Stampin’ Up! merchandise of your choice. That’s $30 additional merchandise for FREE when you purchase your Starter Kit!
Two joining options so you can pick the one that you like the best!!
There is never an obligation to sell. You can join just to enjoy the discount for yourself along with all the other Demonstrator benefits. Once you join, you’ll get at least a 20% discount on all of your Stampin’ Up! merchandise purchases and you get to order early from the upcoming catalogs! You will also be able to attend the OnStage Events and any other events Stampin’ Up! has and you get to be a part of our Stampin’ Up! team!
Unsure about this and want to talk? Contact me at creativestampingdesigns@gmail.com and we can talk. You can also find additional information Here at Join My Team. Being a part of the Stampin’ Up! Community is one of the best decisions I’ve ever made. I have made many friends along the way while doing what I love, Paper Crafting. This Joining offer is only good during Sale-a-bration which starts January 4 and ends on February 29.
Celebrate Easter and Spring with adorable cards and treat boxes! • Makes 9 projects: 3 each of 3 designs • Projects include printed cards, coordinating envelopes, and gift boxes • Precut paper pieces, baker’s twine, and embellishments • Coordinating colors: Petal Pink, Daffodil Delight, Granny Apple Green, Berry Burst, Early Espresso (Classic Stampin’ Spot), Crumb Cake
Don’t miss the coordinatingLove of Spring Dies add-on!
The dies will coordinate with the January, February and March Paper Pumpkin Kit.
The Love of Spring Dies Add-On—available only while supplies last!
Item # 164396 $12.00
This exclusive add-on coordinates with the three upcoming kits! Paper Pumpkin subscribers can purchase it beginning 11 December. The add-on is available only while supplies last, so it’s best to shop early!
Subscribe to the February Paper Pumpkin Kit between 11 January and 10 February by clicking here!
Note: Supplies may be limited toward the end of the subscription period.
Basic White Cardstock 2 1/2″ X 4″ (sentiment), 3″ X 3 1/2″ (flowers), 2 3/4″ X 3 3/4″ (small card base inner liner), 4 1/8″ X 5 3/8″ (large card base back mat)
Boho Blue Cardstock 2 7/8″ X 4 1/8″ (large card bae card front mat), 2 1/2″X 4 1/4″ (sentiment mat), 2 7/8″ X 3 7/8″(small card base inner liner mat)
Mossy Meadow Cardstock 4 1/4″ X 8 1/2″ (large card base scored & folded a t 5 1/2″), 3″ X 8″ (small card base scored & folded at 4″), 2″ X 3″ (leaves)
Poetic Expressions Designer Series Paper 2 3/4″ X 4″ (large card base card front), 4″ X 5 1/4″ (large card base back panel), 2 1/4″ X 6″ (envelope)
Good Friday morning stamping friends and welcome to my Fun Fold Friday. Are you starting to make plans for the weekend yet? I’m off this weekend and my daughter and I are planning a little something.
Today’s card I made on YouTube Live on Wednesday. If you were able to join me or watched the replay, thank you. If you’d like to watch my video and stamp along, the measurements are below, just above the supply list, along with the link to my YouTube channel. Here’s my card for today.
I used the Stampin’ Up! Hot Air Balloon Bundle along with the Lighter Than Air 6 X 6 Designer Series Paper and Sale-a-bration Sunny Days Designer Series Paper for my card today.
I started by adhering a panel of Lighter Than Air DSP to a Fresh Freesia mat using Stampin’ Seal. I adhered the layered panel to a large Pool Party card base using Liquid Glue. I adhered a panel of Sunny Days DSP to a Fresh Freesia mat using Stampin’ Seal. I adhered the layered panel to the front of a small card base using Liquid Glue.
On a panel of Basic White, I stamped the balloon image from the Stampin’ Up! Hot Air Balloon Photopolymer Stamp Set in Petal Pink and Pool Party Inks. I stamped one part of the balloon full strength ink and the second part I stamped off once on scrap paper. I stamped the balloon basket from the Hot Air Balloon stamp set in Pecan Pie Ink below the balloons. From a panel of Balmy Blue, I cut the solid heart balloon using the Hot Air Balloon Dies. From a panel of Azure Afternoon, I cut the heart detailed balloon using the Hot Air Balloon Dies. I adhered the detailed heart to the solid heart. I adhered the balloon to the stamped panel using Stampin’ Dimensionals. from a scrap of Pecan Pie, I cut the balloon basket using the Hot Air Balloon Dies and adhered it under the balloon using a Stampin’ Dimensional. I cut a few clouds using the Hot Air Balloon Dies from a panel of Basic White. I adhered the clouds using Glue Dots and Liquid Glue to the Basic White panel. I adhered the Basic White panel to a Fresh Freesia mat then to the left side of the large card bae using Liquid Glue.
I cut 4 of the solid heart balloons using the Hot Air Balloon Dies. I folded them in half and adhered them together. I adhered the open ends to the small card front using Liquid Glue. I cut a balloon basket using the Hot Air Balloon Dies from a scrap of Pecan Pie. I adhered the basket under the balloon using a Glue Dot. On a panel of Basic White, I stamped the sentiment from the Hot Air Balloon stamp set in Pool Party Ink. I cut the sentiment out using the Hot Air Balloon Dies. I adhered the sentiment to the small card front using Stampin’ Dimensionals. I added a few Rainbow Adhesive-Backed Dots to the card front.
On the inside, I stamped the sentiment from the Hot Air Balloon stamp set in Pool Party Ink on a panel of Basic White. I stamped the balloon image from the Hot Air Balloon next to the sentiment in Fresh Freesia Ink, part stamped full strength and part stamped off once on scrap paper. I added a few of the die cut clouds to the panel. I adhered the Basic White panel to a Fresh Freesia mat then to the inside of the small card base.
To finish my card, I decorated a Basic White Medium Envelope. I stamped the balloon image from the Hot Air Balloon stamp set on the envelope front. I adhered a panel of Lighter Than Air DSP to the envelope flap.
Thank you for stopping by my blog today. I hope you liked my trifold card and will give it a try. I hope you will CASE this card and please feel free to post it in the comments of my Facebook page under my post. I’d love to see your take it. The list of measurements are below if you’d like to stamp along while watching the video. You can watch my video on my YouTube Channel Here.
If you watch this on my YouTube channel, please remember to subscribe so that you will get notified when a new video goes live. Thank you to those that have subscribed already. Happy Stamping!!
If you need any stamping supplies, I’d love to be your Demonstrator. Just click HERE to go directly to my online store or drop me an email if you have any questions.
MY CURRENT HOST CODE IS: T9JKA3XQ
Use this host code when placing an order with me. When you order $50 or greater you will receive a free gift from me! If your order is over $150, please do not use this code, but you’ll still get the free gift. The free gift is your choice of any 1 item valued up to $10.00 from the 2023-2024 Annual Catalog, the January-April 2024 Mini Catalog or from the Online Exclusives! Unfortunately, packs of cardstock are no longer an option for a free gift. Shipping has become too expensive to ship and it’s costing me as much to ship as the cardstock costs. For any orders $50 or more I will also send you my monthly class tutorials. Click HERE or go to my Customer Rewards for more details and to see what this month’s tutorials are.
Please remember to use my current Host Code and make sure that you can see my name on the final checkout page listed as your Demonstrator when you order so that you know that you’re ordering with me, and you’ll get my rewards!
In response to changing policies at Stampin’ Up – I’m adjusting my Ordering Gift policy as well. I’m having to get a little more tough on the adding of Host codes when you place your order thru my Online Store.
Not to worry – you’re still going to get that $10 ordering gift for orders of $50 (before shipping & tax) or greater. And the gift is still any 1 SU! product up to that $10 value – which includes some of our fun Host Sets!
But – if you DO NOT use the Host code for your orders of less than $150 (this is the RETAIL total before Shipping & Handling), then you’ll have two options:
You’ll need to call Stampin’ Up! (1-800-Stamp-Up) and ask them to add it for you. They’re very helpful and will get it done quickly! OR….
If your order was over the $50 threshold but under $150, then…you’ll forfeit that $10 ordering gift and rewards – this is the Bummer Option – and I REALLY don’t want to do this, SO please remember to add my Current Host Code.
Stampin’ Up! has added 2 new kits this month. I’m loving these already!!!
Kits by Stampin’ Up! are perfect for new crafters, busy crafters, or crafters who want quick and easy projects. All-inclusive project kits have everything you need in one box! Give as a gift or try them yourself. Kits are while supplies last. Order today!
BIRTHDAY SPARKLE KIT
Create glittering birthday cards and gift tags with the Birthday Sparkle Kit! This kit includes six cards and six gift tags. Create each project with the included stamp set, die-cut paper pieces, and twine. It also includes other elements such as glitter stickers, pressed wood picks, coordinating envelopes, and gold foil paper pieces! It’s easy to create each project for your recipient or get ahead on your crafting for the year by making quick multiples. Either way, you’ve got a special paper craft that your recipients will love!
Kit includes: *Birthday Sparkle Photopolymer Stamp Set *Clear Stamp Block *Early Espresso Stampin’ Spot *Predesigned projects *Step-by-step instructions *Precut pieces (No prep work! Get right to crafting) *Make 6 cards and 6 gift tags *Cards: 3 each of 2 designs; folded card 5-1/2″ x 4-1/4″ (14 x 10.8 cm) *Gift tags: 3 each of 2 designs; largest tag 2-1/4″ x 3-1/2″ (5.7 x 8.9 cm) * 6 preprinted envelopes *Enough adhesive to complete projects *Gold glitter stickers and pressed wood picks. *Baker’s Twine in Early Espresso and White *A 9-7/8″ x 6-1/2″ x 2-3/4″ (25.1 x 16.5 x 7 cm) printed designer box for storage or crafting on the go
Product colors: Basic White, Crumb Cake, Early Espresso, gold glitter
Calling all plant lovers! The Happy Houseplants Kit is an adorable home decor crafting kit! This kit comes with four 6″ x 6″ (15.2 x 15.2 cm) white frames and precut paper pieces for you to curl and assemble inside the frame. You’ll end up with four coordinated houseplant decor pieces. They can stand by themselves, or you can hang them on your wall. Either way, your houseguests will be amazed that you created it yourself!
Kit includes: * Predesigned projects * Step-by-step instructions * Precut pieces (No prep work! Get right to crafting) * 4 white frames * Frame size: 7-1/8″ x 7-1/8″ x 7/16″ (18.1 x 18.1 x 1.1 cm) * Enough adhesive to complete projects * A 7-3/4″ x 7-1/2″ x 3″ (19.7 x 19 x 7.6 cm) printed designer box for storage or crafting on the go
Product colors: Calypso Coral, Garden Green, Granny Apple Green, Lemon Lime Twist, Pecan Pie
You can see a flyer with some of the new Online Exclusives that will be available to order beginning March 5 Here. If you want to get your hands on the Online Exclusives early, the Demonstrator preorder starts on February 1! So if you join as a Demonstrator, you can either add the new products to your Starter Kit beginning February 1 or add them to a Demonstrator order in February!
Go check out my Online Store for the NEW Online Exclusive products available. Get those orders placed early so you don’t miss out on the pretty new suite and new bundles.
Receiving training information and accessing resources to help you through your first year and beyond
Bonus: Since it’s Sale-A-Bration, now is an excellent time to join and take advantage of the Join offer!
Sale-A-Bration is an excellent time you to join Stampin’ Up! In addition to the already great value of the Starter Kit, if you sign up as a Stampin’ Up! demonstrator during Sale-a-bration, you can choose from two incredible options:
Option 1: Purchase the $99 Starter Kit during Sale-a-bration, pick $125 worth of Stampin’ Up! merchandise of your choice and get the Stampin’ Glass Mat Studio ($60 value!) for FREE with your Starter Kit!
Option 2: Purchase the $99 Starter Kit during Sale-a-bration, pick $155 worth of Stampin’ Up! merchandise of your choice. That’s $30 additional merchandise for FREE when you purchase your Starter Kit!
Two joining options so you can pick the one that you like the best!!
There is never an obligation to sell. You can join just to enjoy the discount for yourself along with all the other Demonstrator benefits. Once you join, you’ll get at least a 20% discount on all of your Stampin’ Up! merchandise purchases and you get to order early from the upcoming catalogs! You will also be able to attend the OnStage Events and any other events Stampin’ Up! has and you get to be a part of our Stampin’ Up! team!
Unsure about this and want to talk? Contact me at creativestampingdesigns@gmail.com and we can talk. You can also find additional information Here at Join My Team. Being a part of the Stampin’ Up! Community is one of the best decisions I’ve ever made. I have made many friends along the way while doing what I love, Paper Crafting. This Joining offer is only good during Sale-a-bration which starts January 4 and ends on February 29.
SHOP
Spend $50 or more and pick from 11 new products (4 stamp sets, 5 designer series paper packs, a pack of gems and a spool of ribbon!) that are available as free items!
Spend $100 or more and pick from 3 new items (1 die set, 1 stamp and embossing folder bundle and 1 stamp set) that are available as free items!
HOST
Get an additional $30 in FREE Stampin’ Rewards with any party or individual order of $300 or greater during Sale-a-bration! You can spend your Stampin’ Rewards on any items currently available from Stampin’ Up! including (but not limited to) the host exclusive stamp sets!
Celebrate Easter and Spring with adorable cards and treat boxes! • Makes 9 projects: 3 each of 3 designs • Projects include printed cards, coordinating envelopes, and gift boxes • Precut paper pieces, baker’s twine, and embellishments • Coordinating colors: Petal Pink, Daffodil Delight, Granny Apple Green, Berry Burst, Early Espresso (Classic Stampin’ Spot), Crumb Cake
Don’t miss the coordinatingLove of Spring Dies add-on!
The dies will coordinate with the January, February and March Paper Pumpkin Kit.
The Love of Spring Dies Add-On—available only while supplies last!
Item # 164396 $12.00
This exclusive add-on coordinates with the three upcoming kits! Paper Pumpkin subscribers can purchase it beginning 11 December. The add-on is available only while supplies last, so it’s best to shop early!
Subscribe to the February Paper Pumpkin Kit between 11 January and 10 February by clicking here!
Note: Supplies may be limited toward the end of the subscription period.
Good Friday morning stamping friends and welcome to my Fun Fold Friday. Are you starting to make plans for the weekend yet? I’ll be working all day tomorrow. I’m getting back into my normal routine from being sick for the last week and a half.
Today’s card I made on YouTube Live on Wednesday. If you were able to join me or watched the replay, thank you. If you’d like to watch my video and stamp along, the measurements are below, just above the supply list, along with the link to my YouTube channel. The idea for my card came from my team leader Amy Koenders who made a similar card a couple weeks ago. Her card used the DSP as the trifold instead of another piece of cardstock. Here’s my card for today.
I used the Stampin’ Up! Delicate Forest Bundle along with the Meandering Meadows 6 X 6 Designer Series Paper and the Stampin’ Up! Sale-a-bration Heartfelt Hellos Cling Stamp Set for my fun fold card today.
I started by cutting a Granny Apple Green card front using the large Delicate Forest Dies. From a panel of Garden Green, I cut 2 of the leaf dies from the Delicate Forest Dies. I cut 2 of the small leaf dies from a panel of Lemon Lime Twist using the Delicate Forest Dies. I adhered the die cut pieces to the back of the large die cut card front using Liquid Glue.
On a panel of Basic White, I stamped the sentiment from the Stampin’ Up! Delicate Forest Photopolymer Stamp Set in Garden Green Ink. I cut the sentiment out using the Delicate Forest Dies. I folded the card front on the 1/4″ score line and added Tear & Tape. I adhered the card front to the left side of the Granny Apple Green card base.
I cut 1/16″ off the left side of the card front so that the card would fold flat once the trifold was created. I adhered a panel of Meandering Meadow DSP to the Granny Apple Green card front using Liquid Glue. I added a few Adhesive-Backed Dragonflies and Birds to the card front.
On the inside, I stamped the sentiment from the Heartfelt Hellos stamp set in Garden Green Ink on a panel of Basic White. I stamped the tall tree image from the Delicate Forest stamp set in Granny Apple Green Ink on the bottom of the panel. I adhered a strip of the Meandering Meadow DSP to the bottom of the panel. I adhered the Basic White panel to a Garden Green mat then to the inside of the Granny Apple Green card base.
To finish my card, I decorated a Basic White Medium Envelope. I stamped the tall tree image from the Delicate Forest stamp set in Granny Apple Green Ink on the envelope front. I adhered a panel of Meandering Meadow DSP to the envelope flap.
Thank you for stopping by my blog today. I hope you liked my trifold card and will give it a try. I hope you will CASE this card and please feel free to post it in the comments of my Facebook page under my post. I’d love to see your take it. The list of measurements are below if you’d like to stamp along while watching the video. You can watch my video on my YouTube Channel Here.
If you watch this on my YouTube channel, please remember to subscribe so that you will get notified when a new video goes live. Thank you to those that have subscribed already. Happy Stamping!!
If you need any stamping supplies, I’d love to be your Demonstrator. Just click HERE to go directly to my online store or drop me an email if you have any questions.
MY CURRENT HOST CODE IS: D9EX7ZXG
Use this host code when placing an order with me. When you order $50 or greater you will receive a free gift from me! If your order is over $150, please do not use this code, but you’ll still get the free gift. The free gift is your choice of any 1 item valued up to $10.00 from the 2023-2024 Annual Catalog, the January-April 2024 Mini Catalog or from the Online Exclusives! Unfortunately, packs of cardstock are no longer an option for a free gift. Shipping has become too expensive to ship and it’s costing me as much to ship as the cardstock costs. For any orders $50 or more I will also send you my monthly class tutorials. Click HERE or go to my Customer Rewards for more details and to see what this month’s tutorials are.
Please remember to use my current Host Code and make sure that you can see my name on the final checkout page listed as your Demonstrator when you order so that you know that you’re ordering with me, and you’ll get my rewards!
In response to changing policies at Stampin’ Up – I’m adjusting my Ordering Gift policy as well. I’m having to get a little more tough on the adding of Host codes when you place your order thru my Online Store.
Not to worry – you’re still going to get that $10 ordering gift for orders of $50 (before shipping & tax) or greater. And the gift is still any 1 SU! product up to that $10 value – which includes some of our fun Host Sets!
But – if you DO NOT use the Host code for your orders of less than $150 (this is the RETAIL total before Shipping & Handling), then you’ll have two options:
You’ll need to call Stampin’ Up! (1-800-Stamp-Up) and ask them to add it for you. They’re very helpful and will get it done quickly! OR….
If your order was over the $50 threshold but under $150, then…you’ll forfeit that $10 ordering gift and rewards – this is the Bummer Option – and I REALLY don’t want to do this, SO please remember to add my Current Host Code.
Receiving training information and accessing resources to help you through your first year and beyond
Bonus: Since it’s Sale-A-Bration, now is an excellent time to join and take advantage of the Join offer!
Sale-A-Bration is an excellent time you to join Stampin’ Up! In addition to the already great value of the Starter Kit, if you sign up as a Stampin’ Up! demonstrator during Sale-a-bration, you can choose from two incredible options:
Option 1: Purchase the $99 Starter Kit during Sale-a-bration, pick $125 worth of Stampin’ Up! merchandise of your choice and get the Stampin’ Glass Mat Studio ($60 value!) for FREE with your Starter Kit!
Option 2: Purchase the $99 Starter Kit during Sale-a-bration, pick $155 worth of Stampin’ Up! merchandise of your choice. That’s $30 additional merchandise for FREE when you purchase your Starter Kit!
Two joining options so you can pick the one that you like the best!!
There is never an obligation to sell. You can join just to enjoy the discount for yourself along with all the other Demonstrator benefits. Once you join, you’ll get at least a 20% discount on all of your Stampin’ Up! merchandise purchases and you get to order early from the upcoming catalogs! You will also be able to attend the OnStage Events and any other events Stampin’ Up! has and you get to be a part of our Stampin’ Up! team!
Unsure about this and want to talk? Contact me at creativestampingdesigns@gmail.com and we can talk. You can also find additional information Here at Join My Team. Being a part of the Stampin’ Up! Community is one of the best decisions I’ve ever made. I have made many friends along the way while doing what I love, Paper Crafting. This Joining offer is only good during Sale-a-bration which starts January 4 and ends on February 29.
SHOP
Spend $50 or more and pick from 11 new products (4 stamp sets, 5 designer series paper packs, a pack of gems and a spool of ribbon!) that are available as free items!
Spend $100 or more and pick from 3 new items (1 die set, 1 stamp and embossing folder bundle and 1 stamp set) that are available as free items!
HOST
Get an additional $30 in FREE Stampin’ Rewards with any party or individual order of $300 or greater during Sale-a-bration! You can spend your Stampin’ Rewards on any items currently available from Stampin’ Up! including (but not limited to) the host exclusive stamp sets!
Celebrate Easter and Spring with adorable cards and treat boxes! • Makes 9 projects: 3 each of 3 designs • Projects include printed cards, coordinating envelopes, and gift boxes • Precut paper pieces, baker’s twine, and embellishments • Coordinating colors: Petal Pink, Daffodil Delight, Granny Apple Green, Berry Burst, Early Espresso (Classic Stampin’ Spot), Crumb Cake
Don’t miss the coordinatingLove of Spring Dies add-on!
The dies will coordinate with the January, February and March Paper Pumpkin Kit.
The Love of Spring Dies Add-On—available only while supplies last!
Item # 164396 $12.00
This exclusive add-on coordinates with the three upcoming kits! Paper Pumpkin subscribers can purchase it beginning 11 December. The add-on is available only while supplies last, so it’s best to shop early!
Subscribe to the February Paper Pumpkin Kit between 11 January and 10 February by clicking here!
Note: Supplies may be limited toward the end of the subscription period.
Good Friday morning stamping friends and welcome to my Fun Fold Friday. Sorry I missed doing a live on Wednesday, I’ve been in bed sick all week. I’m finally able to get up a little, then I have to go back to lay down for a bit. I’m still extremely dizzy and weak, whatever this is that I have is awful. I’m pretty sure it’s pneumonia, but I’m not the Dr.
My card for today is one that we made at our last Stamping Studio meeting where we did some mystery stamping. Jaimie sent us some measurements for card stock and DSP and let us know what other supplies we needed. She then walked us through the process of making today’s card. Here’s my card for today.
I used the Stampin’ Up! Perennial Postage Bundle along with the Stampin’ Up! Painted Lavender Photopolymer Stamp Set and Perennial Lavender Designer Series Paper for my card today.
I started by scoring my Gorgeous Grape card base at 4 1/4″ & 8 1/2″. I made a small pencil mark 1 1/2″ in from the right side (the shortest scored panel). I cut from that 1 1/2″ mark down to the bottom right corner using my Paper Trimmer. I then trimmed 1/16″ off the left side so that the card would fold flat. On the 2 1/4″ X 5 1/4″ panel of Basic White I made a pencil mark 7/8″ from the left. I cut from the pencil mark down to the bottom left corner using my Paper Trimmer. On the 2 1/8″ X 5 1/8″ panel of Perennial Lavender DSP I made a pencil mark 3/4″ in from the left side. I cut from the pencil mark down to the bottom left corner. I adhered the DSP to the Basic White mat using Stampin’ Seal. I adhered the layered panel to the Gorgeous Grape card base using Liquid Glue.
I adhered the 3 7/8″ X 5 1/8″ panel of Perennial Lavender DSP to a Basic White mat using Stampin’ Seal. Adhere the layered panel to the Gorgeous Grape card base using Liquid Glue.
On a small panel of Gorgeous Grape, I stamped the sentiment from the Stampin’ Up! Perennial Postage Cling Stamp Set in Versamark Ink. I sprinkled it with White Embossing Powder and set it using the Heat Tool. I cut the sentiment out using the Perennial Postage Dies. From the panel of Basic White, I cut the next size larger using the Perennial Postage Dies. I adhered the sentiment to the Basic White mat using Stampin’ Seal. I adhered the sentiment to the right card front panel using Stampin’ Dimensionals. I added a few of the Purple Fine Shimmer Gems to the card front.
On the inside, I stamped the sentiment from the Perennial Postage stamp set in Gorgeous Grape Ink on a panel of Basic White. I stamped the stem image from the Painted Lavender stamp set in Pretty Peacock Ink, stamping off once on scrap paper, on the bottom of the panel. I stamped the flower image from the Painted Lavender stamp set in Gorgeous Grape Ink, stamping off once on scrap paper, over the stem image. I adhered the Basic Whtie panel to a Crumb Cake mat then to the inside of the Gorgeous Grape card base.
To finish my card, I decorated a Basic White Medium Envelope. I stamped the stem image from the Painted Lavender stamp set in Pretty Peacock Ink on the envelope front. I stamped the flower image from the Painted Lavender stamp set in Gorgeous Grape Ink on top of the stem. I adhered a panel of Perennial Lavender DSP to the envelope flap.
Thank you for stopping by my blog today. I hope you like the card and will give it a try. Happy Stamping!!
If you need any stamping supplies, I’d love to be your Demonstrator. Just click HERE to go directly to my online store or drop me an email if you have any questions.
MY CURRENT HOST CODE IS: D9EX7ZXG
Use this host code when placing an order with me. When you order $50 or greater you will receive a free gift from me! If your order is over $150, please do not use this code, but you’ll still get the free gift. The free gift is your choice of any 1 item valued up to $10.00 from the 2023-2024 Annual Catalog, the January-April 2024 Mini Catalog or from the Online Exclusives! Unfortunately, packs of cardstock are no longer an option for a free gift. Shipping has become too expensive to ship and it’s costing me as much to ship as the cardstock costs. For any orders $50 or more I will also send you my monthly class tutorials. Click HERE or go to my Customer Rewards for more details and to see what this month’s tutorials are.
Please remember to use my current Host Code and make sure that you can see my name on the final checkout page listed as your Demonstrator when you order so that you know that you’re ordering with me, and you’ll get my rewards!
In response to changing policies at Stampin’ Up – I’m adjusting my Ordering Gift policy as well. I’m having to get a little more tough on the adding of Host codes when you place your order thru my Online Store.
Not to worry – you’re still going to get that $10 ordering gift for orders of $50 (before shipping & tax) or greater. And the gift is still any 1 SU! product up to that $10 value – which includes some of our fun Host Sets!
But – if you DO NOT use the Host code for your orders of less than $150 (this is the RETAIL total before Shipping & Handling), then you’ll have two options:
You’ll need to call Stampin’ Up! (1-800-Stamp-Up) and ask them to add it for you. They’re very helpful and will get it done quickly! OR….
If your order was over the $50 threshold but under $150, then…you’ll forfeit that $10 ordering gift and rewards – this is the Bummer Option – and I REALLY don’t want to do this, SO please remember to add my Current Host Code.
New Joining Special Starting January 4 – February 29
Sale-A-Bration is an excellent time you to join Stampin’ Up! In addition to the already great value of the Starter Kit, if you sign up as a Stampin’ Up! demonstrator during Sale-a-bration, you can choose from two incredible options:
Option 1: Purchase the $99 Starter Kit during Sale-a-bration, pick $125 worth of Stampin’ Up! merchandise of your choice and get the Stampin’ Glass Mat Studio ($60 value!) for FREE with your Starter Kit!
Option 2: Purchase the $99 Starter Kit during Sale-a-bration, pick $155 worth of Stampin’ Up! merchandise of your choice. That’s $30 additional merchandise for FREE when you purchase your Starter Kit!
Two joining options so you can pick the one that you like the best!!
There is never an obligation to sell. You can join just to enjoy the discount for yourself along with all the other Demonstrator benefits. Once you join, you’ll get at least a 20% discount on all of your Stampin’ Up! merchandise purchases and you get to order early from the upcoming catalogs! You will also be able to attend the OnStage Events and any other events Stampin’ Up! has and you get to be a part of our Stampin’ Up! team!
Unsure about this and want to talk? Contact me at creativestampingdesigns@gmail.com and we can talk. You can also find additional information Here at Join My Team. Being a part of the Stampin’ Up! Community is one of the best decisions I’ve ever made. I have made many friends along the way while doing what I love, Paper Crafting. This Joining offer is only good during Sale-a-bration which starts January 4 and ends on February 29.
Celebrate Easter and Spring with adorable cards and treat boxes! • Makes 9 projects: 3 each of 3 designs • Projects include printed cards, coordinating envelopes, and gift boxes • Precut paper pieces, baker’s twine, and embellishments • Coordinating colors: Petal Pink, Daffodil Delight, Granny Apple Green, Berry Burst, Early Espresso (Classic Stampin’ Spot), Crumb Cake
Don’t miss the coordinatingLove of Spring Dies add-on!
The dies will coordinate with the January, February and March Paper Pumpkin Kit.
The Love of Spring Dies Add-On—available only while supplies last!
Item # 164396 $12.00
This exclusive add-on coordinates with the three upcoming kits! Paper Pumpkin subscribers can purchase it beginning 11 December. The add-on is available only while supplies last, so it’s best to shop early!
Subscribe to the February Paper Pumpkin Kit between 11 January and 10 February by clicking here!
Note: Supplies may be limited toward the end of the subscription period.

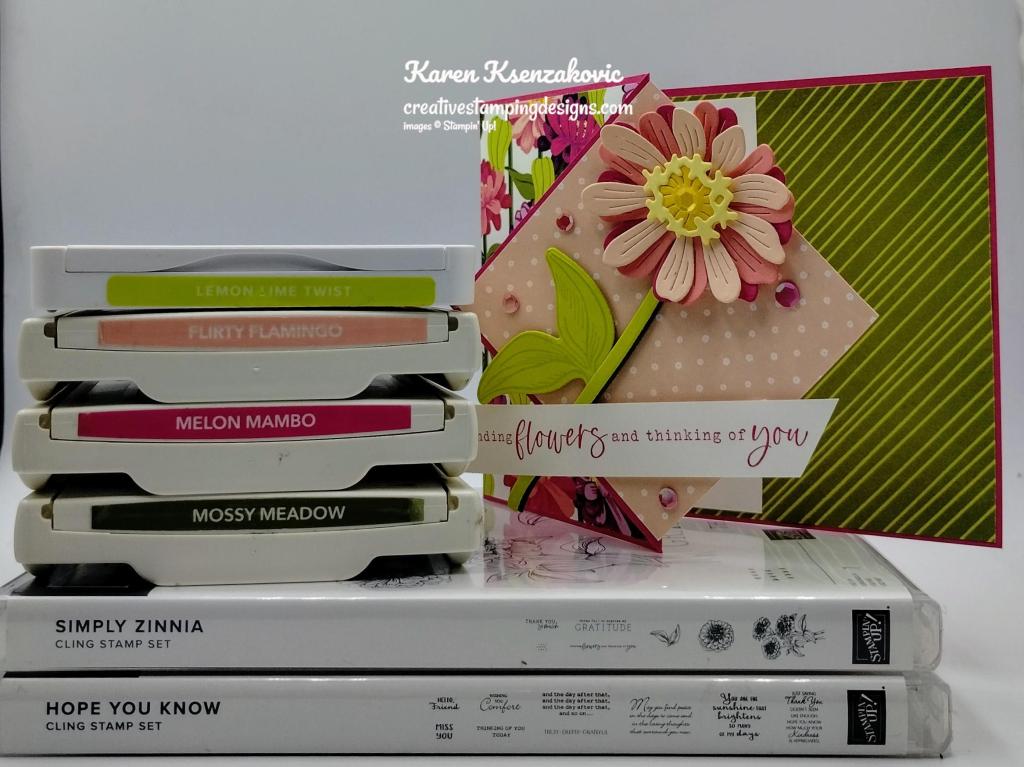
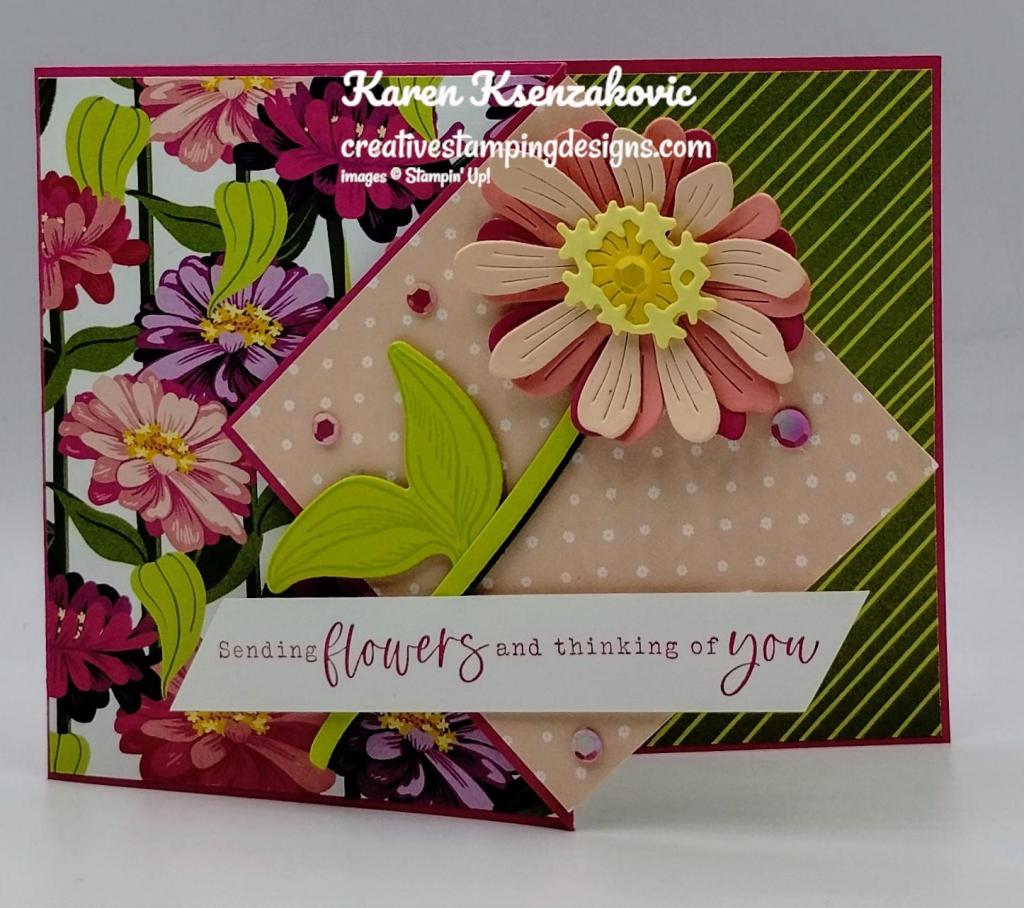


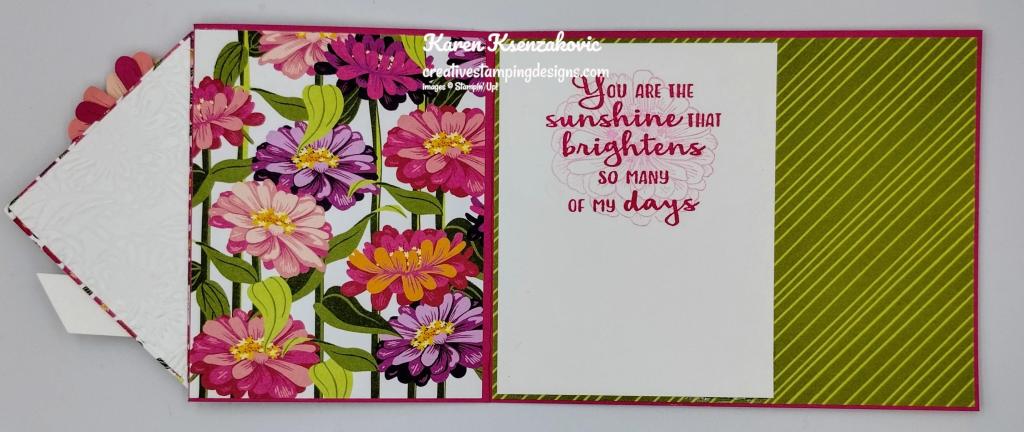
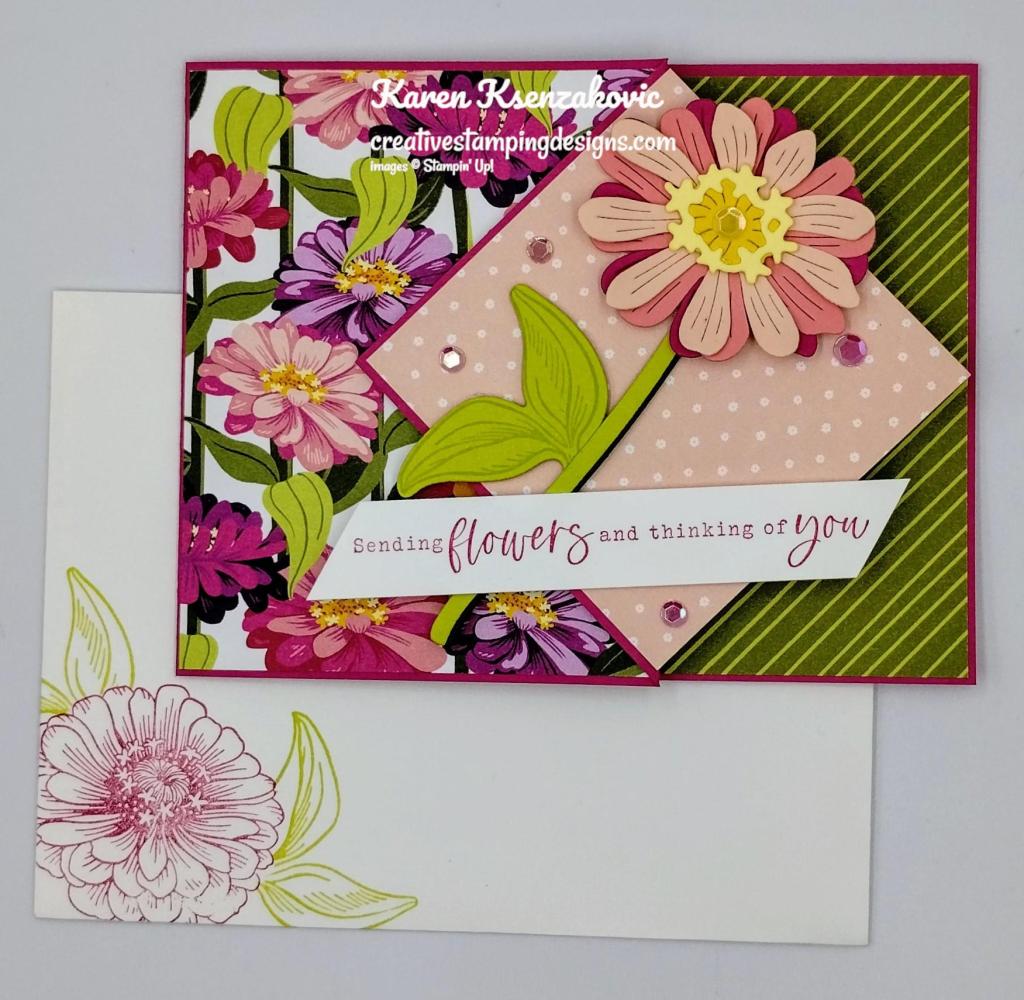
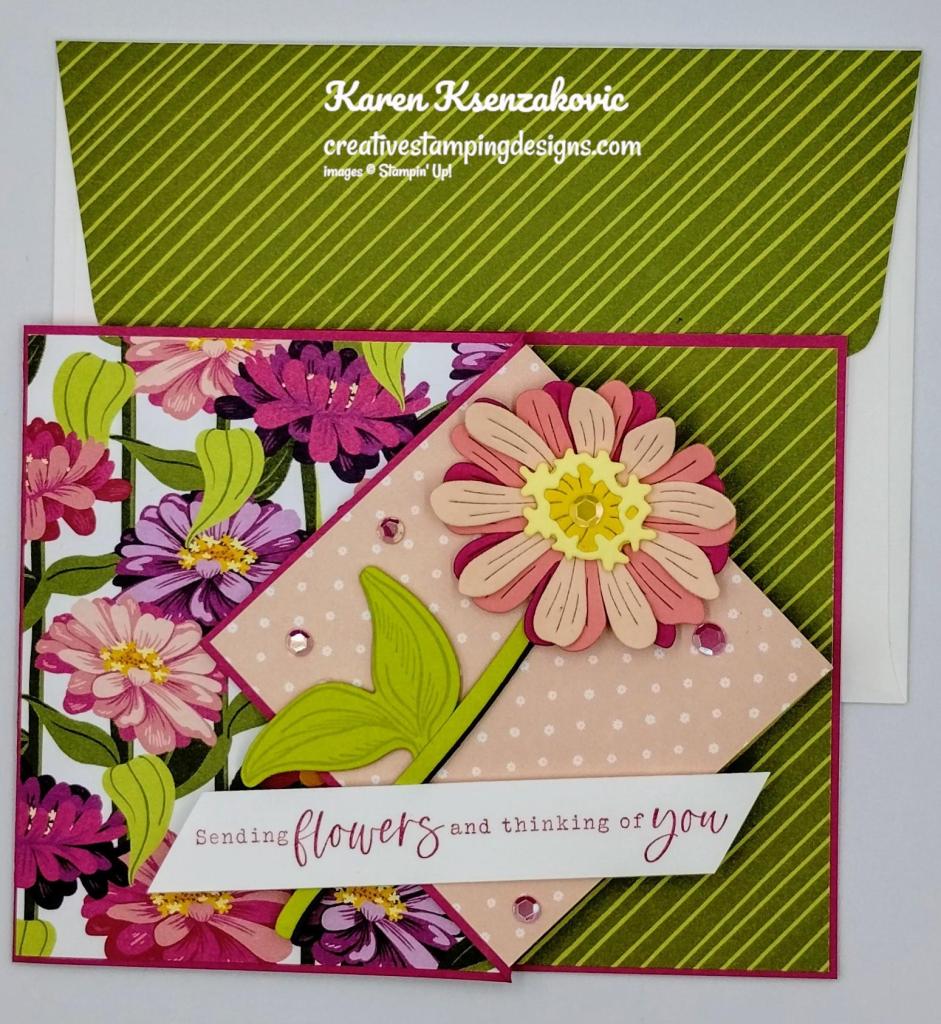
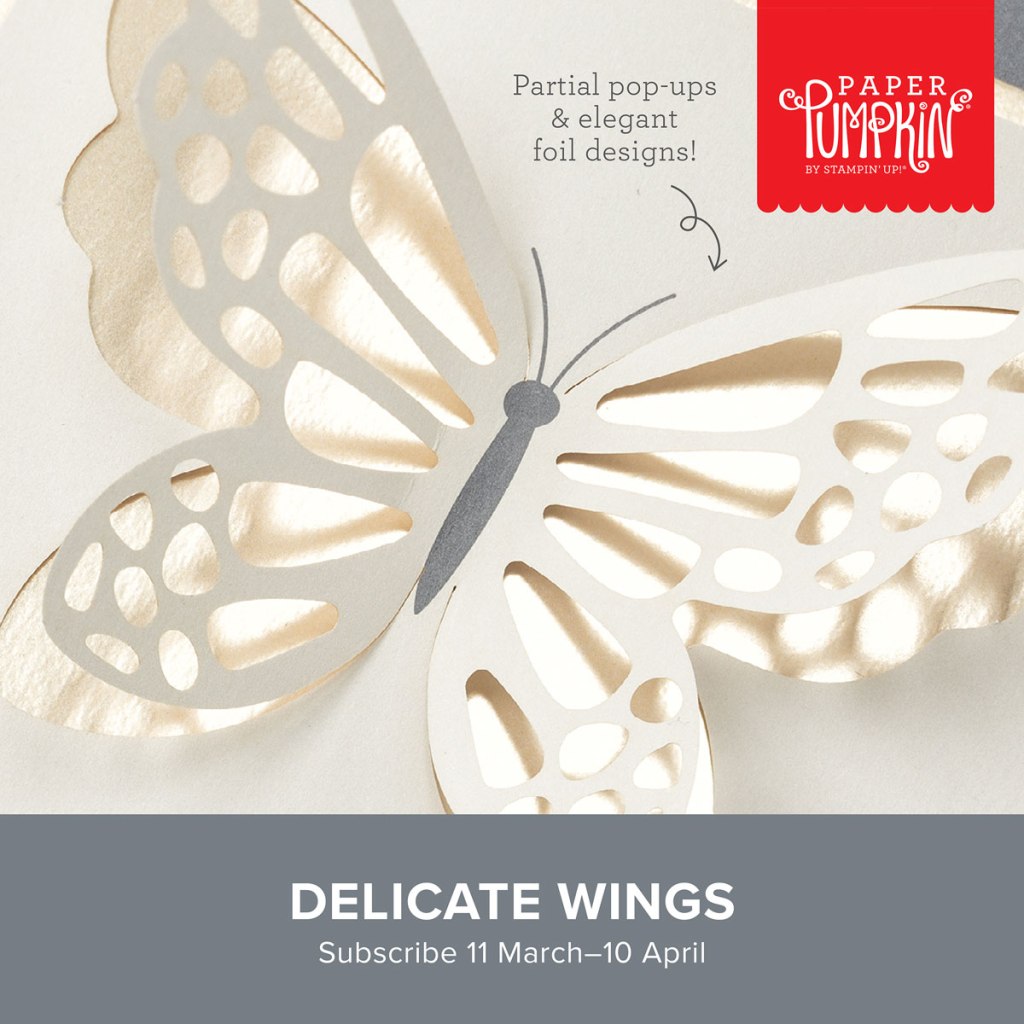

")
")

")


 Designer Series Paper")


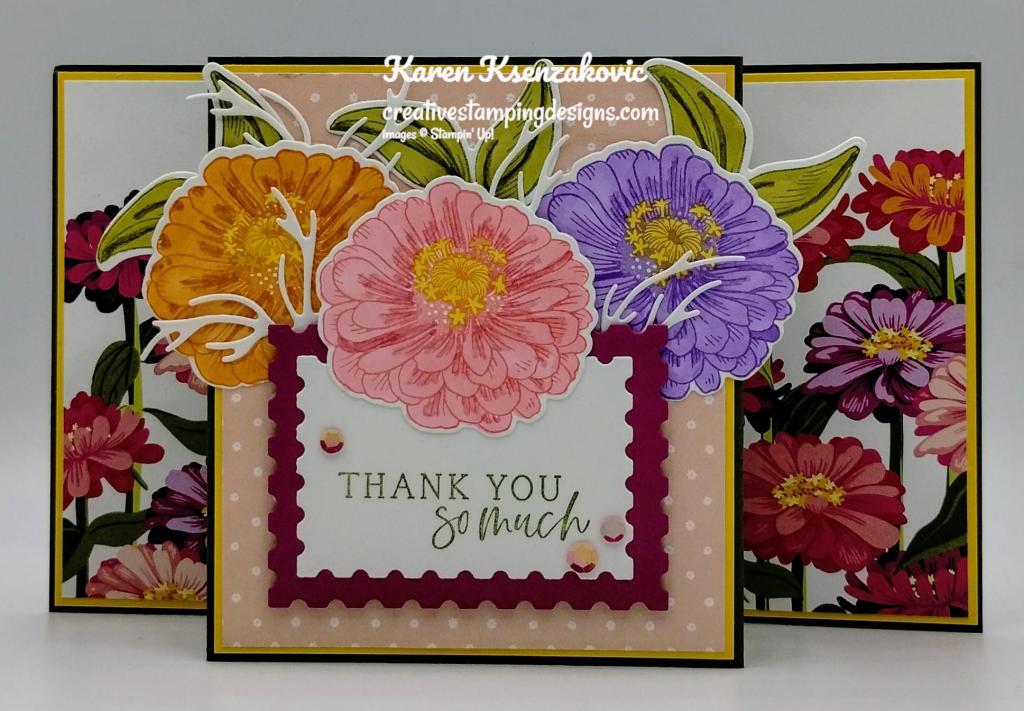
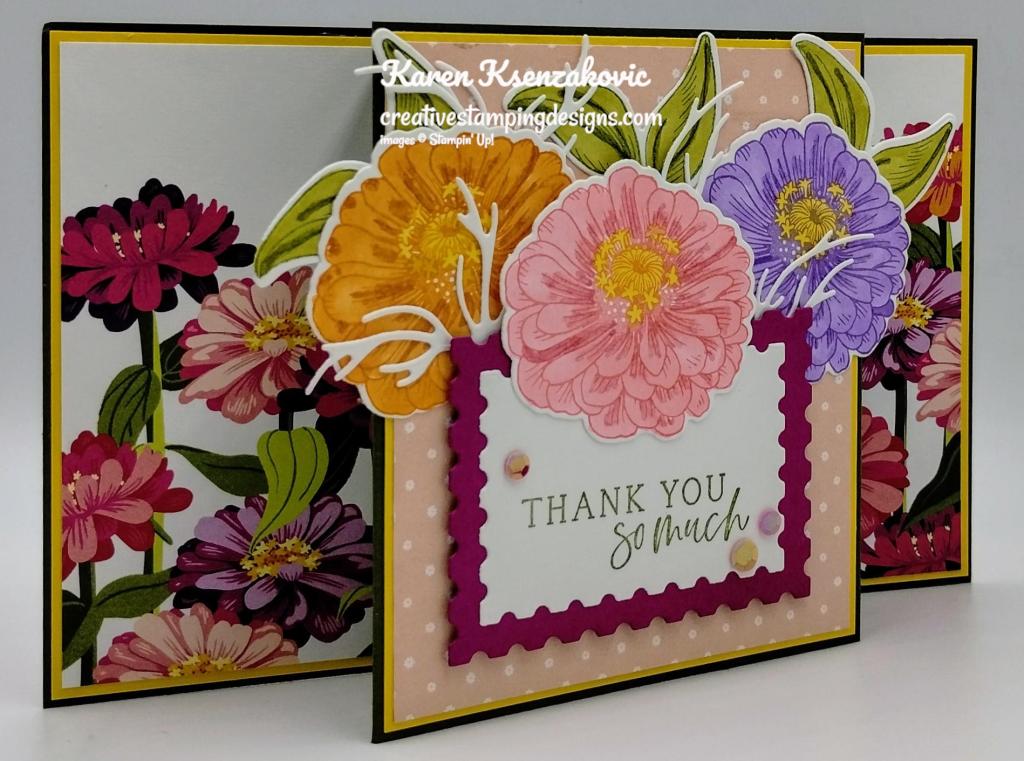
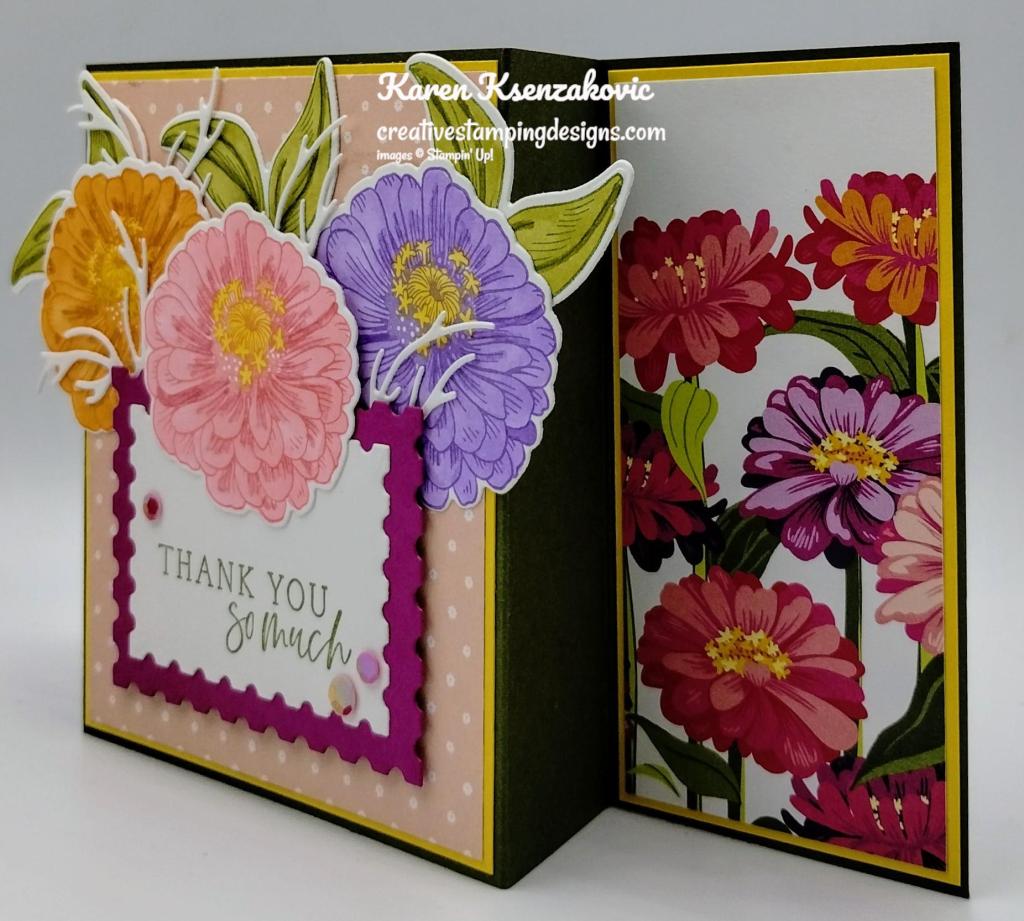
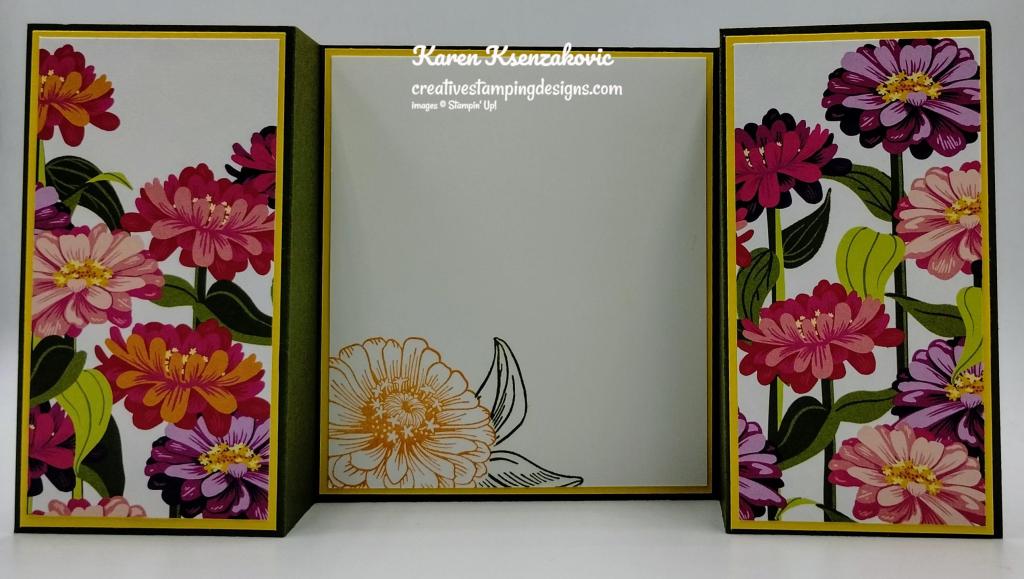
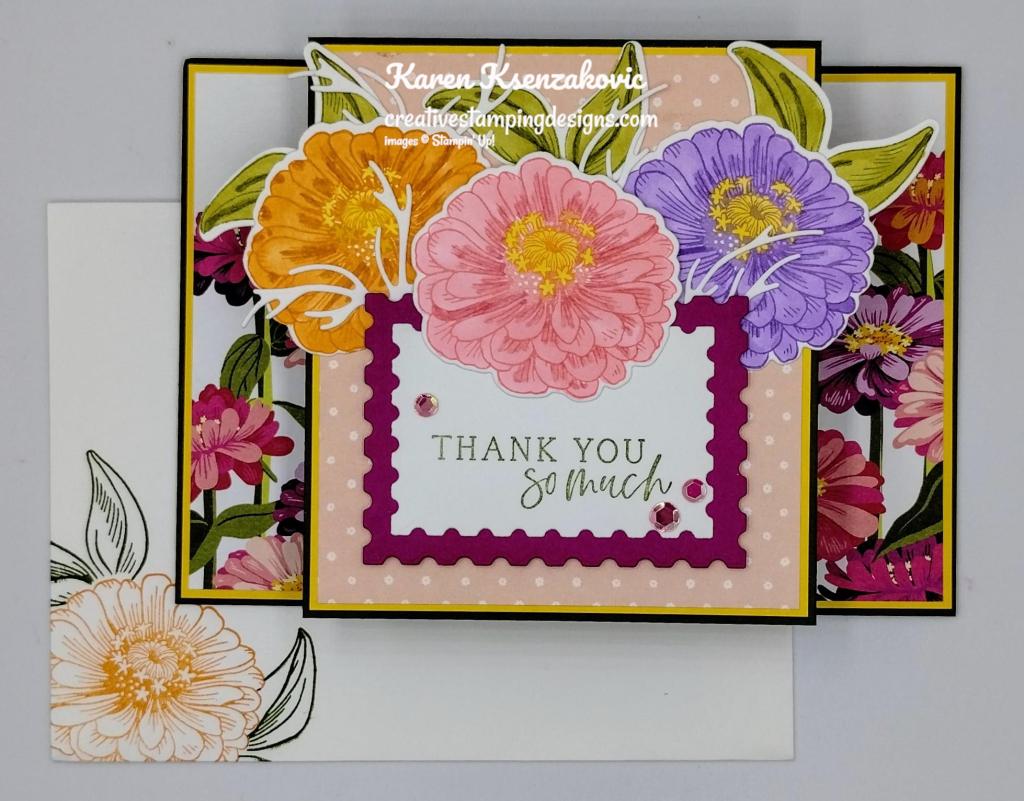
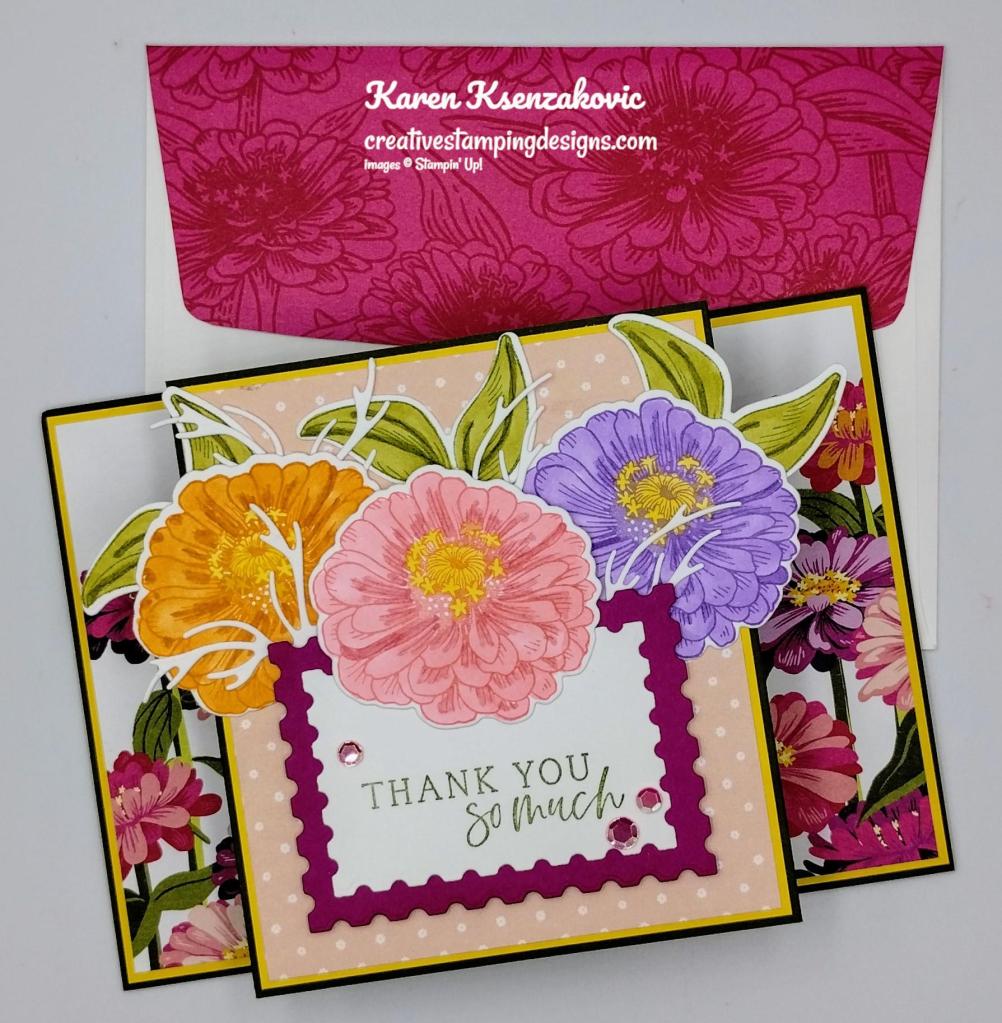


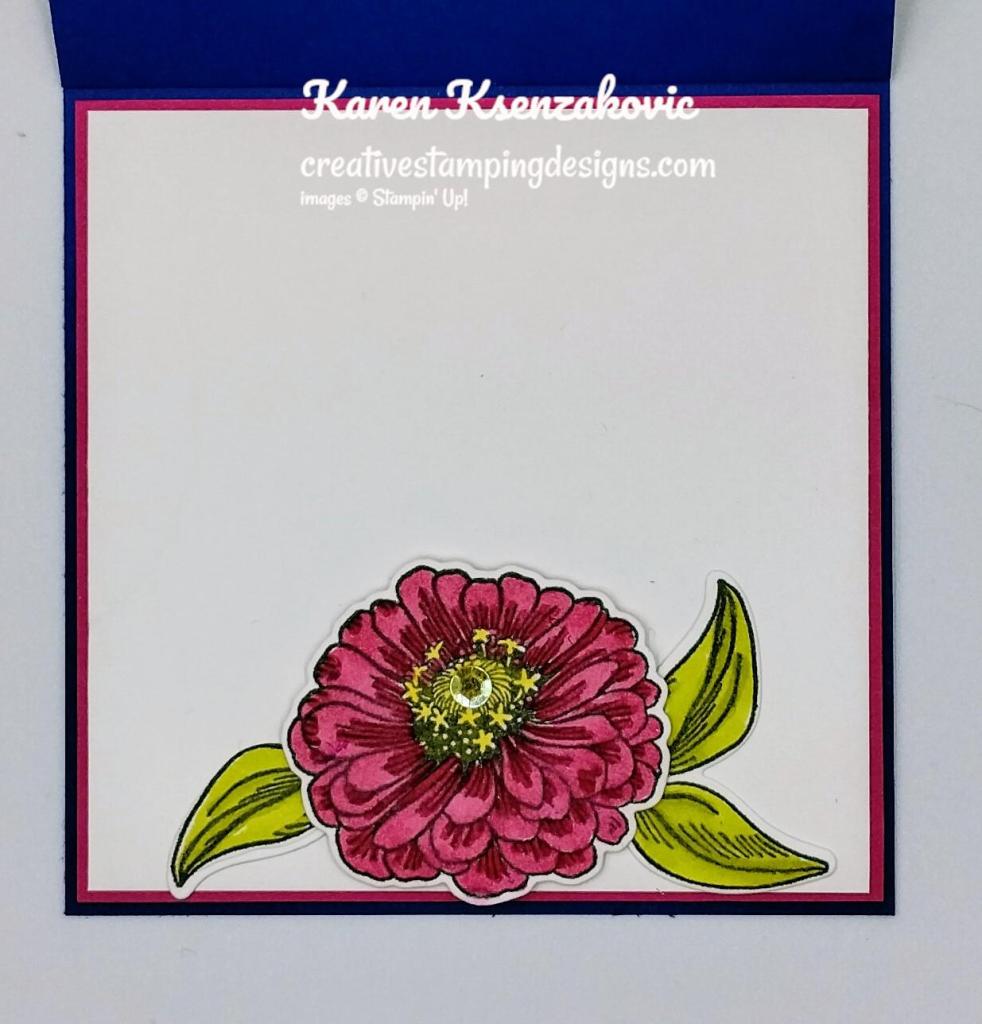


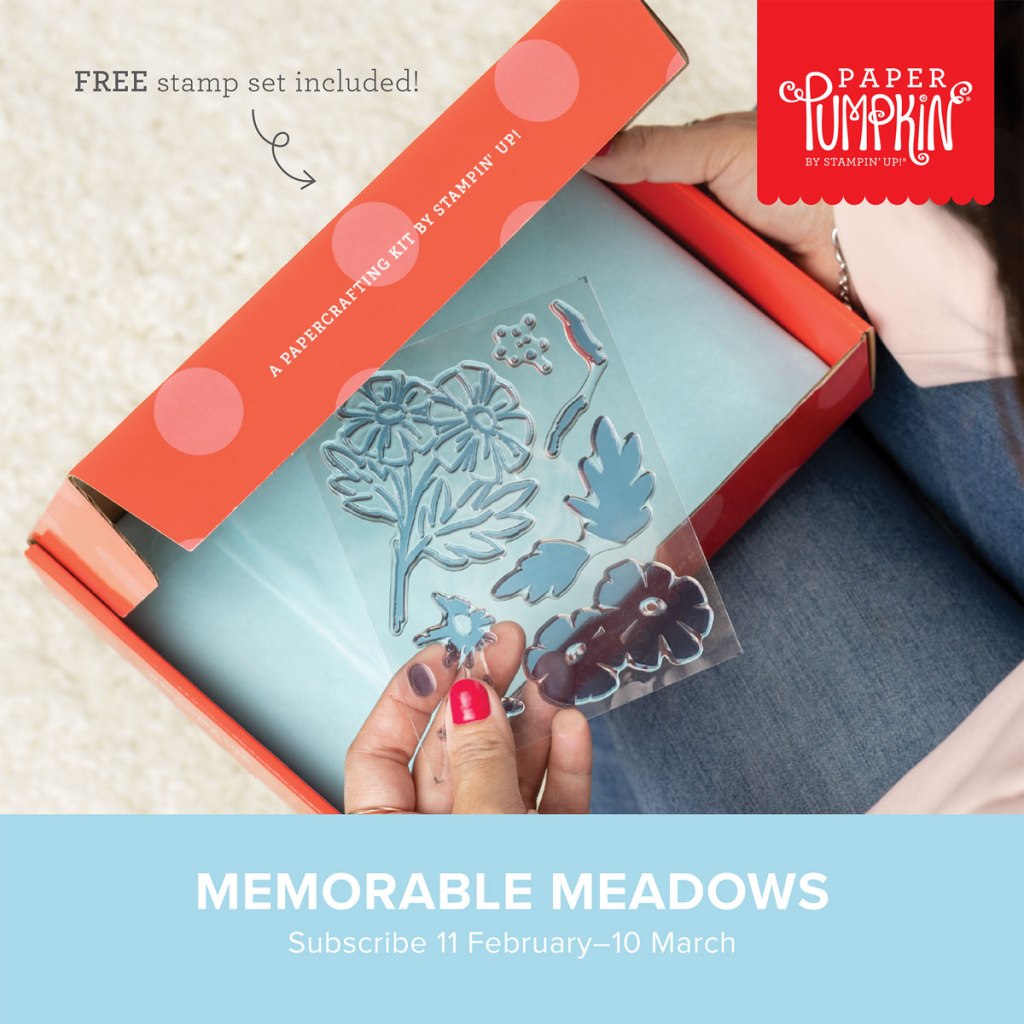


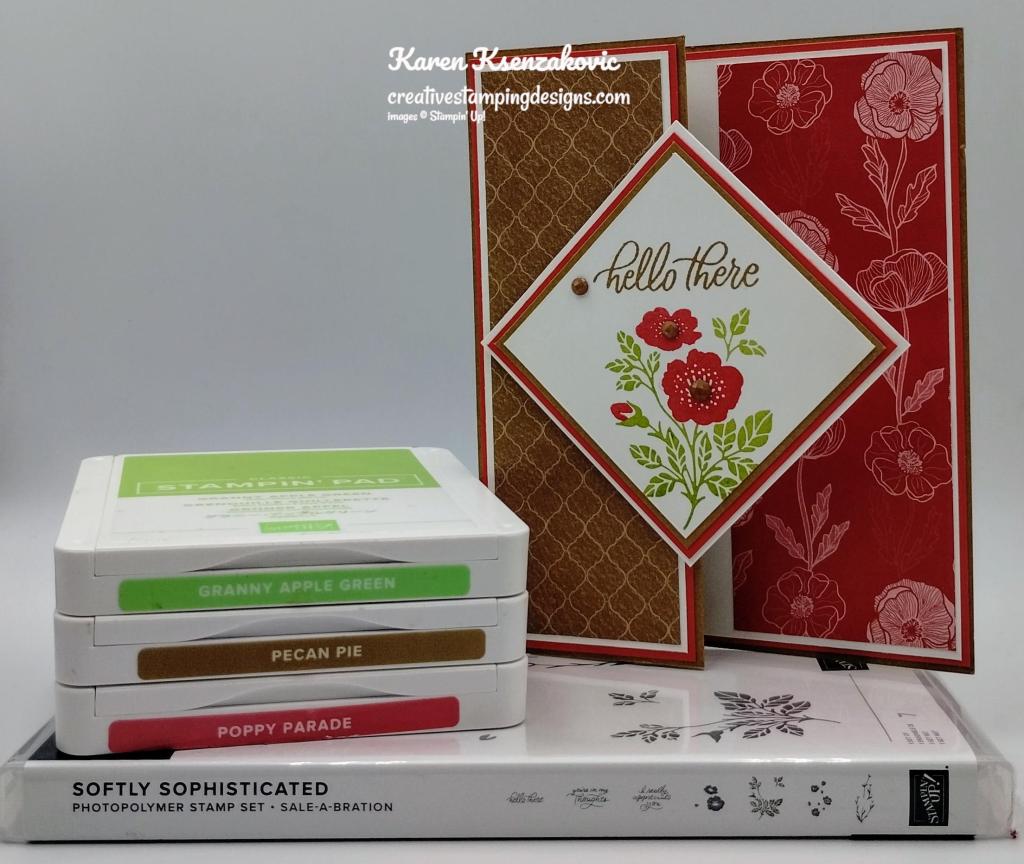
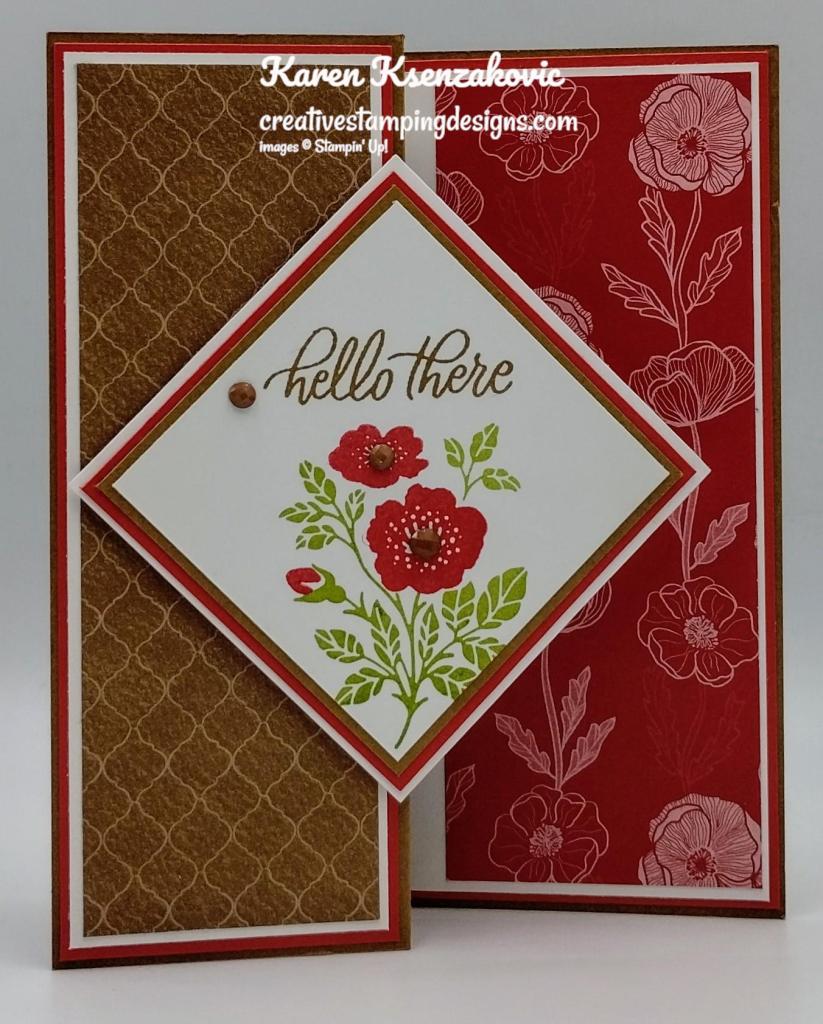
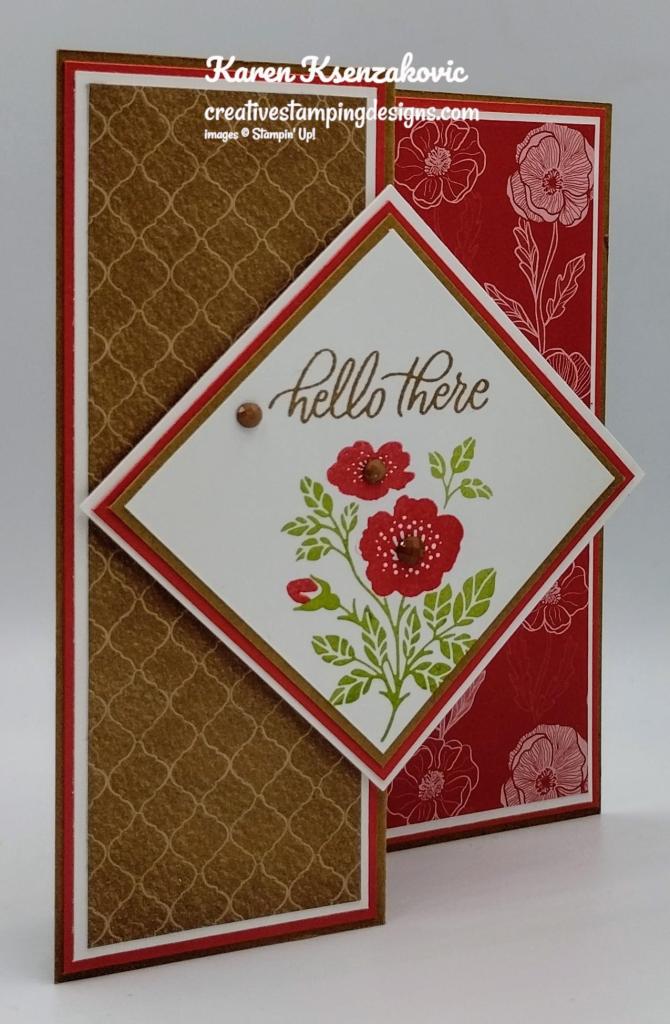
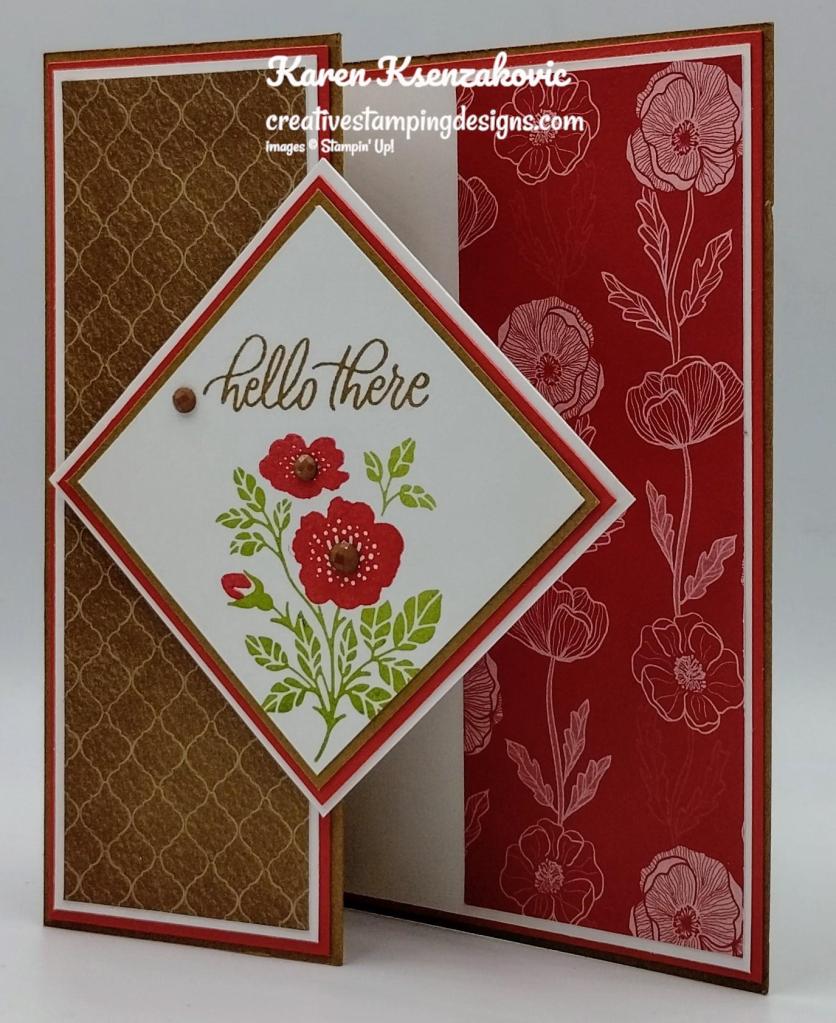
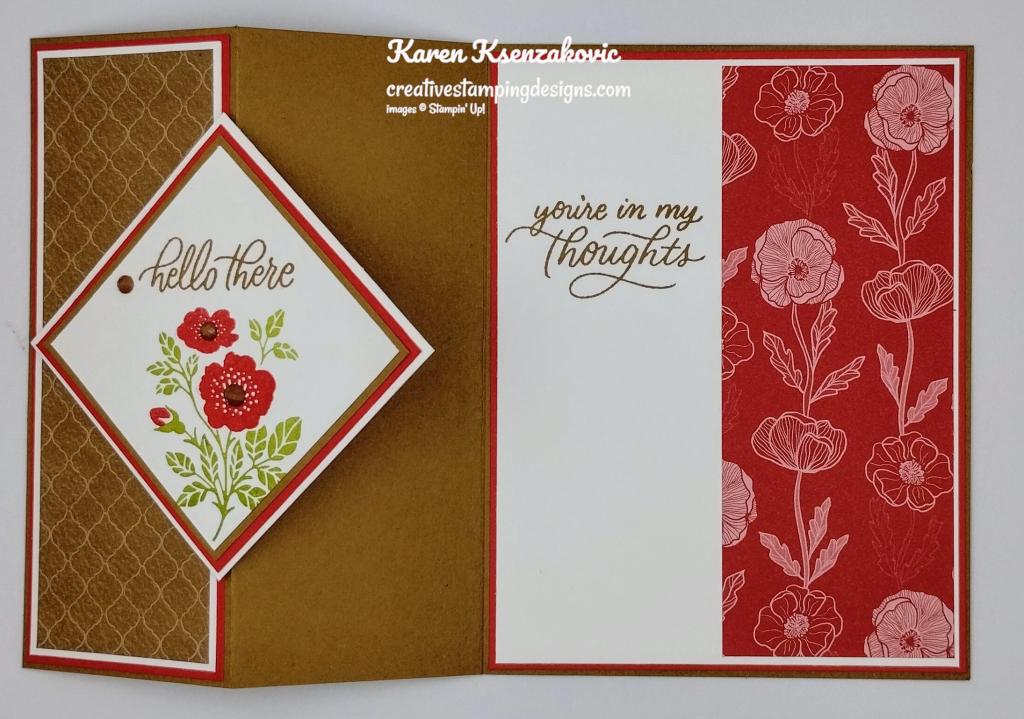
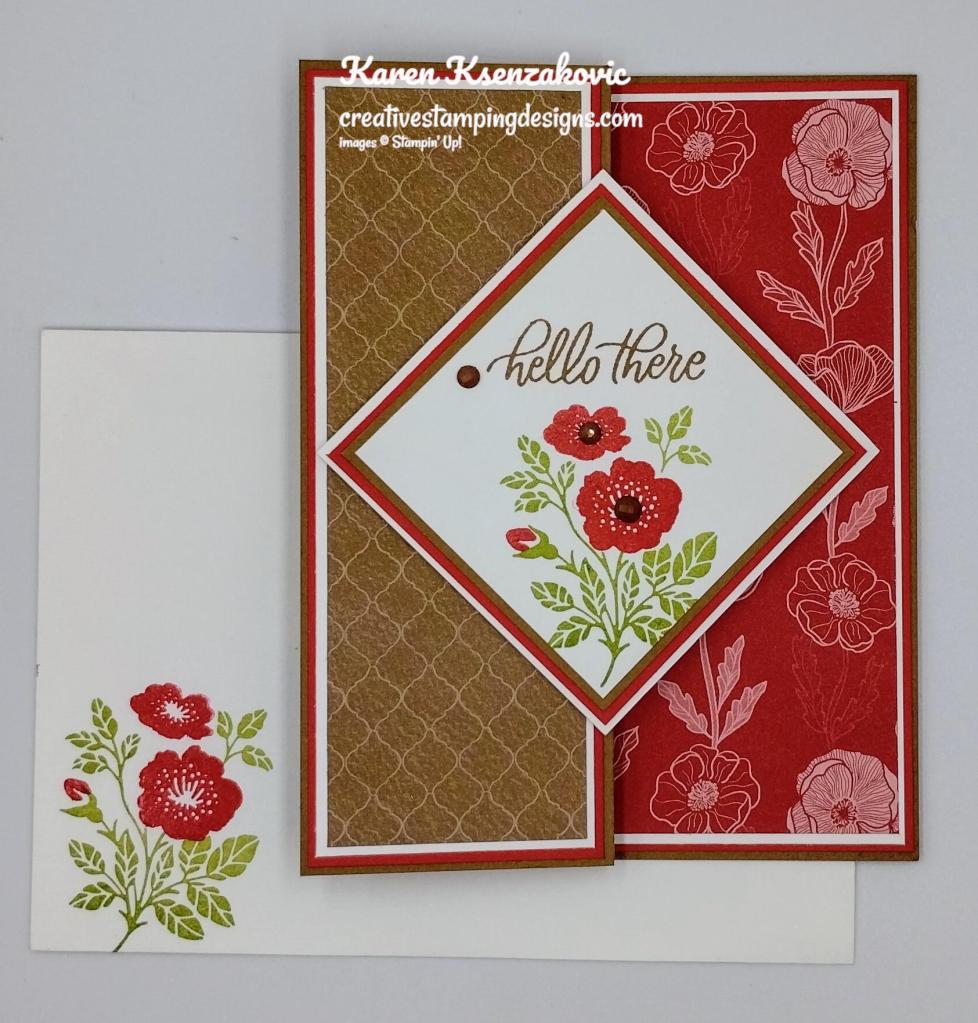
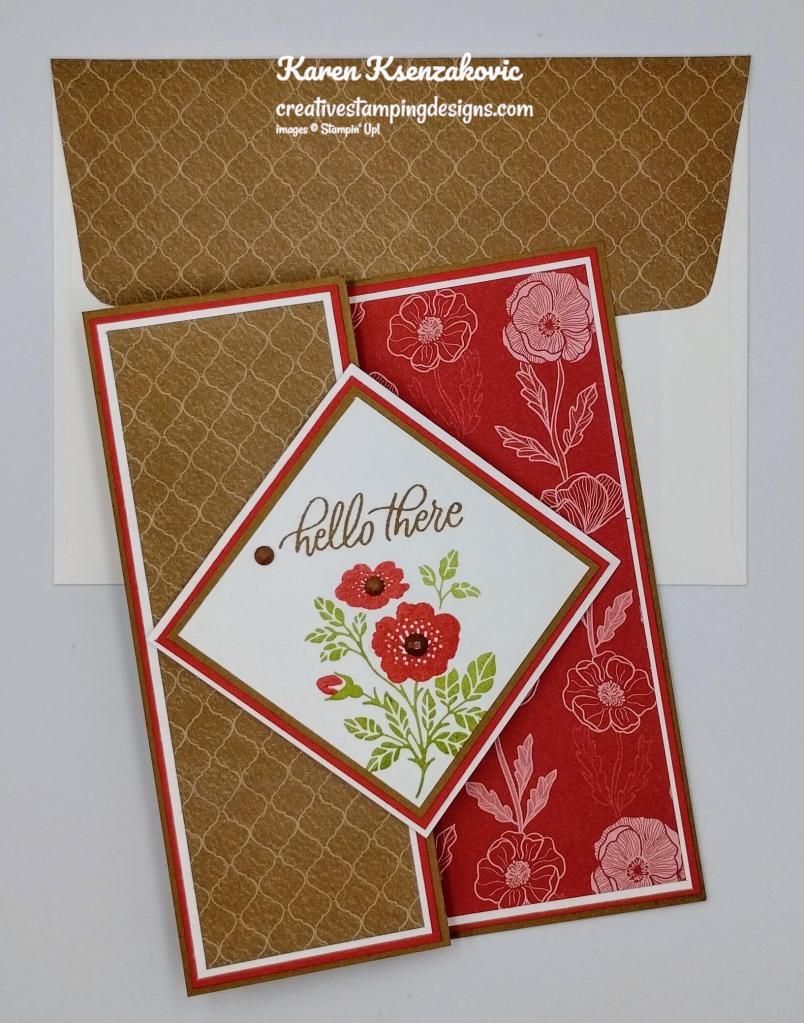


")


 Designer Series Paper")
 Designer Series Paper")


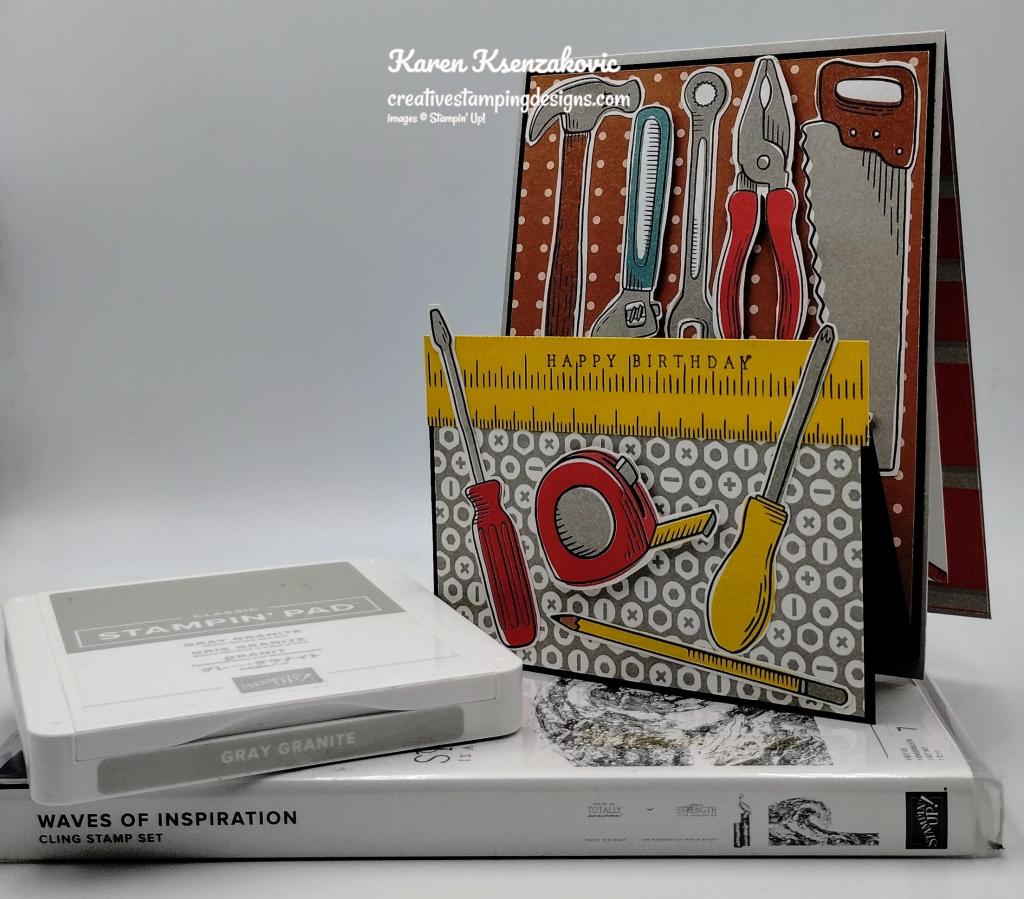

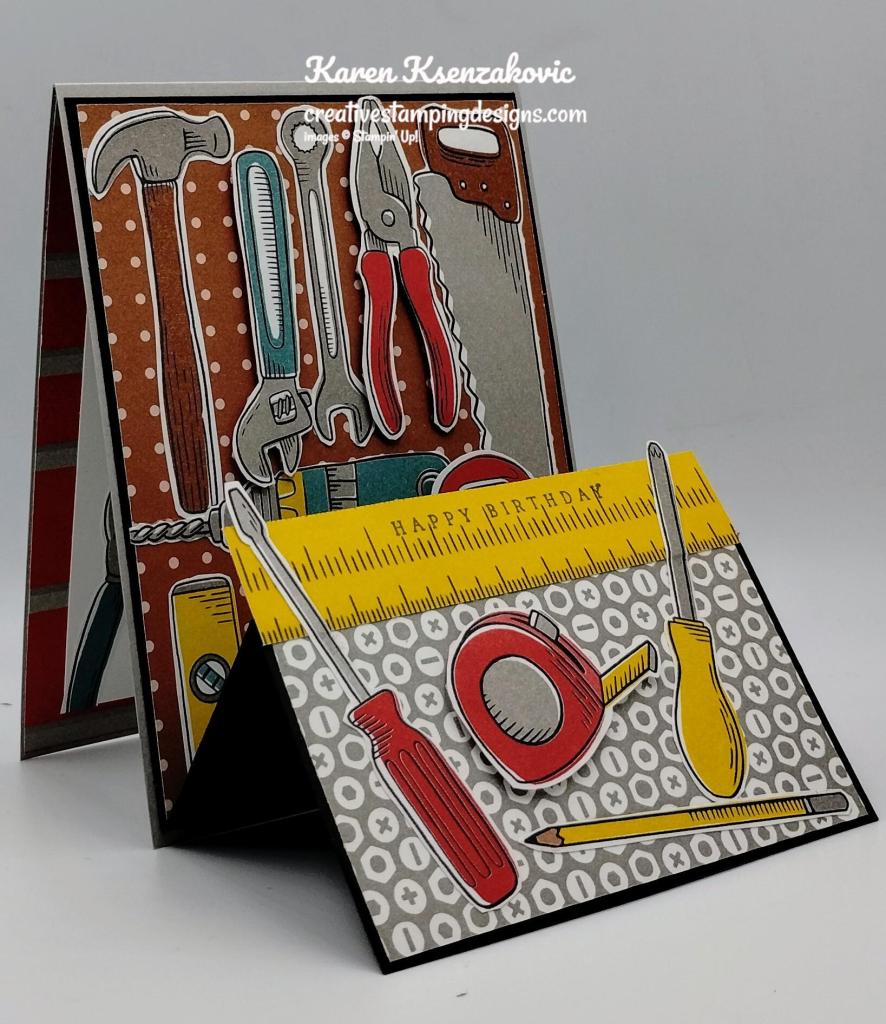

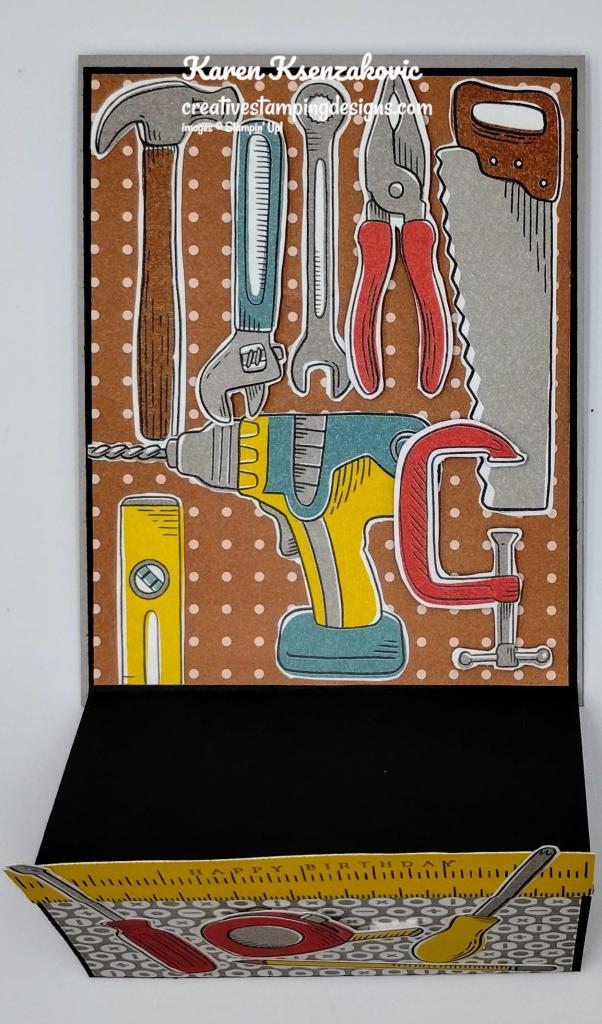
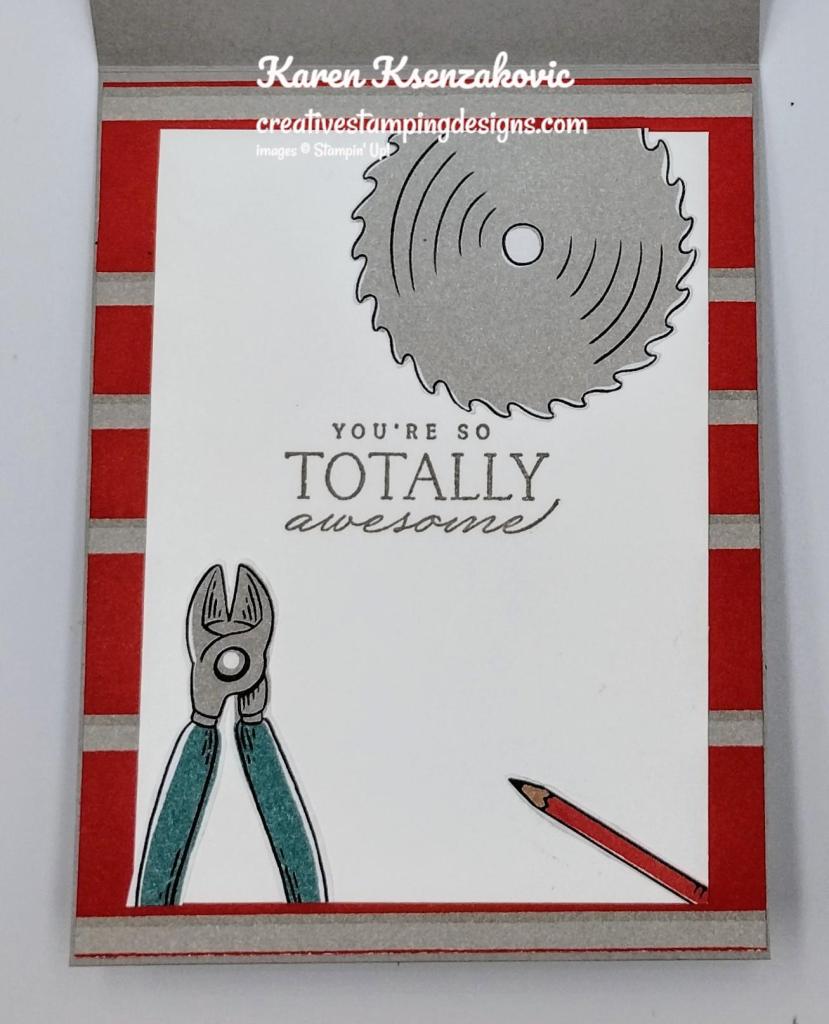
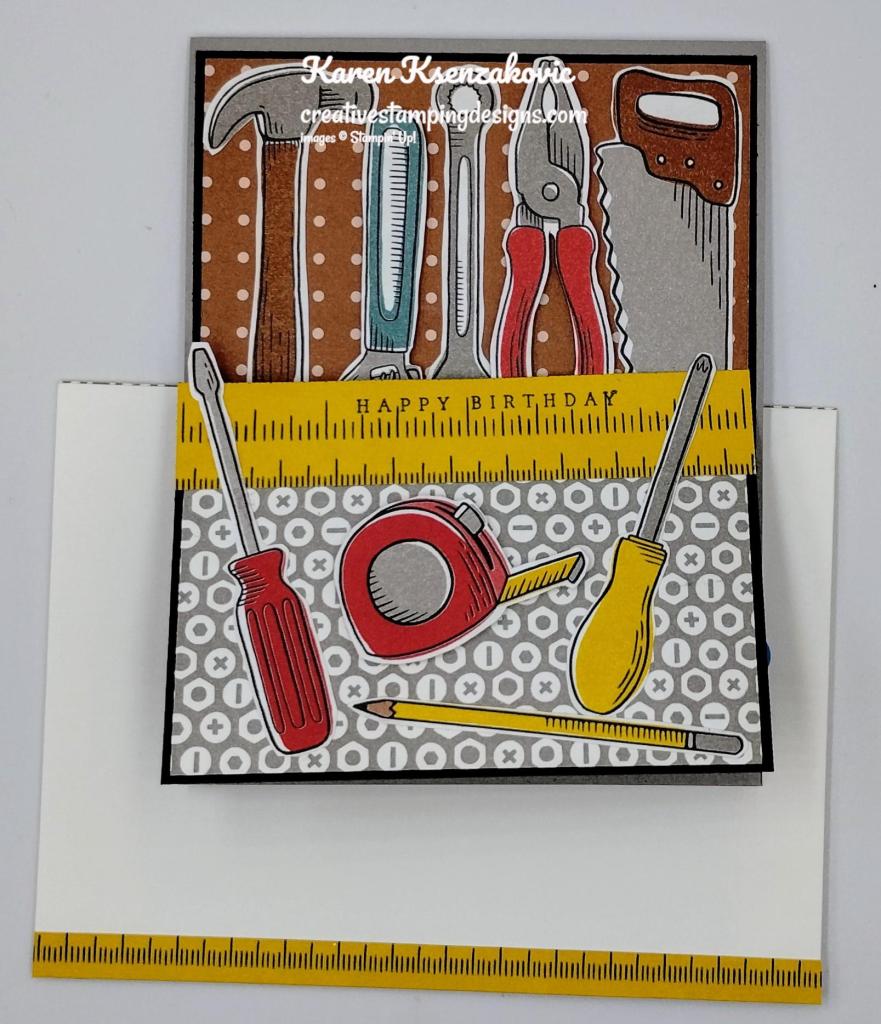


")


 Designer Series Paper")


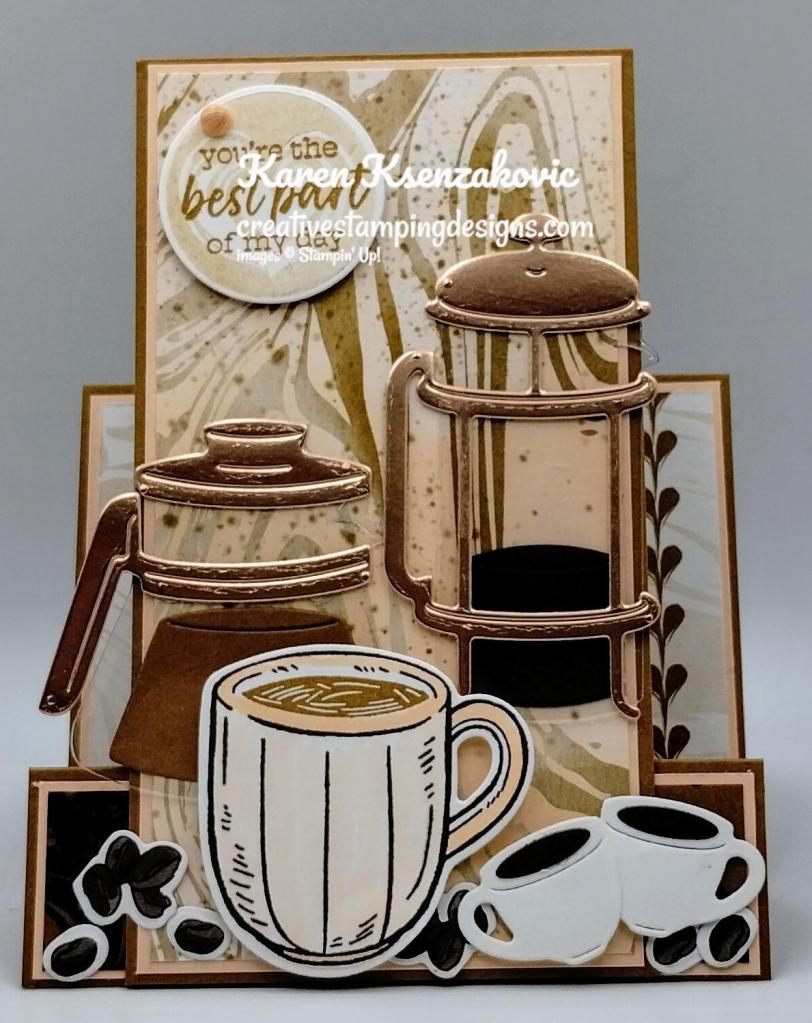


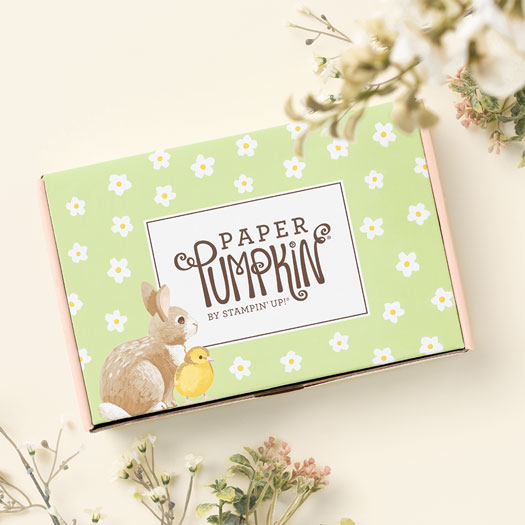

 Specialty Paper")


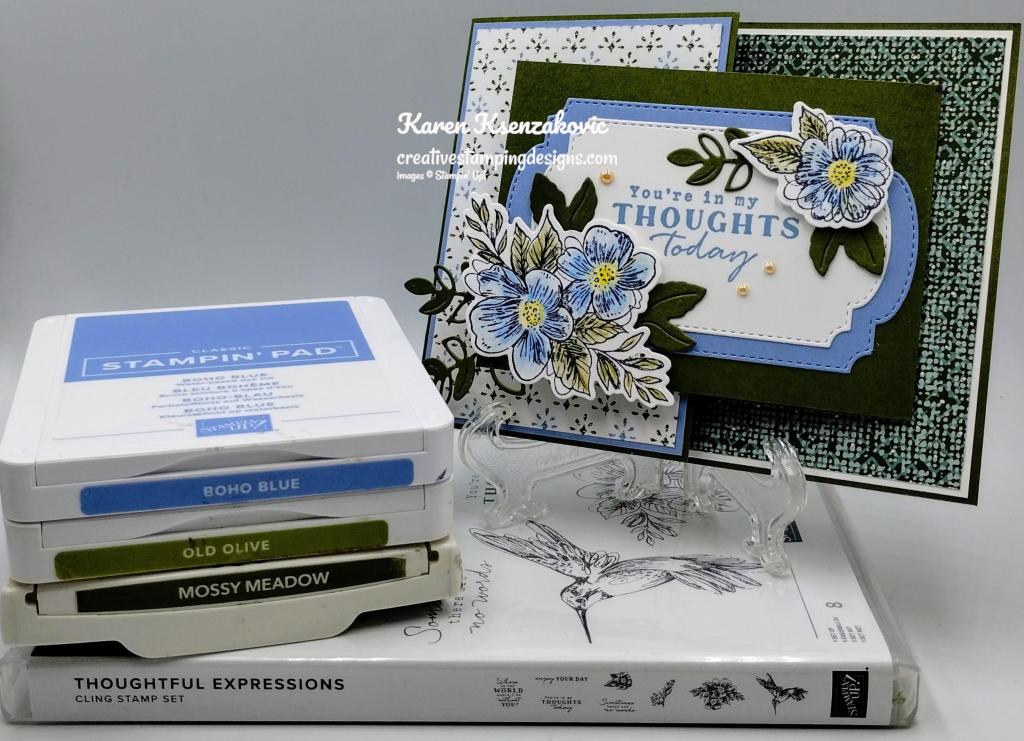
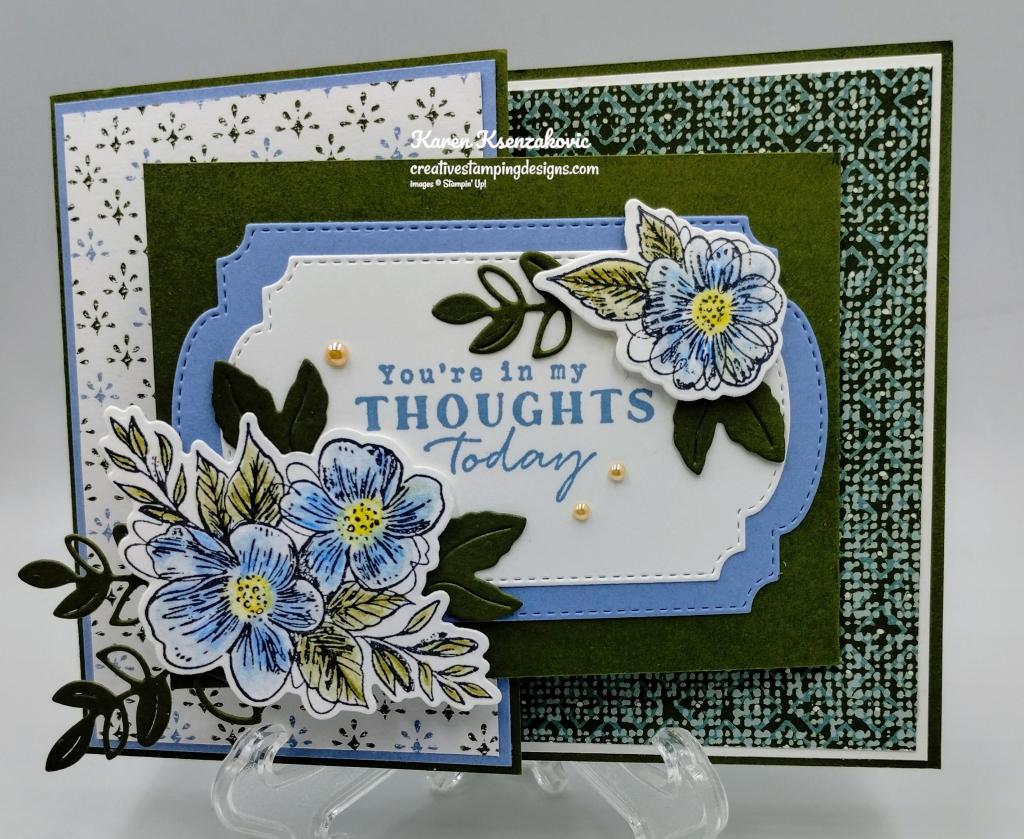
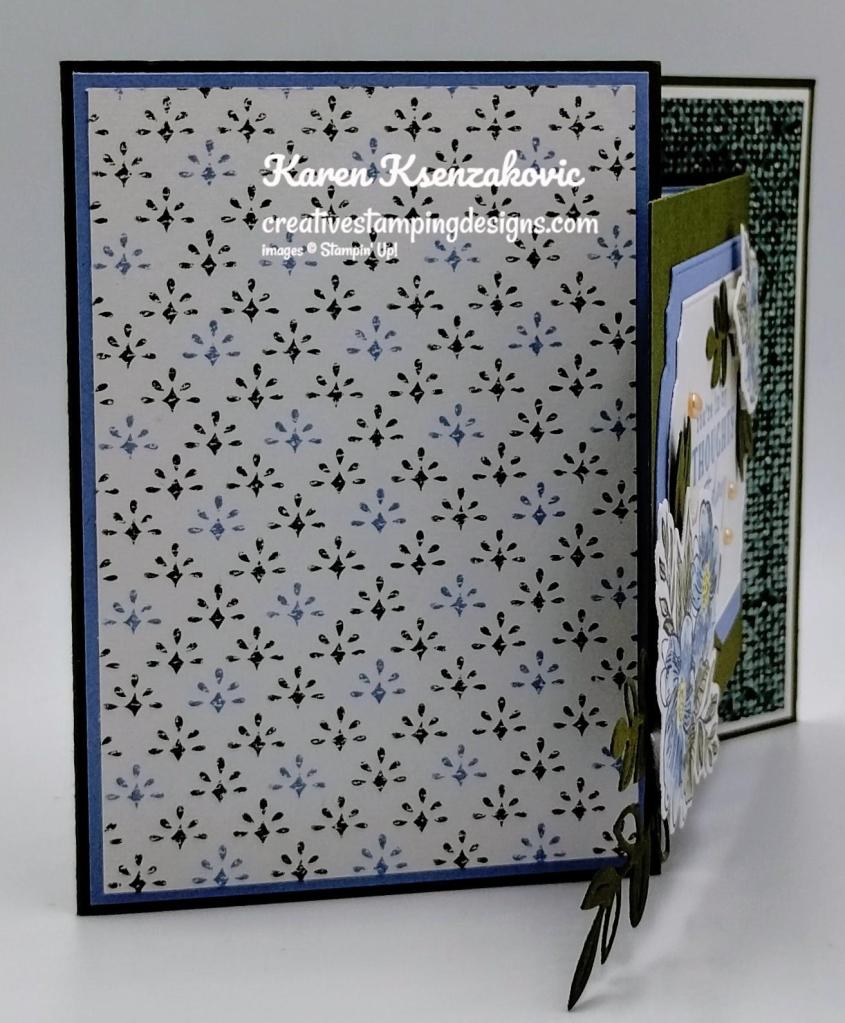


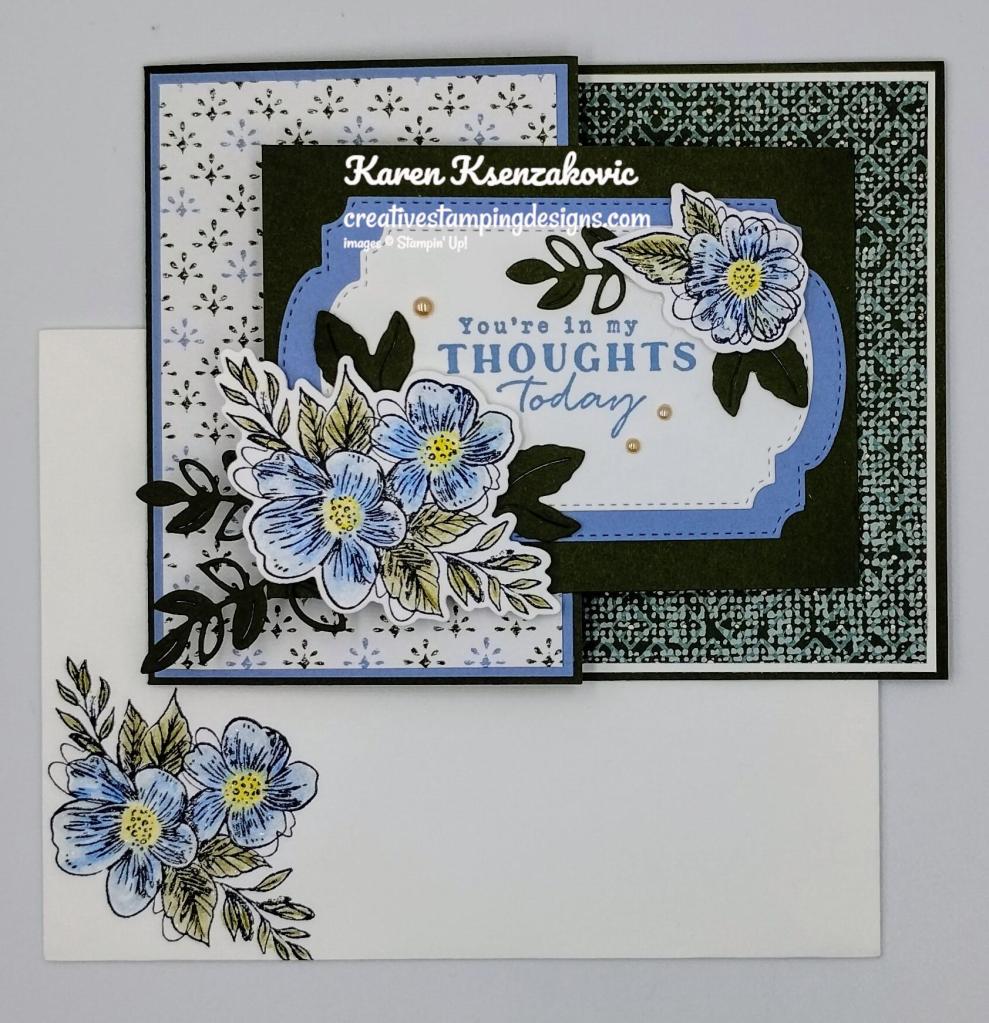


")
")


 Designer Series Paper")


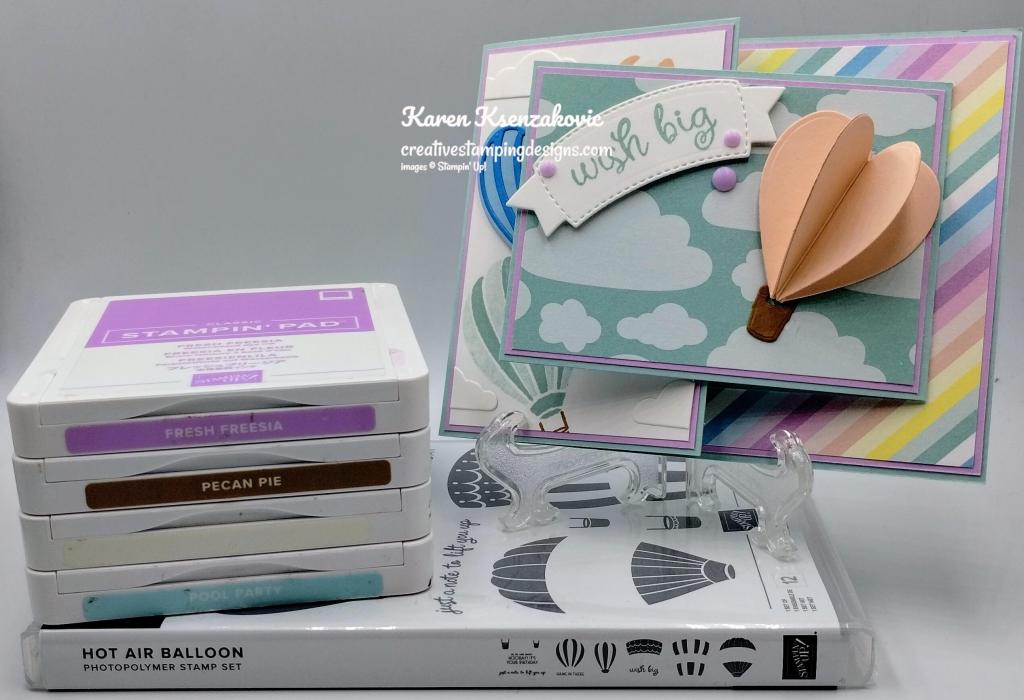


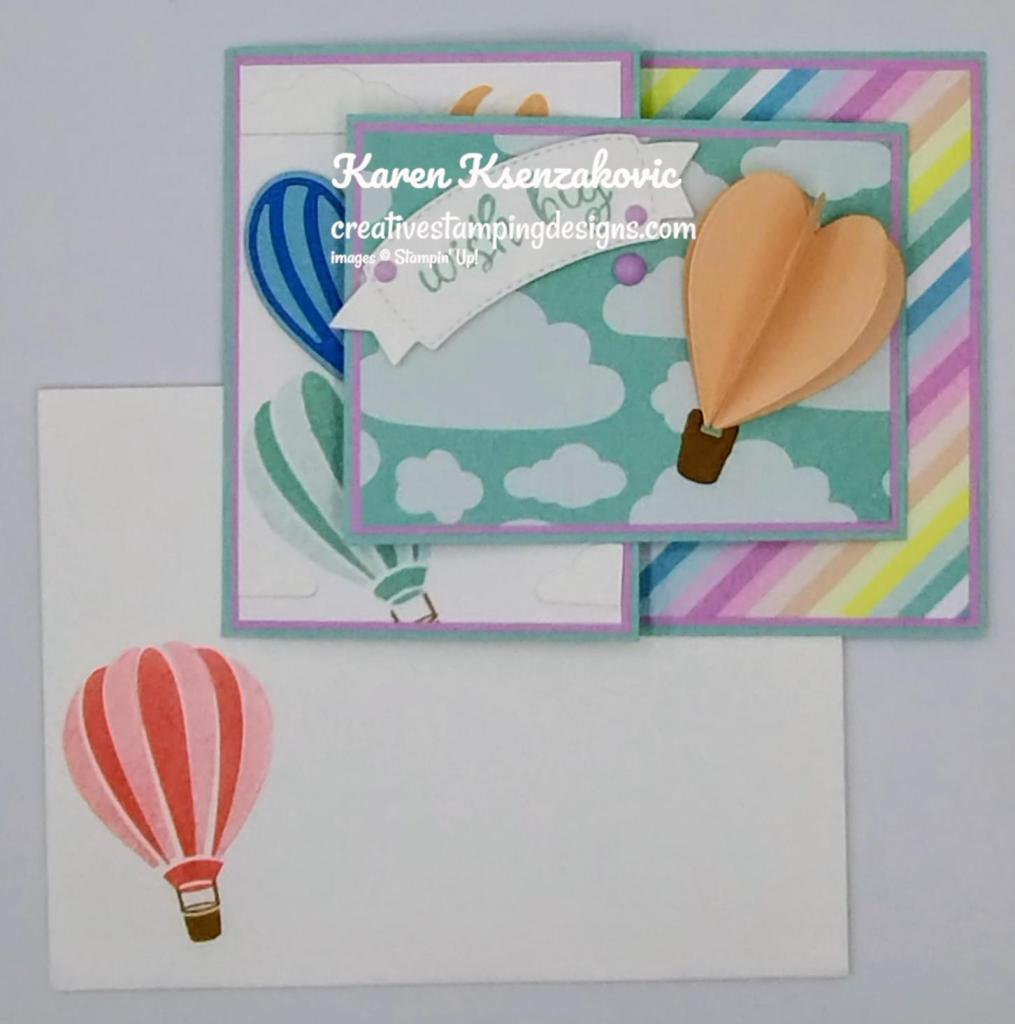


")
")


 Designer Series Paper")


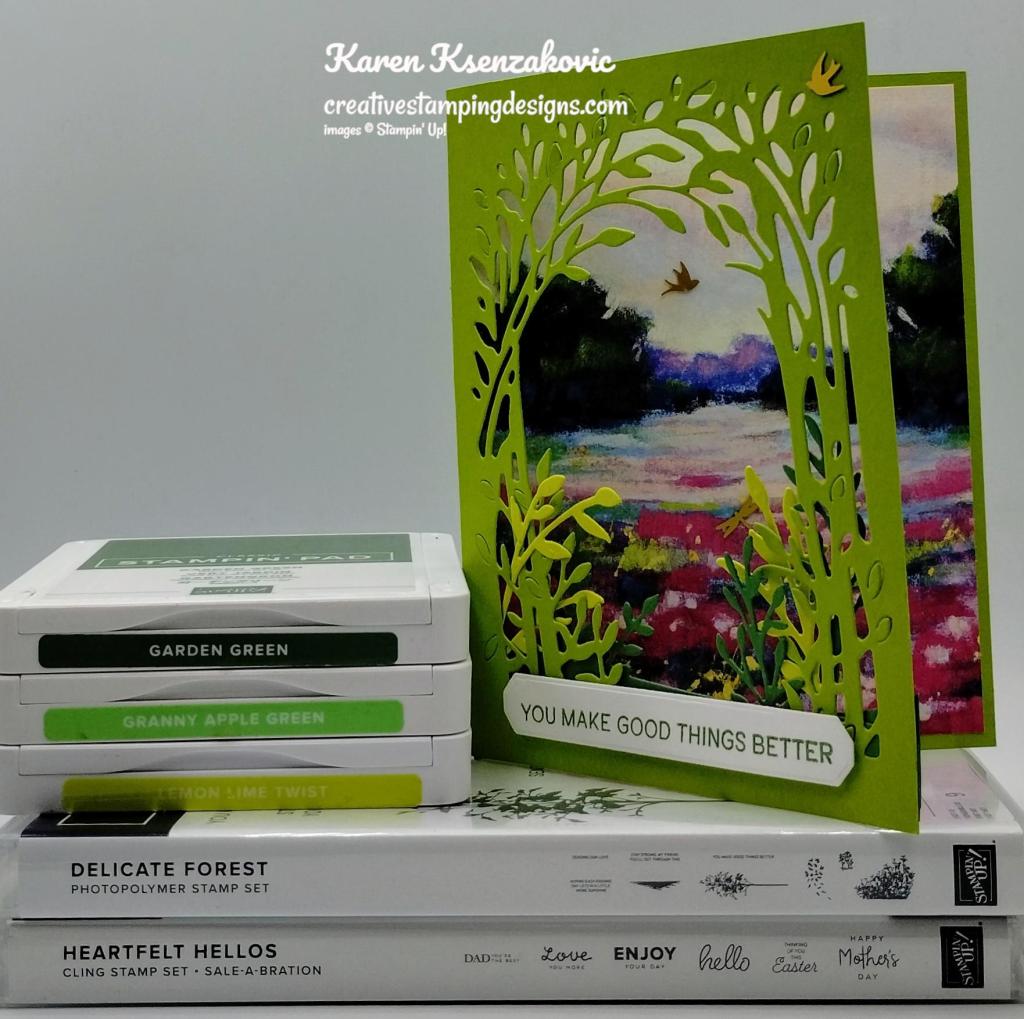
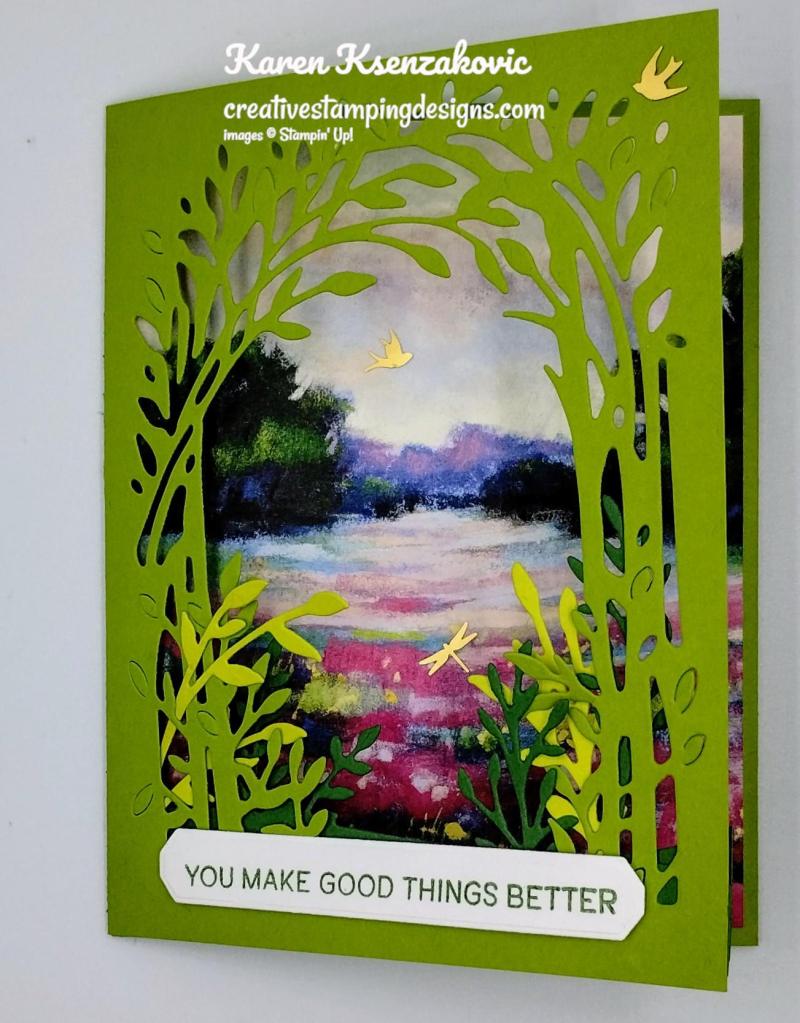


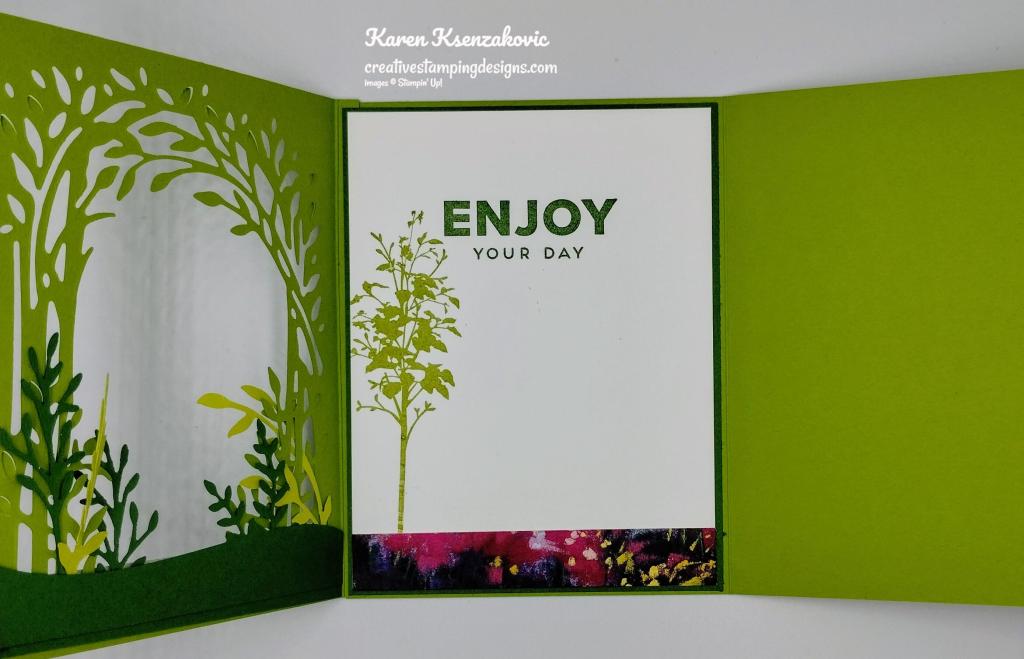
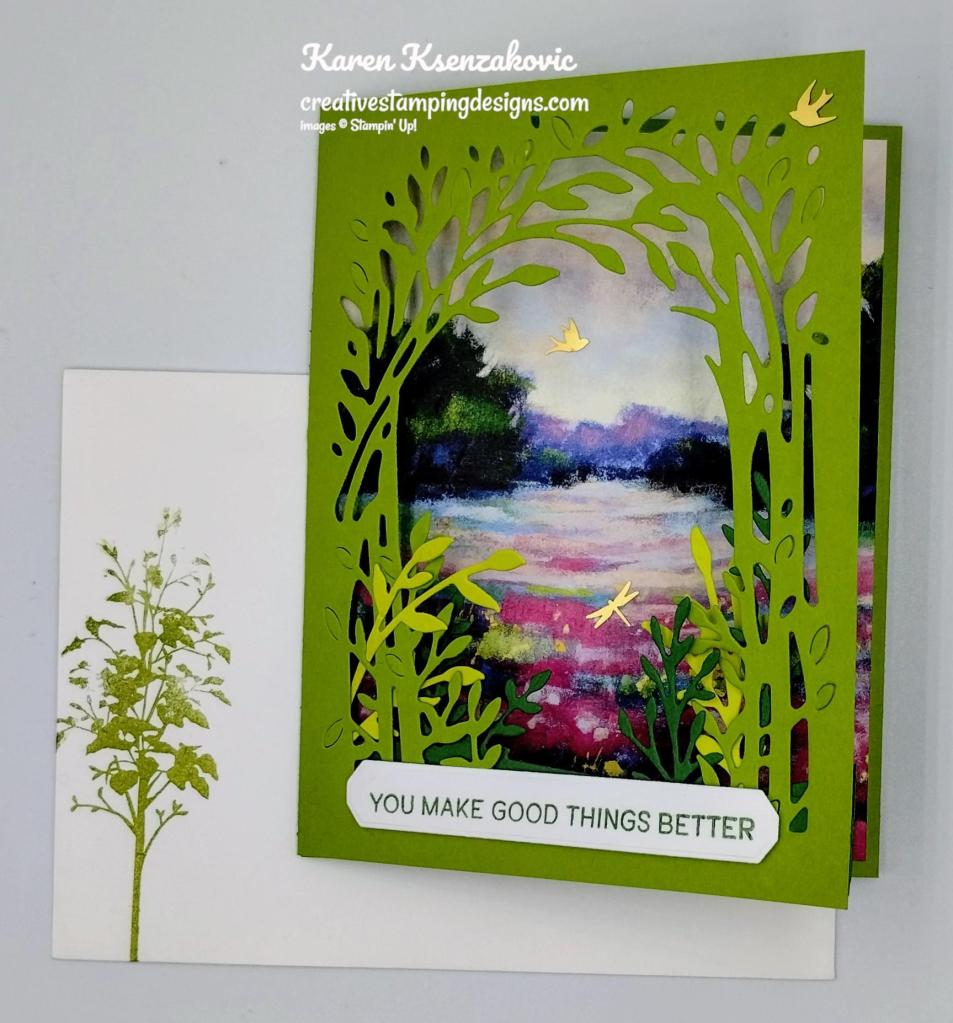

")
")

")


 Designer Series Paper")


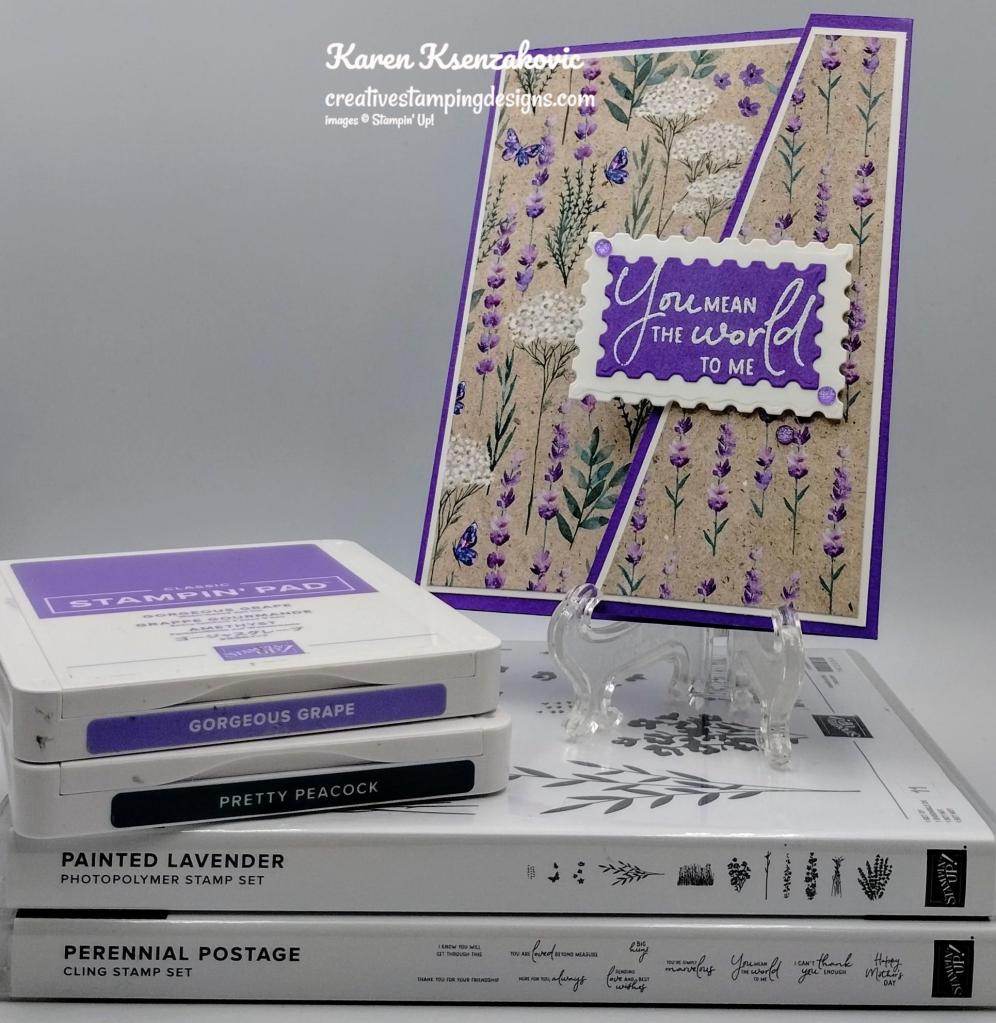
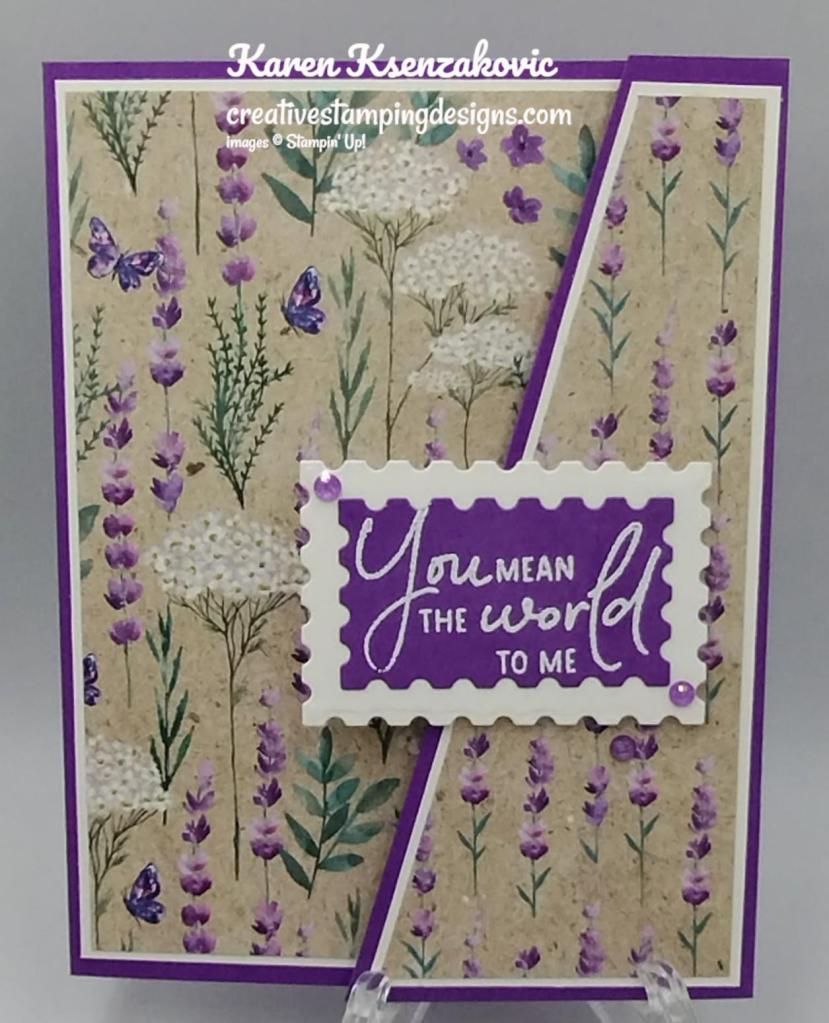
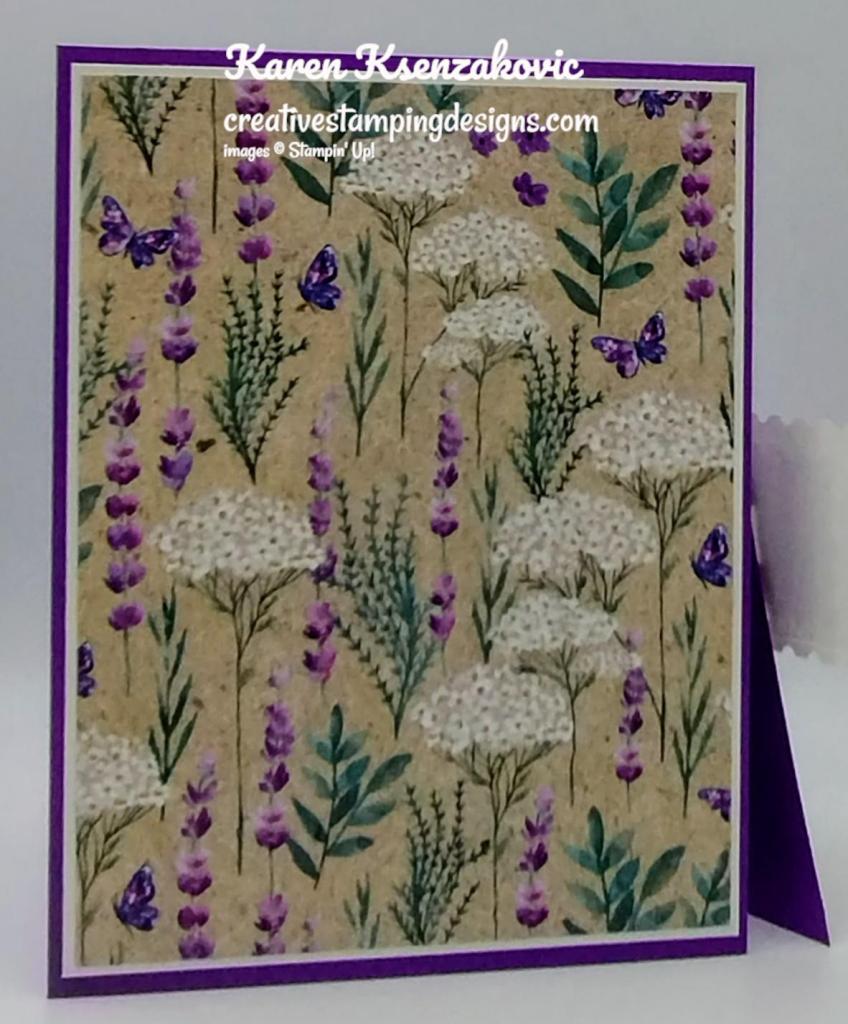
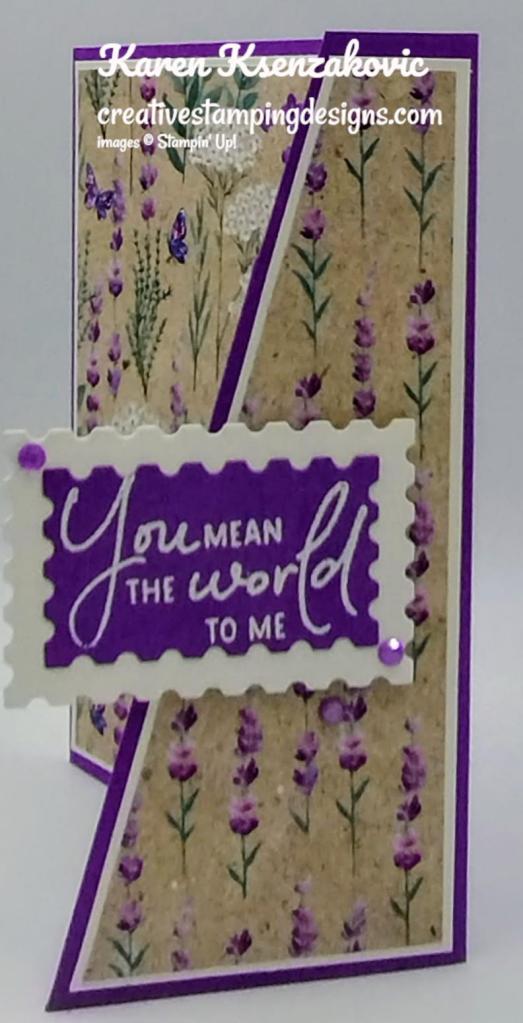
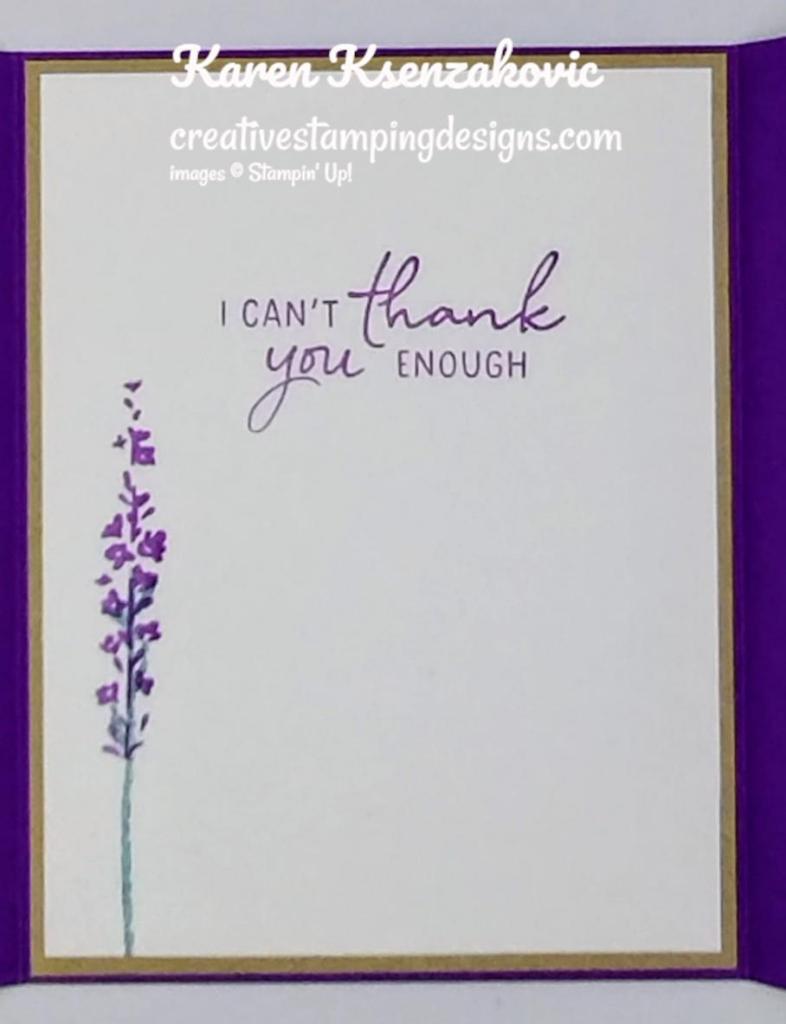
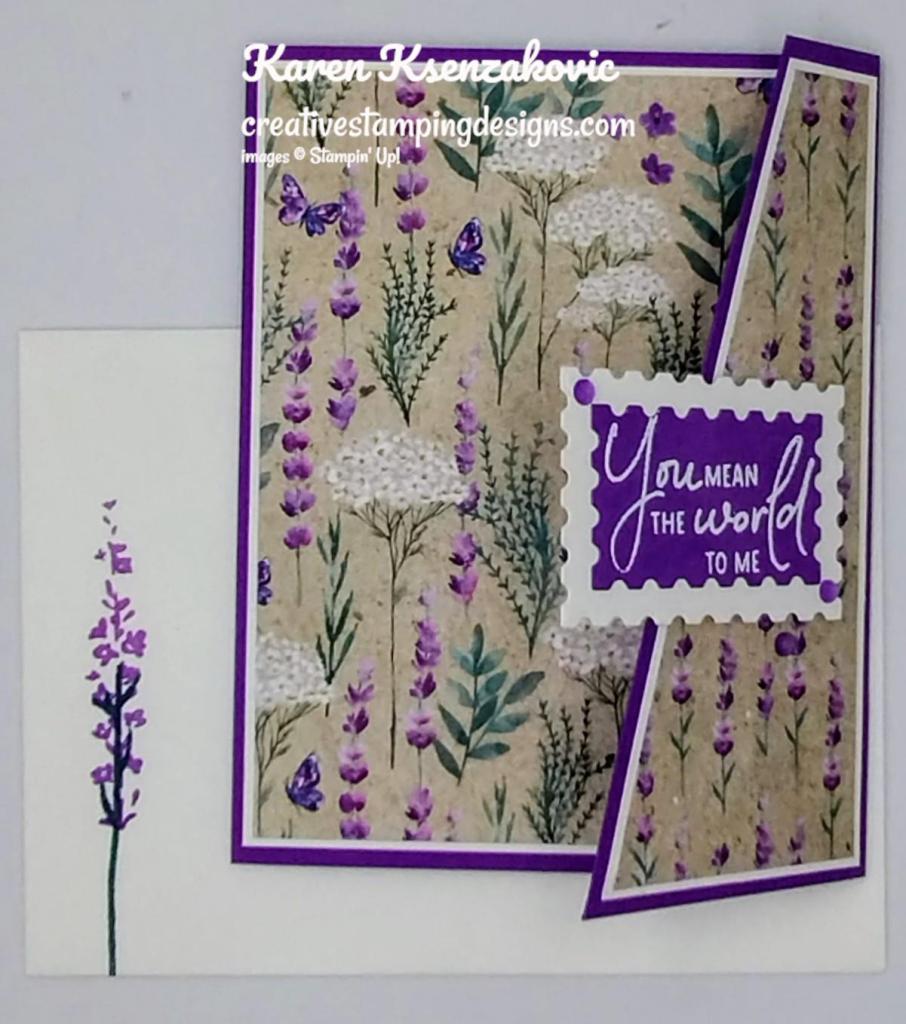
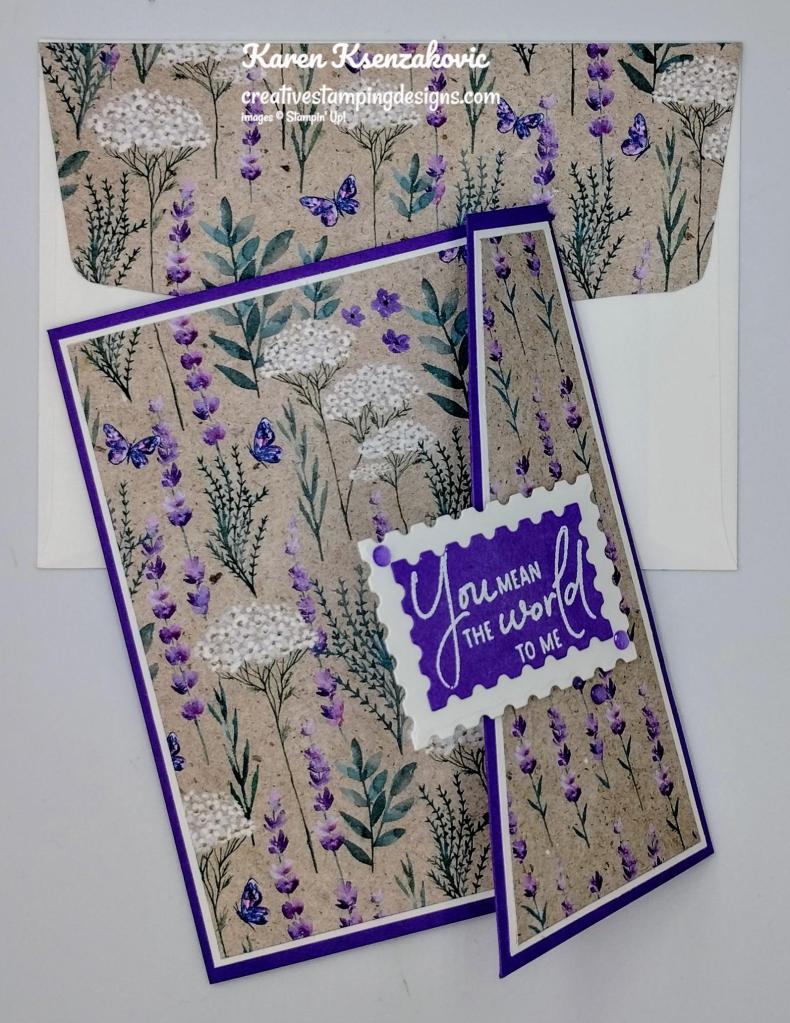
")
")


 Designer Series Paper")


")


