
Good Monday morning stamping friends and Happy Veterans Day. Thank You for your service and the sacrifices you’ve made!! Don’t forget to take a moment to thank a veteran today. My dad was a veteran of the Army for WWII. I remember him telling me many horrible stories of what he went through. My brother was a veteran of Vietnam, although he was out on medical discharge shortly after he enlisted. How was your weekend? Did you do anything fun? FINALLY last night we got a little rain after over 45 days of none. I was in my room reading and I heard something going on outside. I thought the wind had picked up for a minute then realized it was rain. We still need a lot more, but it’s a start.
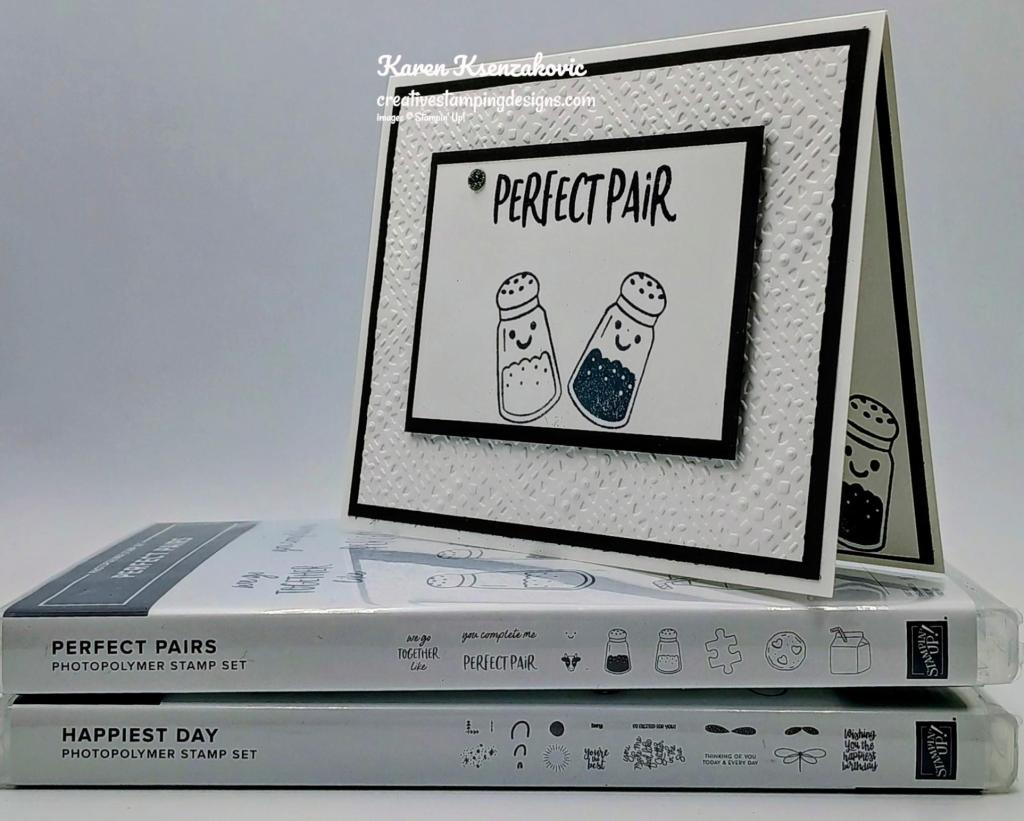
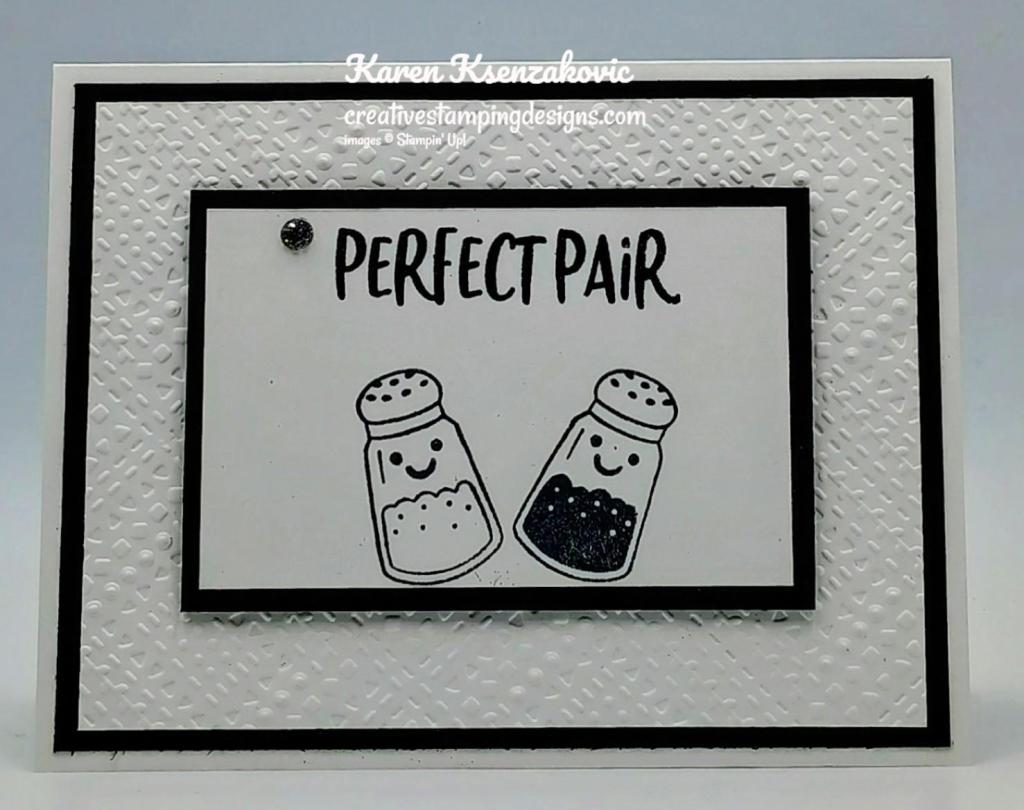
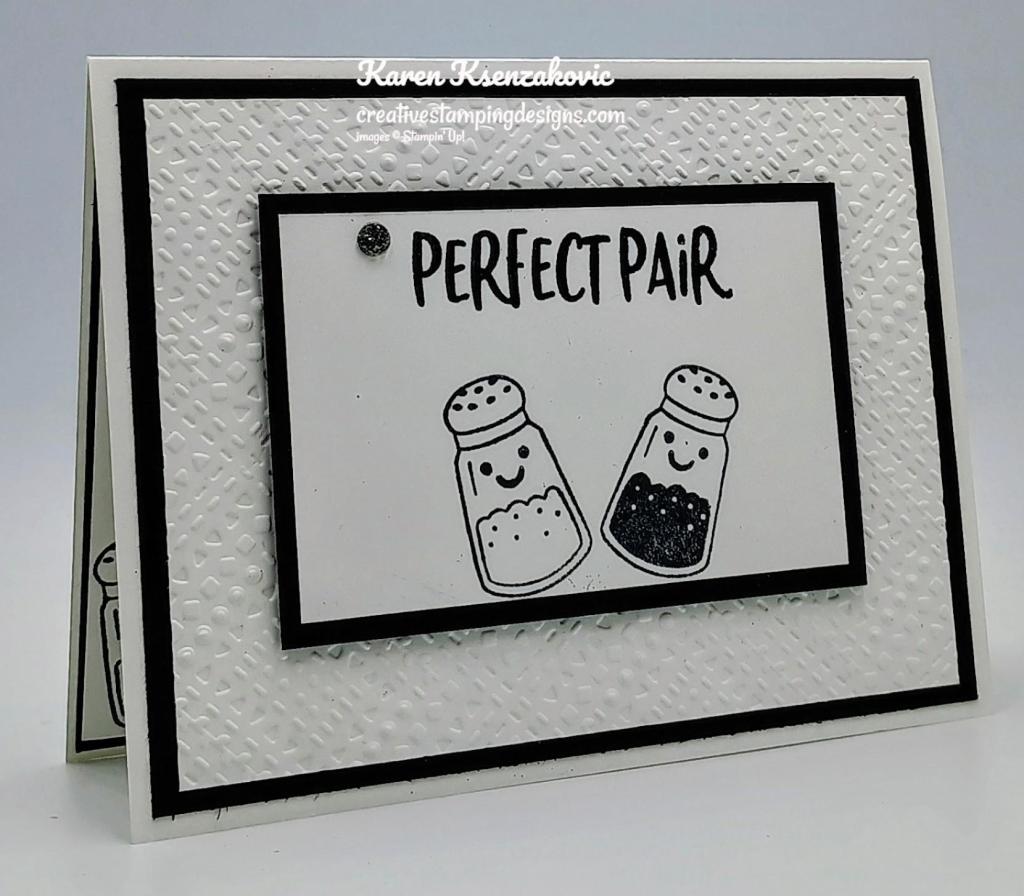
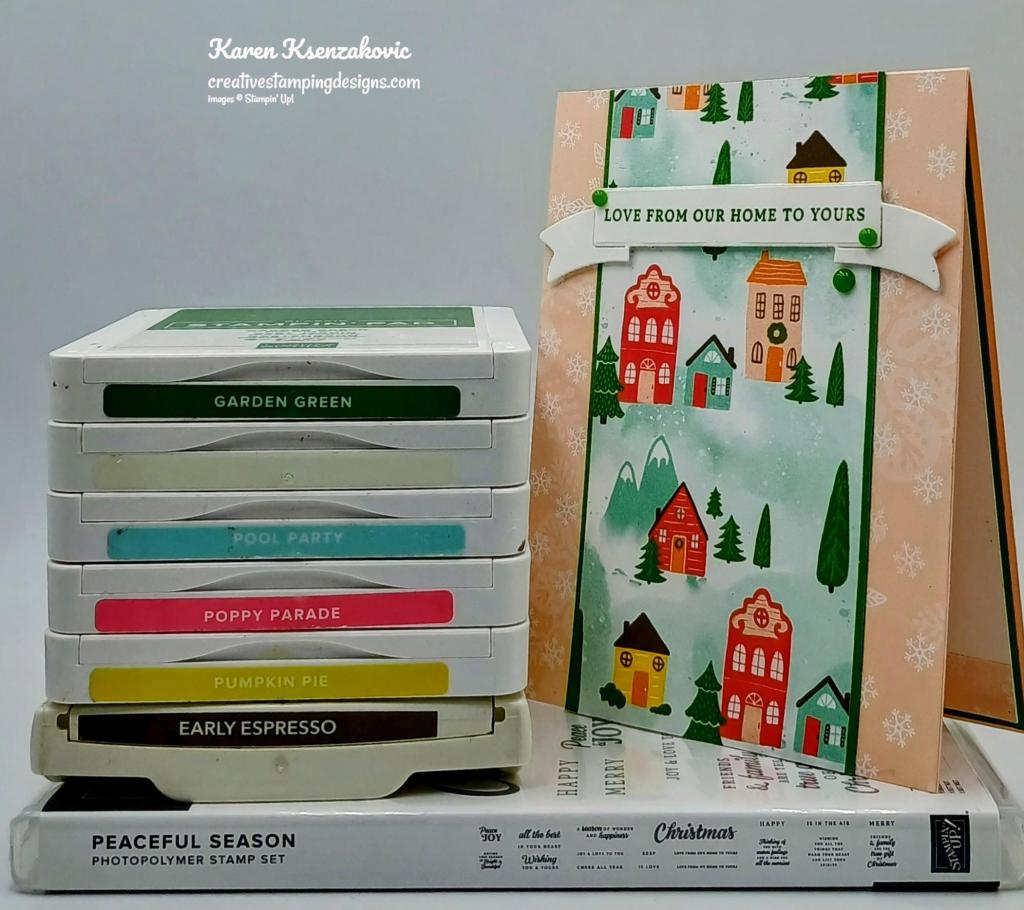
I have a fun winter card for you today that can be used for any occasion. If you’d like to see a quick video of how I made this card, Click Here to go to my Instagram Reels. Here is my card for today.
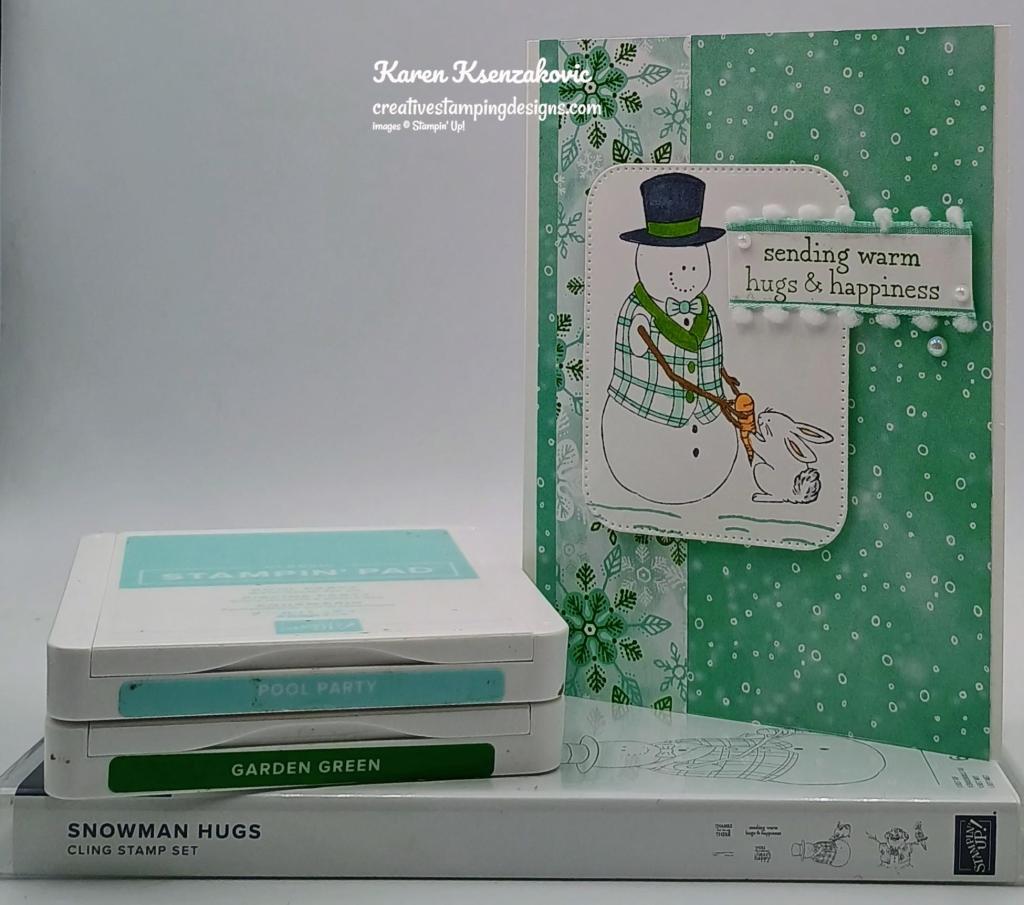
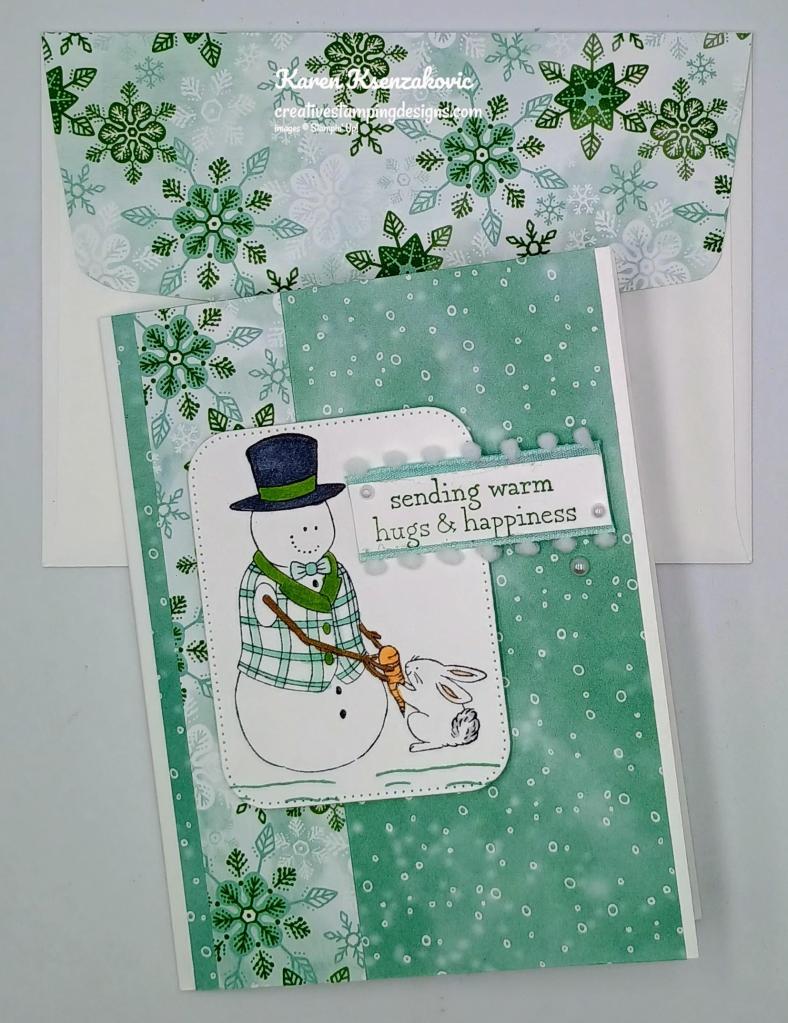
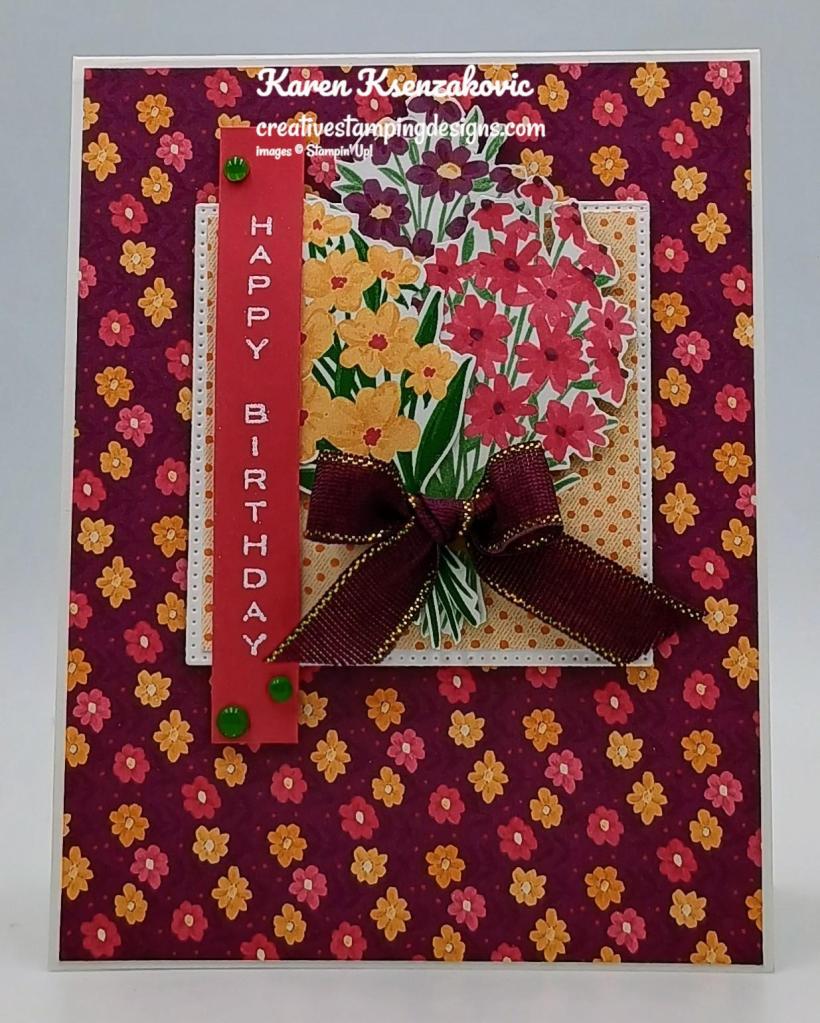
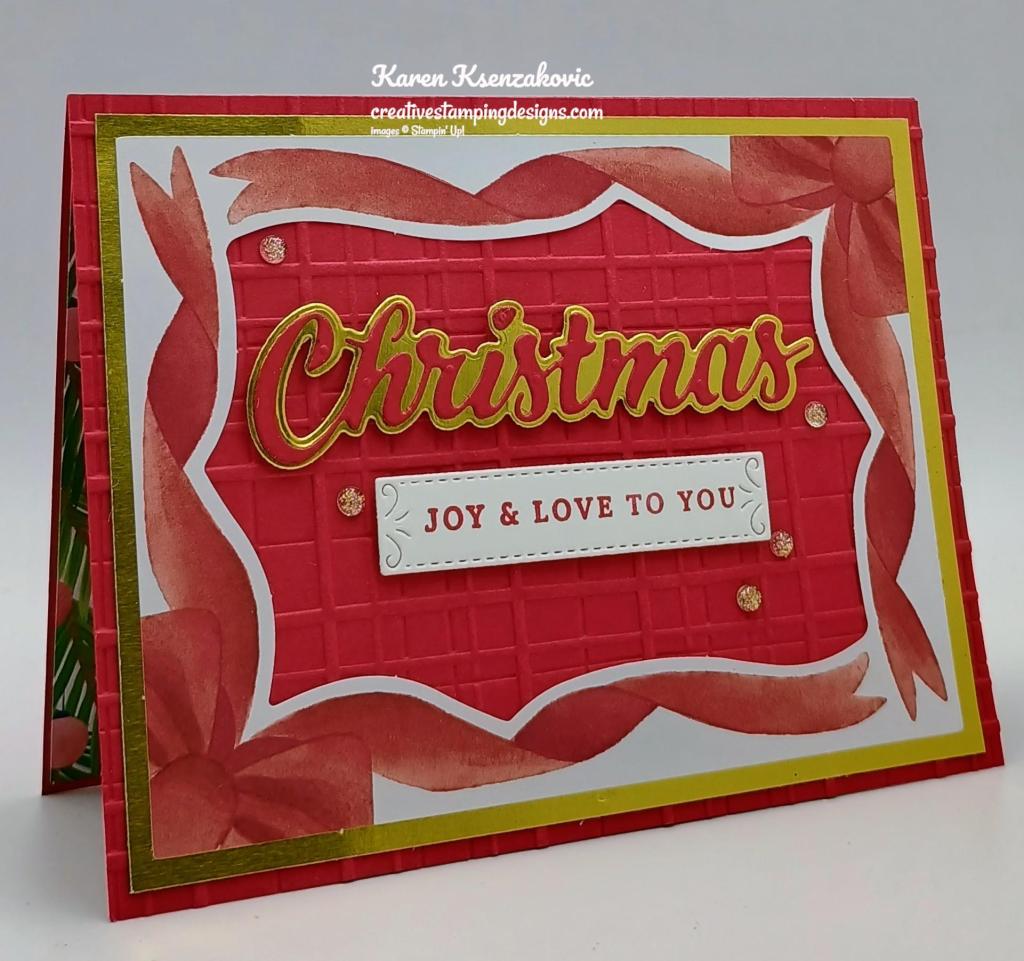
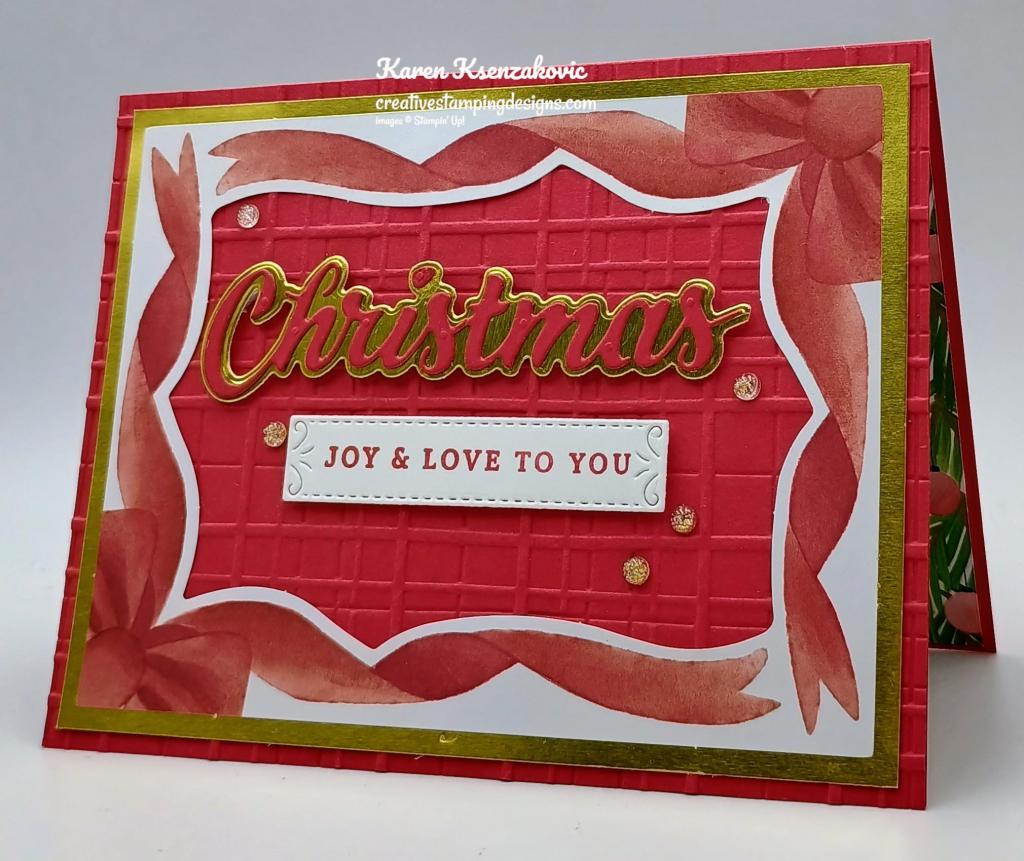
I used the Stampin’ Up! Snowman Hugs Cling Stamp Set along with the Nested Essentials Dies, Nests of Winter Designer Series Paper and Snowy Scenes Designer Series Paper for my card today.

My design is from Sunday Stamps In The Frame Challenge #348.

Adhere a panel of Nests of Winter DSP to a Basic White Thick card base using Liquid Glue. Adhere a strip of Snowy Scenes DSP to the side of the card front using Stampin’ Seal.

On a panel of Basic White, stamp the snowman image from Snowman Hugs stamp set in Tuxedo Black Ink. Stamp the snow image from Snowman Hugs stamp set in Pool Party Ink below the snowman image. Cut the image out using the largest rectangle from the Nested Essentials Dies. Color the image using Basic Black, Granny Apple Green, Pecan Pie, Petal Pink, Pool Party, Pumpkin Pie and Smoky Slate Stampin’ Blends Markers. Adhere the artwork to the card front using Stampin’ Dimensionals.
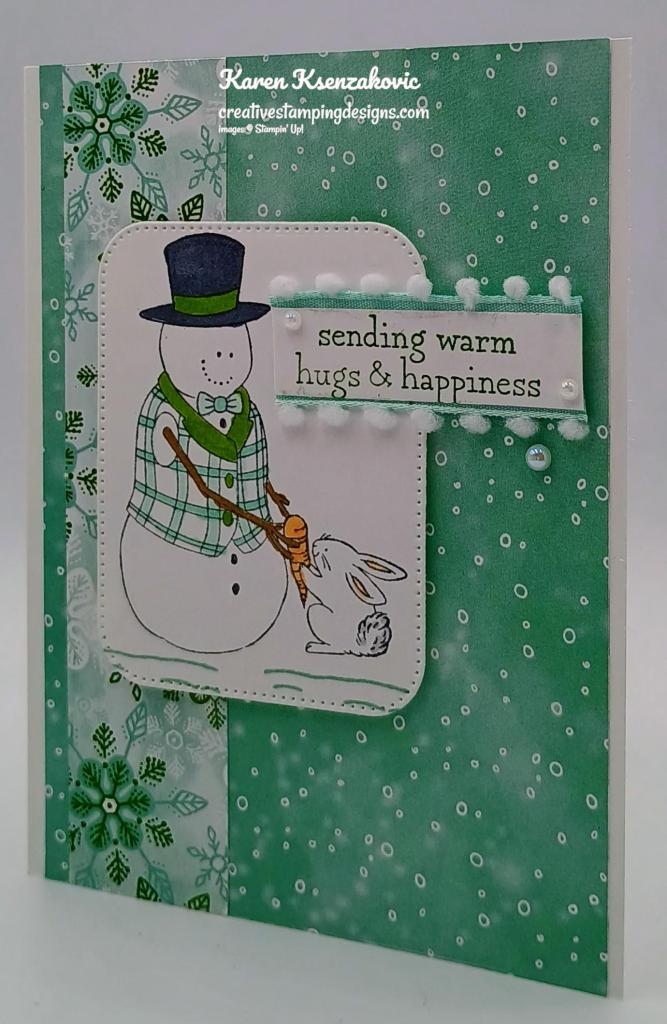
On a panel of Basic White, stamp the sentiment from Snowman Hugs stamp set in Garden Green Ink. Cut a piece of Pool Party 5/8″ Pompom Ribbon in half. Adhere the ribbon to the top and bottom back of the sentiment. Adhere the sentiment to the card front using Glue Dots and Stampin’ Dimensionals. Add a few Iridescent Pearls Basic Jewels to the card front.

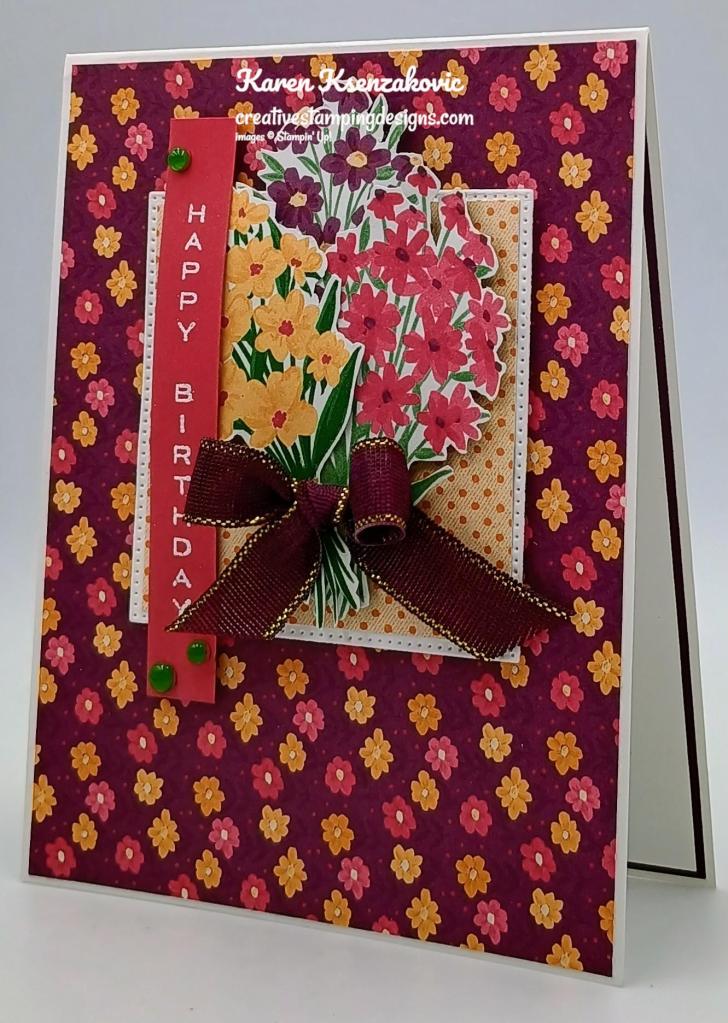
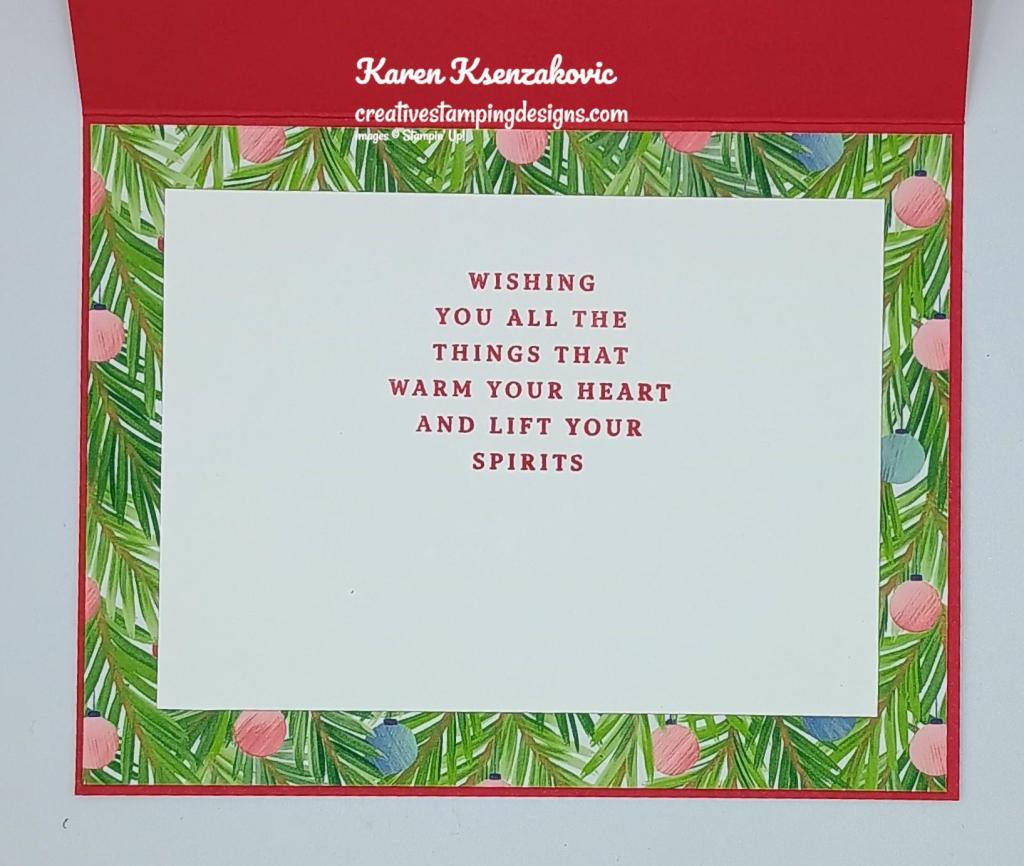
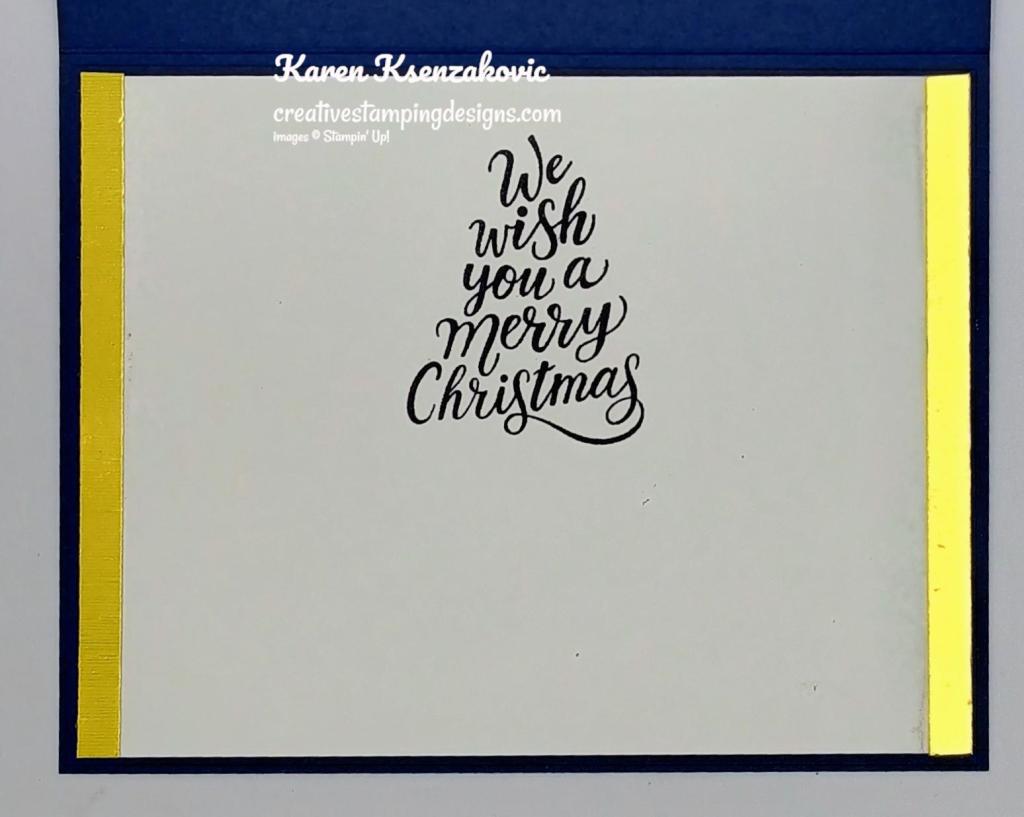
Stamp the sentiment from Snowman Hugs stamp set in Garden Green Ink on a panel of Basic White. Adhere a strip of Nests of Winter DSP to the bottom of the panel. Adhere the Basic White panel to a Pool Party mat then to the inside of the Basic White Thick card base.

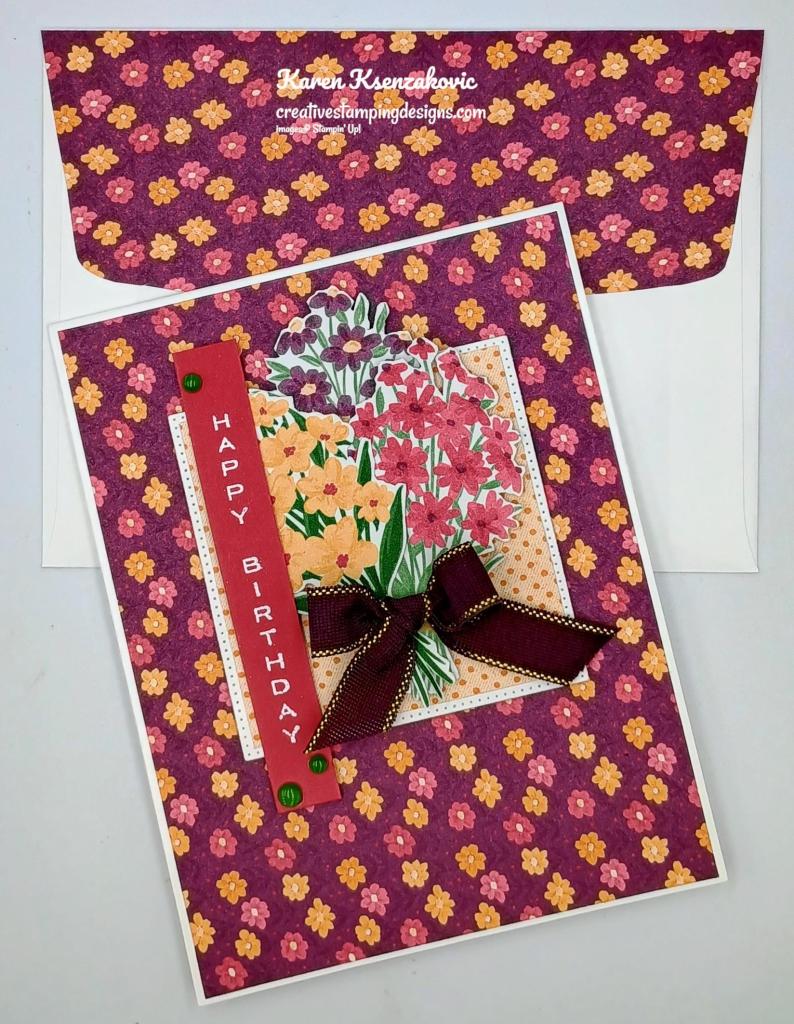
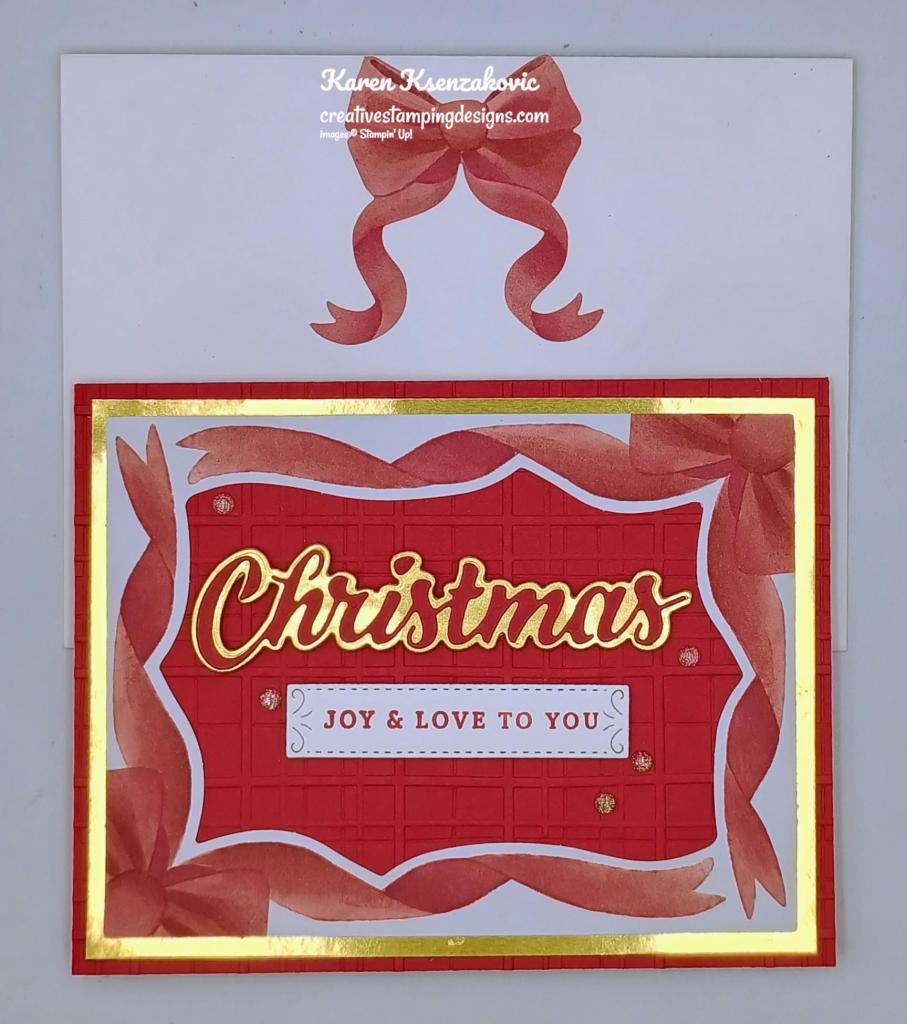
Finish the card by decorating a Basic White Medium Envelope. Stamp the snowman image from the Snowman Hugs stamp set in Tuxedo Black Ink on the envelope front. Color the image using Basic Black, Granny Apple Green, Pecan Pie, Petal Pink, Pool Party, Pumpkin Pie and Smoky Slate Stampin’ Blends Markers. Adhere a panel of Snowy Scene DSP to the envelope flap.
Thank you for stopping by my blog today. I hope you like the card and will give it a try. Happy Stamping!!
*********************************************************************************************************
If you need any stamping supplies, I’d love to be your Demonstrator. Just click HERE to go directly to my online store or drop me an email if you have any questions.
MY CURRENT HOST CODE IS: 4RTJCBH2
Use this host code when placing an order with me. When you order $50 or greater you will receive a free gift from me! If your order is over $150, please do not use this code, but you’ll still get the free gift. The free gift is your choice of any 1 item valued up to $10.00 from the 2024 – 2025 Annual Catalog, September – December 2024 Mini Catalog or from the Online Exclusives! For any orders $50 or more I will also send you my monthly class tutorials. Click HERE or go to my Customer Rewards for more details and to see what this month’s tutorials are.
Please remember to use my current Host Code and make sure that you can see my name on the final checkout page listed as your Demonstrator when you order so that you know that you’re ordering with me, and you’ll get my rewards!
Happy Stamping, Karen
*********************************************************************************************************
I’ve got Double Creative Stamping Designs Rewards for all orders over $50. I’ve decided to extend my Double Rewards through Friday November 15. How does this work? For a $50 you’ll earn 2 rewards, $100 you’ll earn 4 rewards, $150 you’ll earn 6 rewards, etc. This is my way of celebrating an early birthday with you. Head over to my Online Store and get those orders in early and don’t forget you MUST use my Current Host Code 4RTJCBH2 for all orders under $150 to qualify for your rewards and free gift.
*********************************************************************************************************
Stampin’ Up! Seasonal Sale is coming on Wednesday November 13th through Friday November 15th. Create more by spending less during the Seasonal Sale! Between November 13–15, you can get 20% off all stamp bundles and Designer Series Paper and 10% off select ink and cardstock from the 2024–2025 Annual Catalog. Make sure to act quickly on this limited-time-only sale!
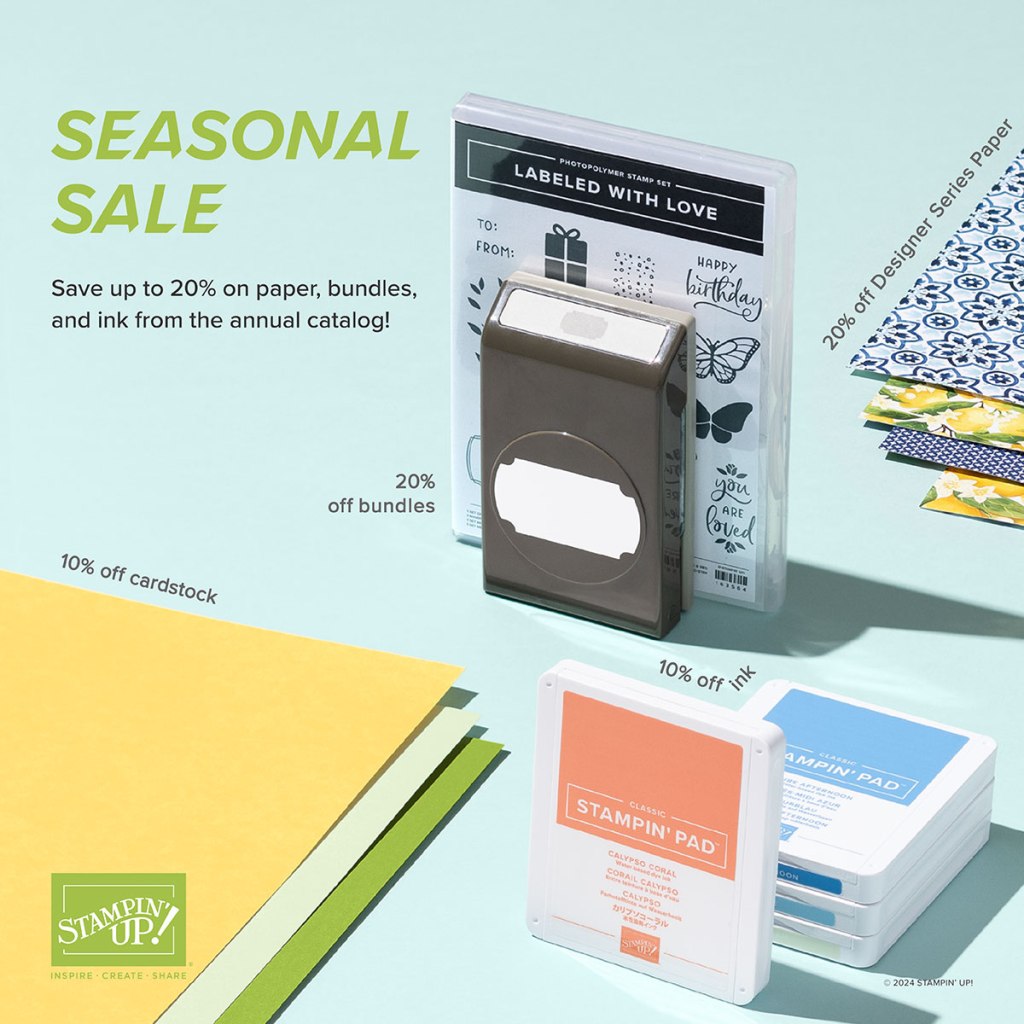
Take this opportunity to build up your collection of crafting supplies and save big! And with Christmas right around the corner, this is the perfect time to treat yourself—or a friend—to Stampin’ Up! products, like a stamp bundle or some Designer Series Paper. Because this sale is only available for three days, we want everyone to take advantage of every minute!
From the 2024–2025 Annual Catalog:
- 10% off ink, including pads, refills, markers, and Stampin’ Blends. Ink pad bundles and third-party ink pads are NOT included.
- 10% off cardstock. Close To My Heart cardstock is NOT included.
- 20% total off all stamp and die bundles and stamp and punch bundles. (Stamp bundles are normally 10% off. With this sale you get an additional 10% off.)
- 20% off all Designer Series Paper.
Important Information:
- Shop online to see the full selection of discounted products available; this is a limited time offer starting Wednesday November 13th.
- Products are available while supplies last.
- Discounts are automatically applied when sale items are added to any order, including Starter Kits.
Sales Period: November 13–15
Ordering Deadlines
- Online: November 15, 2024, at 11:59 p.m. (MT)
Get those shopping lists ready to go for Wednesday!!
*********************************************************************************************************
January – April 2025 Mini Catalog and Sale-A-bration 2025 Brochure Coming Soon!!
The new January-April 2025 Mini Catalog and Sale-a-bration 2025 Brochure catalog will be on the way in late November! I’ll be able to order the January-April 2025 Mini Catalogs and Sale-a-bration 2025 Brochures on November 19 and I’ll be packing them up and mailing them out to my current customers out just as soon as I get them!
If you’ve ordered from me within the last year, you’ll automatically be on my mailing list for the new catalogs. If you are not a current customer of mine but would like to be and would like to get a copy of the upcoming catalog, simply place an order through my online store and I’ll mail you a copy of the catalog too!
*********************************************************************************************************
2 New Kits Now Available
Kits by Stampin’ Up! are perfect for new crafters, busy crafters, or crafters who want quick and easy projects. All-inclusive project kits have everything you need in one box! Give as a gift or try them yourself. Kits are while supplies last. Order today!
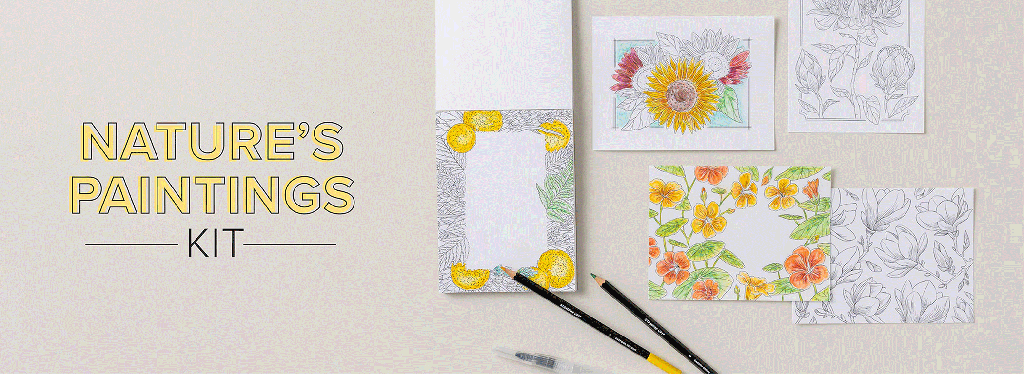
Nature’s Paintings Kits
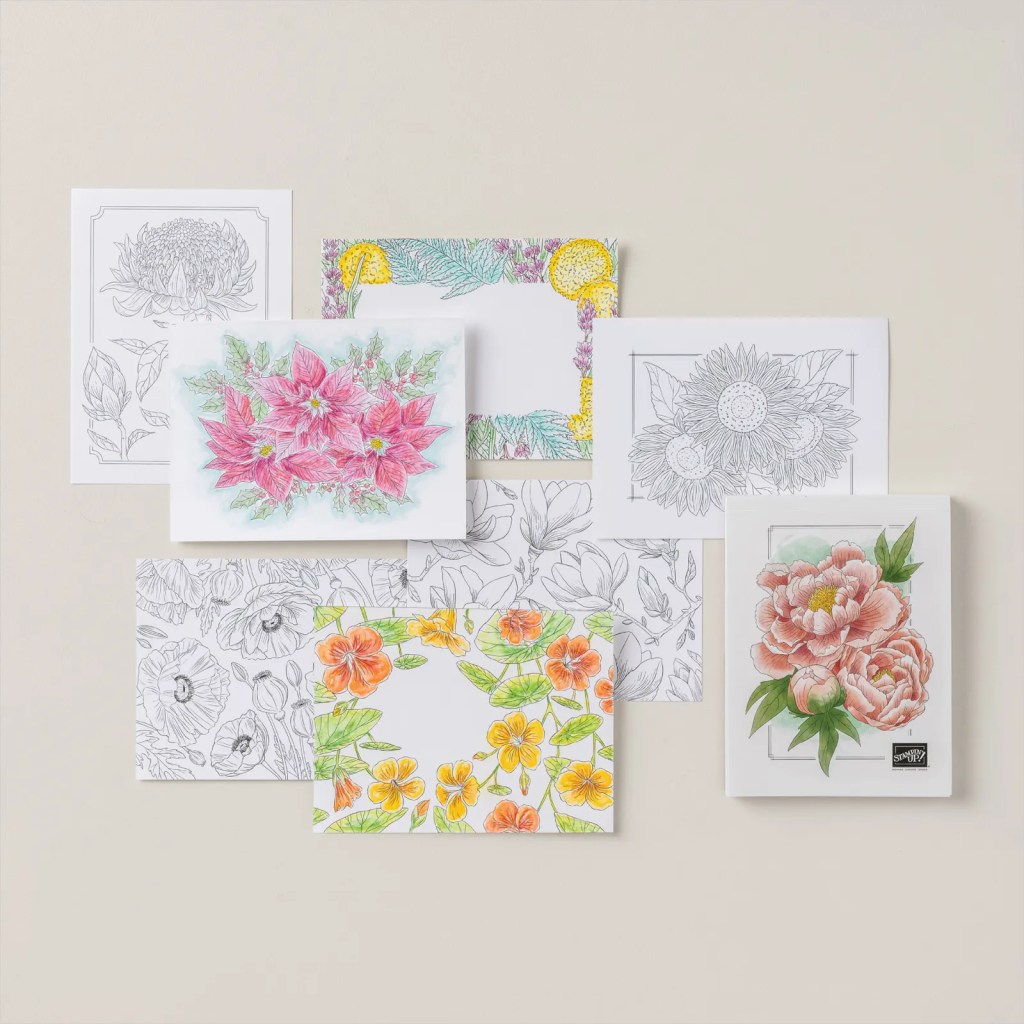
Embrace your creative side with the Nature’s Paintings Kit. This unique kit includes everything you need for a fun creative experience: a coloring book, watercolor pencils, and a water painter. All you need is some imagination and water! Create lovely, picturesque images using advanced coloring techniques with this craft kit. Or make something that’s never been seen before—like green flowers with purple leaves. Keep it realistic or color outside the lines—it’s up to you. And once you’re done, you can use your finished artwork to create a one-of-a-kind card front!
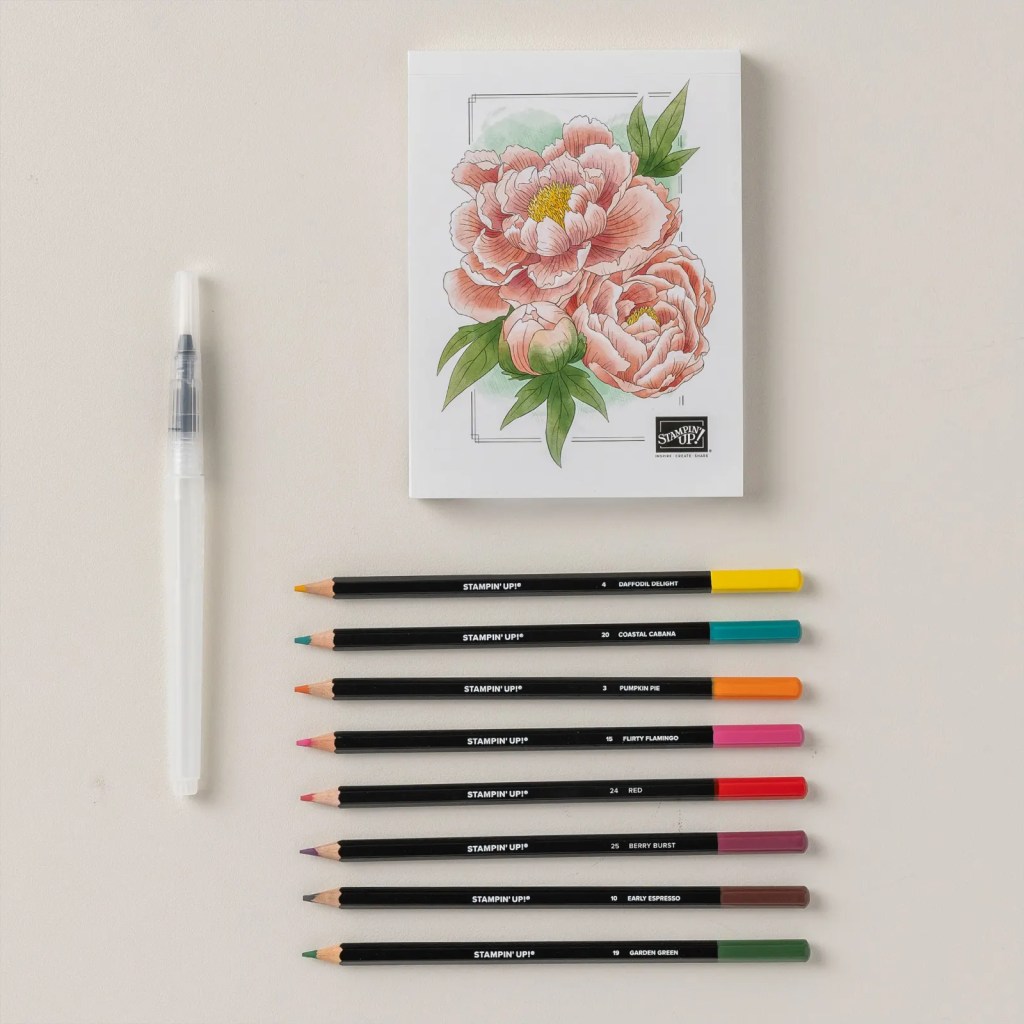
Kit includes:
* Predesigned projects
* Line art illustrations
* Step-by-step instructions
* 24 watercolor paper pages, 2 each of 12 designs
* 8 Watercolor Pencils
* 1 Water Painter
* Coloring Book: 4-1/2″ x 6″ x 1/2″ (11.4 x 15.2 x 1.3 cm)
* A 9-7/8″ x 6-1/2″ x 1-3/4″ (25.1 x 16.5 x 4.4 cm) printed designer box for storage or crafting on the go
Product colors: Berry Burst, Coastal Cabana, Daffodil Delight, Early Espresso, Flirty Flamingo, Garden Green, Pumpkin Pie, Red
164982 $25.00
+++++++++++++++++++++++++++++++++++++++++++++++++++++++++++++++++++++
Layered Landscapes Kit
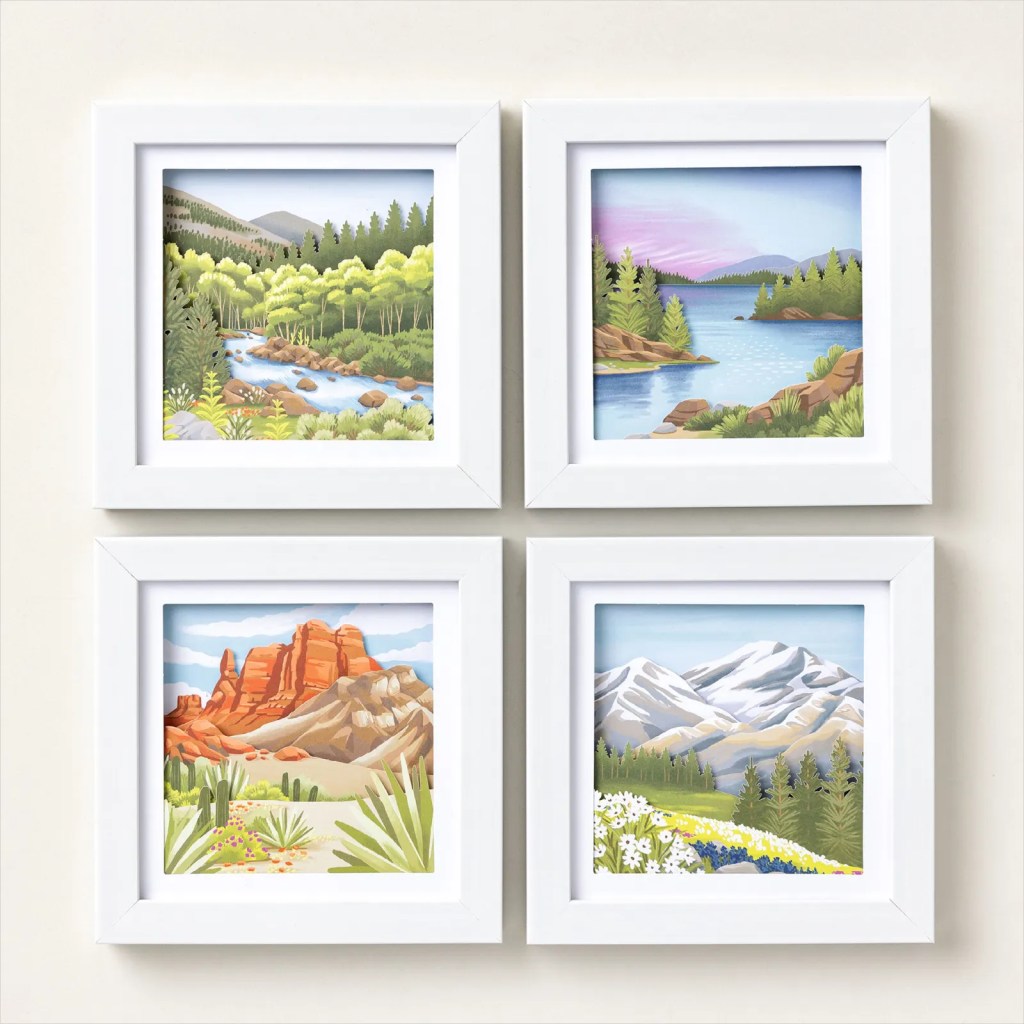
Do you long for the great outdoors but don’t actually want to go outdoors? Then the Layered Landscapes Kit is perfect for you! DIY lovely home decor with this unique kit that includes four 7-1/8″ x 7-1/8″ x 3/4″ (18.1 x 18.1 x 1.9 cm) frames and precut paper pieces. You can either stand the frames up on their included easels or hang them on your wall. Either way, your houseguests are sure to love your new artwork!
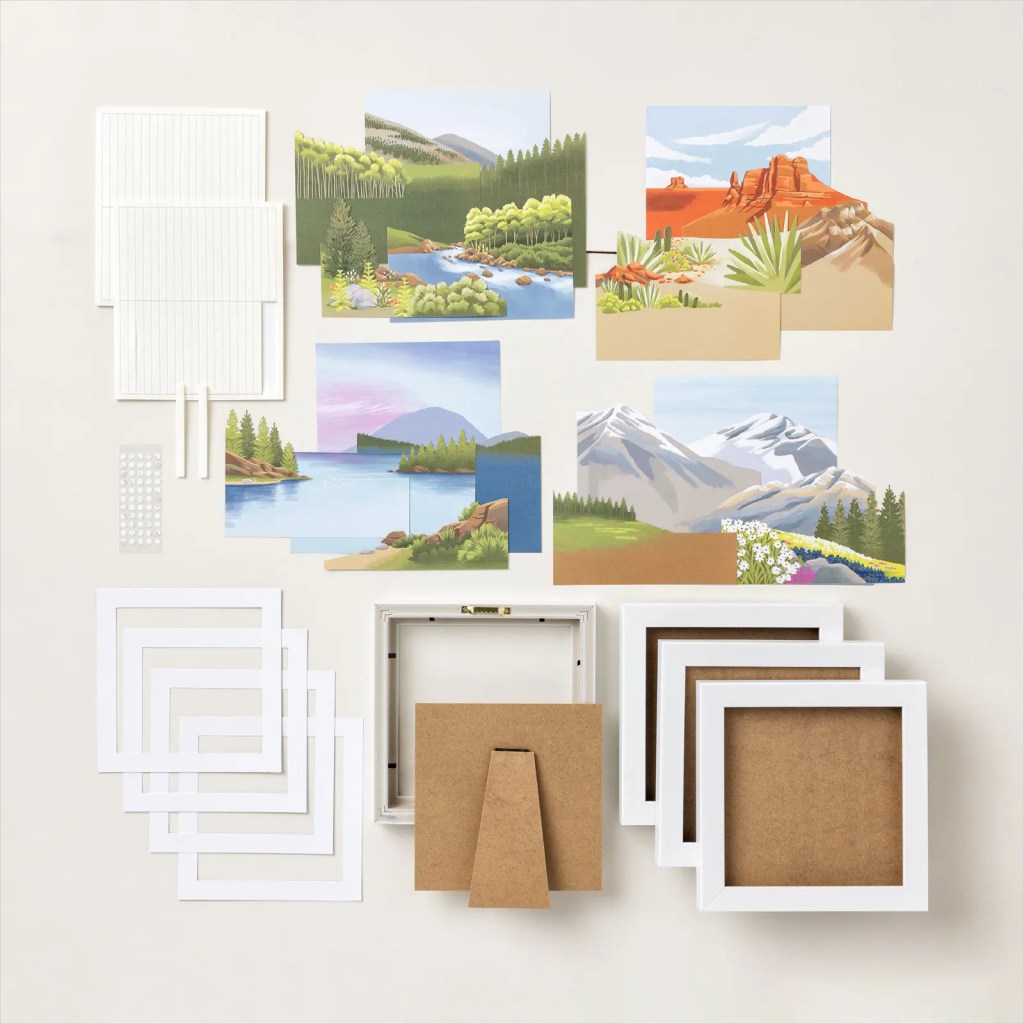
Kit includes:
* Predesigned projects
* Step-by-step instructions
* Precut pieces (No prep work! Get right to crafting)
* 4 white frames
* Frame size: 7-1/8″ x 7-1/8″ x 3/4″ (18.1 x 18.1 x 1.9 cm)
* Enough adhesive to complete projects
* A 9-7/8″ x 6-1/2″ x 2-3/4″ (25.1 x 16.5 x 7 cm) printed designer box for storage or crafting on the go
Product colors: Balmy Blue, Basic Beige, Basic Gray, Berry Burst, Cajun Craze, Crumb Cake, Early Espresso, Gray Granite, Lemon Lime Twist, Misty Moonlight, Mossy Meadow, Night of Navy, Old Olive, Pecan Pie, Soft Sea Foam
164981 $25
*********************************************************************************************************
New Online Exclusive Products Now Available

A new line of products for Online Exclusives are now available! You won’t find these items in any catalog. This is a great opportunity to spark creativity, expand a crafting collection, and discover new opportunities—all from the convenience of the online store.
*********************************************************************************************************
Notes From The Heart
Subscribe November 11 – December 10
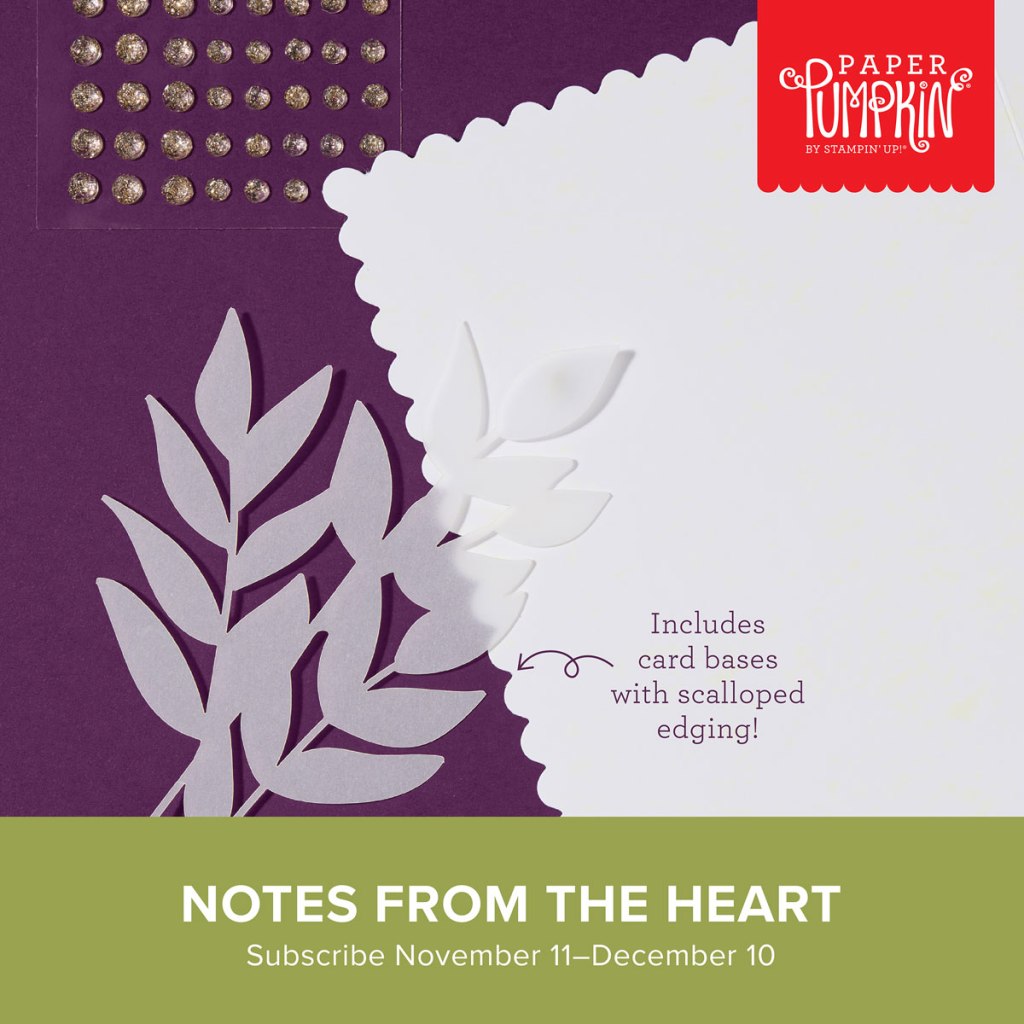
Create cards with hand-sketched botanical designs.
• Makes 9 projects: 3 each of 3 designs
• Precut vellum pieces and sparkling gems
• Scalloped card bases and coordinating envelopes
• Coordinating colors: Blackberry Bliss (Classic Stampin’ Spot), Flirty Flamingo,
Old Olive, Pecan Pie, Pretty in Pink, Very Vanilla
Subscribe to Paper Pumpkin for a monthly, all-inclusive crafting kit that’s a fun surprise! Each kit includes a photopolymer stamp set, Classic Stampin’ Spot, and step by step instructions to complete exclusive paper craft projects, including cards, tags, and gift
packaging. And don’t miss the special add-on that coordinates with the next three months!
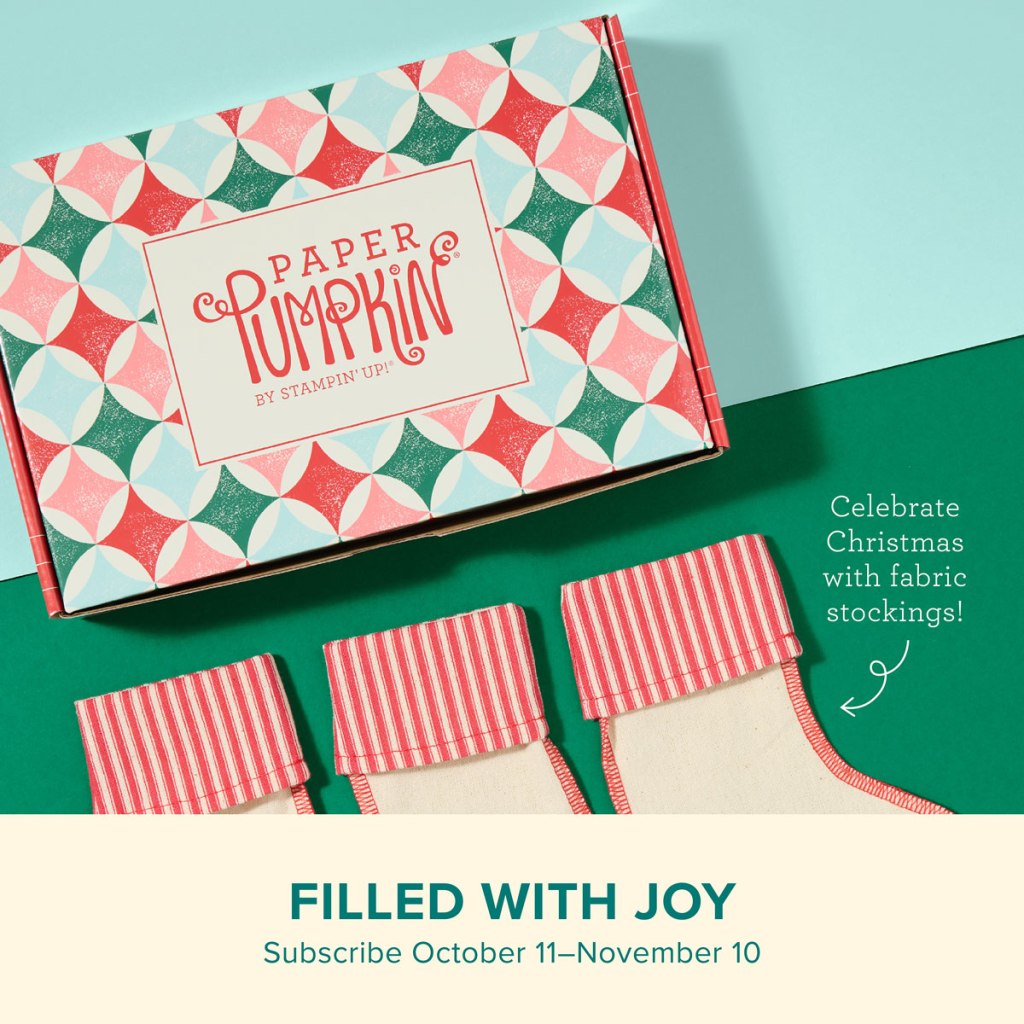
Subscribe to the December Paper Pumpkin Kit between 11 November and 10 December by clicking here!
*********************************************************************************************************
Don’t miss the coordinating
Merry Tags & More Dies Add-On!
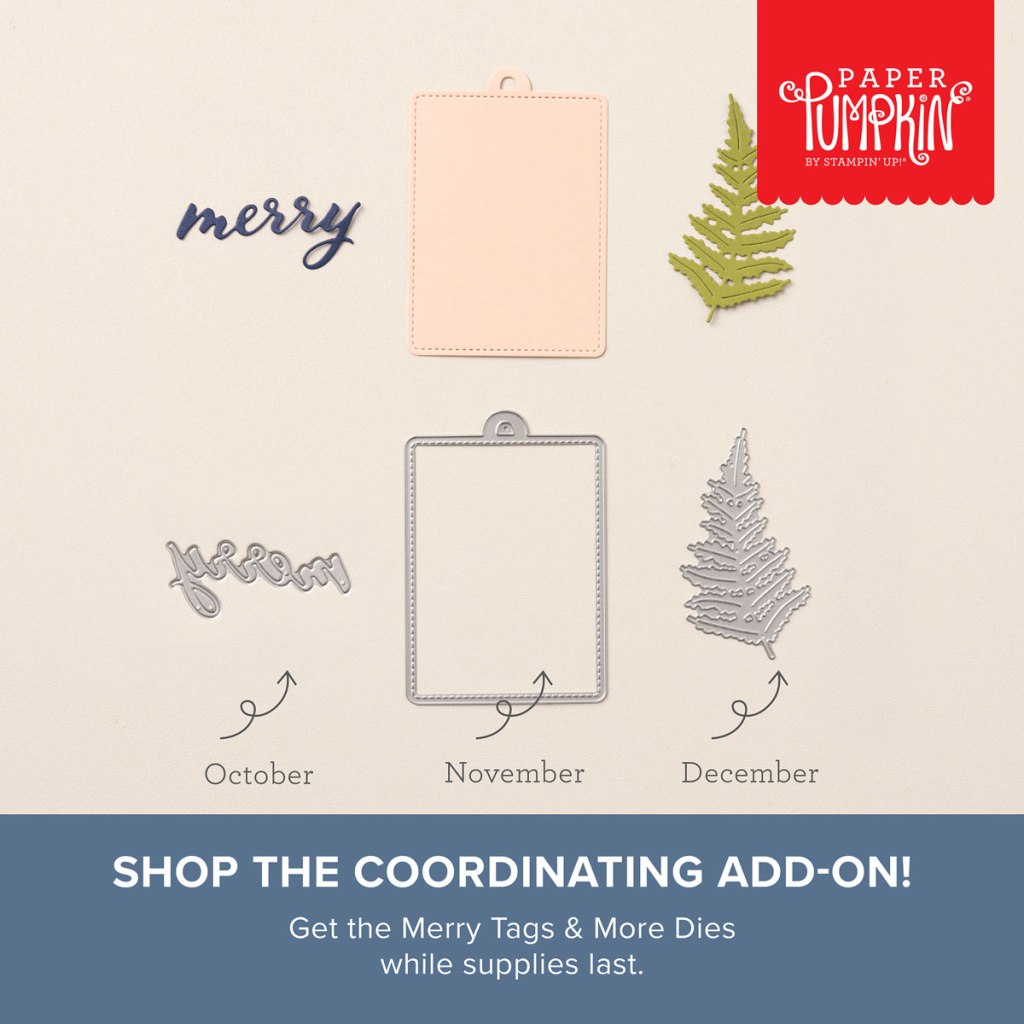
Add dimension and detail to your cards, scrapbook pages, and gift tags with the Merry Tags & More Dies! With a leaf and tag shape and Merry sentiment, these dies are a great way to expand your crafting experience. They even coordinate with three Paper Pumpkin Kits: Nests of Christmas, Filled with Joy, and Notes from the Heart. Such easy coordination makes these dies a must-have for any paper craft. Paper Pumpkin subscribers can purchase it beginning 11 September. The add-on is available only while supplies last, so it’s best to shop early! Please note that the Stampin’ Cut and Emboss Machine is not included and can be purchased separately.
#165639 $12
Note: Supplies may be limited toward the end of the subscription period.
*********************************************************************************************************
Card stock cuts for this project:
- Basic White Cardstock 3″ X 4″(artwork), 1/2″ X 2″(sentiment), 4″ X 5 1/4″(inner liner)
- Basic White Thick Cardstock 5 1/2″ X 8 1/2″ (card base scored & folded at 4 1/4)
- Pool Party Cardstock 4 1/8″ X 5 3/8″(inner liner mat)
- Nests of Winter Designer Series Paper 4″ X 5 1/2″(card front)
- Snowy Scenes Designer Series Paper 1 1/4″ X 5 1/2″(card front panel), 2 1/4″ X 6″(envelope)
*********************************************************************************************************
Product List
")


 Designer Series Paper")
 Designer Series Paper & Sticker Sheet (English)")


 Pompom Ribbon")


")
")


 Designer Series Paper")


")


 Textured Ribbon")


")
")


")
")


 Designer Series Paper")


")
")
")
 Mix & Match Specialty Designer Series Paper")


")


 Glittered Ribbon")


")
")


 Designer Series Paper")


")
")


")


")
")


