
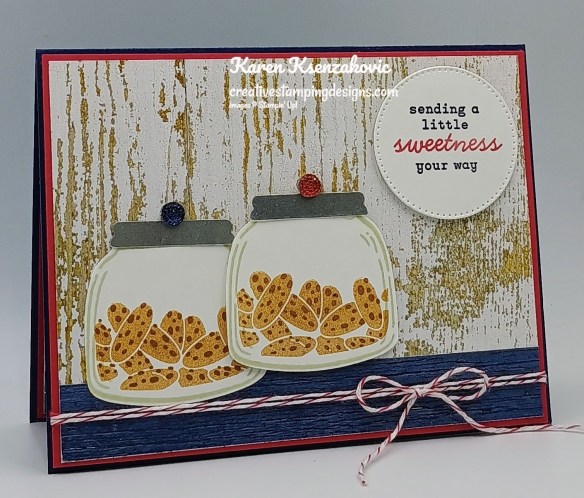
Good Friday afternoon stamping friends and welcome to my fun fold Friday. I hope you all had a wonderful week and are looking forward to the weekend.
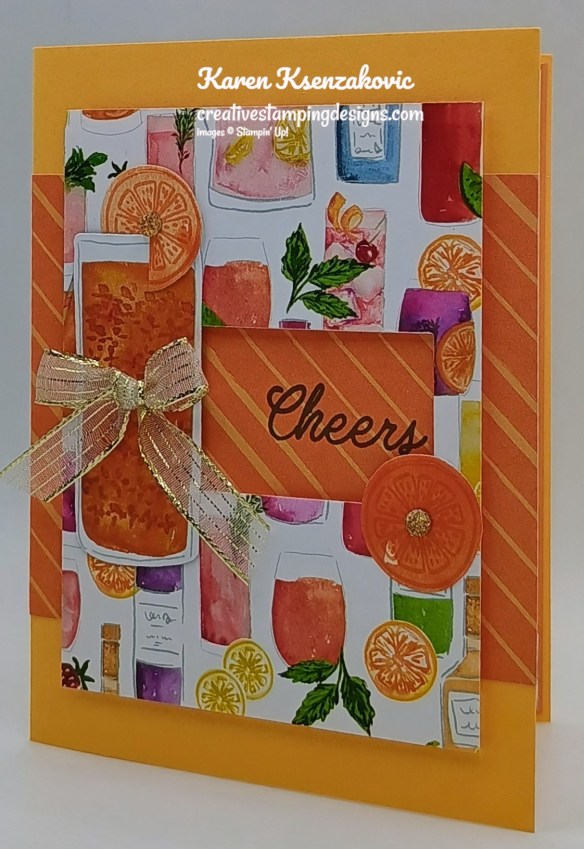
Today’s card is a card we made at our quarterly team meeting Sunday. This card was designed by one of my awesome team members Carmelita Austin and she loves making fun fold cards. I did change things up a little with my card, which I always like to do. Here’s my card for today.
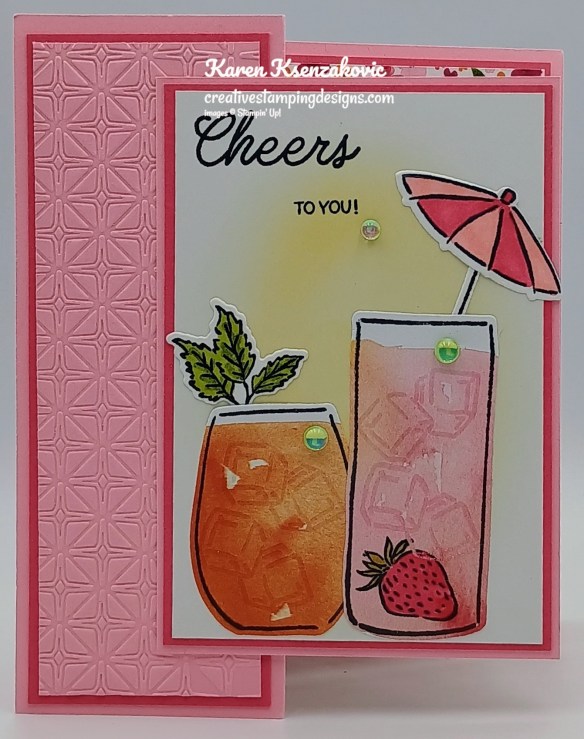
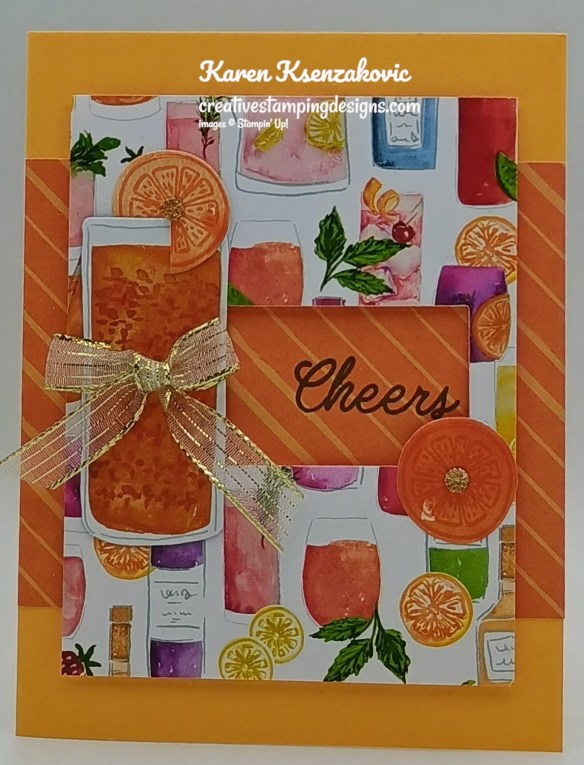
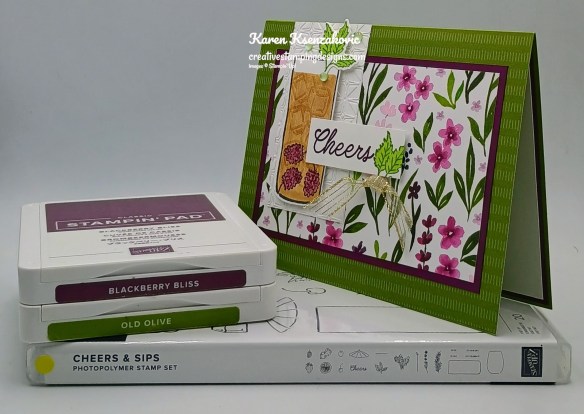
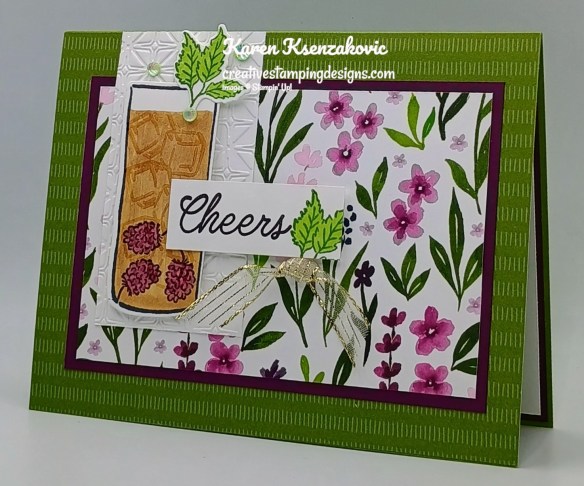
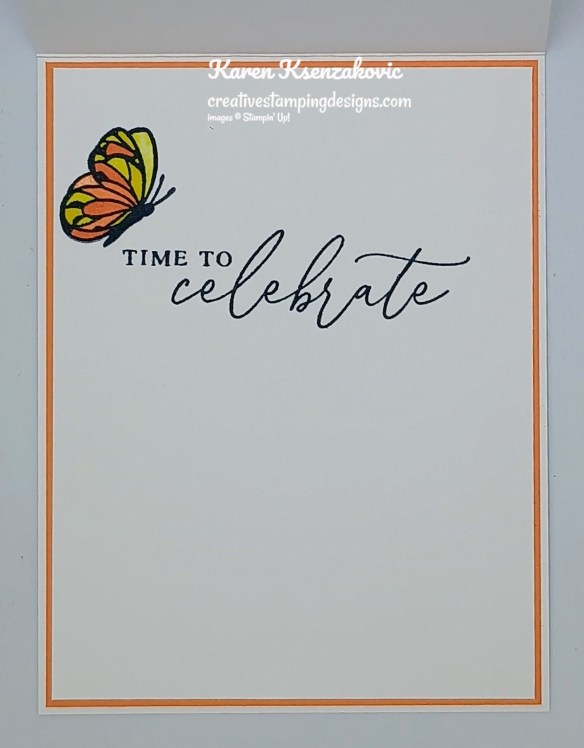
I used the Stampin’ Up! Cheers & Sips Bundle along with the Glass & Garden Embossing Folder, Celebratory Sips Designer Series Paper and Beautiful Butterflies Photopolymer Stamp Set for my card today.

Emboss the panel of Pretty in Pink with the Glass & Garden EF. Adhere the embossed panel to a Strawberry Slush mat with Liquid Glue. Adhere the layered panel to the front of the Pretty in Pink card base with Liquid Glue.

On a Basic White panel use the Blending Brush to add a little Peach Pie Ink. Stamp the sentiment from the Stampin’ Up! Cheers & Sips Photopolymer Stamp Set in Tuxedo Black Ink. From a block panel of Celebratory Sips DSP, stamp the 2 glass images from Cheers & Sips stamp set. Cut the images out with the Cheers & Sips Dies. On a panel of Basic White stamp the umbrella, umbrella stick & mint images from the Cheers & Sips stamp set in Tuxedo Black Ink. Color the images with Old Olive, Pretty in Pink and Strawberry Slush Stampin’ Blends Markers. Cut the images out with the Cheers & Sips Dies. Stamp the strawberry image in the tall glass die cut in Tuxedo Black Ink and color it with Old Olive and Strawberry Slush Stampin’ Blends Markers. Stamp the ice cube image from the Cheers & Sips stamp set in Versamark Ink inside the 2 die cut glass images. Sprinkle them with Clear Embossing Powder and set them with the Heat Tool. Adhere the mint to the back of the small glass with a Glue Dot. Adhere the umbrella to the umbrella stick then to the back of the tall glass with Glue Dots. Adhere the glasses to the Basic White panel with Liquid Glue. Adhere the Basic White panel to a Strawberry Slush mat and a Pretty in Pink mat with Stampin’ Seal. Adhere the layered panel to the embossed panel with Liquid Glue. Add a few Holographic Resin Dots to the card front.

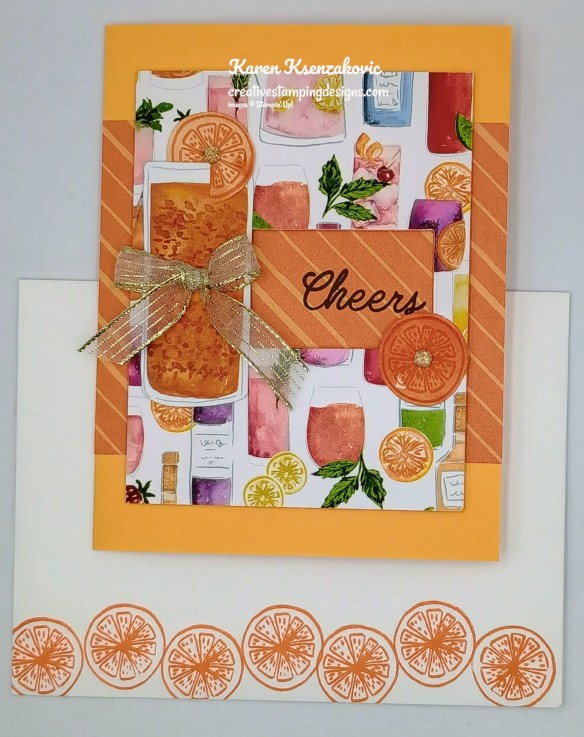
Adhere the panels of Celebratory Sips DSP to the coordinating Strawberry Slush mats with Stampin’ Seal. Adhere the narrow-layered panel to the inside left of the Pretty in Pink card base with Liquid Glue. Adhere the larger layered panel to the inside right of the Pretty in Pink card base with Liquid Glue.

Adhere the last layered panel to the Pretty in Pink mat with Stampin’ Seal. Fold the 1″ x 5″ pop up mechanism on the score lines and adhere the 2 ends together to make a cube. Adhere the Pretty in Pink pop up mechanism to the center of the inside card with Tear & Tape (only on 2 sides). Adhere the layered panel to the pop-up mechanism.

Here is the view from the top of how it will look.
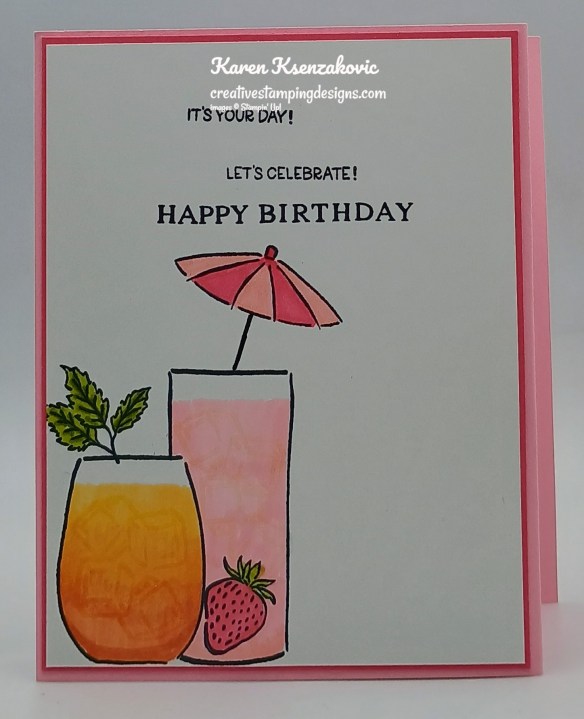
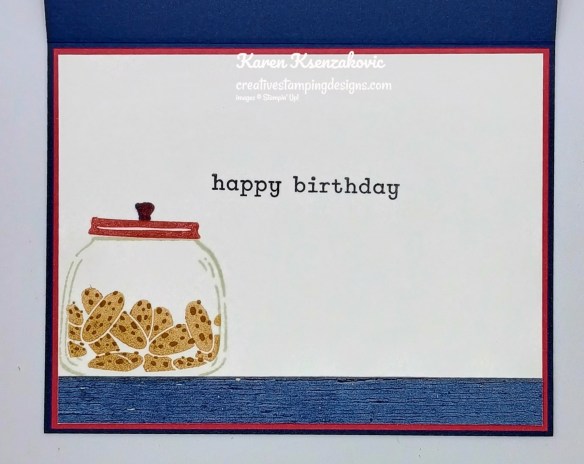
On a panel of Basic White, stamp the sentiments from Cheers & Sups stamp set in Tuxedo Black Ink. Stamp the sentiment from Beautiful Butterflies stamp set in Tuxedo Black Ink below the other 2 sentiments. Stamp the glasses, strawberry, mint and umbrella images from Cheers & Sips stamp set in Tuxedo Black Ink on the bottom of the panel. Color the images with Old Olive, Peach Pie, Pretty in Pink, Strawberry Slush and Timid Tiger Stampin’ Blends Markers. Adhere the Basic White panel to a Strawberry Slush mat then to the back of the Pretty in Pink card base.

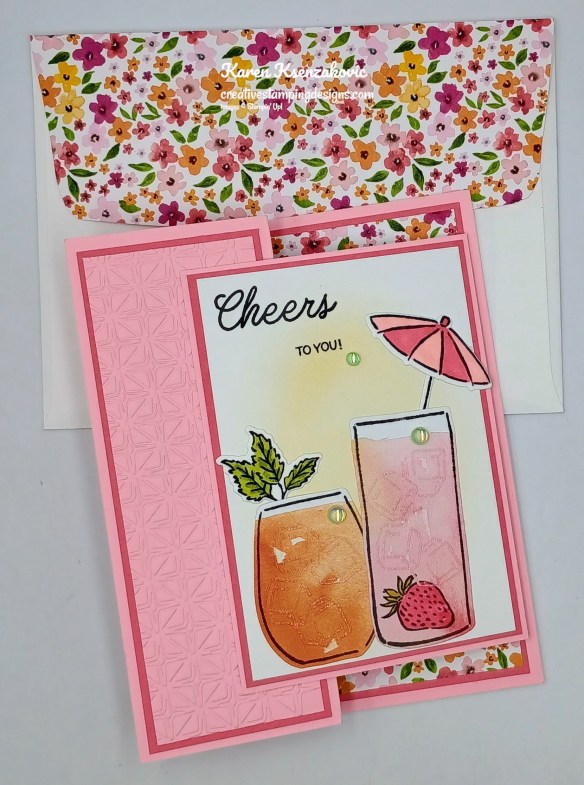
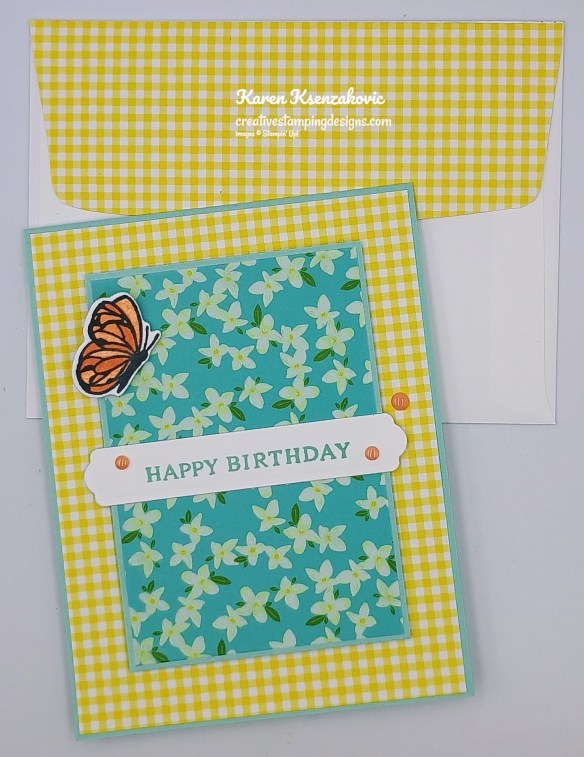
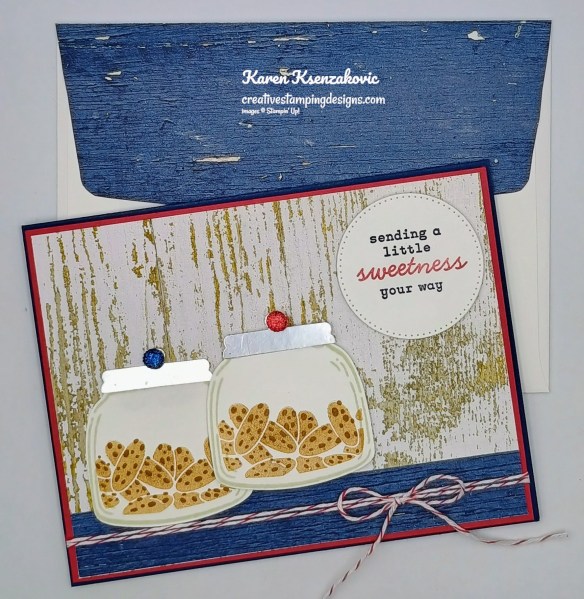
Decorate a Basic White Medium Envelope to finish your card. Stamp the glass, strawberry, umbrella and mint images from the Cheers & Sips stamp set in Tuxedo Black Ink on the envelope front. Color the images with Old Olive, Pretty in Pink, Strawberry Slush and Timid Tiger Stampin’ Blends Markers. Stamp the ice cube image from the Cheers & Sips stamp set in Versamark Ink inside the glasses, sprinkle them with Clear Embossing Powder and set them with the Heat Tool. Adhere a panel of Celebratory Sips DSP to the envelope flap.
Thank you for stopping by my blog today. I hope you like the card and will give it a try. Happy Stamping!!
*********************************************************************************************************
If you need any stamping supplies, I’d love to be your Demonstrator. Just click HERE to go directly to my online store or drop me an email if you have any questions.
*********************************************************************************************************
LAST DAY to Get a Free Stampin’ Blends Combo Pack from me with any order of $50+
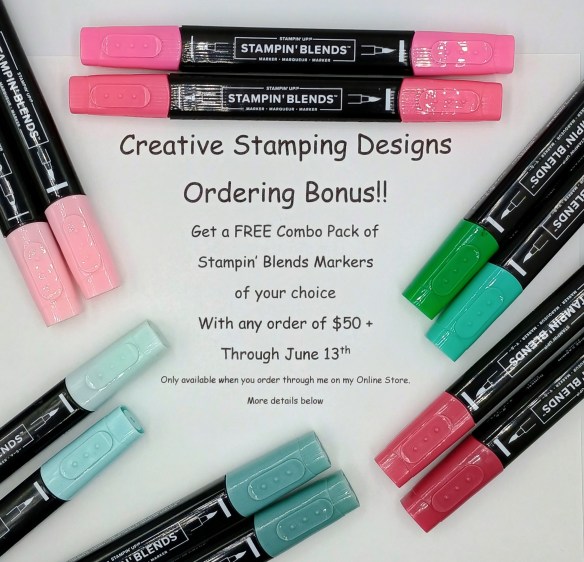
To kick this amazing Suite Sale off, I’m offering a little bonus to help you with coloring all those pretty stamped images. With any order of 50+ (before tax & shipping and after Stampin’ Rewards) placed through my Online Store between June 3 – Friday June 13th, you’ll get your choice of a FREE Combo Pack of Stampin’ Blends Markers. Once you have placed your order, I will send you an email asking which color combo pack you would like. You must send me your selection by June 14th or I will pick a color pack for you. I’ll be placing my order for the blends on June 14th.
All Suite & Bundle Sale June 3rd – 30th
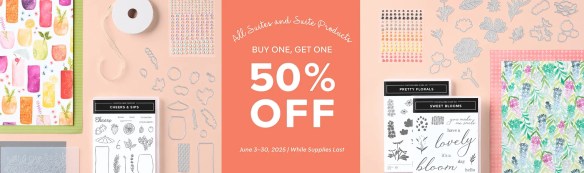
June 3-30, all available suites and suite products from the 2025–2026 Annual Catalog and Online Exclusives are buy one, get one 50% off! If you’ve had your eye on a new suite from the annual catalog or you really like the look of a stamp set from an Online Exclusives suite, you don’t have to choose—you can get both!
Here are the promotion details:
- All available suites and suite products from the 2025–2026 Annual Catalog and Online Exclusives are buy one, get one 50% off.
- When you shop the sale, the 50% off discount will apply to the lower-priced item (for example, if you buy a suite collection and a stamp set from a suite, the suite would be full price, and the stamp set would be 50% off).
- Suite collections are available if all items are in stock; if all items are not in stock, you can still shop the available suite products.
- You don’t have to buy a suite and suite products all from the same suite collection for the discount to apply. You can buy any suite products from any suite.
- The discount will appear in your cart once you’ve added two items within the sale parameters to your cart.
- Products are available only while supplies last.
- See and shop all qualifying suites in the Online Store
- The sale begins June 3, 2025 at 12:01 AM MT.
- The sale ends June 30, 2025 at 11:59 PM MT.
Let me know if you have any questions. YAY for an awesome sale! Get your lists ready and get your orders placed between June 3-30!!
*********************************************************************************************************
Karen & Tara’s Cheers & Sips Online Zoom Class Registration Ends Saturday
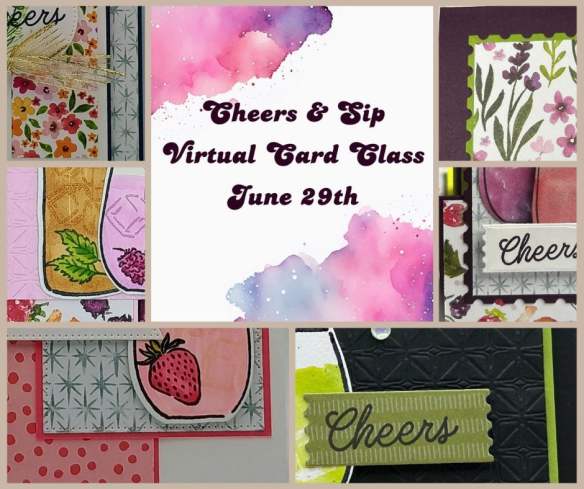
Tara Carpenter and I are teaming up to offer a fun online class using Stampin’ Up! Online Exclusive Cheers & Sips Bundle. We will be creating 6 different cards during the class including 2 fun folds.
The class fee includes:
- Stampin’ Up! Holographic Resin Dots (full pack)
- Stampin’ Up! Gold Striped Mesh Ribbon (full pack)
- Pre-cut card kits to complete each card
- Zoom class with complete instructions to complete each card
- PDF with detailed directions
During sign up you will have the option to add additional items to your order that you can take advantage of at no additional shipping cost. These items are optional, however if you want to recreate the cards you will need them.
The class will be held Sunday June 29th from 1 to 5 pm Eastern Time via Zoom. This allows anyone in the United States to participate live! Can’t join us live… no worries, we will record the session so it can be replayed at any time.
We will email written directions that will include directions, cardstock cuts as well as photos to help you create each card.
We are not including the bundle in the price of the class. You can purchase the bundle through me at an additional 10% discount of the Online Exclusive price (see below).
Class Cost $35 + $9 (Priority Shipping)
Additional purchased items will be included in the above shipping price. We will invoice you through PayPal by June 15tth to insure we can get the products delivered, packaged up and out to you with enough time.
Deadline: Saturday June 14th (this is so we have time to order all the bundles, embellishments and DSP being used)
Click Here to register for the class now!! Let me know if you have any questions.
*********************************************************************************************************
Sweeter With You
Subscribe June 11 – July 10
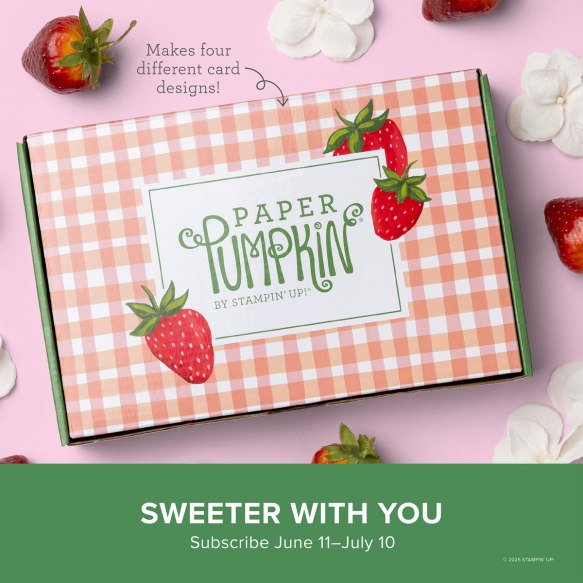
Craft sweet handmade cards featuring sun-kissed strawberries and breezy gingham.
• Makes 8 cards: 2 each of 4 designs with 8 coordinating envelopes
• Precut paper pieces and vellum accents
• Hand-painted card base designs
• Coordinating colors: Garden Green (Classic Stampin’ Spot), Granny Apple Green,
Pool Party, Poppy Parade, Strawberry Slush, Timid Tiger
Subscribe to the June Paper Pumpkin Kit between 11 June and 10 July by clicking here!
*********************************************************************************************************
Don’t miss the coordinating
Circle of Seasons Dies Add-On!

Make the most of your Paper Pumpkin kits with the Circle of Seasons Dies add-on! Quickly and cleanly cut out a strawberry with a blossom, a circle, a leaf, or an acorn to elevate your crafting projects. These additional dies are designed to work with THREE Paper Pumpkin Kits: the Sweeter with You Paper Pumpkin Kit, the Farmhouse Florals Paper Pumpkin Kit, and the Fall for Toile Paper Pumpkin Kit. Pair these dies with other Stampin’ Up! products for even more creative options! This exclusive add-on (item 167277) coordinates with the three upcoming kits! Paper Pumpkin subscribers can purchase it beginning June 11. Add-on is available only while supplies last, so it’s best to shop early!
DETAILS
– 4 dies
– Largest die: 2-1/2″ x 1-1/4″ (6.4 x 3.2 cm)
– Use with a Stampin’ Cut & Emboss Machine (sold separately)
You must be a current Paper Pumpkin subscriber to purchase this item. To become a subscriber, visit www.stampinup.com/paperpumpkin.
Note: Supplies may be limited toward the end of the subscription period.
#167277 $12
*********************************************************************************************************
Card stock cuts for this project:
- Basic White Cardstock 2 7/8″ x 4 1/4″(front panel), scraps for umbrella and mint, 4″ x 5 1/4″ (back panel)
- Pretty in Pink Cardstock 5 1/2″ x 8 1/2″(card base scored & folded at 2 1/8″ & 4 1/4″), 1 3/4″ x 5 1/8″(embossed panel), 3 1/8″ x 4 1/2″(front panel mat), 3 1/8″ x 4″(pop up panel mat), 1″ x 5″(pop up mechanism scored & folded at 1″, 2″, 3″ & 4″)
- Strawberry Slush Cardstock 2 – 1 7/8″ x 5 1/4″(embossed panel mat & inside panel mat), 3″ x 4 3/8″(front panel mat), 3″ X 3 7/8″(pop up panel mat), 4″ x 5 1/4″(inside panel mat), 4 1/8″ x 5 3/8″(back panel mat)
- Celebratory Sips Designer Series Paper 1 3/4″ x 5 1/8″(inside left panel), 2 7/8″ x 3 3/4″(pop up panel), 3 7/8″ x 5 1/8″(inside panel, 2 1/4″ x 6″(envelope flap), blocks panel for glasses
*********************************************************************************************************
Product List
![Cheers & Sips Bundle (English) [ 165594 ]](https://assets1.tamsnetwork.com/images/EC042017NF/165594s.jpg "Cheers & Sips Bundle (English) [ 165594 ]")
![Cheers & Sips Photopolymer Stamp Set (English) [ 165588 ]](https://assets1.tamsnetwork.com/images/EC042017NF/165588s.jpg "Cheers & Sips Photopolymer Stamp Set (English) [ 165588 ]")
![Cheers & Sips Dies [ 165593 ]](https://assets1.tamsnetwork.com/images/EC042017NF/165593s.jpg "Cheers & Sips Dies [ 165593 ]")
![Beautiful Butterflies Photopolymer Stamp Set (English) [ 164608 ]](https://assets1.tamsnetwork.com/images/EC042017NF/164608s.jpg "Beautiful Butterflies Photopolymer Stamp Set (English) [ 164608 ]")
![Basic White 8 1/2" X 11" Cardstock [ 166780 ]](https://assets1.tamsnetwork.com/images/EC042017NF/166780s.jpg "Basic White 8 1/2\" X 11\" Cardstock [ 166780 ]")
![Pretty In Pink 8 1/2" X 11" Cardstock [ 163793 ]](https://assets1.tamsnetwork.com/images/EC042017NF/163793s.jpg "Pretty In Pink 8 1/2\" X 11\" Cardstock [ 163793 ]")
![Strawberry Slush 8 1/2" X 11" Cardstock [ 165625 ]](https://assets1.tamsnetwork.com/images/EC042017NF/165625s.jpg "Strawberry Slush 8 1/2\" X 11\" Cardstock [ 165625 ]")
![Celebratory Sips 12" X 12" (30.5 X 30.5 Cm) Designer Series Paper [ 165586 ]](https://assets1.tamsnetwork.com/images/EC042017NF/165586s.jpg "Celebratory Sips 12\" X 12\" (30.5 X 30.5 Cm) Designer Series Paper [ 165586 ]")
![Peach Pie Classic Stampin Pad [ 163810 ]](https://assets1.tamsnetwork.com/images/EC042017NF/163810s.jpg "Peach Pie Classic Stampin Pad [ 163810 ]")
![Blending Brushes [ 153611 ]](https://assets1.tamsnetwork.com/images/EC042017NF/153611s.jpg "Blending Brushes [ 153611 ]")
![Tuxedo Black Memento Ink Pad [ 132708 ]](https://assets1.tamsnetwork.com/images/EC042017NF/132708s.jpg "Tuxedo Black Memento Ink Pad [ 132708 ]")
![Versamark Pad [ 102283 ]](https://assets1.tamsnetwork.com/images/EC042017NF/102283s.jpg "Versamark Pad [ 102283 ]")
![Basics Wow! Embossing Powder [ 165679 ]](https://assets1.tamsnetwork.com/images/EC042017NF/165679s.jpg "Basics Wow! Embossing Powder [ 165679 ]")
![Heat Tool (Us And Canada) [ 129053 ]](https://assets1.tamsnetwork.com/images/EC042017NF/129053s.jpg "Heat Tool (Us And Canada) [ 129053 ]")
![Old Olive Stampin' Blends Combo Pack [ 154892 ]](https://assets1.tamsnetwork.com/images/EC042017NF/154892s.jpg "Old Olive Stampin' Blends Combo Pack [ 154892 ]")
![Peach Pie Stampin’ Blends Combo Pack [ 163827 ]](https://assets1.tamsnetwork.com/images/EC042017NF/163827s.jpg "Peach Pie Stampin’ Blends Combo Pack [ 163827 ]")
![Pretty In Pink Stampin’ Blends Combo Pack [ 163824 ]](https://assets1.tamsnetwork.com/images/EC042017NF/163824s.jpg "Pretty In Pink Stampin’ Blends Combo Pack [ 163824 ]")
![Strawberry Slush Stampin’ Blends Combo Pack [ 165290 ]](https://assets1.tamsnetwork.com/images/EC042017NF/165290s.jpg "Strawberry Slush Stampin’ Blends Combo Pack [ 165290 ]")
![Timid Tiger Stampin’ Blends Combo Pack [ 165291 ]](https://assets1.tamsnetwork.com/images/EC042017NF/165291s.jpg "Timid Tiger Stampin’ Blends Combo Pack [ 165291 ]")
![Glass & Gardens Embossing Folders [ 165597 ]](https://assets1.tamsnetwork.com/images/EC042017NF/165597s.jpg "Glass & Gardens Embossing Folders [ 165597 ]")
![Holographic Resin Dots [ 165598 ]](https://assets1.tamsnetwork.com/images/EC042017NF/165598s.jpg "Holographic Resin Dots [ 165598 ]")
![Basic White Medium Envelopes [ 159236 ]](https://assets1.tamsnetwork.com/images/EC042017NF/159236s.jpg "Basic White Medium Envelopes [ 159236 ]")


![Take Your Pick [ 144107 ]](https://assets1.tamsnetwork.com/images/EC042017NF/144107s.jpg "Take Your Pick [ 144107 ]")


![Peach Pie 8 1/2" X 11" Cardstock [ 163799 ]](https://assets1.tamsnetwork.com/images/EC042017NF/163799s.jpg "Peach Pie 8 1/2\" X 11\" Cardstock [ 163799 ]")
![Timid Tiger 8 1/2" X 11" Cardstock [ 165626 ]](https://assets1.tamsnetwork.com/images/EC042017NF/165626s.jpg "Timid Tiger 8 1/2\" X 11\" Cardstock [ 165626 ]")
![Timid Tiger Classic Stampin' Pad [ 165278 ]](https://assets1.tamsnetwork.com/images/EC042017NF/165278s.jpg "Timid Tiger Classic Stampin' Pad [ 165278 ]")
![Textured Notes Dies [ 165555 ]](https://assets1.tamsnetwork.com/images/EC042017NF/165555s.jpg "Textured Notes Dies [ 165555 ]")
![Gold Striped 3/8" (1 Cm) Mesh Ribbon [ 165599 ]](https://assets1.tamsnetwork.com/images/EC042017NF/165599s.jpg "Gold Striped 3/8\" (1 Cm) Mesh Ribbon [ 165599 ]")
![Drusy Adhesive Backed Embellishments [ 164223 ]](https://assets1.tamsnetwork.com/images/EC042017NF/164223s.jpg "Drusy Adhesive Backed Embellishments [ 164223 ]")


![Blackberry Bliss 8-1/2" X 11" Cardstock [ 133675 ]](https://assets1.tamsnetwork.com/images/EC042017NF/133675s.jpg "Blackberry Bliss 8-1/2\" X 11\" Cardstock [ 133675 ]")
![Old Olive 8-1/2" X 11" Cardstock [ 100702 ]](https://assets1.tamsnetwork.com/images/EC042017NF/100702s.jpg "Old Olive 8-1/2\" X 11\" Cardstock [ 100702 ]")
![Blackberry Bliss Classic Stampin' Pad [ 147092 ]](https://assets1.tamsnetwork.com/images/EC042017NF/147092s.jpg "Blackberry Bliss Classic Stampin' Pad [ 147092 ]")
![Old Olive Classic Stampin' Pad [ 147090 ]](https://assets1.tamsnetwork.com/images/EC042017NF/147090s.jpg "Old Olive Classic Stampin' Pad [ 147090 ]")
![Blackberry Bliss Stampin' Blends Combo Pack [ 154877 ]](https://assets1.tamsnetwork.com/images/EC042017NF/154877s.jpg "Blackberry Bliss Stampin' Blends Combo Pack [ 154877 ]")
![Stampin’ Blends Medium Combo [ 159462 ]](https://assets1.tamsnetwork.com/images/EC042017NF/159462s.jpg "Stampin’ Blends Medium Combo [ 159462 ]")


![Along These Lines Photopolymer Stamp Set [ 165352 ]](https://assets1.tamsnetwork.com/images/EC042017NF/165352s.jpg "Along These Lines Photopolymer Stamp Set [ 165352 ]")
![Blooming Phrases Photopolymer Stamp Set (English) [ 165523 ]](https://assets1.tamsnetwork.com/images/EC042017NF/165523s.jpg "Blooming Phrases Photopolymer Stamp Set (English) [ 165523 ]")
![Unbounded Love Photopolymer Stamp Set (English) [ 163378 ]](https://assets1.tamsnetwork.com/images/EC042017NF/163378s.jpg "Unbounded Love Photopolymer Stamp Set (English) [ 163378 ]")
![Pool Party 8-1/2" X 11" Cardstock [ 122924 ]](https://assets1.tamsnetwork.com/images/EC042017NF/122924s.jpg "Pool Party 8-1/2\" X 11\" Cardstock [ 122924 ]")
![Wildflower Birthday 12" X 12" (30.5 X 30.5 Cm) Specialty Designer Series Paper [ 164591 ]](https://assets1.tamsnetwork.com/images/EC042017NF/164591s.jpg "Wildflower Birthday 12\" X 12\" (30.5 X 30.5 Cm) Specialty Designer Series Paper [ 164591 ]")
![Pastel Ombre Glimmer 12" X 12" (30.5 X 30.5 Cm) Specialty Paper [ 164851 ]](https://assets1.tamsnetwork.com/images/EC042017NF/164851s.jpg "Pastel Ombre Glimmer 12\" X 12\" (30.5 X 30.5 Cm) Specialty Paper [ 164851 ]")
![Daffodil Delight Stampin' Blends Combo Pack [ 154883 ]](https://assets1.tamsnetwork.com/images/EC042017NF/154883s.jpg "Daffodil Delight Stampin' Blends Combo Pack [ 154883 ]")
![Pool Party Stampin' Blends Combo Pack [ 154894 ]](https://assets1.tamsnetwork.com/images/EC042017NF/154894s.jpg "Pool Party Stampin' Blends Combo Pack [ 154894 ]")
![Party Dots [ 164602 ]](https://assets1.tamsnetwork.com/images/EC042017NF/164602s.jpg "Party Dots [ 164602 ]")


![Gallery Blooms Photopolymer Stamp Set [ 165211 ]](https://assets1.tamsnetwork.com/images/EC042017NF/165211s.jpg "Gallery Blooms Photopolymer Stamp Set [ 165211 ]")
![The Right Words Cling Stamp Set (English) [ 165316 ]](https://assets1.tamsnetwork.com/images/EC042017NF/165316s.jpg "The Right Words Cling Stamp Set (English) [ 165316 ]")
![Petal Pink 8-1/2" X 11" Cardstock [ 146985 ]](https://assets1.tamsnetwork.com/images/EC042017NF/146985s.jpg "Petal Pink 8-1/2\" X 11\" Cardstock [ 146985 ]")
![Irresistible Designs 12" X 12" (30.5 X 30.5 Cm) Specialty Designer Series Paper [ 165305 ]](https://assets1.tamsnetwork.com/images/EC042017NF/165305s.jpg "Irresistible Designs 12\" X 12\" (30.5 X 30.5 Cm) Specialty Designer Series Paper [ 165305 ]")
![Pool Party Classic Stampin' Pad [ 147107 ]](https://assets1.tamsnetwork.com/images/EC042017NF/147107s.jpg "Pool Party Classic Stampin' Pad [ 147107 ]")
![Subtles Stampin' Write Markers [ 161698 ]](https://assets1.tamsnetwork.com/images/EC042017NF/161698s.jpg "Subtles Stampin' Write Markers [ 161698 ]")
![Stylish Shapes Dies [ 159183 ]](https://assets1.tamsnetwork.com/images/EC042017NF/159183s.jpg "Stylish Shapes Dies [ 159183 ]")
![Antique Pearls [ 164679 ]](https://assets1.tamsnetwork.com/images/EC042017NF/164679s.jpg "Antique Pearls [ 164679 ]")


![Beautiful Butterflies Hybrid Embossing Folder [ 164614 ]](https://assets1.tamsnetwork.com/images/EC042017NF/164614s.jpg "Beautiful Butterflies Hybrid Embossing Folder [ 164614 ]")
![Basic White 8 1/2" X 11" Thick Cardstock [ 159229 ]](https://assets1.tamsnetwork.com/images/EC042017NF/159229s.jpg "Basic White 8 1/2\" X 11\" Thick Cardstock [ 159229 ]")
![Darling Duckling Stampin’ Blends Combo Pack [ 165288 ]](https://assets1.tamsnetwork.com/images/EC042017NF/165288s.jpg "Darling Duckling Stampin’ Blends Combo Pack [ 165288 ]")
![Clear Wink Of Stella Glitter Brush [ 141897 ]](https://assets1.tamsnetwork.com/images/EC042017NF/141897s.jpg "Clear Wink Of Stella Glitter Brush [ 141897 ]")
![Timid Tiger 3/8" (1 Cm) Faux Linen Ribbon [ 165275 ]](https://assets1.tamsnetwork.com/images/EC042017NF/165275s.jpg "Timid Tiger 3/8\" (1 Cm) Faux Linen Ribbon [ 165275 ]")
![2025–2027 In Color™ Flat Pearls [ 165192 ]](https://assets1.tamsnetwork.com/images/EC042017NF/165192s.jpg "2025–2027 In Color™ Flat Pearls [ 165192 ]")


![Daffodil Delight 8-1/2" X 11" Cardstock [ 119683 ]](https://assets1.tamsnetwork.com/images/EC042017NF/119683s.jpg "Daffodil Delight 8-1/2\" X 11\" Cardstock [ 119683 ]")
![Floral Delight 12" X 12" (30.5 X 30.5 Cm) Designer Series Paper [ 164700 ]](https://assets1.tamsnetwork.com/images/EC042017NF/164700s.jpg "Floral Delight 12\" X 12\" (30.5 X 30.5 Cm) Designer Series Paper [ 164700 ]")
![Floral & Gingham Vellum 12" X 12" (30.5 X 30.5 Cm) Specialty Designer Series Paper [ 164713 ]](https://assets1.tamsnetwork.com/images/EC042017NF/164713s.jpg "Floral & Gingham Vellum 12\" X 12\" (30.5 X 30.5 Cm) Specialty Designer Series Paper [ 164713 ]")


![Poppin' By Bundle (English) [ 165489 ]](https://assets1.tamsnetwork.com/images/EC042017NF/165489s.jpg "Poppin' By Bundle (English) [ 165489 ]")
![Poppin' By Cling Stamp Set (English) [ 165487 ]](https://assets1.tamsnetwork.com/images/EC042017NF/165487s.jpg "Poppin' By Cling Stamp Set (English) [ 165487 ]")
![Poppin' By Dies [ 165488 ]](https://assets1.tamsnetwork.com/images/EC042017NF/165488s.jpg "Poppin' By Dies [ 165488 ]")
![Basic Black 8-1/2" X 11" Cardstock [ 121045 ]](https://assets1.tamsnetwork.com/images/EC042017NF/121045s.jpg "Basic Black 8-1/2\" X 11\" Cardstock [ 121045 ]")
![Real Red 8-1/2" X 11" Cardstock [ 102482 ]](https://assets1.tamsnetwork.com/images/EC042017NF/102482s.jpg "Real Red 8-1/2\" X 11\" Cardstock [ 102482 ]")
![Lemon Lolly Classic Stampin' Pad [ 161666 ]](https://assets1.tamsnetwork.com/images/EC042017NF/161666s.jpg "Lemon Lolly Classic Stampin' Pad [ 161666 ]")
![Real Red Classic Stampin' Pad [ 147084 ]](https://assets1.tamsnetwork.com/images/EC042017NF/147084s.jpg "Real Red Classic Stampin' Pad [ 147084 ]")
![Basic Black Stampin' Write Marker [ 162481 ]](https://assets1.tamsnetwork.com/images/EC042017NF/162481s.jpg "Basic Black Stampin' Write Marker [ 162481 ]")


![Sweet Jar Bundle (English) [ 165507 ]](https://assets1.tamsnetwork.com/images/EC042017NF/165507s.jpg "Sweet Jar Bundle (English) [ 165507 ]")
![Sweet Jar Photopolymer Stamp Set (English) [ 165501 ]](https://assets1.tamsnetwork.com/images/EC042017NF/165501s.jpg "Sweet Jar Photopolymer Stamp Set (English) [ 165501 ]")
![Sweet Jar Builder Punch [ 165506 ]](https://assets1.tamsnetwork.com/images/EC042017NF/165506s.jpg "Sweet Jar Builder Punch [ 165506 ]")
![Night Of Navy 8-1/2" X 11" Cardstock [ 100867 ]](https://assets1.tamsnetwork.com/images/EC042017NF/100867s.jpg "Night Of Navy 8-1/2\" X 11\" Cardstock [ 100867 ]")
![Country Woods 12" X 12" (30.5 X 30.5 Cm) Designer Series Paper [ 163393 ]](https://assets1.tamsnetwork.com/images/EC042017NF/163393s.jpg "Country Woods 12\" X 12\" (30.5 X 30.5 Cm) Designer Series Paper [ 163393 ]")
![Silver Foil 12" X 12" (30.5 X 30.5 Cm) Specialty Pack [ 163096 ]](https://assets1.tamsnetwork.com/images/EC042017NF/163096s.jpg "Silver Foil 12\" X 12\" (30.5 X 30.5 Cm) Specialty Pack [ 163096 ]")
![Basic Beige Classic Stampin Pad [ 163806 ]](https://assets1.tamsnetwork.com/images/EC042017NF/163806s.jpg "Basic Beige Classic Stampin Pad [ 163806 ]")
![Night Of Navy Classic Stampin' Pad [ 147110 ]](https://assets1.tamsnetwork.com/images/EC042017NF/147110s.jpg "Night Of Navy Classic Stampin' Pad [ 147110 ]")
![Pecan Pie Classic Stampin' Pad [ 161665 ]](https://assets1.tamsnetwork.com/images/EC042017NF/161665s.jpg "Pecan Pie Classic Stampin' Pad [ 161665 ]")
![Night Of Navy Stampin' Blends Combo Pack [ 154891 ]](https://assets1.tamsnetwork.com/images/EC042017NF/154891s.jpg "Night Of Navy Stampin' Blends Combo Pack [ 154891 ]")
![Real Red Stampin' Blends Combo Pack [ 154899 ]d](https://assets1.tamsnetwork.com/images/EC042017NF/154899s.jpg "Real Red Stampin' Blends Combo Pack [ 154899 ]d")
![Real Red & White Baker's Twine [ 164051 ]](https://assets1.tamsnetwork.com/images/EC042017NF/164051s.jpg "Real Red & White Baker's Twine [ 164051 ]")
![Faceted Gems Trio Pack [ 162148 ]](https://assets1.tamsnetwork.com/images/EC042017NF/162148s.jpg "Faceted Gems Trio Pack [ 162148 ]")


![Textured Notes Bundle (English) [ 165556 ]](https://assets1.tamsnetwork.com/images/EC042017NF/165556s.jpg "Textured Notes Bundle (English) [ 165556 ]")
![Textured Notes Cling Stamp Set (English) [ 165548 ]](https://assets1.tamsnetwork.com/images/EC042017NF/165548s.jpg "Textured Notes Cling Stamp Set (English) [ 165548 ]")
![Basic Beige 8 1/2" X 11" Cardstock [ 164511 ]](https://assets1.tamsnetwork.com/images/EC042017NF/164511s.jpg "Basic Beige 8 1/2\" X 11\" Cardstock [ 164511 ]")
![Early Espresso 8-1/2" X 11" Cardstock [ 119686 ]](https://assets1.tamsnetwork.com/images/EC042017NF/119686s.jpg "Early Espresso 8-1/2\" X 11\" Cardstock [ 119686 ]")
![Pecan Pie 8 1/2" X 11" Cardstock [ 161717 ]](https://assets1.tamsnetwork.com/images/EC042017NF/161717s.jpg "Pecan Pie 8 1/2\" X 11\" Cardstock [ 161717 ]")
![Woven Textures 12" X 12" (30.5 X 30.5 Cm) Designer Series Paper [ 165560 ]](https://assets1.tamsnetwork.com/images/EC042017NF/165560s.jpg "Woven Textures 12\" X 12\" (30.5 X 30.5 Cm) Designer Series Paper [ 165560 ]")
![Early Espresso Classic Stampin' Pad [ 147114 ]](https://assets1.tamsnetwork.com/images/EC042017NF/147114s.jpg "Early Espresso Classic Stampin' Pad [ 147114 ]")
![Hole Punch Assortment [ 165409 ]](https://assets1.tamsnetwork.com/images/EC042017NF/165409s.jpg "Hole Punch Assortment [ 165409 ]")
![Basic Beige 3/8" (1 Cm) Classic Ribbon [ 165216 ]](https://assets1.tamsnetwork.com/images/EC042017NF/165216s.jpg "Basic Beige 3/8\" (1 Cm) Classic Ribbon [ 165216 ]")
![Linen Thread [ 104199 ]](https://assets1.tamsnetwork.com/images/EC042017NF/104199s.jpg "Linen Thread [ 104199 ]")
![Neutral Matte Dots [ 165561 ]](https://assets1.tamsnetwork.com/images/EC042017NF/165561s.jpg "Neutral Matte Dots [ 165561 ]")

