Stampin’ Up! Charming Day for Fun Fold Friday

Good Friday morning stamping friends and welcome to my Fun Fold Friday. Happy Black Friday!!!! Who all heads out to go shopping today? Today’s my day to decorate my house for Christmas. I’m hoping to get most of it done today, but if I don’t, I have off tomorrow so I can finish up then. It all starts with me going up into the attic and passing the hundred boxes down and telling them which room to put them all in. I then work on 1 room at a time unpacking and putting everything up.

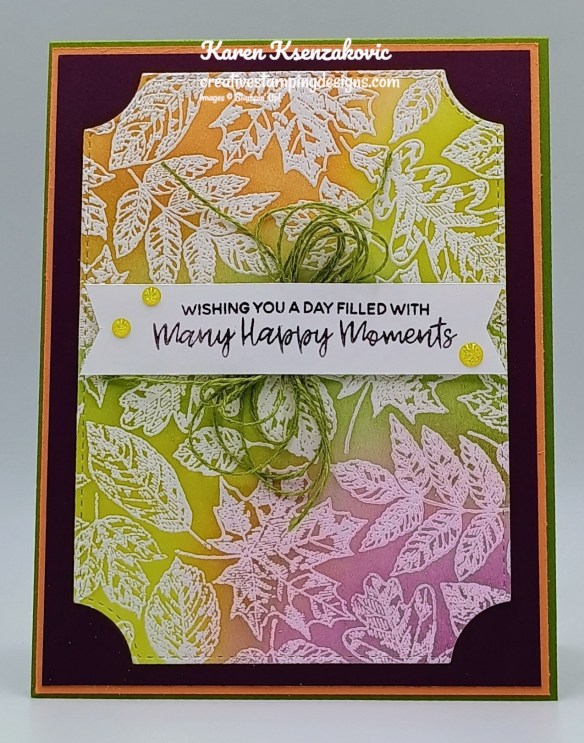
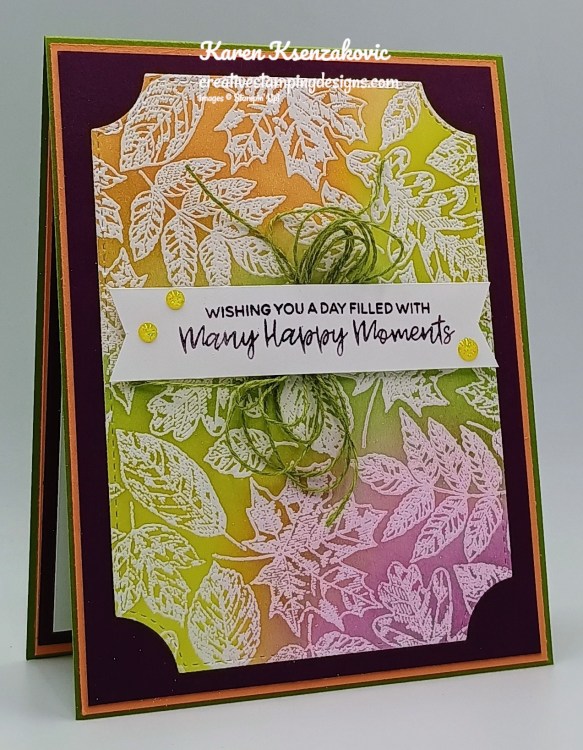
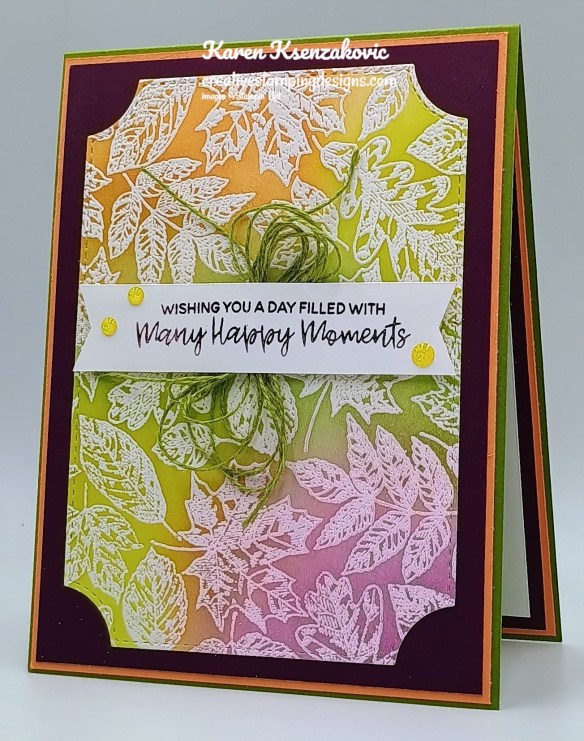
I did a video on my YouTube channel for today’s card. If you’d like to stamp along while you watch the video, the list of measurements are below. Here’s my card for today.

Stampin' Up! Charming Day Fun Fold Birthday 1 creativestampingdesigns.com

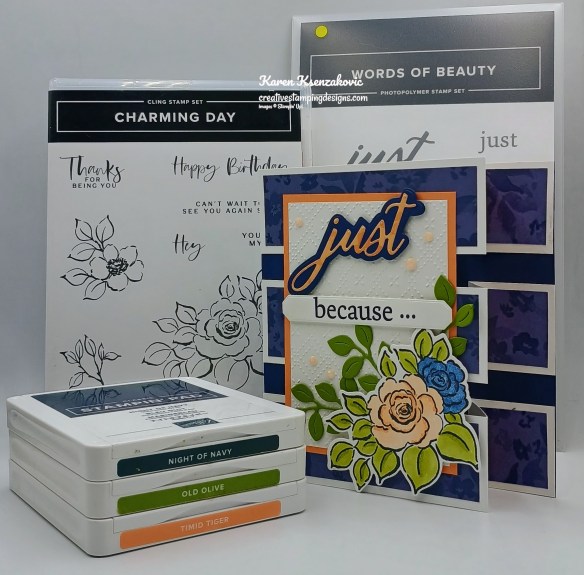
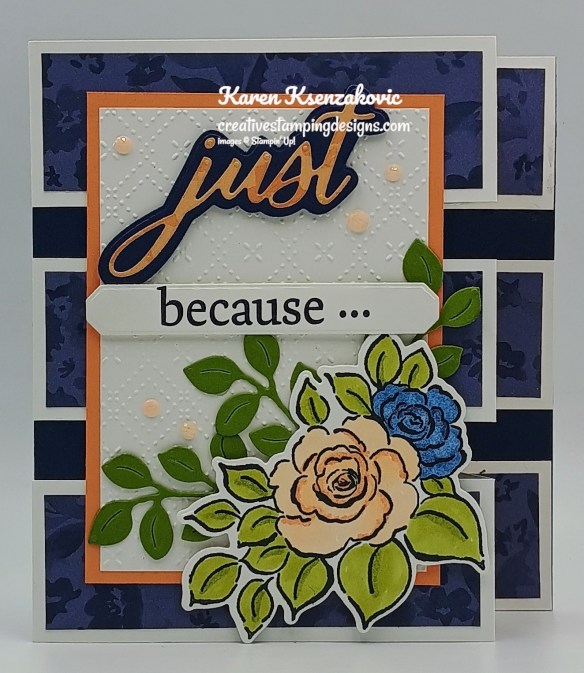
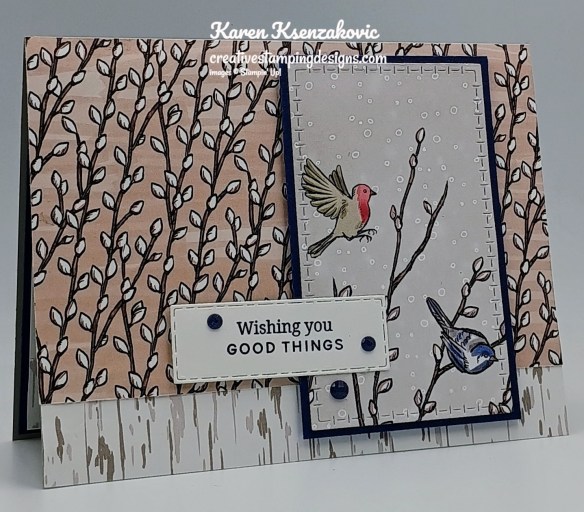
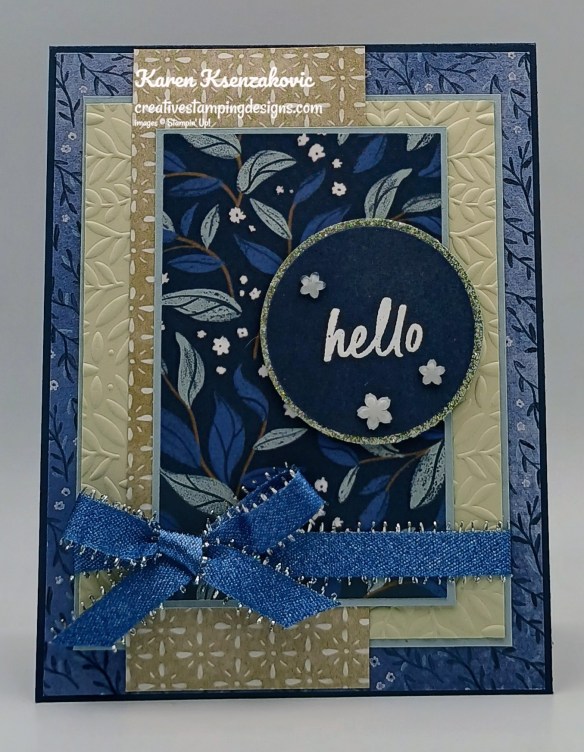
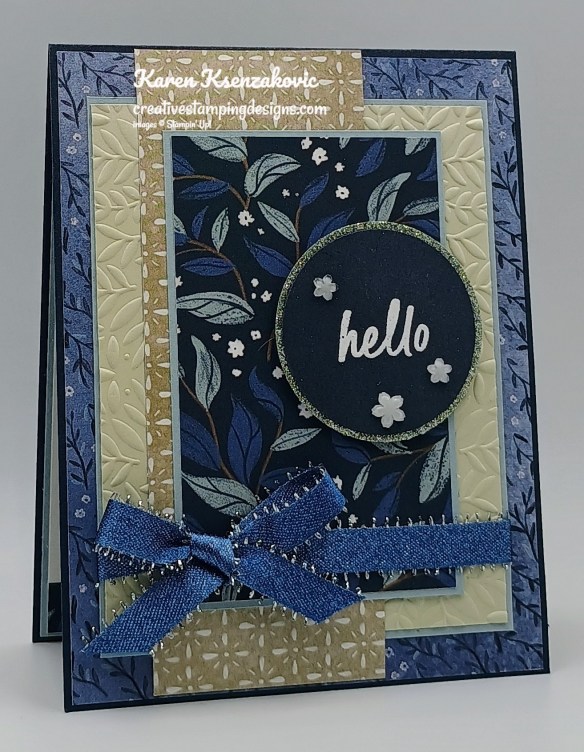
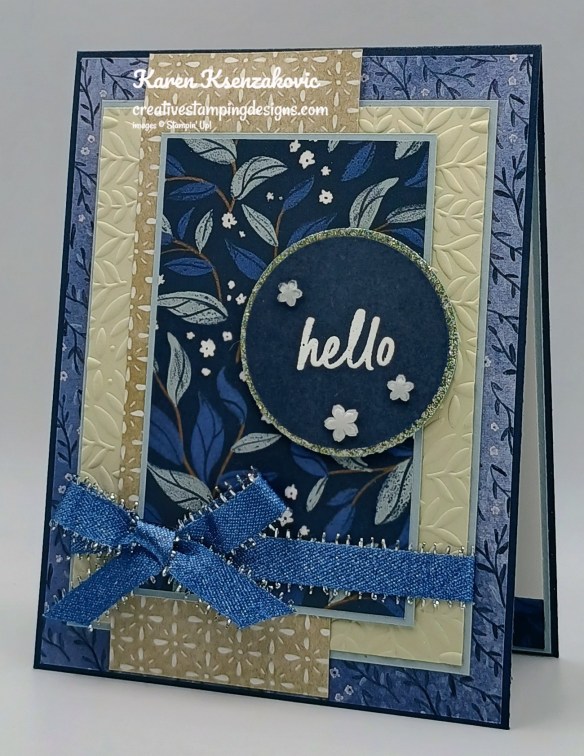
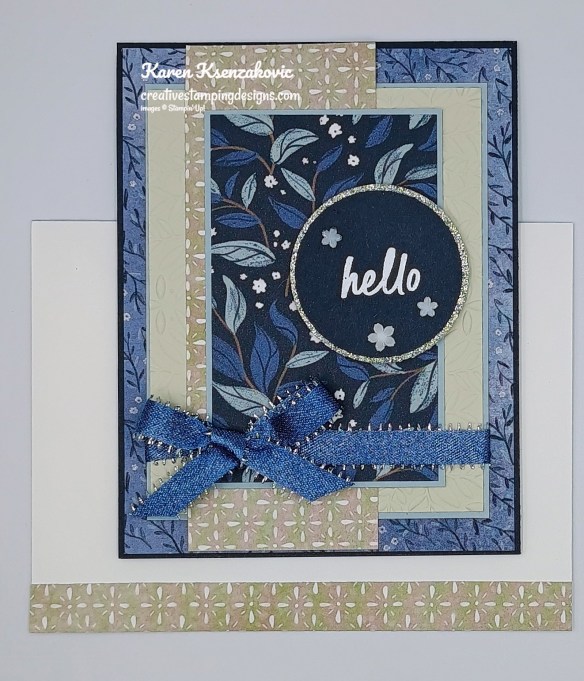
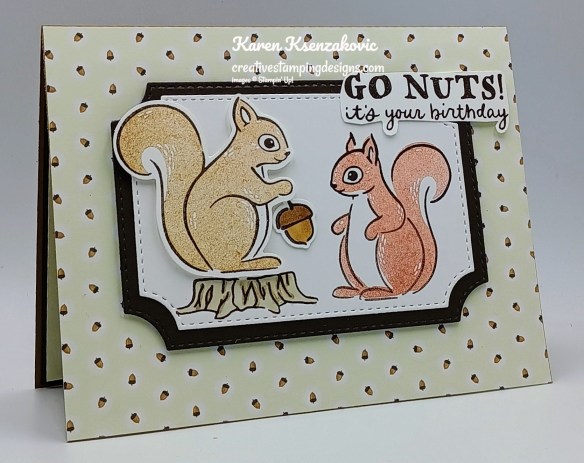
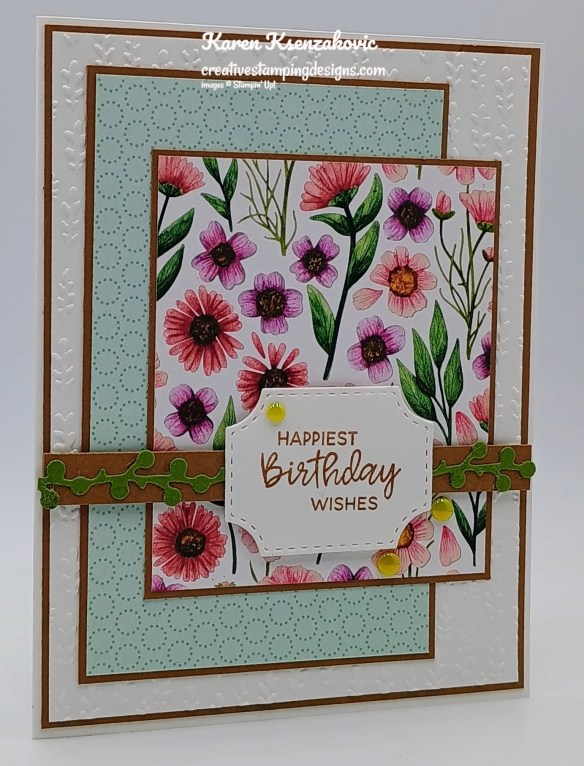
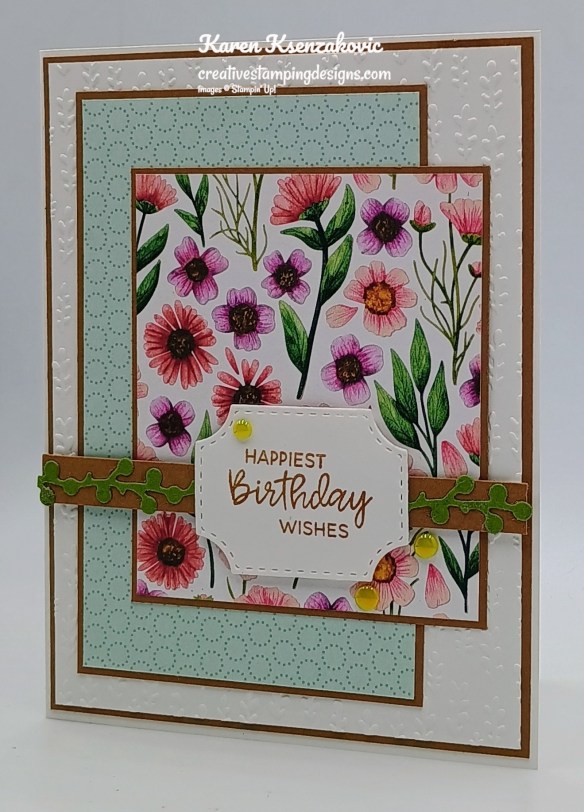
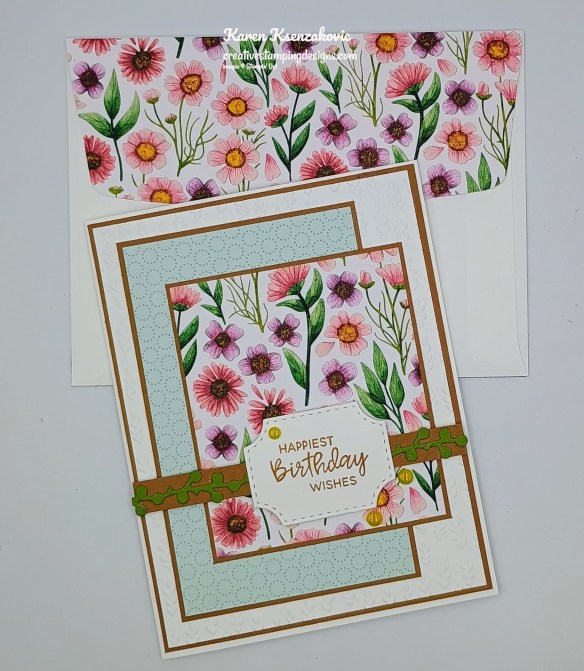
I used the Stampin’ Up! Charming Day Bundle along with the Beautiful Pattern 3D Embossing Folder, Floral Charm Designer Series Paper, and Stampin’ Up! Words of Beauty Bundle for my card today.

Stampin' Up! Charming Day Fun Fold Birthday 2 creativestampingdesigns.com

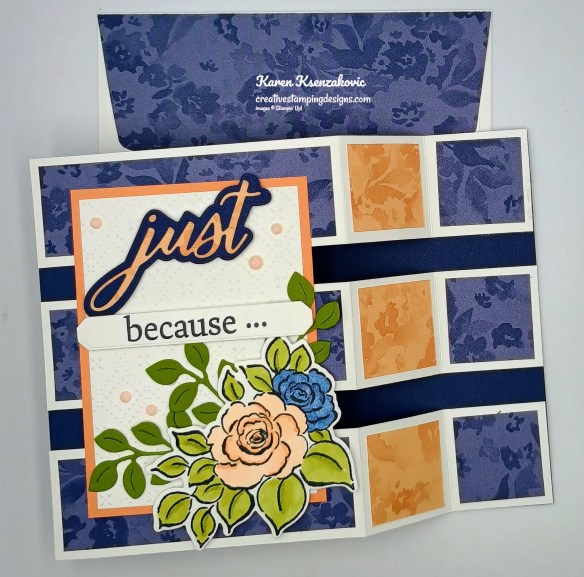
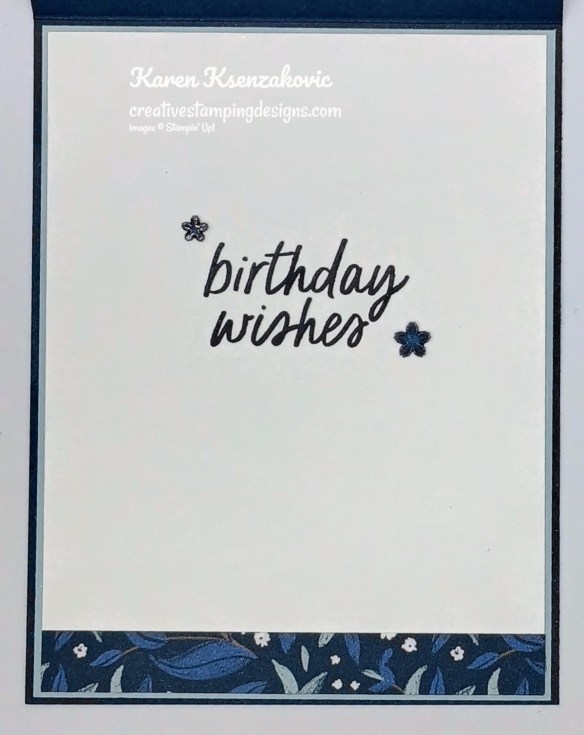
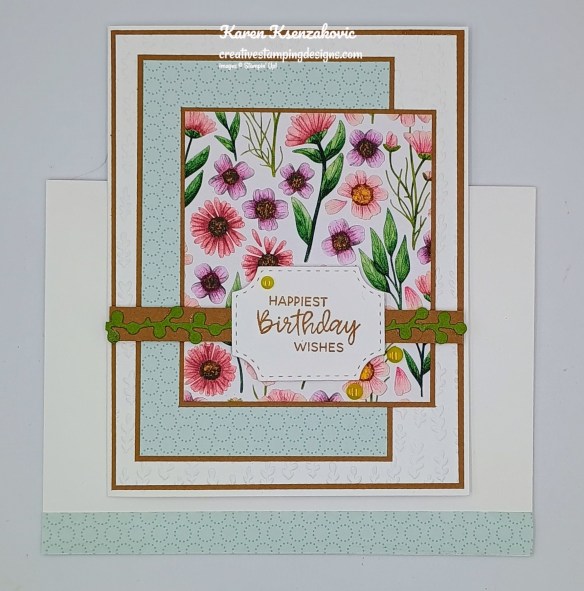
Adhere 3 panels of Floral Charm DSP to the front of the Basic White panels. Adhere 6 small Floral Charm DSP square panels to the folded sections of the Basic White panels. Using the Words of Beauty Dies, cut the detailed sentiment from a panel of Floral Charm DSP and the mat from a panel of Night of Navy. Adhere the detailed sentiment to the Night of Navy mat. On a panel of Basic White, stamp the sentiment from Words of Beauty stamp set in Night of Navy Ink. Cut the sentiment out using the Words of Beauty Dies.

Stampin' Up! Charming Day Fun Fold Birthday 3 creativestampingdesigns.com

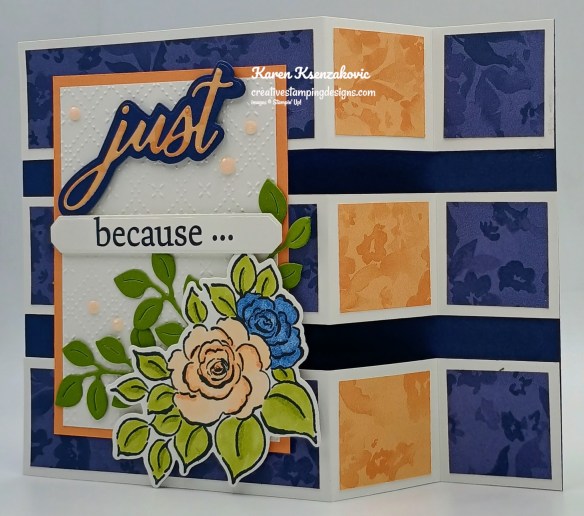
Adhere the Basic White strips to the card base with the longer side on the front and the shorter side on the right side of the card base.

Stampin' Up! Charming Day Fun Fold Birthday 4 creativestampingdesigns.com

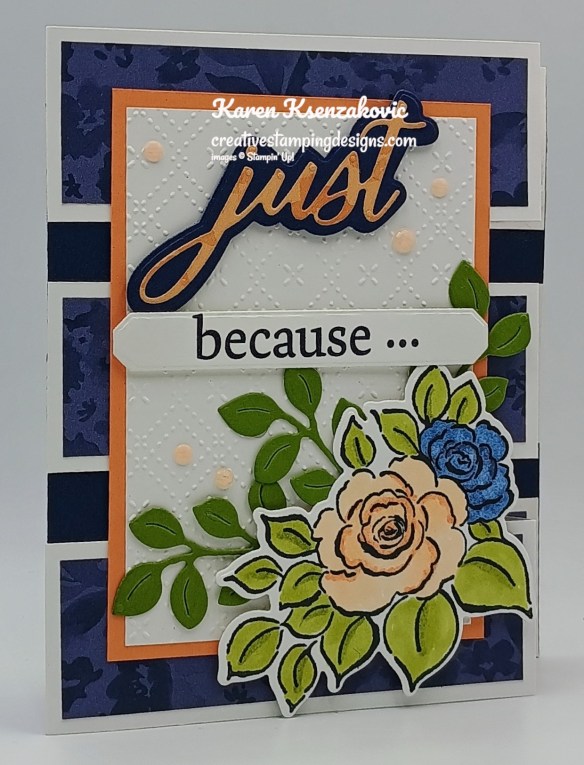
Emboss a panel of Basic White using the Beautiful Pattern EF. Adhere the embossed panel to a Timid Tiger mat. Adhere the layered panel to the front of the card base. On a panel of Basic White, stamp the large flower image from the Charming Day stamp set in Tuxedo Black Ink. Color the image using Night of Navy, Old Olive, Petal Pink and Timid Tiger Stampin’ Blends Markers. Using the Charming Day Dies, cut the image and 3 of the leaf dies from a panel of Old Olive. Adhere the floral image to the card front with Stampin’ Dimensionals. Adhere the leaf dies under the flower image. Adhere the sentiments using Stampin’ Dimensionals. Add a few Charming Shimmer Faceted Dots to the card front.

Stampin' Up! Charming Day Fun Fold Birthday 5 creativestampingdesigns.com

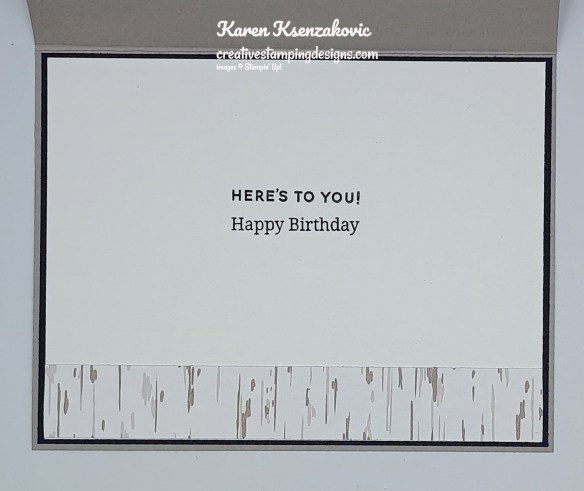
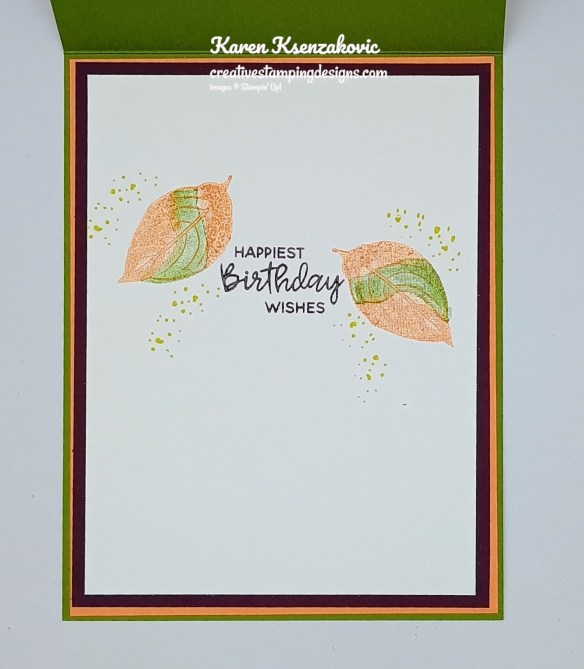
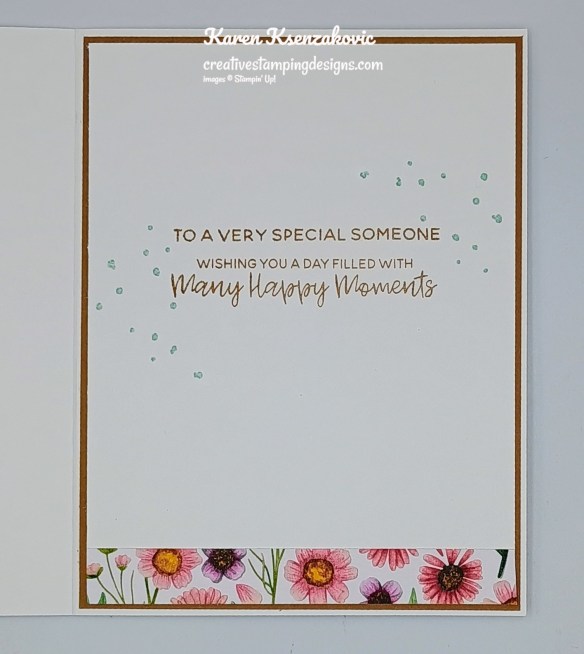
Stamp the sentiments from the Words of Beauty and Charming Day stamp sets on a panel of Basic White in Night of Navy Ink. Stamp the floral image from Charming Day stamp set in Tuxedo Black Ink in the bottom of the panel. Color the image using Old Olive, Petal Pink and Timid Tiger Stampin’ Blends Markers. Adhere the Basic White panel to a Timid Tiger mat then to the back of the Night of Navy card base.

Stampin' Up! Charming Day Fun Fold Birthday 6 creativestampingdesigns.com

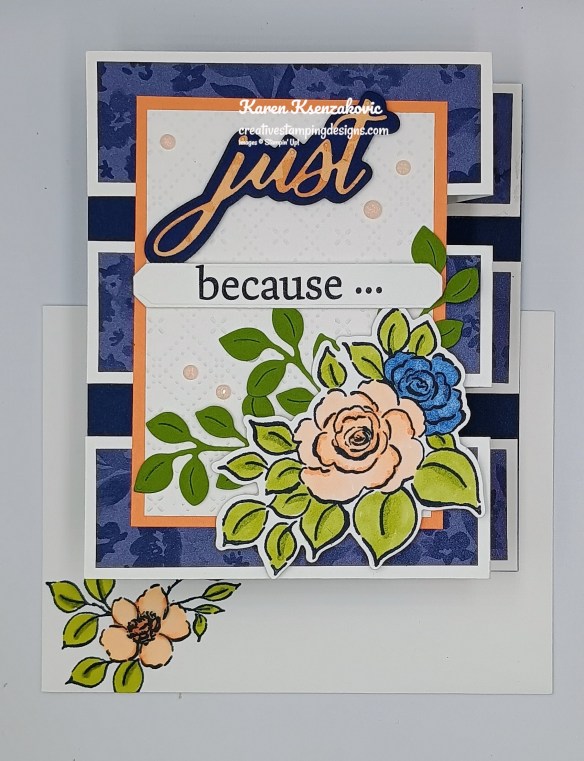
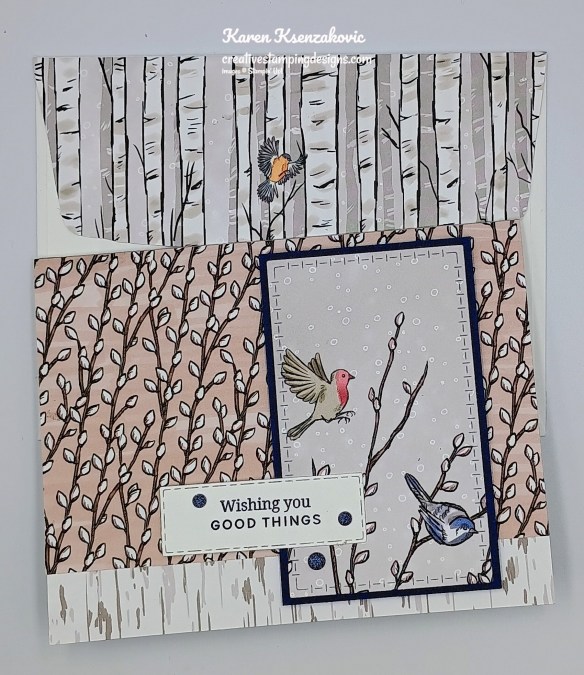
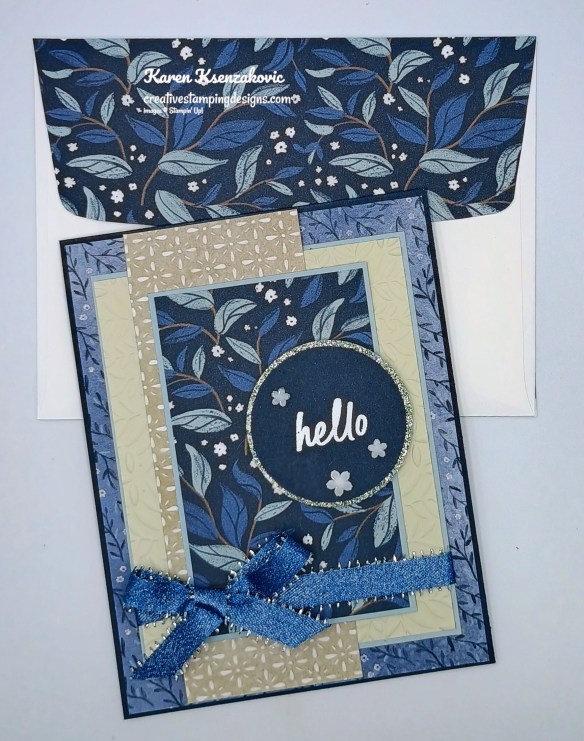
Decorate a Basic White Medium Envelope to finish your card. Stamp the smaller flower image from the Charming Day stamp set in Tuxedo Black Ink on the envelope front. Color the image using the Night Old Olive, Petal Pink and Timid Tiger Stampin’ Blends Markers. Adhere a panel of Floral Charm DSP to the envelope flap.

Stampin' Up! Charming Day Fun Fold Birthday 7 creativestampingdesigns.com

Thank you for stopping by my blog today. I hope you liked my card and will give it a try. I hope you will CASE this card and please feel free to post it in the comments of my Facebook page under my post. I’d love to see your take it. You can watch my video on my YouTube Channel Here

If you watch this on my YouTube channel, please remember to subscribe so that you will get notified when a new video goes live. Thank you to those that have subscribed already. Happy Stamping!!

*********************************************************************************************************

If you need any stamping supplies, I’d love to be your Demonstrator. Just click HERE to go directly to my online store or drop me an email if you have any questions. 

*********************************************************************************************************

Black Friday Sale Going On!!

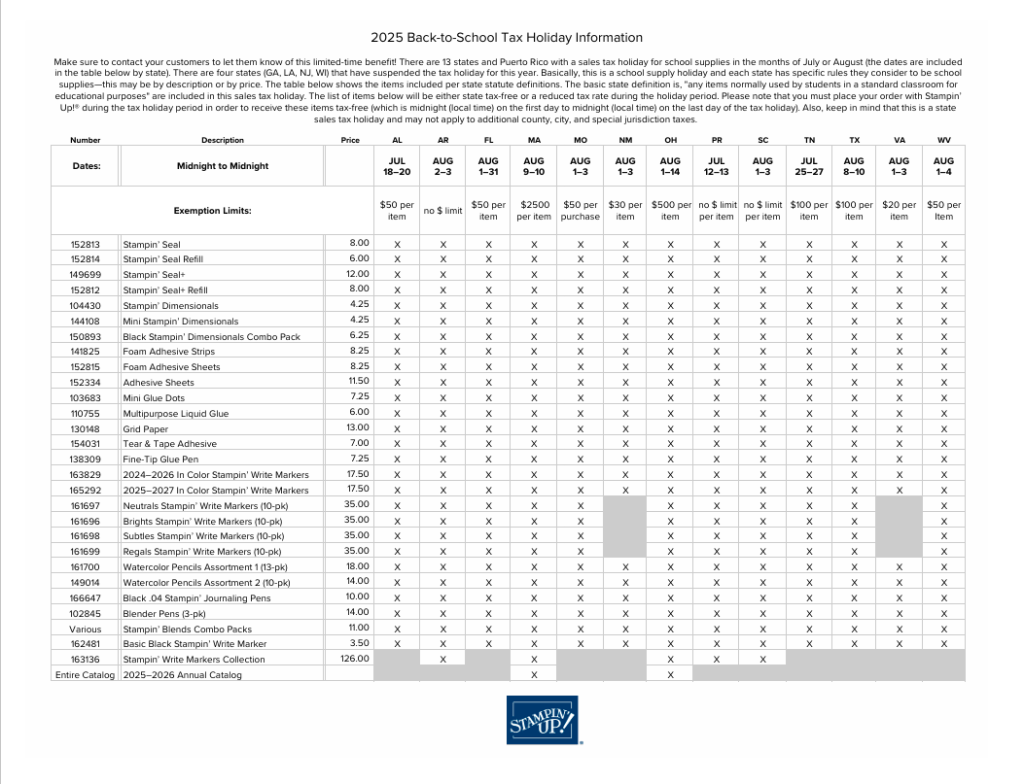
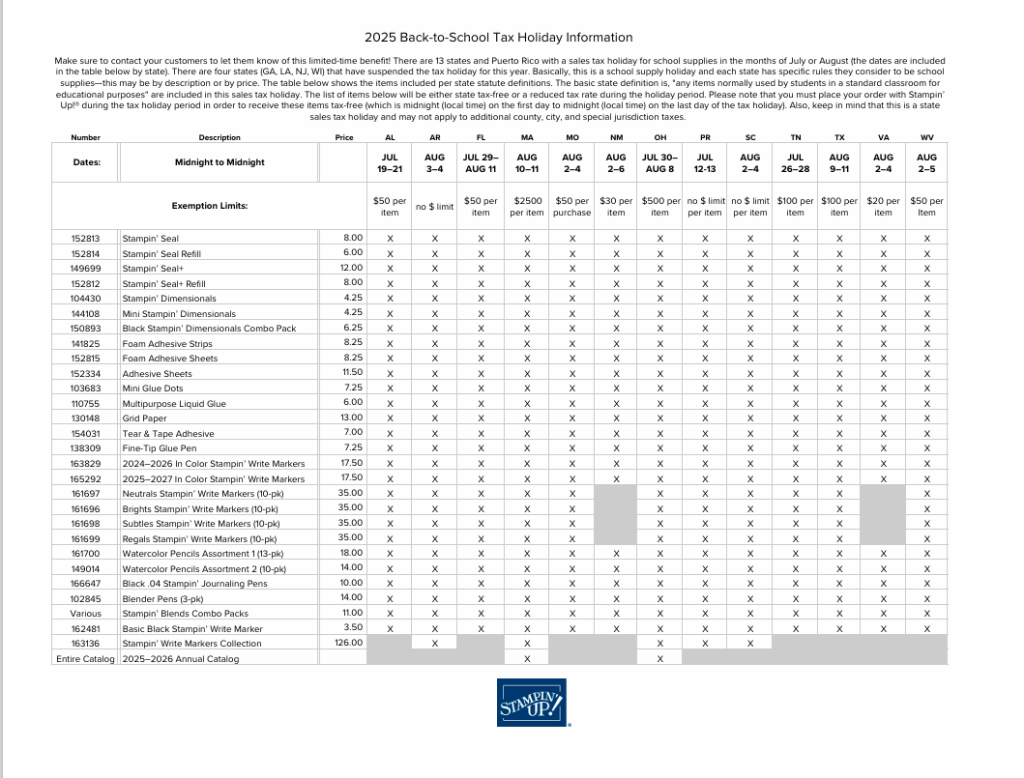
Get ready for Stampin’ Up!’s Black Friday sale with up to 40% off Stampin’ Up! products!  Shop this limited-time-only sale between November 25 to December 1!

Here is what will be on sale:

  • 40% off – Stampin’ Blends – Paper Trimmer and Blades – Ink Bundles
  • 25% off – Select adhesive
  • 15% off – Select cardstock

Here are the details:

  • Shop the full selection of discounted products online.
  • Products are available while supplies last.
  • Orders will likely arrive in time for the holidays.
  • Ordering deadline:  December 1, 2025, at 11:59 p.m. (MT)

Get your lists ready and head to the online store beginning November 25 to get those deals!!

*********************************************************************************************************

Double Creative Stamping Designs Rewards During the Black Friday Sale

I’m offering my Double Creative Stamping Designs Rewards during the Black Friday Sale, starting today through December 1. I’m offering DOUBLE REWARDS for all orders over $50 (before tax & shipping)!! How does this work? For a $50 you’ll earn 2 rewards, $100 you’ll earn 4 rewards, $150 you’ll earn 6 rewards, etc. Head over to my Online Store and get those orders in early and earn those Double Rewards!!

*********************************************************************************************************

My January – April 2026 Mini Catalog and January Online Exclusive Designer Series Paper, Ribbon and Embellishment Shares are open for ordering. You can order just the DSP share, just the Two-Tone cardstock share, just the Ribbon share or just the Embellishment share, or you can it all!! Click Here to order.

For all the information about what’s included Click Here.

*********************************************************************************************************

New Product Of The Month from Stampin’ Up! Coming In December!

If you love exclusive products, you’re going to love Product of the Month, a promotion centered around a special product release every month!  The Product of the Month items are specially designed to be some of the best items Stampin’ Up! has to offer that aren’t available in any of our catalogs or our Online Exclusives.

The first Product of the Month will be available to order beginning on December 2 and it will be available while supplies last!!

Every month Stampin’ Up! will release a new item that is only available for purchase once per account. These items will be limited quantity and are likely to sell out quickly once they’re sold out, they’re gone for good! 

Click Here for all the details and a short video.

*********************************************************************************************************

January-April 2026 Mini Catalog Coming Soon

The January – April 2026 Mini Catalog is coming soon. I’ve ordered the new mini catalog and shipped them out to my customers. To be a customer of mine, you need to have placed an order with me within the last year, and you will automatically receive the catalog. If you would like a copy of the catalog from me, just go to my Online Store and place an order and you will be on my list to receive the new catalog.

*********************************************************************************************************

Card stock cuts for this project:

  • Basic White Cardstock 3″ x 4 1/4″ (card front), 2 3/4″ x 3 1/2″(artwork), 1″ x 3 3/4″(sentiment), (3) – 1 1/2″ x 7 1/4″ (strips scored & folded at 4 1/4″ & 5 3/4″), 3 3/4″ x 5″(back panel)
  • Night of Navy Cardstock 5 1/2″ x 7 1/4″(card base scored & folded at 1 1/2″ & 3″), 1 3/4″ x 3 3/4″(sentiment mat)
  • Old Olive Cardstock 3″ x 3″(die cuts)
  • Timid Tiger Cardstock 3 1/4″ x 4 1/2″(card front mat), 4″ x 5 1/4″(back panel mat)
  • Floral Charm Designer Series Paper (3) – 1 1/4″ x 4″ panels, (6) – 1 1/4″ x 1 1/4″ panels, 1 1/2″ x 2 3/4″(sentiment), 2 1/4″ x 6″ panel

*********************************************************************************************************

Product List

Stampin’ Up! Banner Sayings for The Happy Inkin’ Thursday Blog Hop

Good Thursday morning stamping friends and welcome to our Happy Inkin’ Thursday Blog Hop. If you are starting with me, thank you. I hope you will stop by everyone’s blog to see what they have created this week. If you are hopping over from Mary’s blog, thank you for stopping by. This week we have Sketch Challenge. If you’d like to see a quick video on how I made this card, Click Here to go to my Instagram Reels. Here is my card using this week’s sketch.

Stampin' Up! Banner Sayings CAS 1 creativestampingdesigns.com

I used the Stampin’ Up! Online Exclusive Banner Sayings Photopolymer Stamp Set along with the Nests of Winter Designer Series Paper and Textured Notes Dies for my card today.

This is our sketch for this week.

Stampin' Up! Banner Sayings CAS 2 creativestampingdesigns.com

Adhere 2 different panels of Nests of Winter DSP to the front of the Gray Granite card base.

Stampin' Up! Banner Sayings CAS 3 creativestampingdesigns.com

Cut a panel of the Nests of Winter DSP using the Textured Notes Dies. Adhere the die cut panel to a Night of Navy mat. Adhere the layered panel to the card front with Stampin’ Dimensionals.

Stampin' Up! Banner Sayings CAS 4 creativestampingdesigns.com

Stamp the sentiment from the Banner Sayings stamp set in Night of Navy Ink on a panel of Basic White. Cut the sentiment out using the Textured Notes Dies. Adhere the sentiment to the card front. Add a few Charming Shimmer Faceted Dots to the card front.

Stampin' Up! Banner Sayings CAS 5 creativestampingdesigns.com

Stamp the sentiments from the Banner Sayings stamp set in Night of Navy Ink on a panel of Basic White. Adhere a panel of Nests of Winter DSP to the bottom of the panel. Adhere the Basic White panel to a Night of Navy mat then to the inside of the Gray Granite card base.

Stampin' Up! Banner Sayings CAS 6 creativestampingdesigns.com

Decorate a Basic White Medium Envelope to complete your card. Adhere a strip of Nests of Winter DSP to the envelope front. Adhere a panel of Nests of Winter DSP to the envelope flap.

Stampin' Up! Banner Sayings CAS 7 creativestampingdesigns.com

Thank you for stopping by my blog today.  Now that you’ve seen my card, let’s get on with the hop!  Click the button below to hop over to see what Akiko created. Happy Hopping!!

Just in case you get lost along the way, here is a list of the team members involved in the hop today.

Amy Koenders

Mary Deatherage

Karen Ksenzakovic You Are Here

Akiko Sudano

Tara Carpenter

Terry Lynn Bright

Nicole Bloxom

*********************************************************************************************************

If you need any stamping supplies, I’d love to be your Demonstrator. Just click HERE to go directly to my online store or drop me an email if you have any questions. 

*********************************************************************************************************

Card stock cuts for this project:

  • Basic White Cardstock 1″ x 3″(sentiment), 4″ x 5 1/4″(inner liner)
  • Gray Granite Cardstock 5 1/2″ x 8 1/2″(card base scored & folded at 4 1/4″)
  • Night of Navy Cardstock 2 3/8″ x 3 7/8″(die cut mat), 4 1/8″ x 5 3/8″(inner liner mat)
  • Nests of Winter Designer Series Paper 3 1/2″ x 5 1/2″ & 1″ x 5 1/2″(card front panels), 3/4″ x 5 1/4″(inner liner), 1/2″ x 6″ & 2 1/4″ x 6″(envelope)

*********************************************************************************************************

Product List

Stampin’ Up! Simply Said for The Happy Inkin’ Thursday Blog Hop

Good Thursday morning stamping friends and welcome to our Happy Inkin’ Thursday Blog Hop. If you are starting with me, thank you. I hope you will stop by everyone’s blog to see what they have created this week. If you are hopping over from Mary’s blog, thank you for stopping by. This week we have Color Challenge. If you’d like to see a quick video on how I made this card, Click Here to go to my Instagram Reels. Here is my card using this week’s colors

Stampin' Up! Simply Said Hello 1 creativestampingdesigns.com

I used the Stampin’ Up! simply Said Photopolymer Stamp Set along with the Peaceful Garden Designer Series Paper, Peaceful Garden Glimmer Paper, Peaceful Greenery 3D Embossing Folder, 1 3/4″ & 1 7/8″ Circle Punches for my card today.

These are out colors for this week

Stampin' Up! Simply Said Hello 2 creativestampingdesigns.com

Adhere a panel of Peaceful Garden DSP to a Secret Sea card base. Emboss a panel of Basic Beige using the Peaceful Greenery EF. Adhere the embossed panel to a Cloud Cover mat.

Stampin' Up! Simply Said Hello 3 creativestampingdesigns.com

Adhere a panel of Peaceful Garden DSP to the left side of the embossed panel. Adhere a panel of Peaceful Garden DSP to a Cloud Cover mat. Adhere the layered panel to the right of the embossed panel. Wrap a piece of Misty Moonlight Silver Edged 1/2″ Ribbon around the layered panel and tie a bow. Adhere the layered panel to the card front with Stampin’ Dimensionals.

Stampin' Up! Simply Said Hello 4 creativestampingdesigns.com

Stamp the sentiment from Simply Said stamp set in Versamark Ink to a panel of Secret Sea. Sprinkle the sentiment with White Embossing Powder and set it with the Heat Tool. Cut the sentiment out with the 1 3/4″ Circle Punch. Cut a panel of Peaceful Garden Glimmer Paper using the 1 7/8″ Circle Punch. Adhere the sentiment to the Glimmer mat. Adhere the layered sentiment to the card front with Stampin’ Dimensionals. Add a few Hues of Blue Flowers to the car front.

Stampin' Up! Simply Said Hello 5 creativestampingdesigns.com

Stamp the sentiment from the Simply Said stamp set in Secret Sea Ink on a panel of Basic White. Adhere a panel of Peaceful Garden DSP to the bottom of the panel. Adhere the Basic White panel to a Cloud Cover mat then to the inside of the Secret Sea card base. Add a couple of the Hues of Blue Flowers by the sentiment.

Stampin' Up! Simply Said Hello 6 creativestampingdesigns.com

Decorate a Basic White Medium Envelope to complete the card. Adhere a strip of Peaceful Garden DSP to the envelope front and a panel to the envelope flap.

Stampin' Up! Simply Said Hello 7 creativestampingdesigns.com

Thank you for stopping by my blog today.  Now that you’ve seen my card, let’s get on with the hop!  Click the button below to hop over to see what Akiko has created. Happy Hopping!!

Just in case you get lost along the way, here is a list of the team members involved in the hop today.

Amy Koenders

Mary Deatherage

Karen Ksenzakovic You Are Here

Akiko Sudano

Tara Carpenter

Terry Lynn Bright

Nicole Bloxom

*********************************************************************************************************

If you need any stamping supplies, I’d love to be your Demonstrator. Just click HERE to go directly to my online store or drop me an email if you have any questions. 

*********************************************************************************************************

Card stock cuts for this project:

  • Basic Beige Cardstock 3 1/2″ x 4 1/2″(embossed panel)
  • Basic White Cardstock 4″ x 5 /4″(inner liner)
  • Cloud Cover Cardstock 3 5/8″ x 4 5/8″(embossed panel mat), 2 1/2″ x 4″(card front panel mat), 4 1/8″ x 5 3/8″(inner liner mat)
  • Secret Sea Cardstock 4 1/4″ x 11″(card base scored & folded at 5 1/2″), 2 1/4″ x 2 1/4″(sentiment)
  • Peaceful Garden Designer Series Paper 4 1/8″ x 5 3/8″(card front), 2″ x 5 3/8″ & 2 3/8″ x 3 7/8″(card front panels), 1/2″ x 4″(inner liner), 1/2″ x 6″ & 2 1/4″ x 6″(envelope)
  • Peaceful Garden Glimmer Paper 2 1/4″ x 2 1/4″(sentiment mat)

*********************************************************************************************************

Product List

Stampin’ Up! Etched Autumn Embossed

Good Saturday morning stamping friends and welcome to the weekend. Do you have some plans in the works yet? I’ll be at work all day today.

Today’s card uses the Emboss Resist Technique. If you’d like to see a quick video on how I made this card, Click Here to go to my Instagram Reels. Here’s my card for today.

Stampin' Up! Etched Autumn Embossed 1 creativestampingdesigns.com

I used the Stampin’ Up! Etched Autumn Cling Stamp Set along with the Stampin’ Up! Branching Out Bundle and Stampin’ Up! Artistic Leaves Photopolymer Stamp Set for my card today.

Stampin' Up! Etched Autumn Embossed 2 creativestampingdesigns.com

Stamp the Etched Autumn image on a panel of Basic White in Versamark Ink. Sprinkle image with White Embossing Powder and set it using the Heat Tool.

Stampin' Up! Etched Autumn Embossed 3 creativestampingdesigns.com

Using the Small Blending Brushes, add Blackberry Bliss, Darling Duckling, Old Olive and Timid Tiger Inks a little at a time. Remember you can always add more ink, but you can’t remove it. Wipe image with a tissue when you are done adding color to remove it from the embossed areas. Cut the image out with the largest Branching Out Dies. Adhere the colored panel to a Blackberry Bliss mat with Stampin’ Seal. Adhere the layered panel to a Timid Tiger mat with Stampin’ Seal. Adhere the layered panel to an Old Olive card base with Liquid Glue.

Stampin' Up! Etched Autumn Embossed 4 creativestampingdesigns.com

Stamp the sentiment from the Stampin’ Up! Branching Out Photopolymer Stamp Set in Blackberry Bliss Ink on a panel of Basic White. Cut the ends into a banner using snips. Tie a multi-loop bow with the Old Olive Linen Thread. Adhere the bow to the card front with a Glue Dot. Adhere the sentiment over the bow with Stampin’ Dimensionals. Add a few of the Low-Profile Sparkling Dots to the card front.

Stampin' Up! Etched Autumn Embossed 5 creativestampingdesigns.com

Stamp the sentiment from the Branching Out stamp set in Blackberry Bliss Ink on a pane of Basic White. Stamp the smaller leaf image from the Artistic Leaves stamp set in Timid Tiger Ink, stamping off once on scrap paper, on either side of the sentiment. Stamp the leaf highlight image from the Artistic Leaves stamp set in Old Olive Ink, stamping off once on scrap paper, over the detailed image. Stamp the splatter image from the Artistic Leaves stamp set in Darling Duckling Ink around the leaves. Adhere the Basic White panel to a Blackberry Bliss mat, then to a Timid Tiger mat and to the inside of the Old Olive card base.

Stampin' Up! Etched Autumn Embossed 6 creativestampingdesigns.com

Decorate a Basic White Medium Envelope to finish the card. Stamp the smaller leaf image from the Artistic Leaves stamp set on the envelope front and flap in Blackberry Bliss and Timid Tiger Inks. Stamp the highlight image from the Artistic Leaves stamp set in Old Olive Ink and the splatter image in Darling Duckling Ink.

Stampin' Up! Etched Autumn Embossed 7 creativestampingdesigns.com

Thank you for stopping by my blog today. I hope you like the card and will give it a try. Happy Stamping!!

*********************************************************************************************************

If you need any stamping supplies, I’d love to be your Demonstrator. Just click HERE to go directly to my online store or drop me an email if you have any questions. 

*********************************************************************************************************

Stampin’ Up! BEST JOINING SPECIAL EVER coming soon – October 1 – 31

Crafting is even more fun with community, and there’s never been a better time to join. Become a demonstrator and enjoy all the perks that come with that, like a 20–25% product discount, exclusive early access to the latest releases and catalogs, the opportunity to earn a modest supplemental income, the chance to attend incredible training and crafting events, and so much more! Have you ever thought about joining the Stampin’ Up! community? Are you into scrapbooking and have you seen all the new scrapbook products Stampin’ Up! has? Is your wish/want list pretty long and do you order often? Wouldn’t you love to get all these products at a discount? If you answer was yes to any or all of these questions, why not consider joining the Stampin’ Up! community between Octobr 1-31, and save on everything you buy? Are you new to stamping and don’t know where to start, but would like to join to save? Ask me for help, I’m here to help and assist you anyway that I can. OCTOBER is the best time ever to join!! The best part is you can put November Online Exclusive preorder items in the Starter Kit. Contact me and we can talk about signing you up. There’s never an obligation to sell, you can join to enjoy the discount for yourself.

From October 1 to 31, anyone who purchases the Starter Kit can choose between two amazing offers.  In addition to FREE shippingFREE business supplies, and a FREE Paper Pumpkin kit, you can either get $125 worth of products for just $35 OR $189 worth of products for just $99!  

Promotion Period: October 1–31

Ordering Deadlines

  • Online: October 31, 2025, at 11:59 p.m. (MT)

*********************************************************************************************************

Card stock cuts for this project:

  • Basic White Cardstock 4″ x 5 1/4″(card front), 3/4″ x 3 1/2″(sentiment), 3 3/4″ x 5″(inner liner)
  • Blackberry Bliss Cardstock (2) – 4″ x 5 1/4″(cad front & inner liner mats)
  • Old Olive Cardstock 4 1/4″ x 11″(card base scored & folded at 5 1/2″)
  • Timid Tiger Cardstock (2) – 4 1/8″ x 5 3/8″(card front & inner liner mats)

*********************************************************************************************************

Product List

Stampin’ Up! Fluffy Squirrel for The Happy Inkin’ Thursday Blog Hop

Good Thursday morning stamping friends and welcome to our Happy Inkin’ Thursday Blog Hop. If you are starting with me, thank you. I hope you will stop by everyone’s blog to see what they have created this week. If you are hopping over from Mary’s blog, thank you for stopping by. This week we have Theme Challenge. If you’d like to see a quick video of how I made this card, Click Here to go to my Instagram Reels. Here is my card using this week’s theme.

Stampin' Up1 Fluffy Squirrel Birthday 1 creativestampingdesigns.com

I used the new Stampin’ Up! Fluffy Squirrel Bundle along with the Branching Out Dies and Weekend Adventure Designer Series Paper for my card today.

We have an Autumn Theme for today’s challenge.

Stampin' Up1 Fluffy Squirrel Birthday 2 creativestampingdesigns.com

Adhere a panel of Weekend Adventure DSP to a Pecan Pie card base with Stampin’ Seal. Using the Branching Out Dies, cut panels of Basic White and Early Espresso. On the Basic White die cut, stamp the outlined squirrel image from the Stampin’ Up! Fluffy Squirrel Photopolymer Stamp Set in Early Espresso Ink. Stamp the solid squirrel image from the Fluffy Squirrel stamp set in Cajun Craze Ink, stamping off once on scrap paper, over the outlined image.

Stampin' Up1 Fluffy Squirrel Birthday 3 creativestampingdesigns.com

Stamp the tree stump image from the Fluffy Squirrel stamp set in Early Espresso Ink on the left side of the panel. Color the image with Crumb Cake Stampin’ Blends Markers. On the panel of Basic White, stamp the outlined squirrel and acorn images from the Fluffy Squirrel stamp set in Early Espresso Ink. Stamp the solid squirrel image from the Fluffy Squirrel stamp set in Pecan Pie Ink, stamping off once on scrap paper, over the outlined image. Using the Fluffy Squirrel Builder Punch, punch out the squirrel and acorn images. Adhere the squirrel image on the tree stump with Stampin’ Dimensionals. Adhere the acorn image in the squirrels’ paws using a Glue Dot. Adhere the artwork to the Early Espresso die cut with Stampin’ Seal.

Stampin' Up1 Fluffy Squirrel Birthday 4 creativestampingdesigns.com

Adhere the layered panel to the card front using Stampin’ Dimensionals. Stamp the sentiment from the Fluffy Squirrel stamp set in Early Espresso Ink on the Basic White panel. Fussy cut the sentiment using snips. Adhere the sentiment to the card front with Stampin’ Dimensionals.

Stampin' Up1 Fluffy Squirrel Birthday 5 creativestampingdesigns.com

On a panel of Basic White, stamp the sentiment from the Fluffy Squirrel stamp set in Early Espresso Ink. Stamp the outlined squirrel and acorn images from the Fluffy Squirrel stamp set in Early Espresso Ink on the bottom of the panel. Stamp the solid squirrel image from the Fluffy Squirrel stamp set in Cajun Craze Ink, stamping off once on scrap paper, over the outlined image. Color the acorns using the Pecan Pie Stampin’ Blends Markers. Adhere a panel of Weekend Adventure DSP to the side of the panel. Adhere the Basic White panel to an Early Espresso mat then to the inside of the Pecan Pie card base.

Stampin' Up1 Fluffy Squirrel Birthday 6 creativestampingdesigns.com

To complete the card, decorate a Basic White Medium Envelope. Stamp the outlined squirrel image from the Fluffy Squirrel stamp set in Early Espresso Ink on the envelope front. Stamp the solid squirrel image in Pecan Pie, stamping off once on scrap paper, over the outlined images. Stamp the acorn image from the Fluffy Squirrel stamp set in Early Espresso Ink in the squirrels’ paws. Color the image with Pecan Pie Stampin’ Blends Markers. Adhere a panel of Weekend Adventure DSP to the envelope flap.

Stampin' Up1 Fluffy Squirrel Birthday 7 creativestampingdesigns.com

Thank you for stopping by my blog today.  Now that you’ve seen my card, let’s get on with the hop!  Click the button below to hop over to see what Akiko has created. Happy Hopping!!

Just in case you get lost along the way, here is a list of the team members involved in the hop today.

Amy Koenders

Mary Deatherage

Karen Ksenzakovic You Are Here

Akiko Sudano

Tara Carpenter

Terry Lynn Bright

Nicole Bloxom

*********************************************************************************************************

If you need any stamping supplies, I’d love to be your Demonstrator. Just click HERE to go directly to my online store or drop me an email if you have any questions. 

*********************************************************************************************************

Card stock cuts for this project:

  • Basic White Cardstock (2) – 4″ x 5 1/4″(artwork, sentiment, die cut & inner liner)
  • Early Espresso Cardstock 3 1/2″ x 4 1/2″(die cut), 4 1/8″ x 5 3/8″(inner liner mat)
  • Pecan Pie Cardstock 5 1/2″ x 8 1/2″(card base scored & folded at 4 1/4″)
  • Weekend Adventure Designer Series Paper 4 1/4″ x 5 1/2″(card front), 1/2″ x 4″(inner liner), 2 1/4″ x 6″(envelope flap)

*********************************************************************************************************

Product List

Stampin’ Up! Branching Out for The Happy Inkin’ Thursday Blog Hop

Good Thursday morning stamping friends and welcome to our Happy Inkin’ Thursday Blog Hop. If you are starting with me, thank you. I hope you will stop by everyone’s blog to see what they have created this week. If you are hopping over from Mary’s blog, thank you for stopping by. This week we have Color Challenge. If you’d like to see a quick video of how I made this card, Click Here to go to my Instagram Reels. Here is my card using this week’s colors.

Stampin' Up! Branching Out Birthday 1 creativestampingdesigns.com

I used the new Stamping Up! Branching Out Bundle along with the new Online Exclusive Gathering Leaves Embossing Folder (both items will be available Sept 3rd) and the Floral Impressions Designer Series Paper for my card today.

These are our colors for this week.

Stampin' Up! Branching Out Birthday 2 creativestampingdesigns.com

Emboss Basic White card front using the Gathering Leaves EF. Adhere the embossed panel to a Pecan Pie mat with Liquid Glue. Adhere 2 panels of Floral Impressions DSP to coordinating Pecan Pie mats with Stampin’ Seal. Adhere the layered panel to a Basic White Thick card base with Liquid Glue.

Stampin' Up! Branching Out Birthday 3 creativestampingdesigns.com

Adhere the larger DSP layered panel to the card front with Liquid Glue. Adhere the smaller DSP layered panel to the card front, overlapping the 1st panel, with Liquid Glue. Using the Branching Out Dies, cut the sprig die from a panel of Old Olive. Adhere the sprig to a Pecan Pie mat. Trim off excess. Adhere the layered strip to the card front.

Stampin' Up! Branching Out Birthday 4 creativestampingdesigns.com

On a panel of Basic White, stamp the sentiment from the Stampin’ Up! Branching Out Photopolymer Stamp Set in Pecan Pie Ink. Using the smallest Branching Out Dies, cut the top portion of the sentiment. Move the die to the desired size, matching up the dashes, and cut the bottom portion of the sentiment. Adhere the sentiment to the card front with Stampin’ Dimensionals. Add a few 2025-2027 In-Color Flat Pearls to the card front.

Stampin' Up! Branching Out Birthday 5 creativestampingdesigns.com

Stamp the sentiment from the Branching Out stamp set in Pecan Pie Ink on a panel of Basic White. Stamp the splatter image from the Branching Out stamp set in Pool Party Ink on either side of the sentiment. Adhere a panel of Floral Impressions DSP to the bottom of the panel. Adhere the Basic White panel to a Pecan Pie mat then to the inside of the Basic White Thick card base.

Stampin' Up! Branching Out Birthday 6 creativestampingdesigns.com

Decorate a Basic White Medium Envelope to compete your card. Adhere a strip of the Floral Impressions DSP to the envelope front and a panel to the envelope flap.

Stampin' Up! Branching Out Birthday 7 creativestampingdesigns.com

Thank you for stopping by my blog today.  Now that you’ve seen my card, let’s get on with the hop!  Click the button below to hop over to see what Akiko has created. Happy Hopping!!

Just in case you get lost along the way, here is a list of the team members involved in the hop today.

Amy Koenders

Mary Deatherage

Karen Ksenzakovic You Are Here

Akiko Sudano

Tara Carpenter

Terry Lynn Bright

Nicole Bloxom

*********************************************************************************************************

If you need any stamping supplies, I’d love to be your Demonstrator. Just click HERE to go directly to my online store or drop me an email if you have any questions. 

*********************************************************************************************************

2025-2027 In-Color Products Sale Going On

Starting August 5, select products that feature the new 2025–2027 In Colors™ are 15% off! This is a great opportunity to purchase new In Color products at a discount, so grab products you love—like ink, two-tone cardstock, and Designer Series Paper—and get everything you need to create projects that showcase Stampin’ Up!’s amazing color coordination!

Promotion Details:

  • Sales Period: August 5–31
  • Ordering Deadline: August 31, 2025, at 11:59 p.m. (MT)
  • Sale includes select inks, cardstock, Designer Series Paper, embellishments, and other products that include these new In Colors. Only products featured on the 2025–2027 In Colors page are included in this promotion.
  • Products are available only while supplies last.

You can find the 2025-2027 In Color sale items that will be on sale beginning August 5 right here!  Get your list ready and shop early for the best selection!

*********************************************************************************************************

Card stock cuts for this project:

  • Basic White Cardstock (2) 4″ x 5 1/4(card front & inner liner), 1 1/2″ x 2 1/2″(sentiment)
  • Basic White Tick Cardstock 5 1/2″ x 8 1/2″(card base scored & folded at 4 1/4″)
  • Old Olive Cardstock 1″ x 5″(die cut)
  • Pecan Pie Cardstock (2) – 4 1/8″ x 5 3/8″(card front & inner liner mats), 3″ x 4 3/4& 3″ x 3 1/2″(card front panel mats), 1/2″ x 4 1/8″(die cut mat)
  • Floral Impressions Designer Series Paper 2 7/8″ x 4 5/8″ & 2 7/8″ x 2 3/8″(card front panels), 3/8″ x 4″(inner liner), 1/2″ x 6″ & 2 1/4″ x 6″(envelope)

*********************************************************************************************************

Product List

Stampin’ Up! Layered Thoughts CAS

Good HOT Tuesday morning stamping friends. It’s supposed to hit just about 100 here in NJ today with the real feel of 110. Add the humidity and poor air quality to that and you have an inside crafting day. I did head out for a quick walk early this morning before the heat got too bad.

I have a super quick and easy card for you today for those times when you are heading out the door and realize you forgot the birthday card. I think I put this one together in less than 10 minutes. The stamp set I used along with some of the beautiful DSP makes a perfect quick card that others will think you took much longer to make. It took me longer to take the pictures than to make it. Here’s my card for today.

Stampin' Up! Layered Thoughts CAS 1 creativestampingdesigns.com

I used the Stampin’ Up! Layered Thoughts Photopolymer Stamp Set and the Thoughtful Journey 6 x 6 Designer Series Paper for my card today.

Stampin' Up! Layered Thoughts CAS 2 creativestampingdesigns.com

Stamp the sentiments from the Layered Thoughts stamp set in Mossy Meadow Ink on a panel of Thoughtful Journey DSP.

Stampin' Up! Layered Thoughts CAS 3 creativestampingdesigns.com

Adhere the stamped panel to a Cajun Craze mat with Stampin’ Seal. Adhere the layered panel to a Petal Pink card base with Stampin’ Seal.

Stampin' Up! Layered Thoughts CAS 4 creativestampingdesigns.com

Add a Low-Profile Sparkle Dot to the card front.

Stampin' Up! Layered Thoughts CAS 5 creativestampingdesigns.com

On a panel of Basic White, stamp the sentiment from the Layered Thoughts stamp set in Mossy Meadow Ink. Adhere a panel of Thoughtful Journey DSP to the bottom of the panel Adhere the Basic White panel to a Cajun Craze mat then to the inside of the Petal Pink card base.

Stampin' Up! Layered Thoughts CAS 6 creativestampingdesigns.com

Finish your card by decorating a Basic White Medium Envelope. Adhere a strip of the Thoughtful Journey DSP to the envelope front and a panel to the envelope flap.

Stampin' Up! Layered Thoughts CAS 7 creativestampingdesigns.com

Thank you for stopping by my blog today. I hope you like the card and will give it a try. Happy Stamping!!

*********************************************************************************************************

If you need any stamping supplies, I’d love to be your Demonstrator. Just click HERE to go directly to my online store or drop me an email if you have any questions. 

*********************************************************************************************************

Starting August 5, select products that feature the new 2025–2027 In Colors™ are 15% off! This is a great opportunity to purchase new In Color products at a discount, so grab products you love—like ink, two-tone cardstock, and Designer Series Paper—and get everything you need to create projects that showcase Stampin’ Up!’s amazing color coordination!

Promotion Details:

  • Sales Period: August 5–31
  • Ordering Deadline: August 31, 2025, at 11:59 p.m. (MT)
  • Sale includes select inks, cardstock, Designer Series Paper, embellishments, and other products that include these new In Colors. Only products featured on the 2025–2027 In Colors page are included in this promotion.
  • Products are available only while supplies last.

You can find the 2025-2027 In Color sale items that will be on sale beginning August 5 right here!  Get your list ready and shop early for the best selection!

*********************************************************************************************************

Registration Open for our August Online Technique Class

Tara Carpenter, Nicole Bloxom and I are teaming up to offer a fun Technique Online Zoom Class.  We will be creating 6 different cards using 6 different techniques.  This class is free with a $50 purchase from my Online Store.  We will supply a list of supplies we are going to be using in the next couple days. We decided to open registration early so you can take advantage of the Free Shipping and my Double Rewards and also earn a free class.

The class requirements and What You Will Receive:

  • Visit my Online Store and place a $50 or more order before tax and shipping.
  • Once you have made the purchase, fill out this form and submit Click Here for Google Form
  • Zoom class with complete step by step instructions to complete each card as we go.
  • PDF with detailed directions and photos
  • A Link to the recorded class after we are done so you can watch it again and make more cards.

Here is a list of just some of the items that Tara, Nicole and I will be using.

  • Charming Day Bundle
  • Elements of Text stamp set
  • Artistic Leaves Stamp Set
  • Two-Tone Cardstock
  • Fluid 100 Watercolor Paper
  • Iridescent Treat Bags
  • Stampin’ Spritzer
  • Wow Basics Embossing Powder
  • Heat Tool
  • Floral Charm DSP
  • Adhesive Sheets
  • Stylish Shapes Dies

A week before the class I will send you the complete PDF of the cards so you can cut all your cardstock and gather your supplies, so you are ready to go.  We will NOT be cutting cardstock live.  Everyone’s cards will be unique since you will pick which color cardstock and ink you want to use for each card.

The class will be held on Sunday August 24th from 1pm – 5pm Eastern Time via Zoom.  This will allow everyone all over the United States to participate live!  

I will email you the Zoom link to the class a few days before the event.

Click Here to Register

Deadline to sign up is Sunday August 17th at 5pm ET

*********************************************************************************************************

Sales Tax Holiday

Twelve states and Puerto Rico are having Back-to-School Sales Tax Holidays this year and some Stampin’ Up! items qualify for the tax break in those states!

The states with upcoming tax holidays are:  Alabama, Arkansas, Florida, Massachusetts, Missouri, New Mexico, Ohio, South Carolina, Tennessee, Texas, Virginia and West Virginia.  So if you live in one of those states or Puerto Rico, take a second to download the spreadsheet below and mark your calendar!

Please note that you must place your order with Stampin’ Up! during the tax holiday period in your state in order to receive these items tax-free (which is midnight on the first day to midnight on the last day of the tax holiday).  Also, keep in mind that this is a state sales tax holiday; the state statute may not apply to county, city, and special jurisdiction taxes.

For those wondering about Georgia, Illinois, Louisiana, New Jersey, and Wisconsin, those states have suspended the sales tax holiday this year.

*********************************************************************************************************

Card stock cuts for this project:

  • Basic White Cardstock 4″ x 5 1/4″(inner liner)
  • Cajun Craze Cardstock (2) 4 1/8″ x 5 3/8″(card front & inner liner mats)
  • Petal Pink Cardstock 4 1/4″ x 11″(card base scored & folded at 5 1/2″)
  • Thoughtful Journey 6 x 6 Designer Series Paper 4″ x 5 1/4″(card front), 3/4″ x 4″(inner liner), 1/4″ x 6″ & 2 1/4″ x 6″(envelope)

*********************************************************************************************************

Product List

Stampin’ Up! With You In Mind Birthday

Good Saturday morning stamping friends, welcome to the weekend. What kind of plans do you have for the weekend? I’ll be working all day today and tomorrow Tara and I will be holding our Sweet Jar of Joy Online Zoom class. We’re super excited about this class and can’t wait to make the cards with everyone who signed up.

I played with some Two-Tone cardstock for today’s card.  If you’d like to see a quick video of how I made this card, Click Here to go to my Instagram Reels. Here’s my card for today.

Stampin' Up! With You In Mind Birthday 1 creativestampingdesigns.com

I used the Stampin’ Up! With You IN Mind Photopolymer Stamp Set along with the Stampin’ Up! Paper Tags Cling Stamp Set, Pressed Flowers Embossing Folder and Blackberry Bliss Two-Tone Cardstock for my card today.

Stampin' Up! With You In Mind Birthday 2 creativestampingdesigns.com

Emboss a panel of Blackberry Bliss Tow-Tone cardstock using the Pressed Flowers EF. Stamp the sentiment from With You in Mind stamp set in Versamark Ink on the top of the panel. Sprinkle the sentiment with White Embossing Powder and set it with the Heat Tool.

Stampin' Up! With You In Mind Birthday 3 creativestampingdesigns.com

With a very fine piece of sandpaper or a craft sanding block, lightly go over the embossed portion of the card front to bring out the core white. Adhere the embossed panel to a Basic White mat.

Stampin' Up! With You In Mind Birthday 4 creativestampingdesigns.com

Wrap a piece of White 1/4″ Starter Ribbon around the layered panel and tie a bow. Adhere the layered panel to a Basic White Thick card base with Stampin’ Dimensionals. Add a few Iridescent Faceted Gems to the card front.

Stampin' Up! With You In Mind Birthday 5 creativestampingdesigns.com

Stamp the sentiment from the Paper Tags stamp set in Blackberry Bliss Ink on a panel of Basic White. Adhere the panel of Blackberry Bliss Two-Tone Cardstock to the bottom of the panel. Adhere the Basic White panel to a Blackberry Bliss mat then to the inside of the Basic White Thick card base.

Stampin' Up! With You In Mind Birthday 6 creativestampingdesigns.com

Finish your card by decorating a Basic White Medium Envelope. Stamp the sentiment from Paper Tags stamp set in Blackberry Bliss Ink on the envelope front. Emboss a panel of the Blackberry Bliss Tow-Tone cardstock using the Pressed Flowers EF. Use the sanding block to lighten the image and adhere it to the envelope flap.

Stampin' Up! With You In Mind Birthday 7 creativestampingdesigns.com

Thank you for stopping by my blog today. I hope you like the card and will give it a try. Happy Stamping!!

*********************************************************************************************************

If you need any stamping supplies, I’d love to be your Demonstrator. Just click HERE to go directly to my online store or drop me an email if you have any questions. 

*********************************************************************************************************

Registration Open for our August Online Technique Class

Tara Carpenter, Nicole Bloxom and I are teaming up to offer a fun Technique Online Zoom Class.  We will be creating 6 different cards using 6 different techniques.  This class is free with a $50 purchase from my Online Store.  We will supply a list of supplies we are going to be using in the next couple days. We decided to open registration early so you can take advantage of the Free Shipping and my Double Rewards and also earn a free class.

The class requirements and What You Will Receive:

  • Visit my Online Store and place a $50 or more order before tax and shipping.
  • Once you have made the purchase, fill out this form and submit Click Here for Google Form
  • Zoom class with complete step by step instructions to complete each card as we go.
  • PDF with detailed directions and photos
  • A Link to the recorded class after we are done so you can watch it again and make more cards.

A week before the class I will send you the complete PDF of the cards so you can cut all your cardstock and gather your supplies, so you are ready to go.  We will NOT be cutting cardstock live.  Everyone’s cards will be unique since you will pick which color cardstock and ink you want to use for each card.

The class will be held on Sunday August 24th from 1pm – 5pm Eastern Time via Zoom.  This will allow everyone all over the United States to participate live!  

I will email you the Zoom link to the class a few days before the event.

Click Here to Register

Deadline to sign up is Sunday August 17th at 5pm ET

*********************************************************************************************************

Sales Tax Holiday

Twelve states and Puerto Rico are having Back-to-School Sales Tax Holidays this year and some Stampin’ Up! items qualify for the tax break in those states!

The states with upcoming tax holidays are:  Alabama, Arkansas, Florida, Massachusetts, Missouri, New Mexico, Ohio, South Carolina, Tennessee, Texas, Virginia and West Virginia.  So if you live in one of those states or Puerto Rico, take a second to download the spreadsheet below and mark your calendar!

Please note that you must place your order with Stampin’ Up! during the tax holiday period in your state in order to receive these items tax-free (which is midnight on the first day to midnight on the last day of the tax holiday).  Also, keep in mind that this is a state sales tax holiday; the state statute may not apply to county, city, and special jurisdiction taxes.

For those wondering about Georgia, Illinois, Louisiana, New Jersey, and Wisconsin, those states have suspended the sales tax holiday this year.

*********************************************************************************************************

Card stock cuts for this project:

  • Basic White Cardstock 4 1/8″ x 5 3/8″(card front mat), 4″ x 5 1/4″(inner liner)
  • Basic White Thick Cardstock 5 1/2″ x 8 1/2″(card base scored & folded at 4 1/4″)
  • Blackberry Bliss Cardstock 4 1/8″ x 5 3/8″(inner liner mat)
  • Blackberry Bliss Two-Tone Cardstock 4″ x 5 1/4″(card front), 3/4″ x 4″(inner liner), 2 1/4′ x 6″(envelope flap)

*********************************************************************************************************

Product List

Stampin’ Up! Sunrise Sailing Blended

Good Tuesday morning stamping friends. How did your week start off? After my busy weekend and start of a new week, I’m hoping to play catch up today since I have off.

I played with the Blending Brushes today and an Embossing Folder. Here’s my card for today.

Stampin' Up! Sunrise Sailing Blended 1 creativestampingdesigns.com

I used the Stampin’ Up! Sunrise Sailing Bundle for my card today.

Stampin' Up! Sunrise Sailing Blended 2 creativestampingdesigns.com

Emboss a Basic White panel using the Sunrise Sailing Hybrid Embossing Folder. Using the Blending Brushes, add Summer Splash Ink to the bottom of the panel. On the top portion, add Lemon Lolly, fresh Freesia and Highland Heather Inks with the Blending Brushes. Adhere the colored embossed panel to a Highland Heather card base.

Stampin' Up! Sunrise Sailing Blended 3 creativestampingdesigns.com

On a panel of Basic White, stamp the sailboat image from the Stampin’ Up! Sunrise Sailing Photopolymer Stamp Set in Secret Sea Ink. cut the sailboat out using the Sunrise Sailing Dies and Hybrid EF. Adhere the sailboat to the card front, over the embossed sailboat, with Stampin’ Dimensionals.

Stampin' Up! Sunrise Sailing Blended 4 creativestampingdesigns.com

Stamp the sentiment from the Sunrise Sailing stamp set in Secret Sea Ink on a panel of Basic White. Adhere the sentiment to the card front with Stampin’ Dimensionals. Add a few Riverside Irregular Pearls to the card front.

Stampin' Up! Sunrise Sailing Blended 5 creativestampingdesigns.com

On a panel of Basic White, stamp the sentiment from the Sunrise Sailing stamp set in Secret Sea Ink. Stamp the sailboat image from the Sunrise Sailing stamp set in Secret Sea Ink, stamping off 3 times on scrap paper, over the sentiment. Stamp the water image from the Sunrise Sailing stamp set in Summer Splash Ink, stamping off once on scrap paper, under the sailboat image. Adhere the Basic White panel to a Highland Heather mat then to the inside of the Highland Heather card base.

Stampin' Up! Sunrise Sailing Blended 6 creativestampingdesigns.com

Decorate a Basic White Medium Envelope to finish your card. Stamp the sailboat image from the Sunrise Sailing stamp set in Secret Sea Ink on the envelope front. Stamp the water image in Summer Splash Ink below the sailboat. Stamp the seagull image on the envelope flap in Secret Sea.

Stampin' Up! Sunrise Sailing Blended 7 creativestampingdesigns.com

Thank you for stopping by my blog today. I hope you like the card and will give it a try. Happy Stamping!!

*********************************************************************************************************

If you need any stamping supplies, I’d love to be your Demonstrator. Just click HERE to go directly to my online store or drop me an email if you have any questions. 

*********************************************************************************************************

Starting Tomorrow, Wednesday July 23 – Friday July 25, 3 DAYS ONLY!!

  • All order types qualify for this promotion.
  • Free shipping is for three days only. Orders must be closed July 25.
  • Free shipping automatically applies to your cart after the qualifying amount has been met, which is $75 USD (before tax).
  • Coupon codes and Stampin’ Rewards will lower your order’s retail amount. Orders must meet the qualifying amount to be eligible for free shipping.
  • The additional cost for expedited shipping is not covered by this promotion.
  • Prepaid 3-, 6-, and 12-month Paper Pumpkin subscriptions and month-to-month subscriptions do not qualify for free shipping. Refills, past kits and add-ons do qualify toward free shipping, but you must be a subscriber to purchase. Subscriptions billed and shipped this month will be charged for the normal amount ($27.00 USD shipping included) + tax.

To sweeten the deal a little better, I’m going to be giving you Double Creative Stamping Designs Rewards for those 3 Days Only. How does this work? For a $50 you’ll earn 2 rewards, $100 you’ll earn 4 rewards, $150 you’ll earn 6 rewards, etc. Head over to my Online Store and get those orders in early. When you are shopping, don’t forget to check out the new Online Exclusive products available in the Online Store. My Double Rewards will end on Friday July 25th when the Free Shipping ends.

Get those orders ready and head over to my Online Store first thing Wednesday morning and place those orders early.

*********************************************************************************************************

Sales Tax Holiday

Twelve states and Puerto Rico are having Back-to-School Sales Tax Holidays this year and some Stampin’ Up! items qualify for the tax break in those states!

The states with upcoming tax holidays are:  Alabama, Arkansas, Florida, Massachusetts, Missouri, New Mexico, Ohio, South Carolina, Tennessee, Texas, Virginia and West Virginia.  So if you live in one of those states or Puerto Rico, take a second to download the spreadsheet below and mark your calendar!

Here is the list of states having sales tax holidays, what the dates are and what supplies will be tax free during the holiday (click on the image to download a full-size printable page):

Please note that you must place your order with Stampin’ Up! during the tax holiday period in your state in order to receive these items tax-free (which is midnight on the first day to midnight on the last day of the tax holiday).  Also, keep in mind that this is a state sales tax holiday; the state statute may not apply to county, city, and special jurisdiction taxes.

For those wondering about Georgia, Illinois, Louisiana, New Jersey, and Wisconsin, those states have suspended the sales tax holiday this year.

*********************************************************************************************************

Farmhouse Florals

Subscribe July 11 – August 10

Send whimsical cards featuring flowers nestled in delightfully unexpected places.    

  •  Makes 9 cards: 3 each of 3 designs with 9 coordinating envelopes  
  •  Precut paper pieces and linen thread    
  •  Sentiment stamps for the outside and inside of the cards    
  •  Coordinating colors: Calypso Coral, Darling Duckling, Gray Granite, Lost Lagoon, Pecan Pie, Secret Sea (Classic Stampin’ Spot)

Subscribe to the August Paper Pumpkin Kit between 11 July and 10 August by clicking here!

*********************************************************************************************************

Don’t miss the coordinating
Circle of Seasons Dies Add-On!

Make the most of your Paper Pumpkin kits with the Circle of Seasons Dies add-on! Quickly and cleanly cut out a strawberry with a blossom, a circle, a leaf, or an acorn to elevate your crafting projects. These additional dies are designed to work with THREE Paper Pumpkin Kits: the Sweeter with You Paper Pumpkin Kit, the Farmhouse Florals Paper Pumpkin Kit, and the Fall for Toile Paper Pumpkin Kit. Pair these dies with other Stampin’ Up! products for even more creative options! This exclusive add-on (item 167277) coordinates with the three upcoming kits! Paper Pumpkin subscribers can purchase it beginning June 11. Add-on is available only while supplies last, so it’s best to shop early!

DETAILS
– 4 dies
– Largest die: 2-1/2″ x 1-1/4″ (6.4 x 3.2 cm)
– Use with a Stampin’ Cut & Emboss Machine (sold separately)

You must be a current Paper Pumpkin subscriber to purchase this item. To become a subscriber, visit www.stampinup.com/paperpumpkin.

Note: Supplies may be limited toward the end of the subscription period.

#167277 $12

*********************************************************************************************************

Card stock cuts for this project:

  • Basic White Cardstock 4 1/4″ x 5 1/2″(card front), 3″ x 4″(sailboat), 1/2″ x 3″(sentiment), 4″ x 5 1/4″(inner liner)
  • Highland Heather Cardstock 4 1/4″ x 11″(card base scored & folded at 5 1/2″), 4 1/8″ x 5 3/8″(inner liner mat)

*********************************************************************************************************

Product List

Stampin’ Up! Pattern of Friendship Birthday

Good Tuesday morning stamping friends. Happy middle of July. This month is just flying by. How is everyone doing today? My area of NJ was under water with flash floods last night from all the rain. Even our major highways were flooded. We were ok by my house.

I played with one of my favorite packs of DSP for today’s card. I love the subtles so much. Here’s my card for today.

Stampin' Up! Pattern of Friendship Birthday 1 creativestampingdesigns.com

I used the Stampin’ Up! Pattern of Friendship Photopolymer Stamp Set along with the Wildflower Birthday Specialty Designer Series Paper and the Stampin’ Up! Paper Tags Cling Stamp Set for my card today.

Stampin' Up! Pattern of Friendship Birthday 2 creativestampingdesigns.com

Stamp the sentiment from the Pattern of Friendship stamp set on the panel of Wildflower Birthday DSP in Versamark Ink. Sprinkle the sentiment with Gold Embossing Powder and set it with the Heat Tool. Adhere the embossed panel to the top of the Pretty in Pink panel with Stampin’ Seal.

Stampin' Up! Pattern of Friendship Birthday 3 creativestampingdesigns.com

Cut the panel of Wildflower Birthday DSP down 2″ from the center top. Fold from the cut line to the corners to fan it open. Adhere the panel to the card front with Liquid Glue. Wrap a piece of 3/8″ Gold Striped Mesh Ribbon around the layered panel and tie a bow. Adhere the layered panel to a Soft Sea Foam card front with Stampin’ Dimensionals.

Stampin' Up! Pattern of Friendship Birthday 4 creativestampingdesigns.com

Adhere flowers, leaves and gold sprigs from the Wildflower Birthday DSP to the card front with Stampin’ Dimensionals and Glue Dots. Add a few Iridescent Foil Gems to the card front.

Stampin' Up! Pattern of Friendship Birthday 5 creativestampingdesigns.com

Stamp the sentiment from Paper Tags stamp set in Versamark Ink on a panel of Basic White. Sprinkle the sentiment with Gold Embossing Powder and set it with the Heat Tool. Adhere 2 strips of Wildflower Birthday DSP to either side of the panel. Adhere the Basic White panel to a Pretty in Pink mat then to the inside of the Soft Sea Foam card base.

Stampin' Up! Pattern of Friendship Birthday 6 creativestampingdesigns.com

Decorate a Basic White Medium Envelope to finish your card. Adhere a strip of Wildflower Birthday DSP to the envelope front and a panel to the envelope flap.

Stampin' Up! Pattern of Friendship Birthday 7 creativestampingdesigns.com

Thank you for stopping by my blog today. I hope you like the card and will give it a try. Happy Stamping!!

*********************************************************************************************************

If you need any stamping supplies, I’d love to be your Demonstrator. Just click HERE to go directly to my online store or drop me an email if you have any questions. 

*********************************************************************************************************

Together Let’s Raise Some Money for the Floods in Texas from July 4th

As of last night, July 14th, we’re at $170 of the $500 to be donated. We can Do this!!!

We’ve all been watching – and crying – as we’ve watched the devastation caused by the flooding of the Guadalupe River in Texas on July 4th.  It’s beyond horrible.  Since there’s really nothing most of us can do that is hands-on – I try to help financially.  I’m coming to you for HELP! So…I’m going to do a fundraiser that’ll start right now.  I’ve selected Mercury One as the recipient of our donation. 

Mercury One is a 501(c)(3) charity that was founded in 2011 by media personality, entrepreneur, and New York Times best-selling author Glenn Beck. It was created to inspire the world in the same way the United States’ space program shaped America’s national destiny by setting a goal and committing to reach it against all odds. The only limitations to achievement are those we place on ourselves, and we believe in the goodness and power of the individual to overcome any obstacle.

How can you help me help them??

Place a Stampin’ Up! Order Thru Me OR Donate Directly!

And – as an added incentive – if we hit our donation goal – $500– I’ll be giving away a new Stampin’ Cut and Emboss Machine to one winner!

I’m setting a goal of donating a total of $500 – and here’s how you can help me (and be entered to win a new Stampin’ Cut and Emboss Machine!).

1. – Shop Online:

  • For any orders placed through my Online Store between now and Saturday July 19,2025, I’ll be making a targeted donation of 20% of your merchandise total to Mercury One for Texas Hill County Flood Victims.
    • You’ll earn your Creative Stamping Designs Rewards with all order of $50 or more (before tax & shipping).
    • Anyone ordering $50+ (before tax & shipping) will be entered to win a new Stampin’ Cut & Emboss Machine from me to give away on July 20th.

OR…

2. – Make a Donation of $50+ directly to Mercury One at this LINK

  • For those in the US, send me a screenshot (to creativestampingdesigns@gmail.com) of the receipt for your donation of $50+ to Mercury One and you’ll be entered to win a new Stampin’ Cut & Emboss Machine from me to be give away on July 20th.

OR…

3. – Do Both!!

  • If you order $50+ through my Stampin’ Up! Online Store AND donate at least $50 directly to Mercury One, then your name will be entered TWICE to win the Stampin’ Cut & Emboss Machine!

Please note: Per Stampin’ Up! rules, I’m only allowed to ship the Stampin’ Cut & Emboss Machine to addresses in the United States or military APO addresses.  Only those with US/APO shipping addresses will be eligible to win the Stampin’ Cut & Emboss Machine. Anyone outside the US is welcome to donate but will not be eligible to win the machine.

NOTE: Orders and/or Donations must be placed by midnight Eastern Time on Saturday July 19 to be entered to win the machine.  One winner of the Stampin’ Cut & Emboss Machine will be randomly chosen on Sunday July 20th from all of the entries received.

Any questions, please send me an email to creativestampingdesigns@gmail.com. I appreciate your help more than I can express.

*********************************************************************************************************

Farmhouse Florals

Subscribe July 11 – August 10

Send whimsical cards featuring flowers nestled in delightfully unexpected places.    

  •  Makes 9 cards: 3 each of 3 designs with 9 coordinating envelopes  
  •  Precut paper pieces and linen thread    
  •  Sentiment stamps for the outside and inside of the cards    
  •  Coordinating colors: Calypso Coral, Darling Duckling, Gray Granite, Lost Lagoon, Pecan Pie, Secret Sea (Classic Stampin’ Spot)

Subscribe to the August Paper Pumpkin Kit between 11 July and 10 August by clicking here!

*********************************************************************************************************

Don’t miss the coordinating
Circle of Seasons Dies Add-On!

Make the most of your Paper Pumpkin kits with the Circle of Seasons Dies add-on! Quickly and cleanly cut out a strawberry with a blossom, a circle, a leaf, or an acorn to elevate your crafting projects. These additional dies are designed to work with THREE Paper Pumpkin Kits: the Sweeter with You Paper Pumpkin Kit, the Farmhouse Florals Paper Pumpkin Kit, and the Fall for Toile Paper Pumpkin Kit. Pair these dies with other Stampin’ Up! products for even more creative options! This exclusive add-on (item 167277) coordinates with the three upcoming kits! Paper Pumpkin subscribers can purchase it beginning June 11. Add-on is available only while supplies last, so it’s best to shop early!

DETAILS
– 4 dies
– Largest die: 2-1/2″ x 1-1/4″ (6.4 x 3.2 cm)
– Use with a Stampin’ Cut & Emboss Machine (sold separately)

You must be a current Paper Pumpkin subscriber to purchase this item. To become a subscriber, visit www.stampinup.com/paperpumpkin.

Note: Supplies may be limited toward the end of the subscription period.

#167277 $12

*********************************************************************************************************

Card stock cuts for this project:

  • Basic White Cardstock 4″ x 5 1/4″(inner liner)
  • Pretty in Pink Cardstock (2) – 4 1/8″ x 5 3/8″(card front & inner liner mats)
  • Soft Sea Foam Cardstock 5 1/2″ x 8 1/2″(card base scored & folded at 4 1/4″)
  • Wildflower Birthday Specialty Designer Series Paper 4″ x 5 1/4″(card front), 2 1/4″ x 5 1/4″(card front panel), (2) – 3/8″ x 4″(inner liner), 1/2″ x 6″ & 2 1/4″ x 6″(envelope)

*********************************************************************************************************