
Good Friday morning my stamping friends and welcome to my Fun Fold Friday. How was everyone’s week? What’s everyone doing for the weekend? As of now, I’m only working on Sunday, so I’m not sure what I’m doing Saturday yet. I have a lot of gardening to do, I just need to get the energy to start.
Today’s card I made on my Facebook Live video on Wednesday. If you were able to join me or watched the replay, thank you. If you’d like to watch my video and stamp along, the measurements are below along with the links to my Facebook page and my YouTube channel. Here’s my card for today.

I used the Stampin’ Up! Pansy Petals Bundle for my Fun Fold card today.
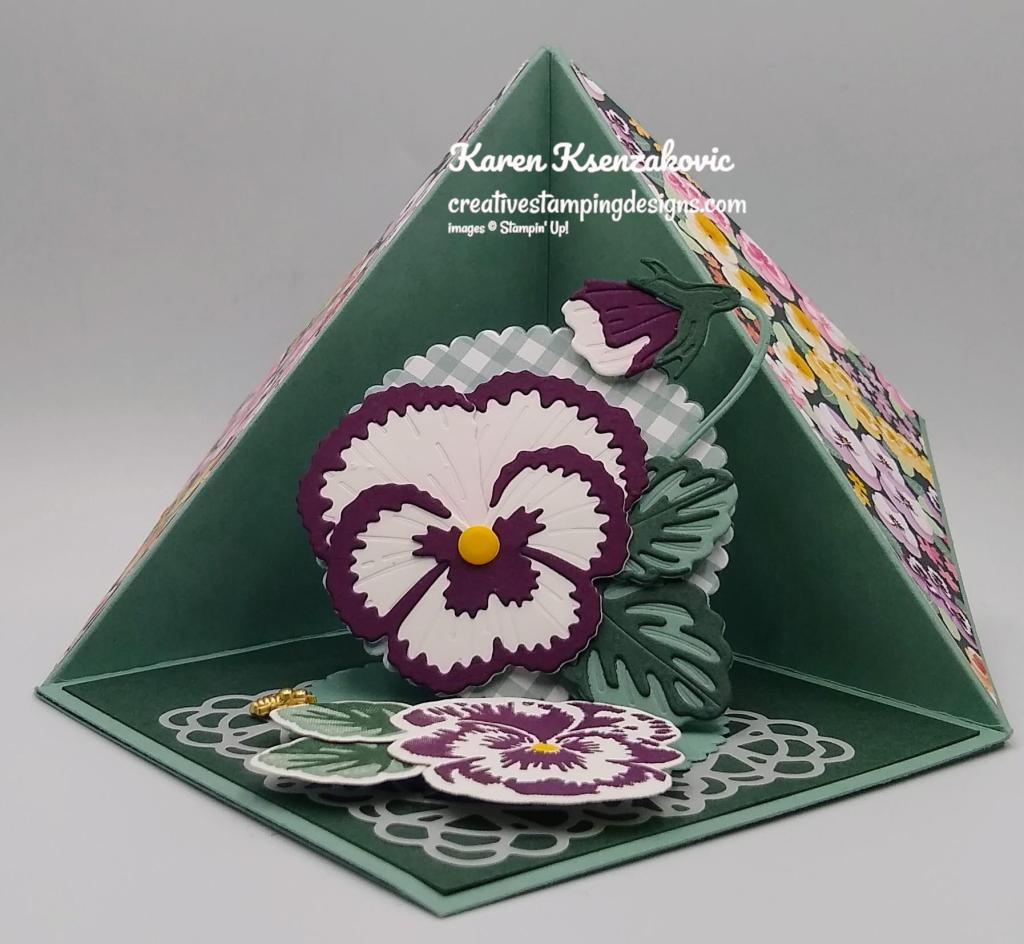
I started with an 8″ X 8″ panel of So Succulent cardstock for my card base. I scored it at 4″ then turned it and scored at 4″ again. I then cut from the center down one side only. On the top portion that was not cut I scored from the outside scored edges to the center top scored edge for the angle fold. Using my Bone Folder I gave it a good crease on all the score lines. The 2 straight score lines, I folded in and the 2 angle score lines I folded out.

I cut a panel of Pansy Petals Designer Series Paper in half to make 2 triangles for the outside folds. I adhered the 2 triangle pieces of DSP to the outside folded pieces using Multipurpose Liquid Glue.
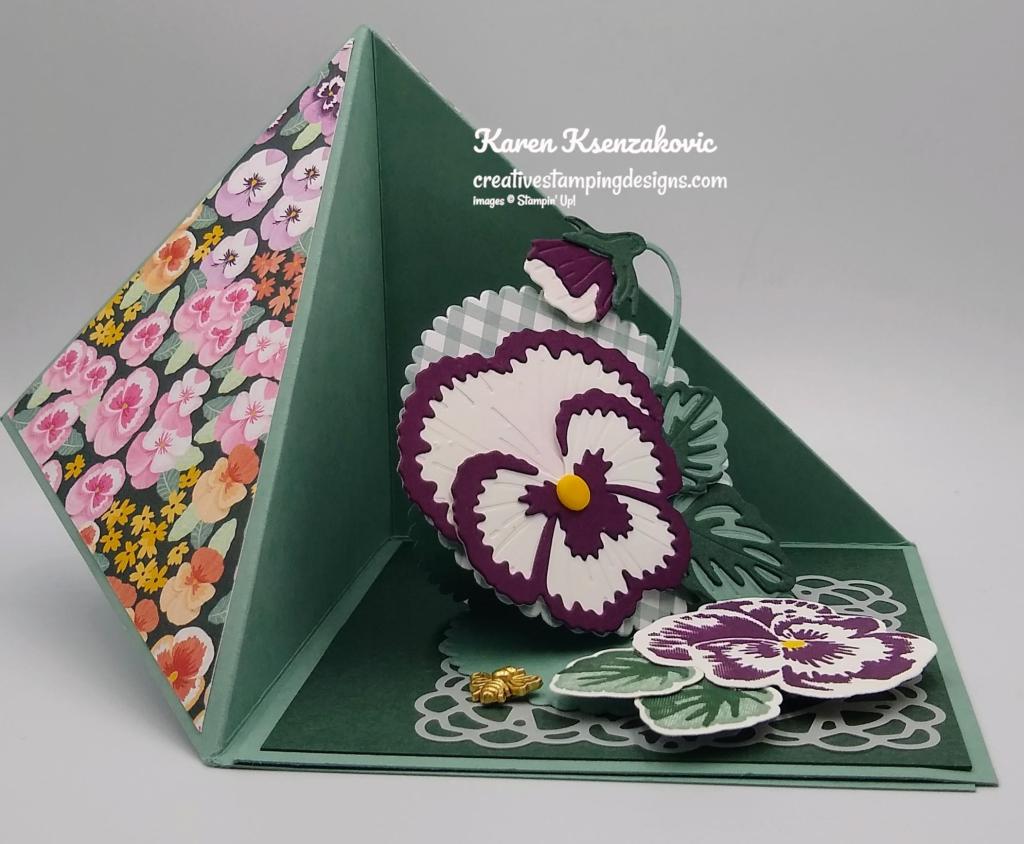
I took a 3″ X 6″ piece of Soft Succulent cardstock and folded it in half. Using the 3rd largest scalloped circle from the Layering Circle Dies, I cut it out not putting the full circle on my paper, letting it hang over the folded edge about 1/4″ so that it would open up like a card. I folded the top of the scallop circle up and in half meeting the little scallops to make the easel. I cut another of the same size scallop circle from a piece of the Pansy Petals DSP and adhered it to the top section of the scallop circle using Multipurpose Liquid Glue. Using the small circle from the Layering Circle Dies I cut a piece of Evening Evergreen cardstock to make the easel stopper. Using my Pansy Dies, I cut the pansies pieces from a panel of Basic White cardstock, I cut the detailed pieces from a panel of Blackberry Bliss cardstock. I cut the solid leaves from a panel of So Succulent cardstock and the detailed leaves from a panel of Evening Evergreen cardstock. I adhered the Blackberry Bliss pieces to the Basic White flower pieces using Multipurpose Liquid Glue then adhered the flower pieces together using Glue Dots. I adhered the detailed Evening Evergreen pieces to the Soft Succulent leaves using Multipurpose Liquid Glue and adhered them to the back of the flower using Glue Dots. I added one of the Playing With Patterns Resin Dots to the center of the flower. I adhered the pansy to the DSP scalloped circle using Stampin’ Dimensionals making sure to place it so the card could close properly. I stamped the detailed pansy images from the Stampin’ Up! Pansy Patch Photopolymer Stamp Set in Blackberry Bliss Ink on the Basic White panel. I stamped the flower center in Daffodil Delight Ink. I stamped the leaf image in Soft Succulent Ink and the detailed leaf image over the solid image in Evening Evergreen Ink. I cut the images out using my Pansy Dies. I adhered the stamped pansy to the small circle using Stampin’ Dimensionals. I adhered a panel of Evening Evergreen to the right bottom panel of the card base using Stampin’ Seal. I adhered a Square Vellum Doilie to the Evening Evergreen panel using Multipurpose Liquid Glue just in the center. I adhered the easel piece to the center of the card base using Multipurpose Liquid Glue. I adhered the easel stop piece in front of the easel piece using Stampin’ Dimensionals. I added one of the adorable Bumblebee Trinkets by my pansy using a Glue Dot.
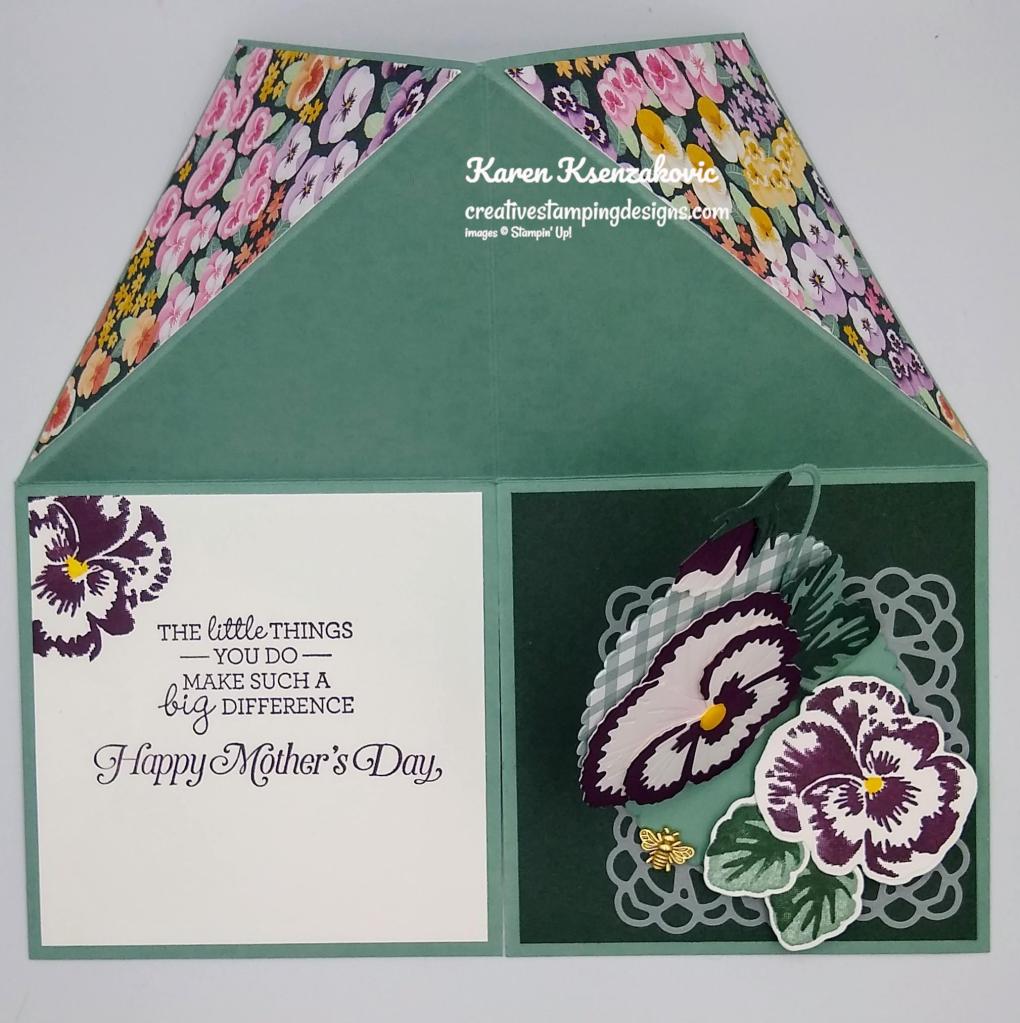
On a panel of Basic White cardstock I stamped the sentiment from the Pansy Patch stamp set in the center of the panel in Blackberry Bliss. I stamped the 2nd sentiment from the Stampin’ Up! Strong & Beautiful Cling Stamp Set in Blackberry Bliss Ink below the 1st. I stamped the detail images of the pansy from the Pansy Patch stamp set in Blackberry Bliss Ink on the top of the panel. I adhered the Whisper White panel to the card base, under the easel panel, using Stampin’ Seal.

The card folds up to a 4″ X 4″ square to fit into our Basic White Medium Envelope.

To finish my card I decorated a Basic White Medium Envelope. I stamped the detailed pansy image from the Pansy Patch stamp set in Blackberry Bliss Ink on the envelope front. I adhered a panel of the Pansy Petal DSP to the envelope flap.

Thank you for stopping by my blog today. I hope you liked my card and will give it a try. The list of measurements are below if you’d like to stamp along while watching the video. You can watch my video on my Facebook page Here.
You can also view the video on my YouTube channel Here. Products I used for my card today will be available on May 4th. Happy Stamping!!
*********************************************************************************************************
If you need any stamping supplies, I’d love to be your Demonstrator. Just click HERE to go directly to my online store or drop me an email if you have any questions.
MY CURRENT HOST CODE IS: 9R4BQD64
Use this host code when you order $50 or greater and receive a free gift from me! If your order is over $150, please do not use this code, but you’ll still get the free gift. The free gift is your choice of any 1 item valued up to $10.00 from the 2020-2021 Annual Catalog or the January-June 2021 Mini Catalog! For any orders $50 or more I will also send you my monthly class tutorials. Click HERE or go to my Customer Rewards for more details and to see what this months tutorials are.
Click HERE to shop the clearance rack.
Please remember to use my current Host Code and make sure that you can see my name on the final checkout page listed as your Demonstrator when you order so that you know that you’re ordering with me and you’ll get my rewards!
Happy Stamping, Karen!
*********************************************************************************************************
2021-2022 Annual Catalog Designer Series Paper Share
Want to get in on my Designer Serie Paper Share? Get a sampling of all the new Designer Series Paper coming in the 2021-2022 Annual Catalog. My Pre-Order for the DSP is gong on now, but you only have until May 2nd at 8pm to order. If you are interested or want to know what a product share is, click HERE.
*********************************************************************************************************
Online Host Club Starting June 1st
Does your Wish List and 2021-2022 Annual Catalog look like mine that just about every page is marked? Do you want it all and don’t want to spend a lot of money all at once? An Online Host Club might just be the perfect solution for you. This is the perfect way to build up your Stampin’ Up! supplies a little at a time and receive host benefits too. Click Here for details on joining my Online Host Club.
*********************************************************************************************************

Stampin’ Up! has updating the Clearance Rack with some new goodies over night! Head over there quickly to get your hands on some great deals. But hurry!! Clearance Rack deals are only while supplies last!
CLICK HERE to head over to my online store to shop those great deals, but it must be after midnight MOUNTAIN TIME tonight!! Have fun shopping!
*********************************************************************************************************
Batter Up!
Subscribe April 11 – May 10
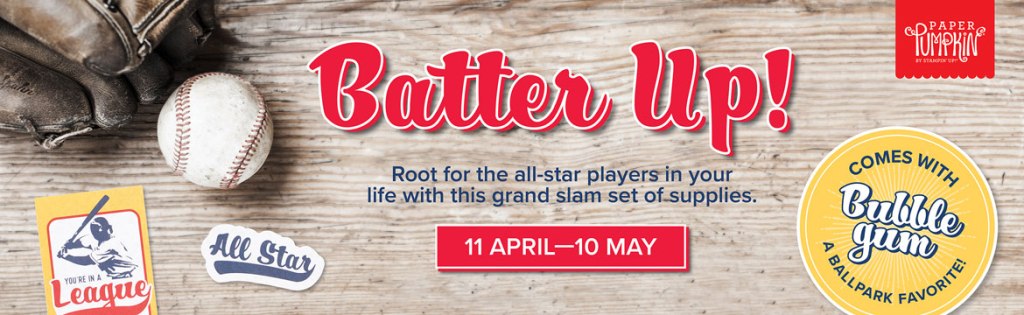
Whether you’re crafting for a father, grandfather, nephew, or brother, we’ve got all your bases covered with the Batter Up! Paper Pumpkin Kit! This month’s kit is the perfect pick for making masculine masterpieces.
Then again, we know that grass-stained pants and sliding into home aren’t just for the boys—this month’s kit is a triple threat! Designed with men, sport-lovin’ ladies, and baseball fanatics in mind, anyone would bounce from their spot in the bleachers if they received a classic card from the Batter Up! kit. After all, this month’s kit was made for celebrating the all-stars, MVPs, and the greats—no matter what team they play on!
Step up to the plate, take a swing, and knock it out of the park! With the Batter Up! Paper Pumpkin Kit, it’s your turn to go to bat for all the people who’ve gone to bat for you. This month’s timeless kit with a “throwback” theme contains enough grand slam supplies to create nine cards—and coordinating envelopes—featuring classic colors, pinwheel and pinstripe patterns, and vintage-washed paper pieces. There’s no “batter” way to root, root, root for your home team and honor the all-stars in your life!
A beloved baseball-themed kit would be incomplete without the sport’s signature, sticky snack—the official bubble gum of the MLB! A favorite in the field, the Batter Up! Paper Pumpkin Kit contains a couple sticks of the chewy staple; chew while you craft, slide a piece into a card, or save it for later.
Send a seventh-inning stretch in a classic card with all-star stripes, a nostalgic nod, and a stamp set fit for an MVP! But, before you give it all you’ve got, give this month’s promotional video a watch. See what the Batter Up! kit is all about! Play ball!
Details
- Kit contains enough supplies to create 9 cards—3 each of 3 designs—and coordinating envelopes. The all-inclusive kit includes printed card bases, die-cut paper pieces, embellishments, adhesive, and more!
- Card size: 4-1/4″ x 5-1/2″ (10.8 x 14 cm)
- Envelope size: 4-1/2″ x 5-3/4″ (11.4 x 14.6 cm)
- Coordinating colors: Basic White, Bumblebee, Night of Navy, Pacific Point, Real Red, Smoky Slate, Soft Suede
- Comes with the official bubble gum of the MLB—a ballpark favorite! Chew while you craft, slide a piece into a card, or save it for later.
Subscribe to the May 2021 Paper Pumpkin Kit between 11 April and 10 May at paperpumpkin.com!
Note: Supplies may be limited toward the end of the subscription period.
*********************************************************************************************************
Card stock cuts for this project:
- Basic White Cardstock 4″ X 5 1/4″ (flowers), 3 3/4″ X 3 3/4″ (inner liner)
- Blackberry Bliss Cardstock 4 1/2″ X 2″ (flower details)
- Evening Evergreen Cardstock 3 3/4″ X 3 3/4″ (base panel), 1 1/2″ x 1 1/2″ (easel stop circle), 2″ X 2″ (leaves)
- Soft Succulent Cardstock 8″ X 8″ (card base scored and cut as listed above), 3″ X 6″ (easel pop up listed above)
- Pansy Petals Designer Series Paper 3 3/4″ X 3 3/4″ (cut in 1/2 for triangle panels), 3″ X 3″ (scallop circle), 2 1/2″ X 6″ (envelope flap)
*********************************************************************************************************
Product List


Such a pretty card Karen! The colors are perfect, love that fancy fold design! 🙂
LikeLiked by 1 person
Thank you so much Amy 🙂
LikeLike
REALLY gorgeous! And an awesome-good fun fold that now I have to make!! TFS! 🙂
LikeLiked by 1 person
Thank you so much Mary 🙂 Can’t wait to see yours
LikeLike
I loved watching you create this! I’ll be trying it soon.
LikeLiked by 1 person
Thank you so much Karen 🙂
LikeLike