

Good snowy Thursday morning my stamping friends and welcome to our Happy Inkin’ Thursday Blog Hop. I hope everyone is doing well today. I woke up to another 6″ of snow on top of the 30 plus inches we got last week and this weekend. It’s not looking like spring here for sure. I’m starting to think this snow is not going away by spring for sure.
If you are hopping over from Akiko, thank you for stopping by my blog. This week we have a color challenge. Be sure to take a moment to hop around to see everyone’s beautiful projects. Here is my card for today.

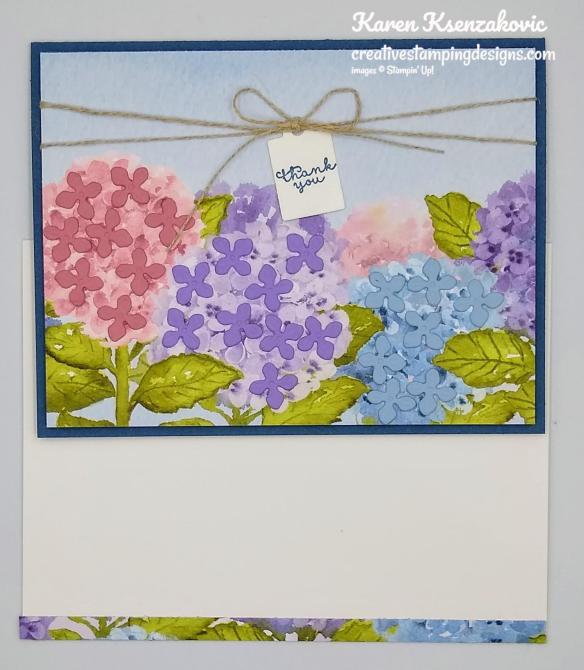
I used the Stampin’ Up! Hydrangea Haven Bundle and the Hydrangea Hill Designer Series Paper. Here are out colors for this weeks Blog Hop.


I started by using the Hydrangea Dies and cutting the tiny flowers from panels of Highland Heather, Rococo Rose and Seaside Spray cardstock. I adhered a piece of Hydrangea Hill DSP to a panel of Night of Navy cardstock using Stampin’ Seal.

I adhered the tiny flowers to the flowers on the Hydrangea Hill DSP using Multipurpose Liquid Glue. On a small panel of Basic White cardstock I stamped the sentiment from the Stampin’ Up! Hydrangea Haven Photopolymer Stamp Set in Misty Moonlight Ink. I cut the sentiment out using the Hydrangea Dies.

I wrapped a piece of Linen Thread around the card front twice, stringing it through the sentiment, and tied a bow. I adhered the card front to a Night of Navy card base using Stampin’ Dimensionals.

On the inside I stamped the sentiment from the Hydrangea Haven stamp set in the center of a Basic White panel in Misty Moonlight Ink. I adhered 2 strips of the Hydrangea Hill DSP on either side of the panel using Stampin’ Seal. I added a couple of the tiny flowers using Multipurpose Liquid Glue. I adhered the Basic White panel to a Seaside Spray mat using Stampin’ Seal and then to the inside of the Night of Navy card base using Stampin’ Seal.
To complete my card I decorated a Basic White Medium Envelope. I adhered a strip of Hydrangea Hill DSP to the envelope front and a panel to the envelope flap.

Thank you for visiting my blog today. I hope you liked my card and will give it a try. Now that you’ve seen my card, take a minute to hop through all our projects today. If you click on the Next Blog button, you’ll go to Amy’s page. Or you can just click on the names below to go directly to all their blogs! Happy Hopping!!

Karen Ksenzakovic: You Are Here
*********************************************************************************************************
If you need any stamping supplies, I’d love to be your Demonstrator. Just click HERE to go directly to my online store or drop me an email if you have any questions.
MY CURRENT HOST CODE IS: 9BCVNW9D
Use this host code when you order $50 or greater and receive a free gift from me! If your order is over $150, please do not use this code, but you’ll still get the free gift. The free gift is your choice of any 1 item valued up to $10.00 from the 2020-2021 Annual Catalog or the January-June 2021 Mini Catalog! For any orders $50 or more I will also send you my monthly class tutorials. Click HERE or go to my Customer Rewards for more details and to see what this months tutorials are.
Click HERE to shop the clearance rack.
Please remember to use my current Host Code and make sure that you can see my name on the final checkout page listed as your Demonstrator when you order so that you know that you’re ordering with me and you’ll get my rewards!
Happy Stamping, Karen!
*********************************************************************************************************
Card stock cuts for this project:
- Basic White Cardstock 1 1/2″ X 1 1/2″ (sentiment), 4″ X 5 1/4″ (inner liner)
- Highland Heather Cardstock 3/4″ x 5 1/2″ (flowers)
- Misty Moonlight Cardstock 8 1/2″ X 5 1/2″(card base scored and folded at 4 1/4″), 4″ X 5 1/4″ (card front)
- Rococo Rose Cardstock 3/4″ X 5 1/2″ (flowers)
- Seaside Spray Cardstock 3/4″ X 5 1/2″ (flowers), 4 1/8″ X 5 3/8″ (inner liner mat)
- Hydrangea Hill Designer Series Paper 4″ X 5 1/4″ (card front), 2 – 1/4″ X 4″ (strips on inner liner), 1/4″ X 6″ (piece for envelope front), 2 1/2″ X 6″ (piece for envelope flap)
*********************************************************************************************************
Product List


So pretty Karen! I love the little flower petals on each DSP flower!!😊
LikeLiked by 1 person
Thank you so much Akiko 🙂
LikeLiked by 1 person
So pretty Karen! Love those little die cut flowers, perfect with the designer paper! 🙂
LikeLiked by 1 person
Thank you so much Amy 🙂
LikeLike
The addition of the little flowers makes this a big hit!
LikeLiked by 1 person
Thank you so much Karen 🙂
LikeLike
This is gorgeous!! I love the dimension you got with the soft background flowers up to the dies!
LikeLiked by 1 person
Thank you so much Kim 🙂
LikeLike
Gorgeous! Love how you added the little die cut flowers to the DSP – that’s perfect! 🙂
LikeLiked by 1 person
Thank you so much Mary 🙂
LikeLike