
Good Friday morning my stamping friends. Did you all have a nice Thanksgiving? How many of you ended up in a food coma after eating your dinner? We had a very nice quiet one here. Once everything was done, I started pulling some boxes out of the attic of our Christmas decorations. It’s been a tradition for years that the weekend after Thanksgiving Christmas explodes in my house. The past couple years it’s taken more that just the weekend to decorate with my work schedule. This year I have the advantage that I don’t have to undecorate and clean before decorating since we just cleaned and put all our furniture back in our house. I’ll see how much I get done between today and tomorrow.
Today’s card I made on my Facebook Live video on Wednesday. If you were able to join me or watched the replay, thank you very much. If you’d like to watch my video and stamp along, the measurements are below along with the links to my Facebook page and my YouTube channel. Here’s my card that I made.
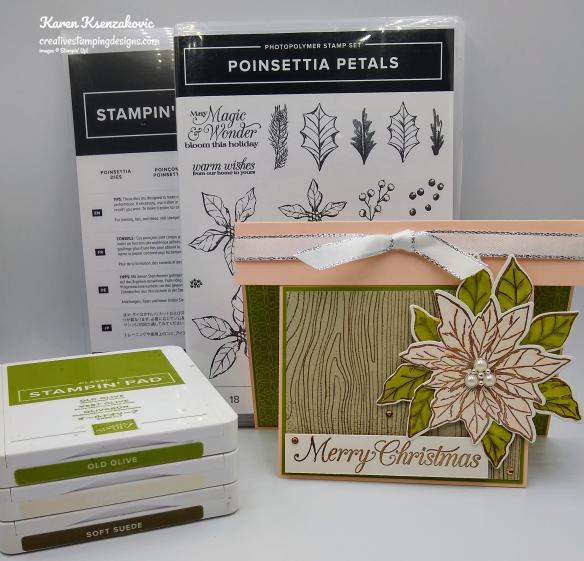
I used the Stampin’ Up! Poinsettia Petals Bundle for today’s Fun Fold Card.
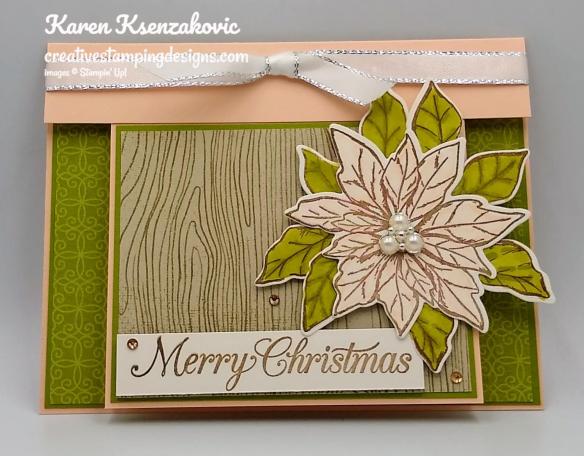
I started by adhering a panel of Poinsettia Place DSP to an Old Olive mat using Stampin’ Seal. I adhered the matted DSP to the Petal Pink card front using Multipurpose Liquid Glue. I adhered the card front just under the 1″ top of the card base using Tear & Tape.

On a panel of Shimmery White cardstock I stamped the poinsettia image from the Stampin’ Up! Poinsettia Petals Photopolymer Stamp Set in Soft Suede Ink. I stamped the medium poinsettia layered image from the Poinsettia Petals stamp set on the Shimmer White cardstock twice in Soft Suede Ink. I colored the poinsettia image in using my Petal Pink Stampin’ Blends Markers. I then used my Stampin’ Blends Color Lifter to remove some of the color so that it had a very light color. I colored the leave in using my Old Olive Stampin’ Blends Markers. I cut all the images out using my Poinsettia Dies. I snipped the leaves apart using my Paper Snips. I adhered the leaves under the flower image using Glue Dots.
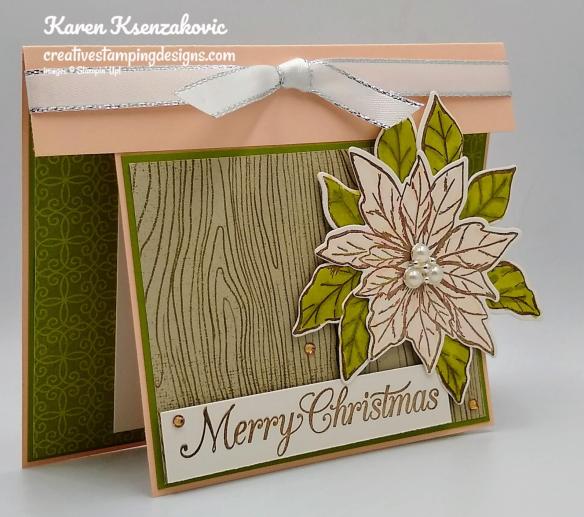
I wrapped a piece of 3/8″ Silver Metallic-Edge Ribbon around the top of the card front and tied a knot. On a strip of Shimmery White cardstock I stamped the sentiment from the Poinsettia Petals stamp set in Soft Suede Ink. I adhered the sentiment to the card front using Stampin’ Dimensionals. I adhered the flower to the right of the card front using Stampin’ Dimensionals. I added a Beaded Pearl embellishment to the flower center using a Glue Dot. I added a few Champagne Rhinestone Basic Jewels to the card front.
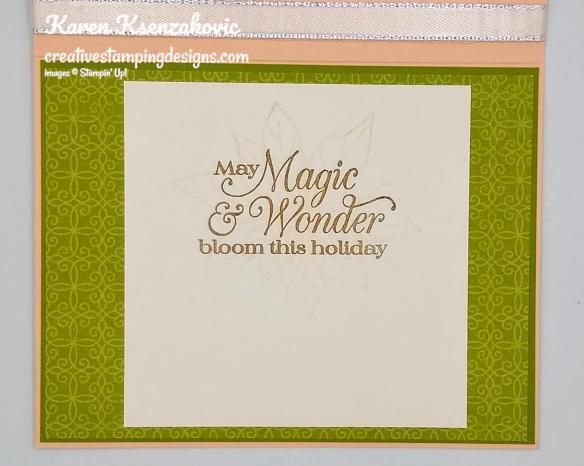
On the inside I adhered a panel of Poinsettia Place DSP to an Old Olive mat using Stampin’ Seal and then to the inside of the Petal Pink card base using Multipurpose Liquid Glue. I stamped the sentiment from Poinsettia Petals stamp set in the center of a panel of Shimmery White cardstock in Soft Suede Ink. I stamped the poinsettia flower from the Poinsettia Petals stamp set over the sentiment in Petal Pink Ink, stamping off once. I adhered the Shimmery White panel to the inside of the Petal Pink card base in the center of the DSP using Multipurpose Liquid Glue.

To finish my card I decorated a Medium Whisper White Envelope. I stamped the poinsettia flower from the Poinsettia Petals stamp set in Soft Suede Ink on the envelope front. I colored the flower in using my Petal Pink Stampin’ Blends Markers. I masked the flower and stamped the leaves from the medium layered poinsettia from the Poinsettia Petals stamp set in Soft Suede Ink. I colored the leave in using my Old Olive Stampin’ Blends Markers. I adhered a panel of Poinsettia Place DSP to the envelope flap.

Thank you for stopping by my blog today. I hope you liked my card and will give it a try. The list of measurements are below if you’d like to stamp along while watching the video. You can watch my video on my Facebook page Here.
You can also view the video on my YouTube channel Here. Happy Stamping!!
*********************************************************************************************************
If you need any stamping supplies, I’d love to be your Demonstrator. Just click HERE to go directly to my online store or drop me an email if you have any questions.
MY CURRENT HOST CODE IS: 9XYYG2ZU
Use this host code when you order $50 or greater and receive a free gift from me! If your order is over $150, please do not use this code, but you’ll still get the free gift. The free gift is your choice of any 1 item valued up to $10.00 in the 2020-2021 Annual Catalog! For any orders $50 or more I will also send you my monthly class tutorials. Click HERE or go to my Customer Rewards for more details and to see what this months tutorials are.
Click HERE to shop the clearance rack.
Please remember to use my current Host Code and make sure that you can see my name on the final checkout page listed as your Demonstrator when you order so that you know that you’re ordering with me and you’ll get my rewards!
Happy Stamping, Karen!
*********************************************************************************************************
Beary Comforting
Subscribe November 11-December 10

If you haven’t heard already, Paper Pumpkin is our monthly One-Stop Box™ that offers a wide variety of unique papercrafting projects for subscribers of any skill level! These themed, all-inclusive craft kits encourage customers to explore their creativity, try new techniques, and discover their potential in papercrafting.
December’s cute and cuddly Paper Pumpkin kit—called “Beary Comforting”—is designed to uplift your loved ones as this beary tough year finally comes to a close. After a year like 2020, we all could use a big bear hug! With the help of this bear-themed kit, you can create 12 unbearably cute cards featuring warm and fuzzy friends, sweet stamps, and meaningful messages. Near or far, send your friends and family the extra comfort, love, and encouragement they need with this month’s Paper Pumpkin kit!
ABOUT THE DECEMBER KIT
Details
- Kit contains enough supplies to create 12 cards and coordinating envelopes.
- Card size: 4-1/4″ x 5-1/2″ (10.8 x 14 cm)
- Envelope size: 4-1/2″ x 5-3/4″ (11.4 x 14.6 cm)
- Coordinating colors: Basic Gray, Calypso Coral, Cinnamon Cider, Daffodil Delight, Rich Razzleberry, Soft Sea Foam, Whisper White
SUBSCRIPTION INFORMATION
Subscribe to the December 2020 Paper Pumpkin Kit between 11 November and 10 December at paperpumpkin.com!
Note: Supplies may be limited toward the end of the subscription period.
*********************************************************************************************************
FREE Bonus Quite Curvy and Curvy Christmas Project Tutorials With Videos When You Purchase The Bundle From Me!!

A group of us worked together to create five awesome tutorials using the Stampin’ Up! Curvy Celebrations special release products with video tutorials! You can get this set of exclusive tutorials when you purchase either the Quite Curvy Variety Bundle (item 158396) or the Quite Curvy Bundle (item 156228) from me between now and January 4!
If your order is $50 or greater and includes either of these bundles, you will get this set of tutorials in addition to the monthly online class tutorials AND your $10 thank you gift! And you’ll also earn my Creative Stamping Designs Reward Points!
*********************************************************************************************************
Card stock cuts for this project:
- Old Olive Cardstock 3 7/8″ X 3 1/8″ (card front mat), 4 1/8″ X 5 3/8″ (inner liner mat)
- Petal Pink Cardstock 5 1/2″ X 5 1/4″ (card base scored and folded at 4 1/4″), 4″ X 4″ (card front)
- Shimmer White Cardstock 5 1/2″ X 5 1/2″ (flowers), 5/8″ X 3 1/4″ (sentiment), 3 3/4″ X 3 3/4″ (inner liner)
- Poinsettia Place Designer Series Paper 3 3/4″ X 3″ (card front), 4″ x 5 1/4″ (inner liner), 2 1/4″ X 6″ (piece for envelope flap)
*********************************************************************************************************
Product List
")
")


So pretty Karen! Love the colors that you used. Have fun decorating…it only takes us a few hours (thank goodness!). 🙂
LikeLiked by 1 person
Thank you Amy 🙂 It usually takes me a couple days to decorate LOL Yes, we have that much stuff
LikeLiked by 1 person