
Good Saturday morning my stamping friends and welcome to the weekend. I hope you have something fun planned or maybe relaxing is the plan. It’s supposed to be a beautiful weekend here in NJ. I’m hoping to get in a walk or 2 with Coraline to get some of her energy out. Tomorrow, I get to visit my team leader Amy for our meeting and see her dog, Ginny. Ginny always knows I’m coming, and I bring her some kind of treat from the bakery.
Today’s card I used a set from the Annual Catalog doing one of my favorite techniques. This card used Stamps, Ink and Paper all layered together. I added a couple embellishment to dress it up a bit. Here’s my card for today.
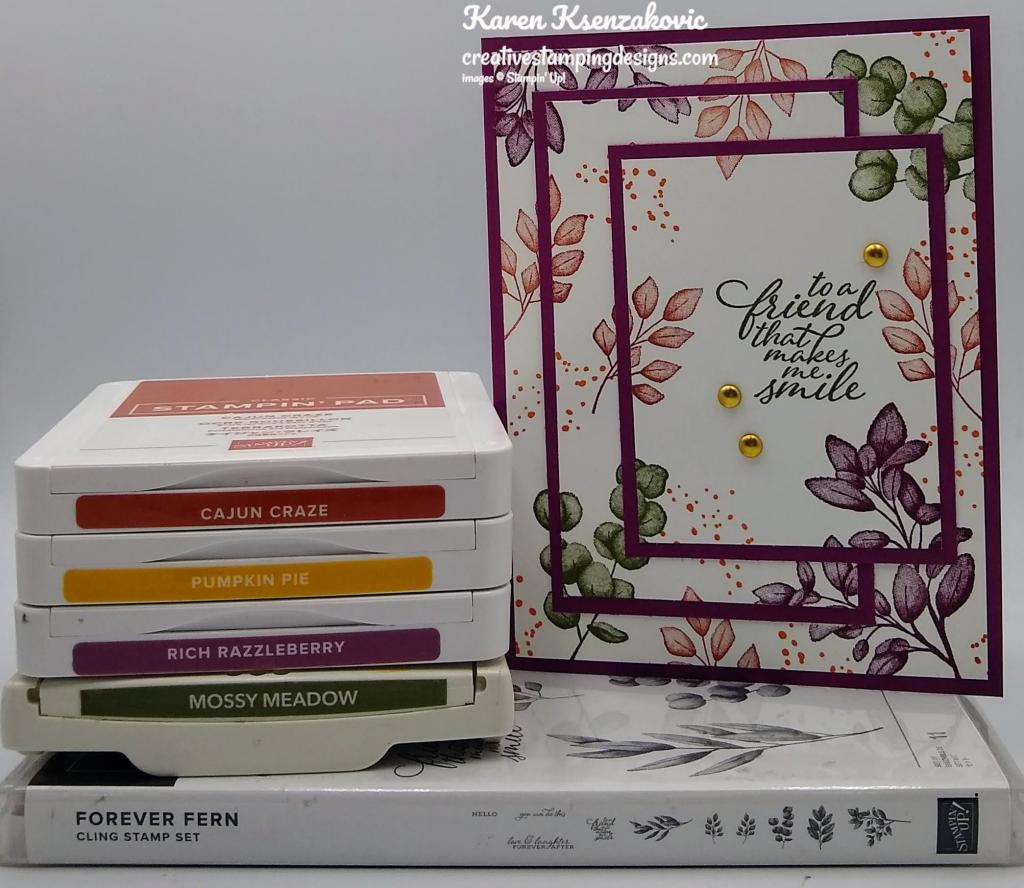
I used the Stampin’ Up! Forever Fern Cling Stamp Set for my Triple Time card today.

I started by stamping the sentiment from the Forever Fern stamp set in Mossy Meadow Ink on the smallest panel of Basic White cardstock. I took the 3 panels of Basic White cardstock and lightly adhered them together using a tiny amount of Stampin’ Seal.
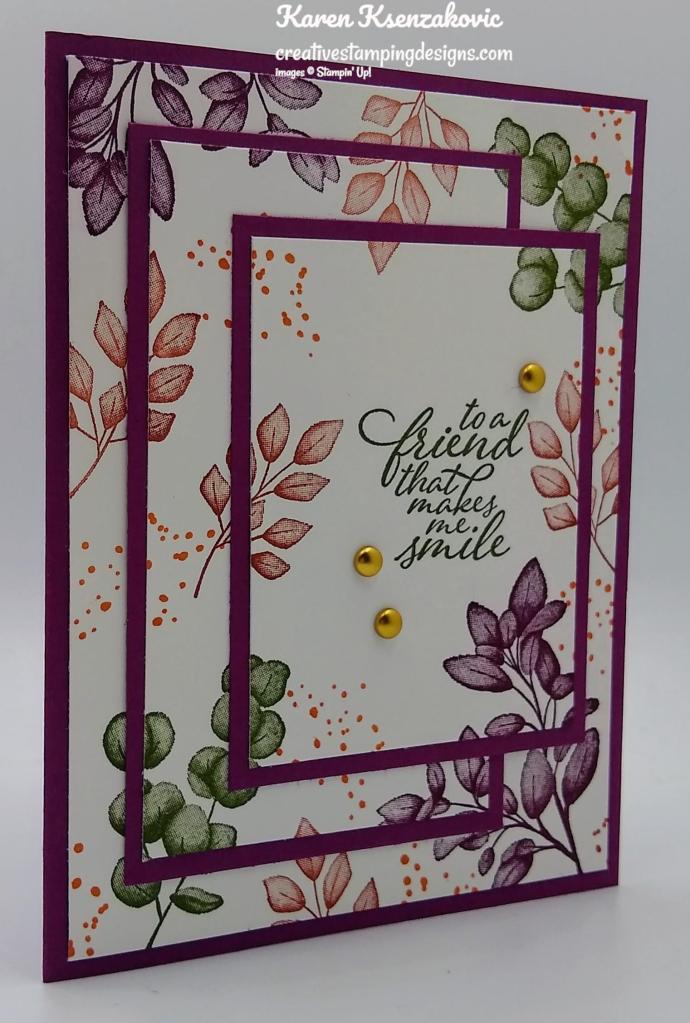
I randomly stamped the leaf and splatter images from the Forever Fern stamp set in Cajun Craze, Mossy Meadow, Pumpkin Pie and Rich Razzleberry Inks on the layered panels.

I adhered the 2 smaller stamped panels to Rich Razzleberry mats using Stampin’ Seal. I adhered the larger Basic White panel to the Rich Razzleberry card base using Stampin’ Seal. I adhered the other 2 panels to the card front matching up the leaf images. I added a few Brushed Metallic Adhesive Backed Dots to the card front.

On the inside I stamped the sentiment from the Forever Fern stamp set in Mossy Meadow Ink on a panel of Basic White cardstock. I stamped the leaf and splatter images from the Forever Fern stamp set in Cajun Craze, Mossy Meadow, Pumpkin Pie and Rich Razzleberry Inks on the top and bottom of the panel. I adhered the Basic White panel to a Mossy Meadow mat and then to the inside of the Rich Razzleberry card base.

To finish my card, I decorated a Basic White Medium Envelope. I stamped the leaf images from the Forever Fern stamp set on the envelope front and flap the same as I did for the card.

Thank you for stopping by my blog today. I hope you liked my card and will give it a try. Happy Stamping!!
*********************************************************************************************************
If you need any stamping supplies, I’d love to be your Demonstrator. Just click HERE to go directly to my online store or drop me an email if you have any questions.
MY CURRENT HOST CODE IS: CD74ZSKH
Use this host code when placing an order with me. When you order $50 or greater you will receive a free gift from me! If your order is over $150, please do not use this code, but you’ll still get the free gift. The free gift is your choice of any 1 item valued up to $10.00 from the 2021-2022 Annual Catalog or the January – June 2022 Mini Catalog! For any orders $50 or more I will also send you my monthly class tutorials. Click HERE or go to my Customer Rewards for more details and to see what this month’s tutorials are.
Please remember to use my current Host Code and make sure that you can see my name on the final checkout page listed as your Demonstrator when you order so that you know that you’re ordering with me and you’ll get my rewards!
Happy Stamping, Karen
*********************************************************************************************************
September 1 – September 30!!!

Every week in the month of September Stampin’ Up! will be offering a selection of discounted products. Discounts and product selection will vary from week to week.
Head over to my Online Store Here to see the Weekly Deals for this week.
- New products added each week on 1, 8, 15, and 22 September.
- Week 1: Sept 1−7, Week 2: Sept 8−14, Week 3: Sept 15−21, Week 4: Sept 22−28
- Promotion ends 28 September.
- Product options and discounts vary based on inventory availability.
- All order types qualify for this promotion
- Discounted items can be added to a Starter Kit.
- Get the most up-to-date product information on the online store beginning 1 September.
*********************************************************************************************************
Available Now!!

Some things are great on their own but become epic when they are paired with something else: cereal and milk, toast and butter, Fred Astaire and Ginger Rogers. We may be biased, but our favorite combo is our stamp sets and dies—and that’s what the Perfect Partners promotion is all about!
We created six new dies that coordinate with stamp sets in the 2022–2023 Annual Catalog and the July–December 2022 Mini Catalog. These coordinating dies will only be available during this promotion and will not be offered in any catalog.
These stamp sets and dies are available separately or as a bundle. By buying the bundle, you and your customers will save 10% off the retail price.
Put these wonderful stamp sets and dies together for more papercrafting fun!
*********************************************************************************************************
Spooky Treats
Today, September 10 is The Last Day to Subscribe

Get your Halloween crafting on with the Spooky Treats Paper Pumpkin Kit. This month’s kit includes everything you need to make 18 absolutely adorable (and just the right amount of spooky) treat boxes—that’s 6 each of 3 unique designs! No need to let the season creep up on you; subscribe and order your kit today.
Plus, we’re putting the TREAT in trick-or-treat with a special GIVEAWAY on social media starting 5 September at 9:00am (MT)! Simply follow @PaperPumpkin on Instagram or the Paper Pumpkin page on Facebook, like either post, and mention three friends in the comments for your chance to win one of two personalized JBL speakers. You’ll have to be quick because the giveaway closes 8 September at 4:00pm (MT). Don’t miss out on this fang-tastic opportunity!
This kit includes:
- This month’s kit contains enough elements to create 18 treat boxes—6 each of 3 designs. This all-inclusive kit includes printed box bases and tops, die-cut paper pieces, adhesives, and more!
- The Spooky Treats Paper Pumpkin Kit includes an Orchid Oasis Classic Stampin’ Spot!
- This kit’s stamp set puts the TREAT in trick-or-treat with fun, Halloween-themed sentiments and designs. Embrace the spooky season with ghost, bat, spider, and star images.
- This kit also includes a special peek-through box top on one of the box designs.
Finished box size: 2-1/2″ x 3″ x 1″ (6.4 x 7.6 x 2.5 cm)
Coordinating Stampin’ Up! colors: Basic Black, Gray Granite, Orchid Oasis, Fresh Freesia, Crushed Curry, Pumpkin Pie
Subscribe to the August Paper Pumpkin Kit between 11 August and 10 September at paperpumpkin.com!
Note: Supplies may be limited toward the end of the subscription period.
*********************************************************************************************************
Card stock cuts for this project:
- Basic White Cardstock 2 – 4″ X 5 1/4″ (card front & inner liner), 2 1/2″ X 4 1/4″ & 3 1/4″ x 2 1/2″ (card front panels)
- Mossy Meadow Cardstock 4 1/8″ x 5 3/8″ (inner liner mat)
- Rich Razzleberry Cardstock 8 1/2″ x 5 1/2″ (card base scored & folded at 4 1/4″), 2 3/4″ X 4 1/2″ & 3 1/2″ X 2 3/4″ (card front panel mats)
*********************************************************************************************************
Product List
")


So pretty Karen! The fall colors are perfect with those images, love your design! 🙂
LikeLiked by 1 person
Thank you so much Amy 🙂
LikeLike
So so pretty. Love your choice of colors. Great example of triple time stamping! TFS
LikeLiked by 1 person
Thank you so much Susan 🙂
LikeLike
Hi Karen ~ I absolutely LOVE your card for today! Thank you for using this stamp set in such a unique way! This is one of my favorite sets and you’ve brought in right into fall. I’ve never decorated the back flap of an envelope but will sure start doing this when I create your card for my stash. Thank you for sharing and taking the time to blog your creations as well! Terry Dunlap
LikeLiked by 1 person
Thank you so much Terry for all your kind words 🙂 I’m so happy you like it.
LikeLike
Love your card and stamp set. Have this one and use it a lot. Do you have instructions on how to make the triple time. Made it years ago and can’t find the instructions. Would appreciate it.Maureen Wheatley
LikeLiked by 1 person
Thank you so much Maureen 🙂 The directions and measurements are on my blog. Measurements are on the bottom
LikeLike