

Good Thursday morning stamping friends and welcome to our Happy Inkin’ Thursday Blog Hop. If you are starting with me, thank you. I hope you will stop by everyone’s blog to see what they have created this week. If you are hopping over from Mary’s blog, thank you for stopping by. This week we have Sketch Challenge. If you’d like to see a quick video on how I made this card, Click Here to go to my Instagram Reels. Here is my card using this week’s sketch.
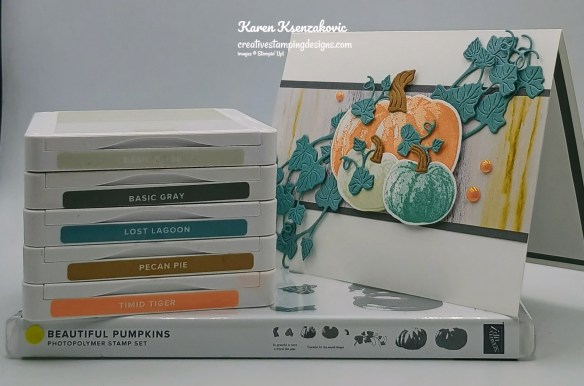
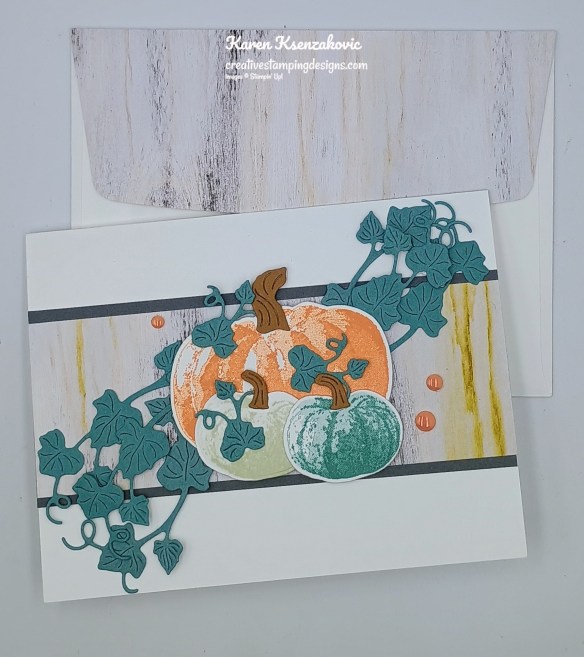
I used the Stampin’ Up! Beautiful Pumpkins Bundle along with the Country Woods Designer Series Paper for my card today.
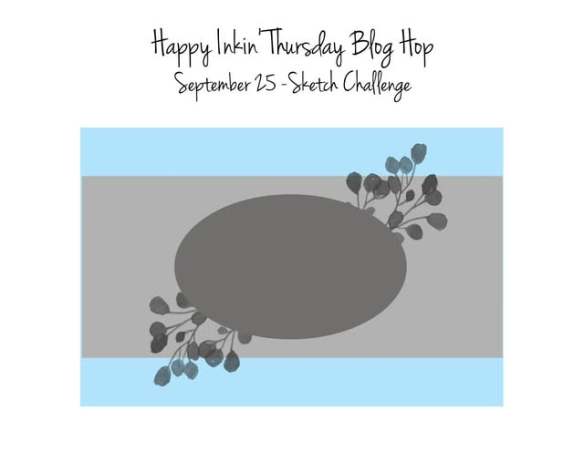
Here is our sketch for this week.
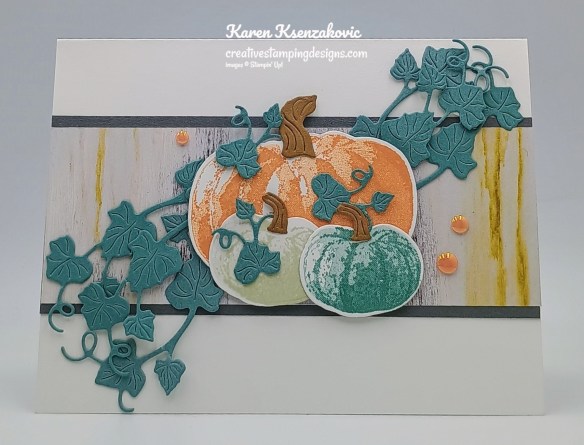
Adhere a panel of Country Wood DSP to a Basic Gray mat with Stampin’ Seal. Adhere the layered panel to a Basic White Thick card base with Stampin’ Seal.

On a panel of Basic White, stamp the large, detailed pumpkin from the Stampin’ Up! Beautiful Pumpkins Photopolymer Stamp Set in Timid Tiger Ink. Stamp the large solid pumpkin image from the Beautiful Pumpkins stamp set in Timid Tiger Ink, stamping off once on scrap paper. Stamp the small, detailed pumpkin image from the Beautiful Pumpkins stamp set in Basic Beige Ink and Lost Lagoon Ink. Stamp the small, solid pumpkin from the Beautiful Pumpkins stamp set in Basic Beige and Lost Lagoon Inks, stamping off once on scrap paper for each of them. Cut the pumpkin images out using the Beautiful Pumpkins Dies.
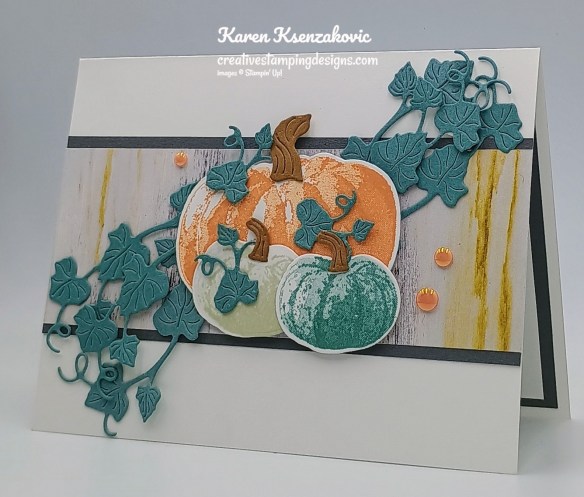
Using the Beautiful Pumpkins Dies, cut the vein/leaves die from a panel of Lost Lagoon and the pumpkin stem die from a panel of Pecan Pie. Adhere the stems to the pumpkins using Glue Dots. Adhere the small leaves to the pumpkins using Glue Dots. Adhere the pumpkins to the card front using Stampin’ Dimensionals. Adhere the vein/leaves under the pumpkins using Glue Dots and Stampin’ Dimensionals. Add a few 2025-2027 In-Color Flat Pearls to the card front.
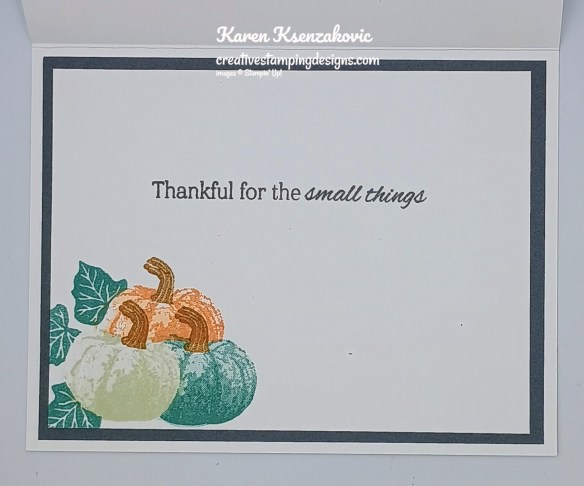
Stamp the sentiment from the Beautiful Pumpkins stamp set in Basic Gray Ink on a panel of Basic White. Stamp the small pumpkin image from the Beautiful Pumpkins stamp set in Basic Beige, Lost Lagoon and Timid Tiger Inks on the bottom of the panel. Stamp the leave in Lost Lagoon Ink and the stems in Pecan Pie Ink. Adhere the Basic White panel to a Basic Gray mat then to the inside of the Basic White Thick card base.
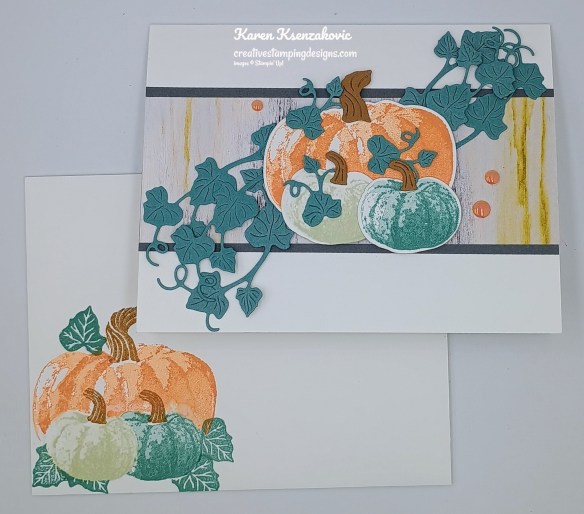
Decorate a Basic White Medium Envelope to complete your card. Stamp the small pumpkin image from the Beautiful Pumpkins stamp set in Basic Beige and Lost Lagoon Inks on the envelope front. Stamp the large pumpkin image from the Beautiful Pumpkins stamp set in Timid Tiger Ink, the leaves in Lost Lagoon and the stems in Pecan Pie Inks. Adhere a panel of Country Woods DSP to the envelope flap.
Thank you for stopping by my blog today. Now that you’ve seen my card, let’s get on with the hop! Click the button below to hop over to see what Akiko has created. Happy Hopping!!

Just in case you get lost along the way, here is a list of the team members involved in the hop today.
Karen Ksenzakovic You are here
*********************************************************************************************************
If you need any stamping supplies, I’d love to be your Demonstrator. Just click HERE to go directly to my online store or drop me an email if you have any questions.
*********************************************************************************************************
Card stock cuts for this project:
- Basic White Cardstock 3″ x 4″(pumpkins), 3 3/4″ x 5″(inner liner)
- Basic White Thick Cardstock 5 1/2″ x 8 1/2″(card base scored & folded at 4 1/4″)
- Basic Gray Cardstock 2 1/4″ x 5 1/2″(card front panel mat), 4″ x 5 /4″(inner liner mat)
- Lost Lagoon Cardstock 4 1/4″ x 5″(leaves)
- Pecan Pie Cardstock 1 1/4″ x 1 1/2″(die cuts)
- Country Woods Designer Series Paper 2″ x 5 1/2″(card front panel), 2 1/4″ x 6″(envelope)
*********************************************************************************************************
Product List
![Beautiful Pumpkins Bundle (English) [ 166012 ]](https://assets1.tamsnetwork.com/images/EC042017NF/166012s.jpg "Beautiful Pumpkins Bundle (English) [ 166012 ]")
![Beautiful Pumpkins Photopolymer Stamp Set (English) [ 166009 ]](https://assets1.tamsnetwork.com/images/EC042017NF/166009s.jpg "Beautiful Pumpkins Photopolymer Stamp Set (English) [ 166009 ]")
![Beautiful Pumpkins Dies [ 166011 ]](https://assets1.tamsnetwork.com/images/EC042017NF/166011s.jpg "Beautiful Pumpkins Dies [ 166011 ]")
![Basic Gray 8-1/2" X 11" Cardstock [ 121044 ]](https://assets1.tamsnetwork.com/images/EC042017NF/121044s.jpg "Basic Gray 8-1/2\" X 11\" Cardstock [ 121044 ]")
![Basic White 8 1/2" X 11" Cardstock [ 166780 ]](https://assets1.tamsnetwork.com/images/EC042017NF/166780s.jpg "Basic White 8 1/2\" X 11\" Cardstock [ 166780 ]")
![Basic White 8 1/2" X 11" Thick Cardstock [ 159229 ]](https://assets1.tamsnetwork.com/images/EC042017NF/159229s.jpg "Basic White 8 1/2\" X 11\" Thick Cardstock [ 159229 ]")
![Lost Lagoon 8-1/2" X 11" Cardstock [ 133679 ]](https://assets1.tamsnetwork.com/images/EC042017NF/133679s.jpg "Lost Lagoon 8-1/2\" X 11\" Cardstock [ 133679 ]")
![Pecan Pie 8 1/2" X 11" Cardstock [ 161717 ]](https://assets1.tamsnetwork.com/images/EC042017NF/161717s.jpg "Pecan Pie 8 1/2\" X 11\" Cardstock [ 161717 ]")
![Country Woods 12" X 12" (30.5 X 30.5 Cm) Designer Series Paper [ 163393 ]](https://assets1.tamsnetwork.com/images/EC042017NF/163393s.jpg "Country Woods 12\" X 12\" (30.5 X 30.5 Cm) Designer Series Paper [ 163393 ]")
![Basic Gray Classic Stampin' Pad [ 149165 ]](https://assets1.tamsnetwork.com/images/EC042017NF/149165s.jpg "Basic Gray Classic Stampin' Pad [ 149165 ]")
![Basic Beige Classic Stampin Pad [ 163806 ]](https://assets1.tamsnetwork.com/images/EC042017NF/163806s.jpg "Basic Beige Classic Stampin Pad [ 163806 ]")
![Lost Lagoon Classic Stampin' Pad [ 161678 ]](https://assets1.tamsnetwork.com/images/EC042017NF/161678s.jpg "Lost Lagoon Classic Stampin' Pad [ 161678 ]")
![Timid Tiger Classic Stampin' Pad [ 165278 ]](https://assets1.tamsnetwork.com/images/EC042017NF/165278s.jpg "Timid Tiger Classic Stampin' Pad [ 165278 ]")
![Pecan Pie Classic Stampin' Pad [ 161665 ]](https://assets1.tamsnetwork.com/images/EC042017NF/161665s.jpg "Pecan Pie Classic Stampin' Pad [ 161665 ]")
![2025–2027 In Color™ Flat Pearls [ 165192 ]](https://assets1.tamsnetwork.com/images/EC042017NF/165192s.jpg "2025–2027 In Color™ Flat Pearls [ 165192 ]")
![Basic White Medium Envelopes [ 159236 ]](https://assets1.tamsnetwork.com/images/EC042017NF/159236s.jpg "Basic White Medium Envelopes [ 159236 ]")


![Take Your Pick [ 144107 ]](https://assets1.tamsnetwork.com/images/EC042017NF/144107s.jpg "Take Your Pick [ 144107 ]")


Gorgeous card! Love those pumpkins! 😊
LikeLike
Thank you so much Akiko 🙂
LikeLike
Such a pretty card! Love the pumpkins, perfect for a fall card! 🙂
LikeLike
Thank you Amy 🙂
LikeLike
Beautiful! I love the use of green with this! TFS
LikeLike
Thank you Tara 🙂
LikeLike
oooh – love the pumpkins – and the use of Lost Lagoon as the green – pretty combo!
LikeLike
Thank you so much Terry Lynn 🙂
LikeLike
So pretty, Karen. I love those colors! TFS
LikeLike
Thank you so much Susan 🙂
LikeLike
Oh – that’s so pretty! Love the blues and oranges – and the DSP was a cool touch! 🙂
LikeLike
Thank you so much Mary 🙂
LikeLike