
Good Friday morning stamping friends and welcome to my fun fold Friday. I hope you all had a great week and are looking forward to the weekend ahead.
Today’s card is one that we made at our quarterly in person team meeting on Sunday. This beauty was designed by one of my team members Terry Lynn Bright. Here’s my card for today.
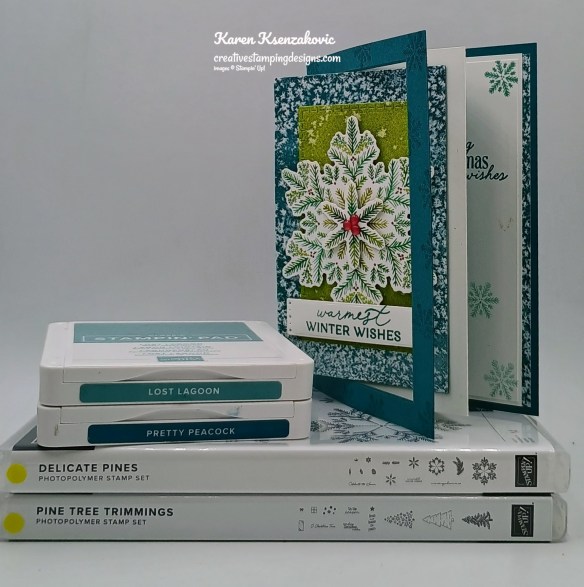
I used the Stampin’ Up! Delicate Pines Bundle along with the Elegant Pines Designer Series Paper, Textured Notes Dies and Stampin’ Up! Pine Tree Trimmings Photopolymer Stamp Set for my card today.

Randomly stamp the small snowflake image from the Stampin’ Up! Delicate Pines Photopolymer Stamp Set in Pretty Peacock Ink around the edges of the panel of Pretty Peacock. Adhere panel of Pretty Peacock to card front of the Pretty Peacock card base w/ adhesive on outer edges only. Die cut using Textured Notes Dies in center of card front, remove both panels. Die cut a panel of Elegant Pines DSP using the same Textured Notes Dies. Adhere the die cut DSP to one of the die cut panels of Pretty Peacock with Stampin’ Seal.

Fold the Basic White panel that has been scored. Fold in mountain, mountain, valley folds. Adhere the panel of Elegant Pines DSP to the back of the inside of the Pretty Peacock card base. Adhere the Basic white panel first to the inside front of the Pretty Peacock card base being sure to put a small amount of adhesive just along the outside edges of the first folded section. Adhere the back section of the Basic White panel to the back inside of the card base, opening the card base and laying the panel flat.

Close the card base and adhere the layered DSP panel to the 2nd section of the Basic White panel, being sure to only add adhesive to only the back left of the layered panel. Center this panel inside the front of the card base. Using a smaller Textured Notes Dies, cut a panel of Elegant Pines DSP. Adhere the die cut panel to the center of the card front with Stampin’ Seal.
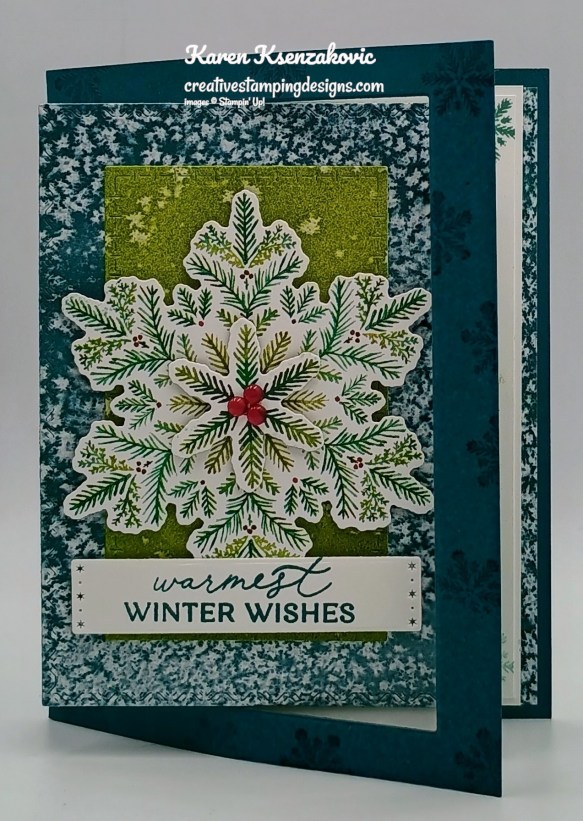
Using the Delicate Pines Dies, cut a large and medium snowflake from a panel of Elegant Pines DSP. Adhere the snowflakes together with a Stampin’ Dimensional. Adhere the layered snowflake to the center of the card front, making sure the snowflake is not in the way of opening the card. Stamp the sentiment from the Delicate Pines stamp set in Pretty Peacock Ink on a panel of Basic White. Cut the sentiment out using the Snowflake Kisses Dies. Adhere the sentiment to the card front with Stampin’ Dimensionals. Add a Cherry Cobbler & Pearl Adhesive-Backed Berries to the center of the snowflake.
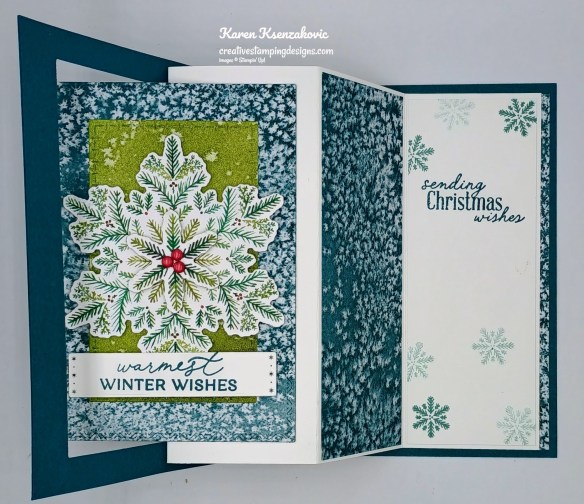
Adhere the panel of Elegant Pines DSP to the 3rd panel of the Basic White panel on the inside of the card base. On a panel of Basic White, stamp the sentiment from the Pine Tree Trimmings stamp set in Pretty Peacock Ink. Stamp the small snowflake image from the Delicate Pines stamp set in Lost Lagoon Ink on the Basic White panel. Adhere the Basic White panel to the 4th section of the Basic White panel on the inside of the card base.
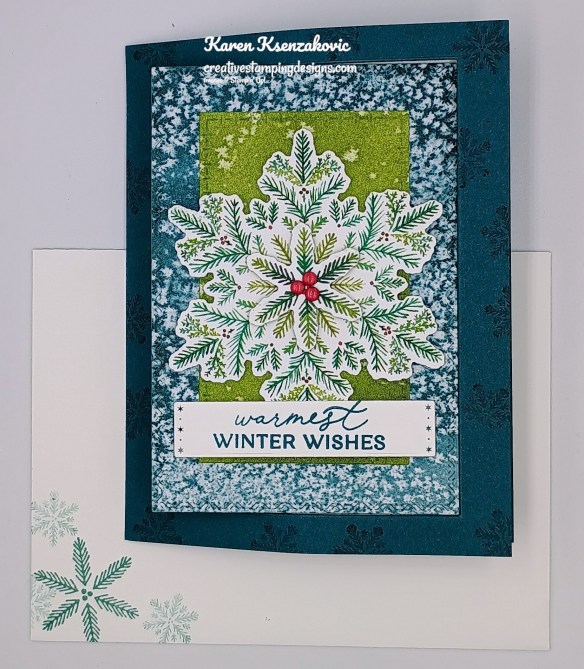
Decorate a Basic White Medium Envelope to finish the card. Stamp the medium & small snowflakes from the Delicate Pines stamp set on the envelope front in Pretty Peacock and Lost Lagoon Inks. Adhere a panel of Elegant Pines DSP to the envelope flap.

Thank you for stopping by my blog today. I hope you like the card and will give it a try. Happy Stamping!!
*********************************************************************************************************
If you need any stamping supplies, I’d love to be your Demonstrator. Just click HERE to go directly to my online store or drop me an email if you have any questions.
*********************************************************************************************************
Card stock cuts for this project:
- Basic White Cardstock 5 1/4″ x 8″(mechanism scored & folded at 2″, 4″ & 6″), 1 7/8″ x 5 1/8″(inner liner), 1″ x 3 1/3″ (sentiment)
- Pretty Peacock Cardstock 5 1/2″ x 8 1/2″(card base scored & folded at 4 1/4″, 4 1/4″ x 5 1/2″(card front panel)
- Elegant Pines Designer Series Paper 3 1/2″ x 5″(interlocking panel), 4″ x 5 1/4″(back panel), 1 7/8″ x 5 1/8″(inside panel), 2 1/2″ x 4″(card front panel), 2 1/4″ x 6″(envelope flap)
*********************************************************************************************************
Product List
![Delicate Pines Bundle (English) [ 166074 ]](https://assets1.tamsnetwork.com/images/EC042017NF/166074s.jpg "Delicate Pines Bundle (English) [ 166074 ]")
![Delicate Pines Photopolymer Stamp Set (English) [ 166067 ]](https://assets1.tamsnetwork.com/images/EC042017NF/166067s.jpg "Delicate Pines Photopolymer Stamp Set (English) [ 166067 ]")
![Delicate Pines Dies [ 166073 ]](https://assets1.tamsnetwork.com/images/EC042017NF/166073s.jpg "Delicate Pines Dies [ 166073 ]")
![Pine Tree Trimmings Photopolymer Stamp Set (English) [ 166040 ]](https://assets1.tamsnetwork.com/images/EC042017NF/166040s.jpg "Pine Tree Trimmings Photopolymer Stamp Set (English) [ 166040 ]")
![Basic White 8 1/2" X 11" Cardstock [ 166780 ]](https://assets1.tamsnetwork.com/images/EC042017NF/166780s.jpg "Basic White 8 1/2\" X 11\" Cardstock [ 166780 ]")
![Pretty Peacock 8-1/2" X 11" Cardstock [ 150880 ]](https://assets1.tamsnetwork.com/images/EC042017NF/150880s.jpg "Pretty Peacock 8-1/2\" X 11\" Cardstock [ 150880 ]")
![Elegant Pine Snowflakes 12" X 12" (30.5 X 30.5 Cm) Designer Series Paper [ 166066 ]](https://assets1.tamsnetwork.com/images/EC042017NF/166066s.jpg "Elegant Pine Snowflakes 12\" X 12\" (30.5 X 30.5 Cm) Designer Series Paper [ 166066 ]")
![Lost Lagoon Classic Stampin' Pad [ 161678 ]](https://assets1.tamsnetwork.com/images/EC042017NF/161678s.jpg "Lost Lagoon Classic Stampin' Pad [ 161678 ]")
![Pretty Peacock Classic Stampin’ Pad [ 150083 ]](https://assets1.tamsnetwork.com/images/EC042017NF/150083s.jpg "Pretty Peacock Classic Stampin’ Pad [ 150083 ]")
![Snowflake Kisses Dies [ 166022 ]](https://assets1.tamsnetwork.com/images/EC042017NF/166022s.jpg "Snowflake Kisses Dies [ 166022 ]")
![Textured Notes Dies [ 165555 ]](https://assets1.tamsnetwork.com/images/EC042017NF/165555s.jpg "Textured Notes Dies [ 165555 ]")
![Cherry Cobbler & Pearl Adhesive Backed Berries [ 164119 ]](https://assets1.tamsnetwork.com/images/EC042017NF/164119s.jpg "Cherry Cobbler & Pearl Adhesive Backed Berries [ 164119 ]")
![Basic White Medium Envelopes [ 159236 ]](https://assets1.tamsnetwork.com/images/EC042017NF/159236s.jpg "Basic White Medium Envelopes [ 159236 ]")


![Take Your Pick [ 144107 ]](https://assets1.tamsnetwork.com/images/EC042017NF/144107s.jpg "Take Your Pick [ 144107 ]")


Such a pretty card Karen! So glad that you were able to make it with us at the meeting! 🙂
LikeLike
Thank you Amy 🙂 I always have fun at your meetings
LikeLike