

Good Thursday morning stamping friends and welcome to our Happy Inkin’ Thursday Blog Hop. If you are starting with me, thank you. I hope you will stop by everyone’s blog to see what they have created this week. If you are hopping over from Mary’s blog, thank you for stopping by. This week we have Designer Series Paper Challenge. If you’d like to see a quick video of how I made this card, Click Here to go to my Instagram Reels. Here is my card using this week’s theme.
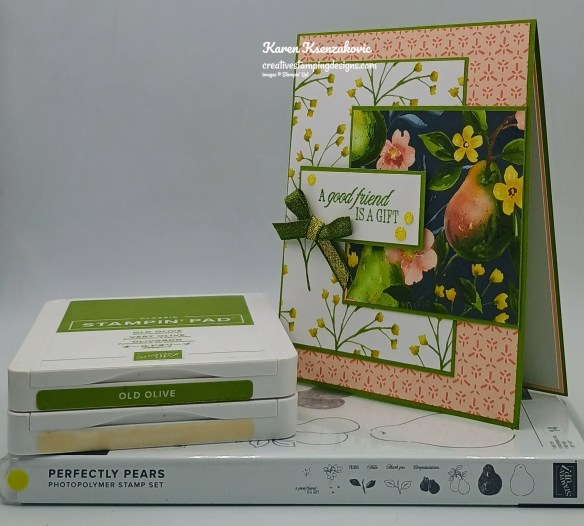
I used the new Stampin’ Up! Perfectly Pears Photopolymer Stamp Set along with the Painterly Pears Designer Series Paper for my card today.

Adhere a panel of Painterly Pears DSP to an Old Olive card base with Stampin’ Seal. Adhere 2 more panels of Painterly Pears DSP to the coordinating mats with Stampin’ Seal.

Adhere the 2 layered panels to the card front with Liquid Glue on either side of the card front.
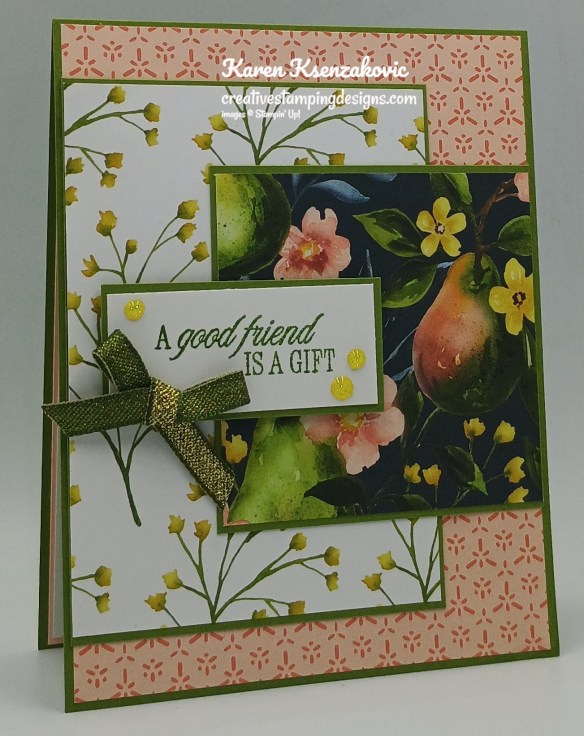
Stamp the sentiment from Perfectly Pears stamp set in Old Olive Ink on a panel of Basic White. Adhere the sentiment to an Old Olive mat with Stampin’ Seal. Adhere the layered sentiment to the card front with Stampin’ Dimensionals. Tie a small bow with the new 1/4″ Mossy Meadow & Gold Trim (available July 1). Adhere the bow to the sentiment with a Glue Dot. Add a few Low-Profile Sparkle Dots (available July 1) to the card front.
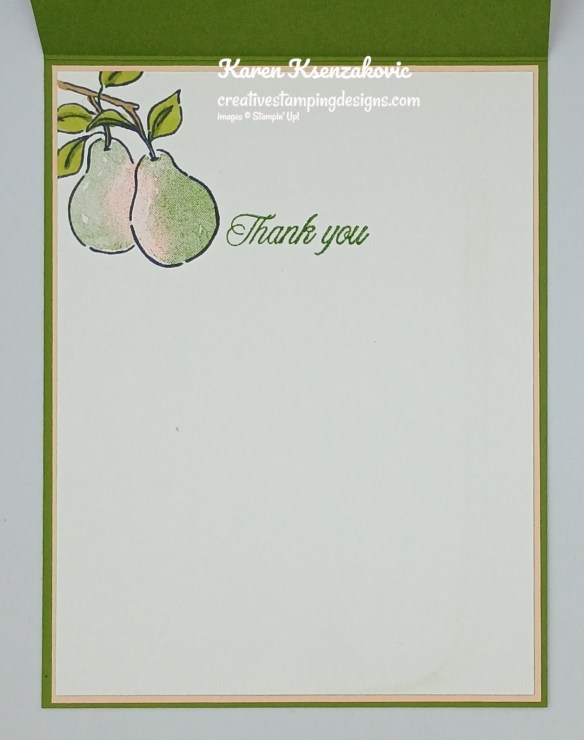
Stamp the sentiment from Perfectly Pears stamp set in Old Olive Ink on a panel of Basic White. Stamp the outlined pear image from Perfectly Pears stamp set in Tuxedo Black Ink on the top of the panel. Color the leaves and stem with Old Olive and Pecan Pie Stampin’ Blends Markers. Stamp the solid pear image from the Perfectly Pears stamp set inside the outlines image by inking up the stamp using Sponge Daubers with Old Olive and Petal Pink Inks. Adhere the Basic White panel to a Petal Pink mat then to the inside of the Old Olive card base.

Decorate a Basic White Medium Envelope to complete your card. Stamp the pear image from the Perfectly Pears stamp set in Tuxedo Black Ink on the envelope front. Color the image the same as for the card. Adhere a panel of Painterly Pears DSP to the envelope flap.

Thank you for stopping by my blog today. Now that you’ve seen my card, let’s get on with the hop! Click the button below to hop over to see what Tara has created. Happy Hoping!!

Just in case you get lost along the way, here is a list of the team members involved in the hop today.
Karen Ksenzakovic You Are Here
*********************************************************************************************************
If you need any stamping supplies, I’d love to be your Demonstrator. Just click HERE to go directly to my online store or drop me an email if you have any questions.
*********************************************************************************************************
Sweeter With You
Subscribe June 11 – July 10
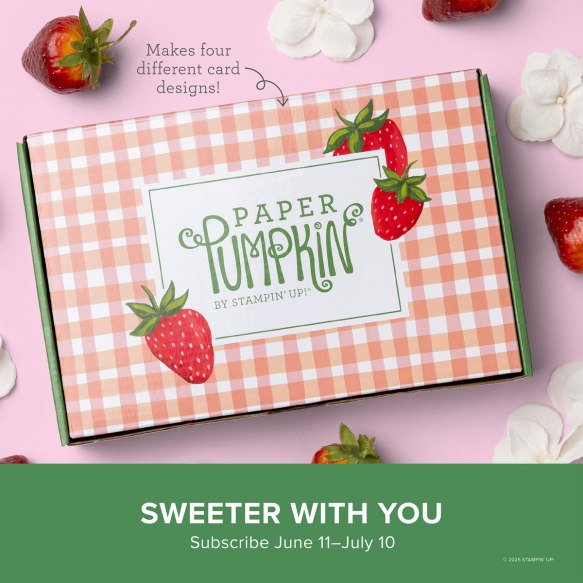
Craft sweet handmade cards featuring sun-kissed strawberries and breezy gingham.
• Makes 8 cards: 2 each of 4 designs with 8 coordinating envelopes
• Precut paper pieces and vellum accents
• Hand-painted card base designs
• Coordinating colors: Garden Green (Classic Stampin’ Spot), Granny Apple Green,
Pool Party, Poppy Parade, Strawberry Slush, Timid Tiger
Subscribe to the June Paper Pumpkin Kit between 11 June and 10 July by clicking here!
*********************************************************************************************************
Don’t miss the coordinating
Circle of Seasons Dies Add-On!

Make the most of your Paper Pumpkin kits with the Circle of Seasons Dies add-on! Quickly and cleanly cut out a strawberry with a blossom, a circle, a leaf, or an acorn to elevate your crafting projects. These additional dies are designed to work with THREE Paper Pumpkin Kits: the Sweeter with You Paper Pumpkin Kit, the Farmhouse Florals Paper Pumpkin Kit, and the Fall for Toile Paper Pumpkin Kit. Pair these dies with other Stampin’ Up! products for even more creative options! This exclusive add-on (item 167277) coordinates with the three upcoming kits! Paper Pumpkin subscribers can purchase it beginning June 11. Add-on is available only while supplies last, so it’s best to shop early!
DETAILS
– 4 dies
– Largest die: 2-1/2″ x 1-1/4″ (6.4 x 3.2 cm)
– Use with a Stampin’ Cut & Emboss Machine (sold separately)
You must be a current Paper Pumpkin subscriber to purchase this item. To become a subscriber, visit www.stampinup.com/paperpumpkin.
Note: Supplies may be limited toward the end of the subscription period.
#167277 $12
*********************************************************************************************************
Card stock cuts for this project:
- Basic White Cardstock 1″ x 2 1/4″(sentiment), 4″ x 5 1/4″(inner liner)
- Old Olive Cardstock 5 1/2″ x 8 1/2″(card base scored & folded at 4 1/4″), 3 1/4″ x 4 1/2″(card front panel mat), 3″ x 3″(card front panel mat), 1 1/8″ x 2 3/8″(sentiment mat)
- Petal Pink Cardstock 4 1/8″ x 5 3/8″(inner liner mat)
- Painterly Pears Designer Series Paper 4 1/8″ x 5 3/8″(card front), 3 1/8″ x 4 3/8″(card front panel), 2 7/7″ x 2 7/8″(card front panel), 2 1/4″ x 6″(envelope flap)
*********************************************************************************************************
Product List
![Basic White 8 1/2" X 11" Cardstock [ 166780 ]](https://assets1.tamsnetwork.com/images/EC042017NF/166780s.jpg "Basic White 8 1/2\" X 11\" Cardstock [ 166780 ]")
![Old Olive 8-1/2" X 11" Cardstock [ 100702 ]](https://assets1.tamsnetwork.com/images/EC042017NF/100702s.jpg "Old Olive 8-1/2\" X 11\" Cardstock [ 100702 ]")
![Petal Pink 8-1/2" X 11" Cardstock [ 146985 ]](https://assets1.tamsnetwork.com/images/EC042017NF/146985s.jpg "Petal Pink 8-1/2\" X 11\" Cardstock [ 146985 ]")
![Old Olive Classic Stampin' Pad [ 147090 ]](https://assets1.tamsnetwork.com/images/EC042017NF/147090s.jpg "Old Olive Classic Stampin' Pad [ 147090 ]")
![Petal Pink Classic Stampin' Pad [ 147108 ]](https://assets1.tamsnetwork.com/images/EC042017NF/147108s.jpg "Petal Pink Classic Stampin' Pad [ 147108 ]")
![Old Olive Stampin' Blends Combo Pack [ 154892 ]](https://assets1.tamsnetwork.com/images/EC042017NF/154892s.jpg "Old Olive Stampin' Blends Combo Pack [ 154892 ]")
![Pecan Pie Stampin’ Blends Combo Pack [ 161674 ]](https://assets1.tamsnetwork.com/images/EC042017NF/161674s.jpg "Pecan Pie Stampin’ Blends Combo Pack [ 161674 ]")
![Sponge Daubers [ 133773 ]](https://assets1.tamsnetwork.com/images/EC042017NF/133773s.jpg "Sponge Daubers [ 133773 ]")
![Basic White Medium Envelopes [ 159236 ]](https://assets1.tamsnetwork.com/images/EC042017NF/159236s.jpg "Basic White Medium Envelopes [ 159236 ]")


![Take Your Pick [ 144107 ]](https://assets1.tamsnetwork.com/images/EC042017NF/144107s.jpg "Take Your Pick [ 144107 ]")


So pretty Karen – I should have rushed my order!!! 😖
LikeLike
Thank you Terry Lynn 🙂 I’m so happy I did rush mine LOL
LikeLike
So pretty! Love the designer paper that you’ve used, perfectly layered! 🙂
LikeLike
Thank you so much Amy 🙂
LikeLike
Wow – this is stunning! I LOVE the DSP’s you picked – just perfect! 🙂
LikeLike
Thank you so much Mary 🙂
LikeLike