
Good Tuesday morning stamping friends. I hope your week has started off well. We had such a beautiful breezy day here yesterday. Little to no humidity, 70’s, sunny and a little breezy. Those are the kind of days I’d love to bottle up and save.
Today’s card I played with some Online Exclusive products again. I positive this is my absolute favorite pack of DSP. I just can’t get enough of it, good thing I have 2 packs. If you’d like to see a quick video of how I made this card, Click Here to go to my Instagram Reels. Here’s my card for today.
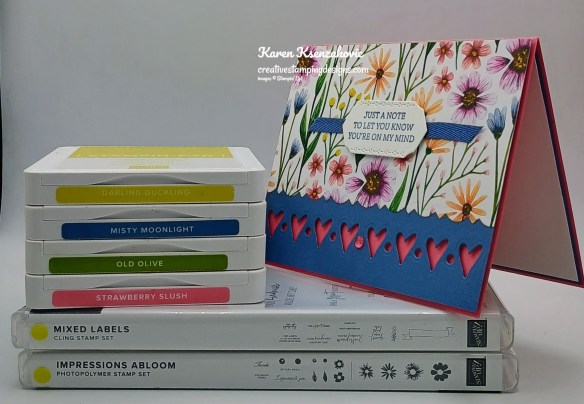
I used the Stampin’ Up! Online Exclusive Mixed Labels Bundle along with the Floral Impressions Designer Series Paper, Fancy Borders Dies and Stampin’ Up! Impressions Abloom Photopolymer Stamp Set for my card today.

Cut the bottom edge of a panel of Floral Impressions DSP using the Fancy Borders Dies. Cut the bottom portion of a Misty Moonlight mat using the Fancy Borders Dies. Adhere the panel of Floral Impressions DSP to the top of the Misty Moonlight mat with Stampin’ Seal.

Adhere the layered panel to a Strawberry Slush card base with Stampin’ Dimensionals. Add a Strawberry Slush Gem in the center of the hearts on the bottom of the panel.
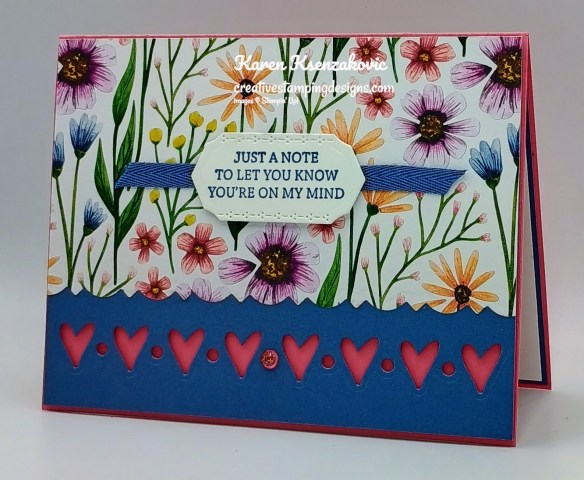
On a panel of Basic White, stamp the sentiment from the Stampin’ Up! Mixed Labels Cling Stamp Set in Misty Moonlight Ink. Cut the sentiment out using the Mixed Labels Dies. Adhere a piece of Misty Moonlight 1/4″ Ribbon from the Misty Moonlight & White 1/4″ Starter Ribbon Pack. Adhere the sentiment over the ribbon with Stampin’ Dimensionals.
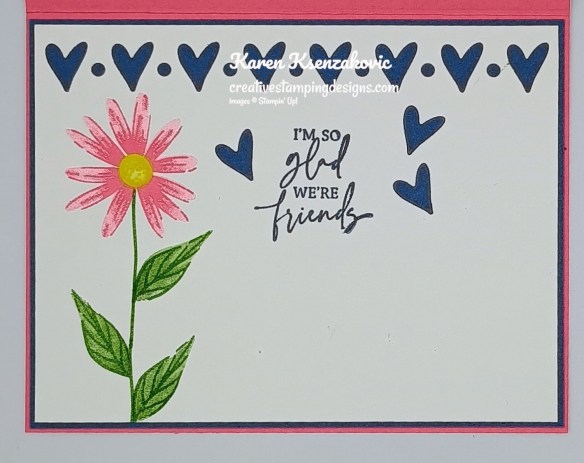
On a panel of Basic White, stamp the sentiment from the Mixed Labels stamp set in Misty Moonlight Ink. Using the Fancy Borders Dies, cut the hearts from the top of the panel. Stamp the stem and detailed leaf images from the Impressions Abloom stamp set in Old Olive Ink on the side of the panel. Stamp the solid leaf image from the Impressions Abloom stamp set in Old Olive Ink, stamping off once on scrap paper, over the detailed images. Stamp the detailed daisy image from Impressions Abloom stamp set in Strawberry Slush Ink on top of the stem. Stamp the solid daisy image in Strawberry Slush Ink, stamping off once on scrap paper, over the detailed image. Stamp the flower center in Darling Duckling Ink. Adhere some of the Misty Moonlight hearts that you cut out from the cut panel around the sentiment. Adhere the Basic White panel to a Misty Moonlight mat then to the inside of the Strawberry Slush card base.
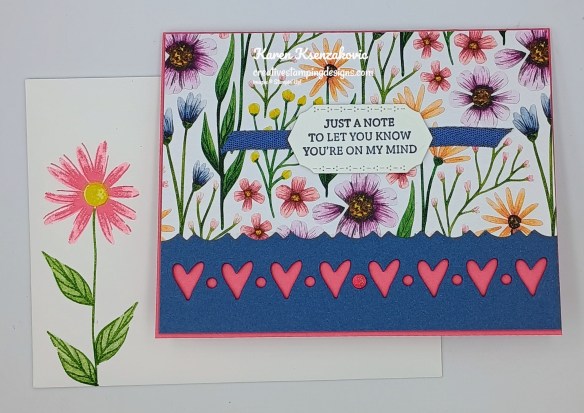
Decorate a Basic White Medium Envelope to finish your card. Stamp the stem and leaf images from the Impressions Abloom stamp set in Old Olive Ink on the envelope front. Stamp the daisy image in Strawberry Slush Ink and the flower center in Darling Duckling Ink. Adhere a panel of Floral Impressions DSP to the envelope flap.

Thank you for stopping by my blog today. I hope you like the card and will give it a try. Happy Stamping!!
*********************************************************************************************************
If you need any stamping supplies, I’d love to be your Demonstrator. Just click HERE to go directly to my online store or drop me an email if you have any questions.
*********************************************************************************************************
Stampin’ Up!’s BIGGEST Starter Kit Joining Special May 6th – 31st
May is an awesome time to join my Stampin’ Up! Team!! Have you ever thought about joining the Stampin’ Up! community? Are you into scrapbooking and have you seen all the new scrapbook products Stampin’ Up! has? Is your wish/want list pretty long and do you order often? Wouldn’t you love to get all these products at a discount? Why not consider joining the Stampin’ Up! community between May 6-31, and save a minimum of 20% off everything you buy? Are you new to stamping and don’t know where to start, but would like to join to save? Ask me for help, I’m here to help and assist you anyway that I can.
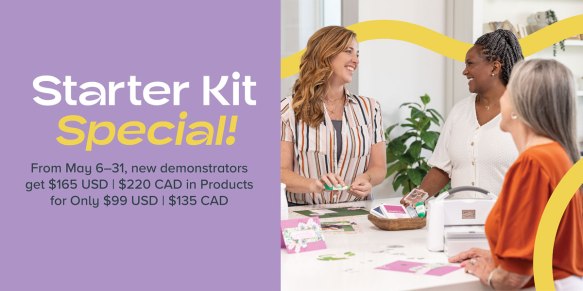
Stampin’ Up!’s BIGGEST Starter Kit Special will be available for a limited time! Between May 6–31, anyone who signs up to be a demonstrator can pack their Starter Kit with $165 USD worth of products for only $99 USD. That’s an extra $66 USD in products!
Crafting is even more fun with community, and there’s never been a better time to join then with Stampin’ Up!’s BIGGEST Starter Kit Special. Become a demonstrator and enjoy all the perks that come with that, like a 20–25% product discount, exclusive early access to new products, the chance to attend incredible training and crafting events like Stampin’ Up!’s OnStage and Creativity Now, and so much more!
If you join my team, I’m offering free classes to my team members. Tara Carpenter and I run Online Zoom classes and we decided that our direct team members will receive the classes for free. You’ll get the PDF and the link to the Online Zoom class along with the replay.
There is never an obligation to sell. You can join just to enjoy the discount for yourself along with all the other Demonstrator benefits. Once you join, you’ll get at least a 20% discount on all of your Stampin’ Up! merchandise purchases and you get to order early from the upcoming catalogs and Online Exclusives! You will also be able to attend the OnStage Events and any other events Stampin’ Up! has and you get to be a part of our awesome Stampin’ Up! team!
Unsure about this and want to talk? Contact me at creativestampingdesigns@gmail.com and we can talk. You can also find additional information Here at Join My Team. Being a part of the Stampin’ Up! Community is one of the best decisions I’ve ever made. I have made many friends along the way while doing what I love, Paper Crafting. This Joining offer is only good starting May 6 – May 31. Why not give it a try? I’d love to have you on my team.
*********************************************************************************************************
Full of Charm
Subscribe May 11 – June 10

Send your loved ones elevated cards with heartfelt sentiments!
• Makes 9 cards: 3 each of 3 designs with 9 coordinating envelopes
• Envelopes and card bases with decorative gold foil
• Precut paper pieces and unique sentiment labels
• Coordinating colors: Berry Burst, Cajun Craze, Early Espresso, Mossy Meadow,
Pretty Peacock (Classic Stampin’ Spot), Timid Tiger
Coordinates with the Floral Charm Suite Collection (item 166141)
Subscribe to the June Paper Pumpkin Kit between 11 May and 10 June by clicking here!
*********************************************************************************************************
Don’t miss the coordinating
Hugs Abloom Dies Add-On!

Make the most of your Paper Pumpkin kits with the Hugs Abloom Dies add-on! Quickly and cleanly cut out a flower, leaf sprig, sentiment label, or Hugs sentiment to elevate your crafting projects. These additional dies are designed to work with THREE Paper Pumpkin Kits: the Inked Occasions Paper Pumpkin Kit, the Mountain Majesties Paper Pumpkin Kit, and the Full of Charm Paper Pumpkin Kit. Pair these dies with other Stampin’ Up! products for even more creative options!
DETAILS
– 4 dies
– Largest die: 2-1/2″ x 1-1/4″ (6.4 x 3.2 cm)
– Use with a Stampin’ Cut & Emboss Machine (sold separately)
You must be a current Paper Pumpkin subscriber to purchase this item. To become a subscriber, visit www.stampinup.com/paperpumpkin.
Note: Supplies may be limited toward the end of the subscription period.
#166238 $12
*********************************************************************************************************
Card stock cuts for this project:
- Basic White Cardstock 1 1/2″ x 2 1/2″(sentiment), 4″ x 5 1/4″(inner liner)
- Misty Moonlight Cardstock 2 – 4 1/8″ x 5 3/8″ (card front & inner liner mats)
- Strawberry Slush Cardstock 5 1/2″ x 8 1/2″(card base scored & folded at 4 1/4″)
- Floral Impressions Designer Series Paper 3″ x 5 3/8″ (card front), 2 1/4″ x 6″(envelope)
*********************************************************************************************************
Product List
![Mixed Labels Bundle (English) [ 164653 ]](https://assets1.tamsnetwork.com/images/EC042017NF/164653s.jpg "Mixed Labels Bundle (English) [ 164653 ]")
![Mixed Labels Cling Stamp Set (English) [ 164643 ]](https://assets1.tamsnetwork.com/images/EC042017NF/164643s.jpg "Mixed Labels Cling Stamp Set (English) [ 164643 ]")
![Mixed Labels Dies [ 164652 ]](https://assets1.tamsnetwork.com/images/EC042017NF/164652s.jpg "Mixed Labels Dies [ 164652 ]")
![Impressions Abloom Photopolymer Stamp Set (English) [ 165605 ]](https://assets1.tamsnetwork.com/images/EC042017NF/165605s.jpg "Impressions Abloom Photopolymer Stamp Set (English) [ 165605 ]")
![Basic White 8 1/2" X 11" Cardstock [ 166780 ]](https://assets1.tamsnetwork.com/images/EC042017NF/166780s.jpg "Basic White 8 1/2\" X 11\" Cardstock [ 166780 ]")
![Misty Moonlight 8-1/2" X 11" Cardstock [ 153081 ]](https://assets1.tamsnetwork.com/images/EC042017NF/153081s.jpg "Misty Moonlight 8-1/2\" X 11\" Cardstock [ 153081 ]")
![Strawberry Slush 8 1/2" X 11" Cardstock [ 165625 ]](https://assets1.tamsnetwork.com/images/EC042017NF/165625s.jpg "Strawberry Slush 8 1/2\" X 11\" Cardstock [ 165625 ]")
![Floral Impressions 12" X 12" (30.5 X 30.5 Cm) Designer Series Paper [ 165603 ]](https://assets1.tamsnetwork.com/images/EC042017NF/165603s.jpg "Floral Impressions 12\" X 12\" (30.5 X 30.5 Cm) Designer Series Paper [ 165603 ]")
![Darling Duckling Classic Stampin' Pad [ 165277 ]](https://assets1.tamsnetwork.com/images/EC042017NF/165277s.jpg "Darling Duckling Classic Stampin' Pad [ 165277 ]")
![Misty Moonlight Classic Stampin' Pad [ 153118 ]](https://assets1.tamsnetwork.com/images/EC042017NF/153118s.jpg "Misty Moonlight Classic Stampin' Pad [ 153118 ]")
![Old Olive Classic Stampin' Pad [ 147090 ]](https://assets1.tamsnetwork.com/images/EC042017NF/147090s.jpg "Old Olive Classic Stampin' Pad [ 147090 ]")
![Strawberry Slush Classic Stampin' Pad [ 165286 ]](https://assets1.tamsnetwork.com/images/EC042017NF/165286s.jpg "Strawberry Slush Classic Stampin' Pad [ 165286 ]")
![Fancy Borders Dies [ 165380 ]](https://assets1.tamsnetwork.com/images/EC042017NF/165380s.jpg "Fancy Borders Dies [ 165380 ]")
![Misty Moonlight & White 1/4" (6.4 Mm) Starter Ribbon Pack [ 165276 ]](https://assets1.tamsnetwork.com/images/EC042017NF/165276s.jpg "Misty Moonlight & White 1/4\" (6.4 Mm) Starter Ribbon Pack [ 165276 ]")
![Strawberry Slush & Pretty In Pink Gems [ 165615 ]](https://assets1.tamsnetwork.com/images/EC042017NF/165615s.jpg "Strawberry Slush & Pretty In Pink Gems [ 165615 ]")
![Basic White Medium Envelopes [ 159236 ]](https://assets1.tamsnetwork.com/images/EC042017NF/159236s.jpg "Basic White Medium Envelopes [ 159236 ]")


Very pretty card Karen! Love the designer paper that you’ve used! 🙂
LikeLike
Thank you Amy 🙂
LikeLike