
Good Wednesday morning my stamping friends. How is everyone doing today? We’re halfway through the week and on our way to the weekend.
Today’s card is for the inspiration challenge from The Card Concepts We are doing month-long challenges now, so you have all month to enter multiple times. The inspiration photo #208 is Hello Summer. If you’d like to see a quick video on how I made this card, Click Here for my Instagram Reels. Here is my card that was inspired from the challenge photo.
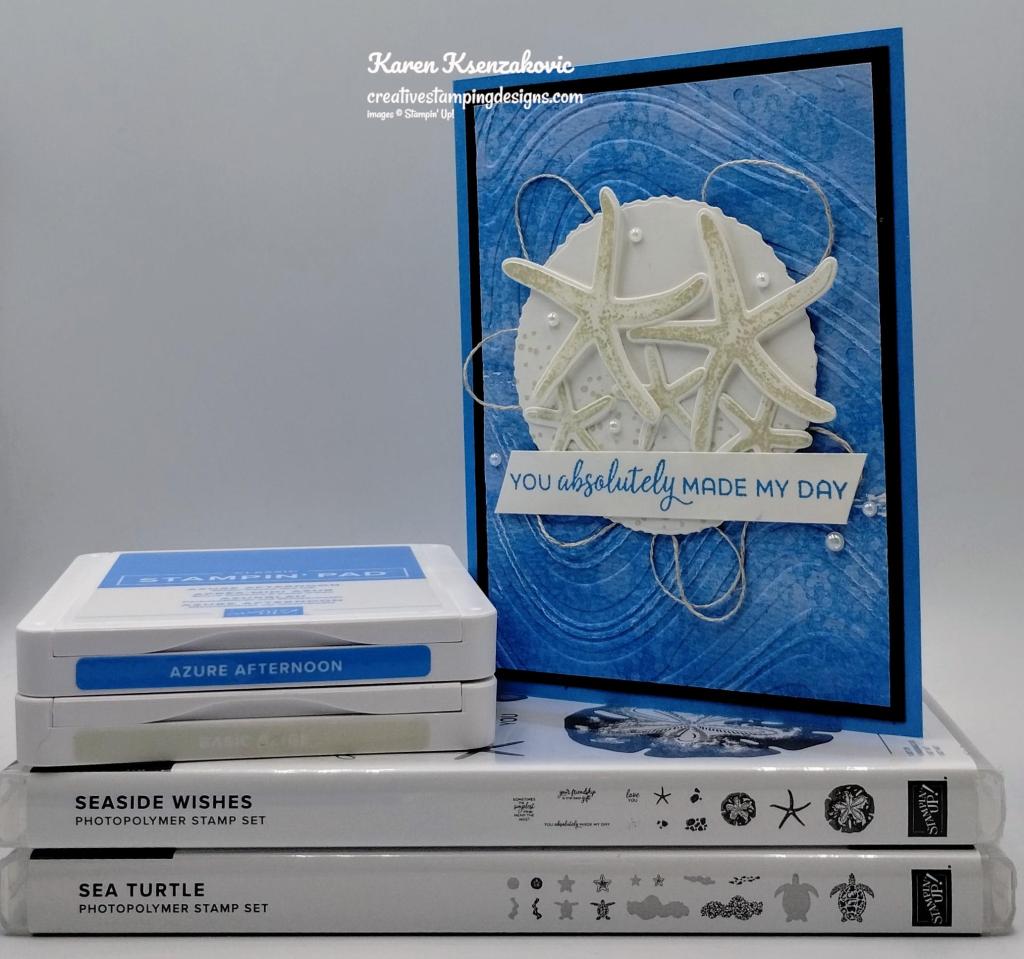
I used the Stampin’ Up! Seaside Wishes Bundle along with the Stampin’ Up! Sea turtle Photopolymer Stamp Set, Bright & Beautiful 6X 6 Designer Series Paper, So Swirly Embossing Folder and Deckled Circles Dies for my Clean & Layered Card today. The starfish caught my eye as soon as I saw the inspiration photo, so that is what inspired me, and I worked around that.
I hope you will take a moment to visit The Card Concepts and join us for our challenge 208. How are you inspired by the photos?
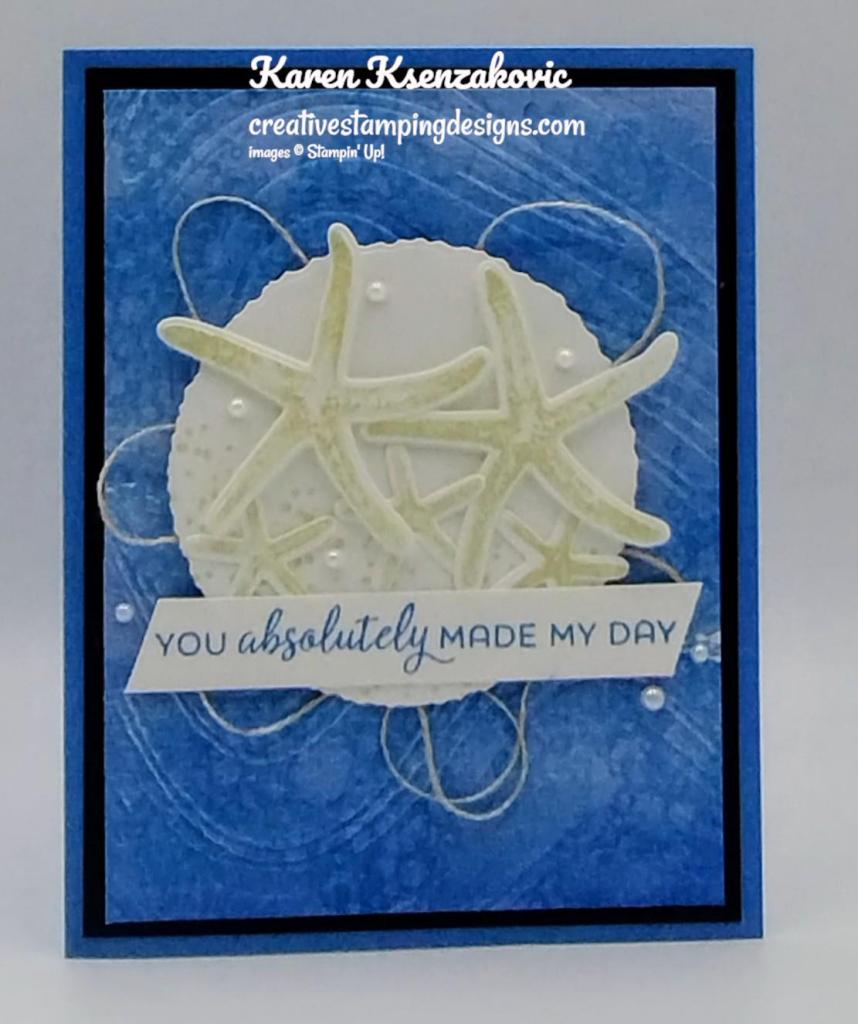
I started by stamping the bubble image from the Sea Turtle stamp set in Azure Afternoon Ink multiple times, stamping off once on scrap paper, on a panel of Bright & Beautiful DSP. I embossed the DSP panel using the So Swirly EF. I adhered the embossed panel to a Basic Black mat using Liquid Glue. I adhered the layered panel to an Azure Afternoon card base using Liquid Glue.
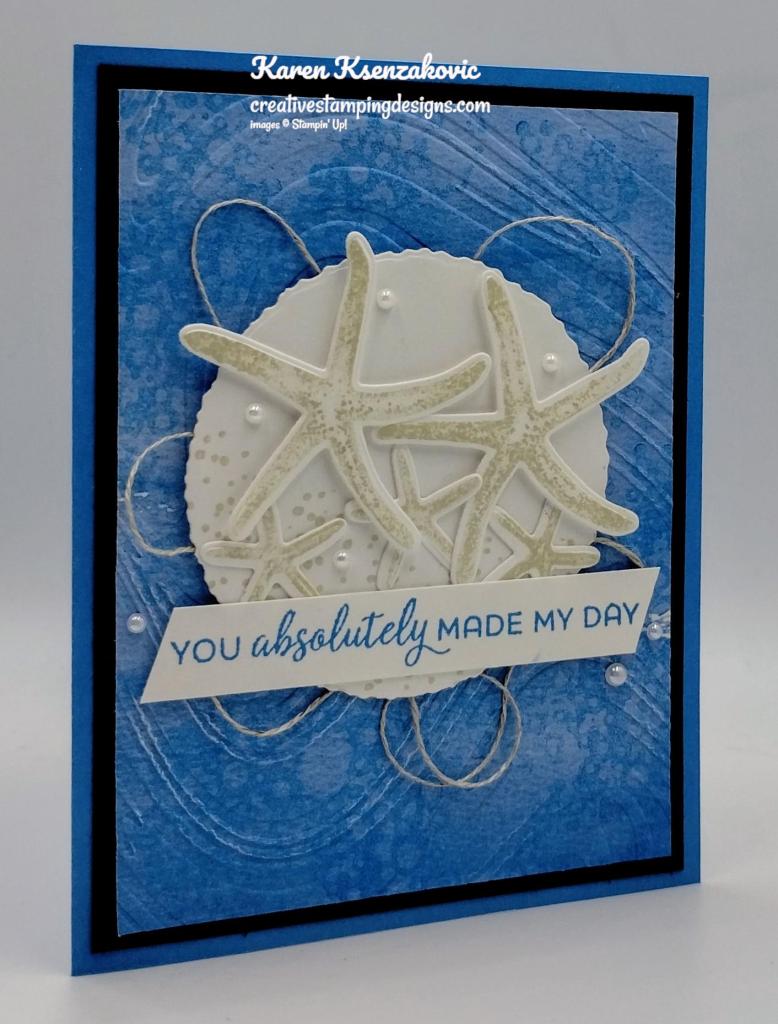
Using the Deckled Circle Dies, I cut a panel of Basic White. I stamped the sand image from the Stampin’ Up! Seaside Wishes Photopolymer Stamp Set in Basic Beige Ink on the bottom of the circle. On the panel of Basic White, I stamped the large and small starfish images in Basic Beige Ink. I cut the images out using the Seaside Wishes Dies. I adhered a piece of Linen Thread to the card front using Stampin’ Seal. I adhered the circle over the thread using Stampin’ Dimensionals.
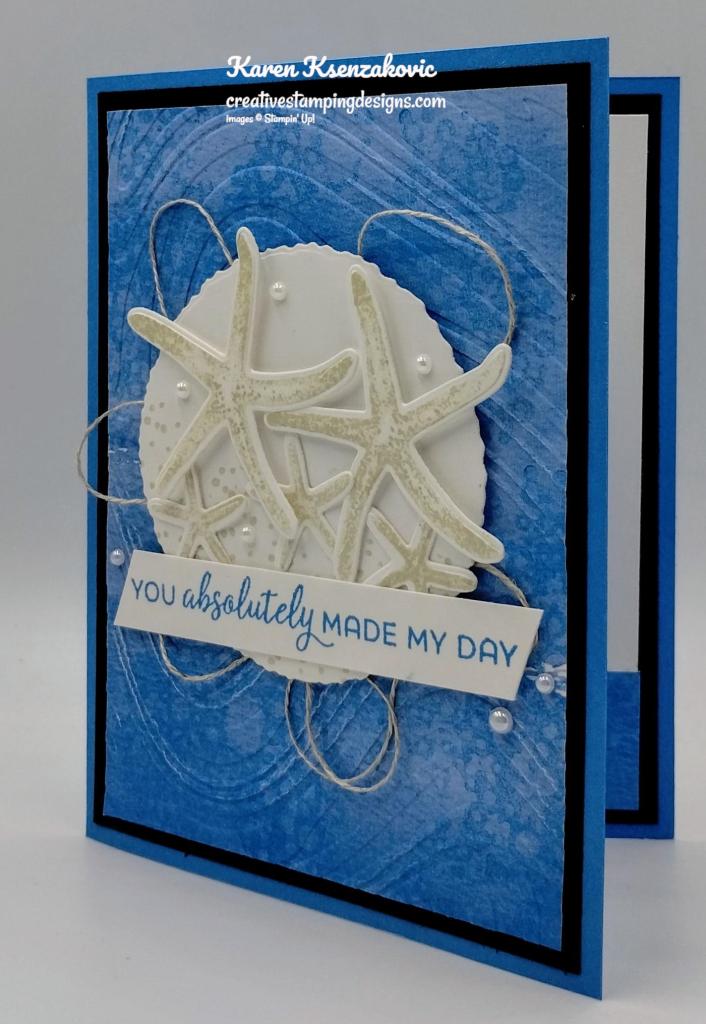
I adhered the larger starfish to the circle using Stampin’ Dimensionals and the smaller ones using Glue Dots. On a strip of Basic White, I stamped the sentiment from the Seaside Wishes stamp set in Azure Afternoon Ink. I cut the ends on an angle using Paper Snips. I adhered the sentiment to the card front using Stampin’ Dimensionals on the ends and Glue Dots in the center. I added a few Iridescent Pearls Basic Jewels to the card front.
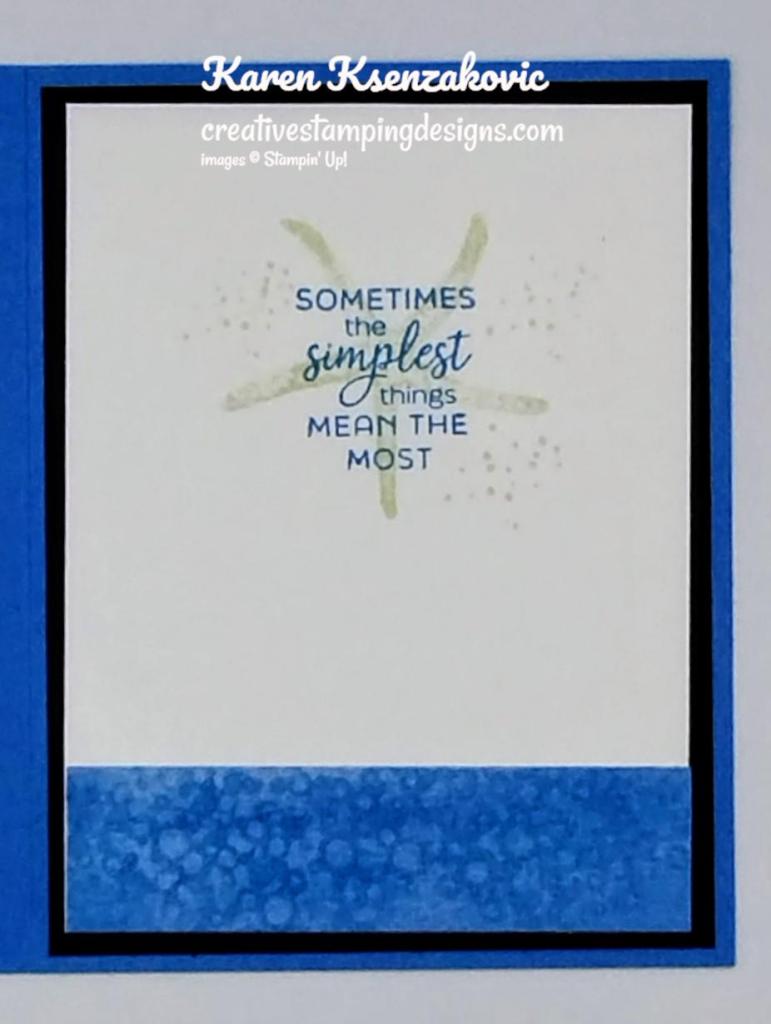
On the inside, I stamped the sentiment from the Seaside Wishes stamp set in Azure Afternoon Ink on a panel of Basic White. I stamped the starfish and sand images from the Seaside Wishes stamp set in Basic Beige Ink around the sentiment. I stamped the bubble image from the Sea Turtle stamp set on a panel of Bright & Beautiful DSP, stamping off once on scrap paper, in Azure Afternoon Ink. I adhered the panel to the bottom of the Basic White panel. I adhered the Basic White panel to a Basic Black mat then to the inside of the Azure Afternoon card base.
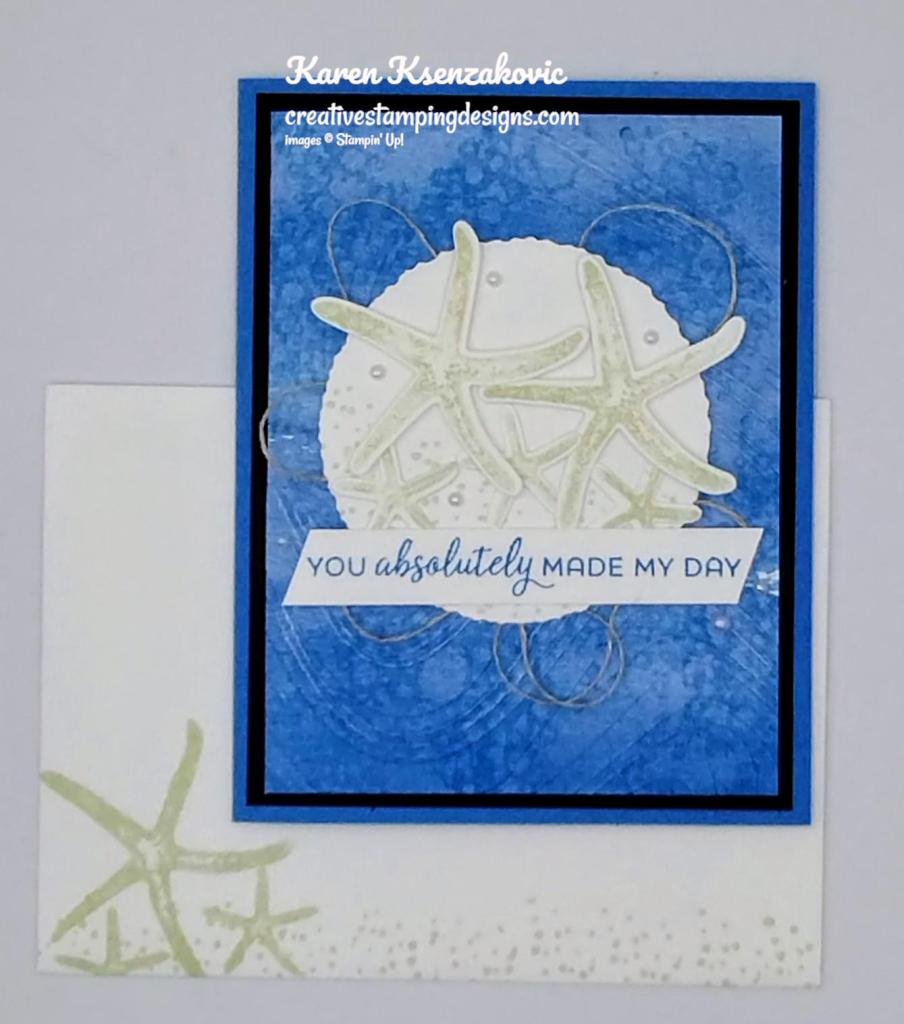
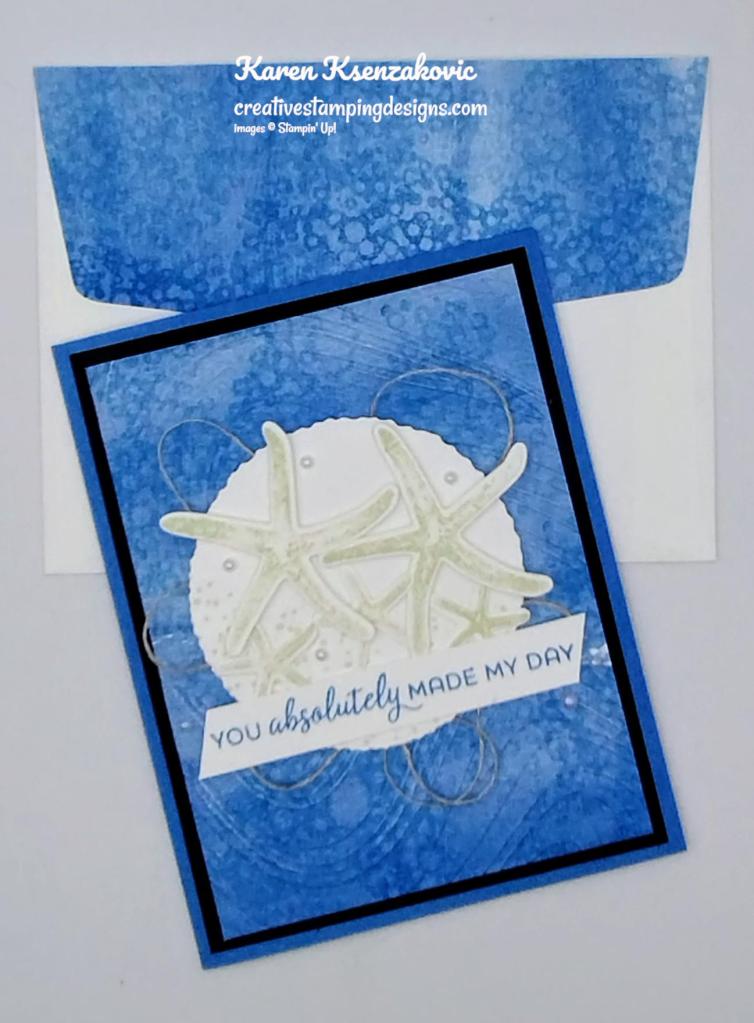
To finish my card, I decorated a Basic White Medium Envelope. I stamped the starfish and sand images from the Seaside Wishes stamp set in Basic Beige Ink on the envelope front. I stamped the bubble image from the Sea Turtle stamp set in Azure Afternoon Ink, stamping off once on scrap paper, on a panel of Bright & Beautiful DSP. I adhered the panel to the envelope flap.
Thank you for stopping by my blog today. I hope you like the card and will give it a try. Happy Stamping!!
*********************************************************************************************************
If you need any stamping supplies, I’d love to be your Demonstrator. Just click HERE to go directly to my online store or drop me an email if you have any questions.
MY CURRENT HOST CODE IS: PKXMFP73
Use this host code when placing an order with me. When you order $50 or greater you will receive a free gift from me! If your order is over $150, please do not use this code, but you’ll still get the free gift. The free gift is your choice of any 1 item valued up to $10.00 from the 2024-2025Annual Catalog, or from the Online Exclusives! Unfortunately, packs of cardstock are no longer an option for a free gift. Shipping has become too expensive to ship and it’s costing me as much to ship as the cardstock costs. For any orders $50 or more I will also send you my monthly class tutorials. Click HERE or go to my Customer Rewards for more details and to see what this month’s tutorials are.
Please remember to use my current Host Code and make sure that you can see my name on the final checkout page listed as your Demonstrator when you order so that you know that you’re ordering with me, and you’ll get my rewards!
Happy Stamping, Karen
*********************************************************************************************************
In response to changing policies at Stampin’ Up – I’m adjusting my Ordering Gift policy as well. I’m having to get a little more tough on the adding of Host codes when you place your order thru my Online Store.
Not to worry – you’re still going to get that $10 ordering gift for orders of $50 (before shipping & tax) or greater. And the gift is still any 1 SU! product up to that $10 value – which includes some of our fun Host Sets!
But – if you DO NOT use the Host code for your orders of less than $150 (this is the RETAIL total before Shipping & Handling), then you’ll have two options:
- You’ll need to call Stampin’ Up! (1-800-Stamp-Up) and ask them to add it for you. They’re very helpful and will get it done quickly! OR….
- If your order was over the $50 threshold but under $150, then…you’ll forfeit that $10 ordering gift and rewards – this is the Bummer Option – and I REALLY don’t want to do this, SO please remember to add my Current Host Code.
*********************************************************************************************************
10% Off Stamp & Die Set Bundles and
Stampin’ Cut & Emboss Machines June 5-30!!

Everyone loves a good deal, which is why Stampin’ Up! is offering an additional 10% off all stamp and die bundles! Between June 5-30, take advantage of the sale and add some new bundles to your collection!! Plus, save 10% on the Stampin’ Cut & Emboss Machine and the Mini Stampin’ Cut & Emboss Machine!! These machines make the perfect crafting partner for stamp and die bundles!

PROMOTION DETAILS
Sales Period: June 5-30, 2024
Ordering Deadline: June 30, 2024 at 11:59 p.m. (MT)
- Get an additional 10% discount on stamp and die bundles only. This excludes suite collections, stamp and punch bundles, bundles not yet released to customers, and any other bundles*.
- Save 10% on Stampin’ Cut & Emboss Machine and Mini Stampin’ Cut & Emboss Machine (white and Boho Blue).
- The 10% discount applies automatically to stamp and die bundles in all orders including Starter Kit orders placed between June 5-30, 2024.
*Please note Close to My Heart products are not included in this promotion.
YAY for a great sale!! You can see the stamp and die set bundles in the online store right Here and the Stampin’ Cut & Emboss Machines Here (note that the machines only will be on sale, the accessories are note included). Get your orders ready and save beginning June 5!
***As an added bonus, Demonstrators get the additional 10% discount on bundles and machines too! So purchase the Starter Kit in May and get the free In Color items (see the details above) and then get the additional 10% discount on top of your Demonstrator discount on bundles and machines from June 5-30!!
*********************************************************************************************************
Painted Petals
Subscribe June 11 – July 10
Subscribe to Paper Pumpkin for a monthly, all-inclusive crafting kit that’s a fun surprise! Each kit includes a photopolymer stamp set, Classic Stampin’ Spot, and step by step instructions to complete exclusive paper craft projects, including cards, tags, and gift
packaging. And don’t miss the special add-on that coordinates with the next three months!
With the July Paper Pumpkin, Painted Petals, you can craft beautiful cards with unique watercolor designs and pretty layers!

• Makes 9 cards: 3 each of 3 designs
• Project includes printed cards and coordinating envelopes
• Precut paper pieces and embellishments
• Coordinating colors: Calypso Coral, Gray Granite (Classic Stampin’ Spot), Melon
Mambo, Mossy Meadow, Old Olive
Kit comes in a beautiful coordinating box
Don’t miss the coordinating
Every Celebration Dies Add-On!

This exclusive add-on (item 164991) coordinates with the three upcoming kits! Paper Pumpkin subscribers can purchase it beginning 11 July. The add-on is available only while supplies last, so it’s best to shop early!
Subscribe to the July Paper Pumpkin Kit between 11 June and 10 July by clicking here!
Note: Supplies may be limited toward the end of the subscription period.
*********************************************************************************************************
Card stock cuts for this project:
- Azure Afternoon Cardstock 5 1/2″ X 8 1/2″(card base scored & folded at 4 1/4″)
- Basic Black Cardstock 2 – 4″ X 5 1/4″(card front & inner liner mats)
- Basic White Cardstock 4″ X 5 1/4″ (artwork), 3 3/4″ X 5″(inner liner)
- Bright & Beautiful 6 X 6 Designer Series Paper 3 3/4″ X 5″ (card front), 1″ X 3 3/4″ (inner liner), 2 1/4″ X 6″ (envelope flap)
*********************************************************************************************************
Product List
")
")


 Designer Series Paper")


So pretty Karen! Love the colors and those starfish are amazing! 🙂
LikeLiked by 1 person
Thank you so much Amy
LikeLike