
Good Friday morning my stamping friends welcome to my fun fold Friday. How was everyone’s week? I hope you are ready for the weekend. I’ll be working all day tomorrow.
Today’s card I made on YouTube Live on Wednesday. If you were able to join me or watched the replay, thank you. If you’d like to watch my video and stamp along, the measurements are below along with the link to my YouTube channel. Here is my card for today.

I used the Stampin’ Up! Lighting The Way Photopolymer Stamp Set along with the Lighting The Way Dies, Timber 3D Embossing Folder, Stylish Shapes Dies, Online Exclusive Timeless Charm Dies and One Horse Open Sleigh 65 X 6 Designer Series Paper for my joy fold card today.

I started by embossing the square panel of Basic White using the Timber 3D Embossing Folder. I adhered the embossed panel to an Azure Afternoon mat using Multipurpose Liquid Glue. On a panel of Basic White, I stamped the leaf images from the Lighting The Way stamp set in Garden Green, Granny Apple Green and Soft Sea Foam Inks. On the same panel I stamped the firefly images from Lighting The Way stamp set in Basic Gray Ink. I cut all the images out using the Lighting The Way Dies. I colored the fireflies using Lemon Lolly Stampin’ Blends Markers. From 2 panels of Soft Shimmer Specialty Paper, I cut 2 of the open leaf die and 3 of the grassy leaf die from the Timeless Charm Dies.

I adhered 2 panels of One Horse Open Sleigh DSP to Granny Apple Green mats using Stampin’ Seal. I adhered the layered panels to an Azure Afternoon card base using Multipurpose Liquid Glue, the smaller one to the front of the card base and the larger one to the inside back of the card base.

I adhered the die cut leaves to the embossed panel using Multipurpose Liquid Glue and Stampin’ Dimensionals. I adhered the fireflies above the leaves using Stampin’ Dimensionals. I added a few Iridescent Rhinestones Basic Jewels to the embossed panel. I adhered a panel of One Horse Open Sleigh DSP to an Azure Afternoon mat using Stampin’ Seal. I adhered the layered panel to the front of the small Granny Apple Green card base using Multipurpose Liquid Glue. I adhered the square artwork panel to the front of the small card front using Stampin’ Dimensionals. On a panel of Basic White, I stamped the sentiment from Lighting The Way stamp set in Azure Afternoon Ink. I cut the sentiment out using the long narrow die from Stylish Shapes Dies. The sentiment was longer than the die, so I ran it through partway, moved the die to the end of the sentiment lining up the little dashes and ran it through the Stampin’ Cut & Emboss Machine partway through again. I adhered the sentiment to the bottom of the artwork using Stampin’ Dimensionals.

For the inside, on 1 panel of Basic White, I stamped the sentiment from Lighting The Way stamp set in Azure Afternoon Ink. On another panel of Basic White, I stamped the leaf images from the Lighting The Way stamp set in Garden Green, Granny Apple Green and Soft Sea Foam Inks on the side of the panel. I adhered the other Soft Shimmer die cut leaf in front of the stamped leaves using Multipurpose Liquid Glue. I stamped the small firefly from the Lighting The Way stamp set in Basic Gray Ink above the leaves. I colored the firefly using Lemon Lolly Stampin’ Blends Markers. I adhered the Basic White panels to Azure Afternoon mats using Stampin’ Seal. I adhered the 2 layered panels to the inside of the small Granny Apple Green card base using Multipurpose Liquid Glue. I adhered the small card base to the inside back panel of the Azure Afternoon card base, centering it, using Multipurpose Liquid Glue.

To finish my card, I decorated a Basic White Medium Envelope. I stamped the leaf images from the Lighting The Way stamp set on the envelope front in Garden Green, Granny Apple Green and Soft Sea Foam Inks. I stamped the fireflies in Basic Gray Ink. I adhered a panel of One Horse Open Sleigh DSP to the envelope flap.

Thank you for stopping by my blog today. I hope you liked my card and will give it a try. I hope you will CASE this card and please feel free to post it in the comments of my Facebook page under my post. I’d love to see your take on the card. The list of measurements are below if you’d like to stamp along while watching the video. You can watch my video on my YouTube Channel Here.
If you watch this on my YouTube channel, please remember to subscribe so that you will get notified when a new video goes live. Thank you to those that have subscribed already. Happy Stamping!!
*********************************************************************************************************
If you need any stamping supplies, I’d love to be your Demonstrator. Just click HERE to go directly to my online store or drop me an email if you have any questions.
MY CURRENT HOST CODE IS: MHTQEVEX
Use this host code when placing an order with me. When you order $50 or greater you will receive a free gift from me! If your order is over $150, please do not use this code, but you’ll still get the free gift. The free gift is your choice of any 1 item valued up to $10.00 from the 2023-2024 Annual Catalog! Unfortunately, packs of cardstock are no longer an option for a free gift. Shipping has become too expensive to ship and it’s costing me as much to ship as the cardstock costs. For any orders $50 or more I will also send you my monthly class tutorials. Click HERE or go to my Customer Rewards for more details and to see what this month’s tutorials are.
Please remember to use my current Host Code and make sure that you can see my name on the final checkout page listed as your Demonstrator when you order so that you know that you’re ordering with me, and you’ll get my rewards!
Happy Stamping, Karen
*********************************************************************************************************
In response to changing policies at Stampin’ Up – I’m adjusting my Ordering Gift policy as well. I’m having to get a little more tough on the adding of Host codes when you place your order thru my Online Store.
Not to worry – you’re still going to get that $10 ordering gift for orders of $50 (before shipping & tax) or greater. And the gift is still any 1 SU! product up to that $10 value – which includes some of our fun Host Sets!
But – if you DO NOT use the Host code for your orders of less than $150 (this is the RETAIL total before Shipping & Handling), then you’ll have two options:
- You’ll need to call Stampin’ Up! (1-800-Stamp-Up) and ask them to add it for you. They’re very helpful and will get it done quickly! OR….
- If your order was over the $50 threshold but under $150, then…you’ll forfeit that $10 ordering gift and rewards – this is the Bummer Option – and I REALLY don’t want to do this, SO please remember to add my Current Host Code.
*********************************************************************************************************
Bonus Days Going On NOW!!!

We’re bringing back one of our favorite promotions—BONUS DAYS! Because do you know what’s a great deal? Getting rewarded for all the crafting supplies you’re already going to buy! When you shop between 6–31 July and spend $50 USD you will earn a $5 USD coupon! Make sure you save all your coupons because you can redeem them (and we mean ALL of them) between 1–31 August. There’s no limit to how many coupons you can earn! So, get your ready to earn and redeem coupons!
Ordering Deadlines
Earning Period: July 6th – July 31, 2023 at 11:59 p.m. (MT)
- Earn a $5 USD coupon for every $50 USD spent (before shipping and tax).
- All coupon codes will be emailed right after a qualifying purchase has been made.
- If a participant earns multiple codes from a single order, they will receive one email with multiple codes. If they earn multiple codes from multiple orders, they will receive separate emails for each code earned.
- All order types qualify for this promotion. Phone and email orders still require an email address.
- Orders that are started before the promotion begins will not count toward earning coupon codes. For example, if you add items to your cart before 6 July and wait to purchase until that date or later, then those items will not qualify towards earning coupons. You must add items to your cart and complete your purchase during the earning period.
- There is no limit to the number of coupon codes participants can earn per order or throughout the duration of the earning period.
Ordering Deadlines
Redemption Period: August1– August 31, 2023 at 11:59 p.m. (MT)
- There is no limit to the number of coupon codes participants can redeem on an order during the redemption period. If using multiple codes, they must be separated by a space.
- Coupons may be redeemed one time only.
- Coupon codes may be redeemed for any product (excluding Starter Kits, demonstrator supply items, and Paper Pumpkin month-to-month subscriptions).
- New prepaid Paper Pumpkin codes may be discounted using Bonus Days coupon codes.
*********************************************************************************************************
Blossom Wishes Kit Now Available
Introducing the newest addition to the Stampin’ Up! Kit’s Collection: Blossom Wishes! This kit is special for its trendy, slimline card design, and includes all the precut paper pieces for a fun card for a friend!


This kit includes:
- Enough supplies to create 8 cards—4 each of 2 designs
- 8 coordinating envelopes.
- Embossed card bases, printed die cuts, vellum blossoms, adhesive, and embellishments.
- Precut sentiments in Dutch, English, French, and German.
- Finished card size: 8-1/2″ x 3-1/2″ (21.6 x 8.9 cm), 6-1/4″ x 3-1/4″ (15.9 x 8.3 cm)
- Coordinating colors: Lemon Lolly, Orchid Oasis, Petal Pink, Starry Sky, Sweet Sorbet, Wild Wheat
162431 $13.00 USD
*********************************************************************************************************
New Online Exclusives Now Available

Stampin’ Up! has some new Online Exclusive items that are available to order now!! You won’t find these products in any catalog, they’ll only be listed in the online store.
The Online Exclusive product releases will continue throughout the year so there will be new products to shop from, in addition to new catalogs!
We got some new Online Exclusive items on July 6. Click HERE and head over to my Online Store to see the Online Exclusives Now.
*********************************************************************************************************
Meaningful Flowers
Subscribe Julu 11 – August 10
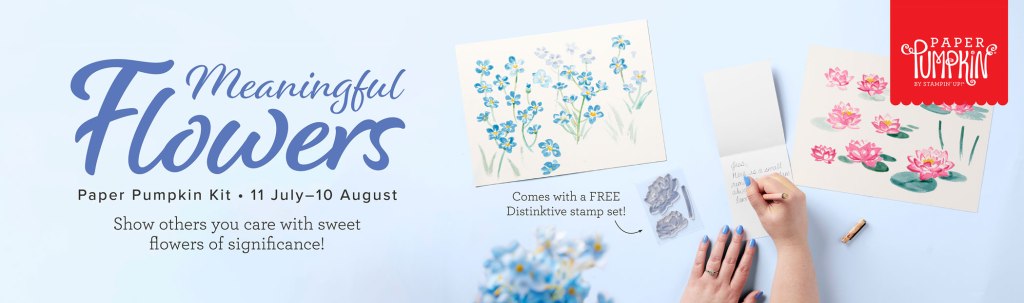
Discover messages of friendship and loyalty in the flowers from the August Paper Pumpkin Kit! This kit includes 8 cards, 4 each of 2 designs, and 8 coordinating envelopes. The kit is special because of the way it uses the meaning of flowers. On each card, you’ll find a small inscription of what the flowers represent. As you craft with the included vellum and watercolor paper pieces, you’ll know you’re sending a message of encouragement and loyalty to your recipients. The Meaningful Flowers Paper Pumpkin Kit is full of florals that are meant to spread hope, encouragement, and remind you of your favorite memories. The kit focuses specifically on forget-me-nots and lotuses. Their meaning is enscripted on the back of each card. Subscribe by 10 August to send beautiful paper crafts with thoughtful messages to those you love.
And don’t wait, because anyone who subscribes to this month’s kit will get a FREE stamp set! This Distinktive stamp set is perfect for a variety of occasions!
This kit includes:
- 8 cards; 4 each of 2 designs
- 8 coordinating envelopes
- 1 photopolymer stamp set
- 1 Pretty Peacock Ink Spot
- Linen thread
- Vellum and precut paper pieces
- FREE Distinktive stamp set
- Adhesives
- Final card size: 4-1/4″ x 5-1/2″ (10.8 x 14 cm)
Coordinating Stampin’ Up! colors: Bubble Bath, Crushed Curry, Garden Green, Melon Mambo, Misty Moonlight, Orchid Oasis, Pretty Peacock, Tahitian Tide
Subscribe to the August Paper Pumpkin Kit between 11 July and 10 August by clicking here!
Note: Supplies may be limited toward the end of the subscription period.
*********************************************************************************************************
Card stock cuts for this project:
- Basic White Cardstock 3 1/2″ X 3 1/2″ (artwork panel), 1″ X 4″ (sentiment), 2 – 2 3/4″ X 4 1/8″ (inner liners), 5 X 5 1/2″ (die cuts)
- Azure Afternoon Cardstock 4 1/4″ X 8 1/2″ (large card base scored & folded at 3″), 3 – 2 7/8″ x 4 1/4″ (small card base mats), 3 5/8″ X 3 5/8″ (artwork mat)
- Granny Apple Green Cardstock3″ X 8 3/4″ (small card base scored & folded at 4 3/8″), 4 1/8″ X 5 3/8″ (large card base back mat), 2 7/8″ X 4 1/8″ (large card base card front mat),
- One Horse Open Sleigh 6 X 6 Designer Series Paper 2 3/4″ X 4″ (large card base card front), 2 3/4″ X 4 1/8″ (small card base card front), 4″ X 5 1/4″ (large card base card back), 2 1/4″ X 6″ (envelope flap)
- Soft Shimmer specialty Paper 2 – 1 1/2″ X 4″ (die cut pieces)
*********************************************************************************************************
Product List
")


 Designer Series Paper")
 Specialty Paper")


Such a pretty card Karen! Love the layering and the colors are perfect! 🙂
LikeLiked by 1 person
Thank you Amy 🙂
LikeLike
Lovely card- so pretty!
LikeLiked by 1 person
Thank you Deborah 🙂
LikeLiked by 1 person