

Good Thursday morning my stamping friends and welcome to our Happy Inkin’ Thursday Blog Hop. Hope you are all doing well. If you are hopping over from Akiko, thank you for stopping by my blog. This week we have a sketch challenge. Be sure to take a moment to hop around to see everyone’s beautiful projects.
Here is our sketch for this week.

Here is my card using this sketch.

I used the Stampin’ Up! In The Pines Bundle for today’s card. I played along with the Double ‘D’ Challenge. Their theme is Pine Trees and/or Pine Cones. Here is their Mood Board.

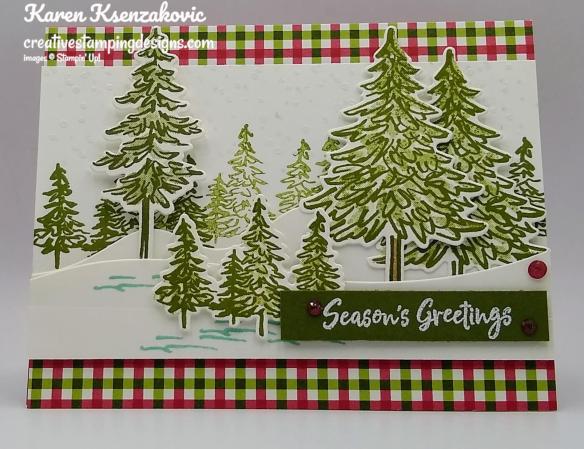
I started by adhering a panel of Heartwarming Hugs Designer Series Paper to a Real Red card base using Multipurpose Liquid Glue. On a panel of Whisper White cardstock I stamped 2 of the largest tree and the group of 4 tree outlines from the Stampin’ Up! In The Pines Photopolymer Stamp Set in Old Olive Ink. I stamped the fill images for the same trees in Old Olive Ink, stamping off once. I stamped the tall tree outline from In The Pines stamp set in Mossy Meadow Ink on the Whisper White panel and the fill image for the same tree in Mossy Meadow Ink, stamped off once. I cut all the trees out using my Pine Woods Dies.

I took another panel of Whisper White cardstock and using the Pine Woods Dies, I cut the 2 snow curve images starting from the bottom. On the remaining cut piece I stamped the group of 4 tree outlines from the In The Pines stamp set in Old Olive Ink, some stamped full and some stamped off, across the panel. I randomly stamped the snow dots image from In The Pines stamp set on the top of the panel in Pool Party Ink, stamped off once. I stamped all over the top of the panel with the same stamp in Versamark Ink. I immediately sprinkled it with my White Stampin’ Emboss Powder and set it using my Heat Tool. I adhered the 2 curves to the stamped piece, adhering the 1st one with Glue Dots just on the ends and the top one using Stamping Dimensionals. I lined these up on my Grid Paper so that it measured 3 1/4″ X 5 1/2″. I stamped the snow drift image from the In The Pines stamp set, where I was going to be placing the die cut trees, in Pool Party Ink on the front panel. I adhered the die cut trees on the panel using Stampin’ Dimensionals, some behind the drifts and some in front.

On a strip of Mossy Meadow cardstock I stamped the sentiment from In The Pines stamp set in Versamark Ink. I immediately sprinkled it with my White Stampin’ Emboss Powder and set it using my Heat Tool. I adhered the sentiment strip to the card front using Stampin’ Dimensionals. I added a few Real Red Wonderful Gems to the artwork panel. I adhered the artwork to the card front using Stampin’ Dimensionals.

On the inside I stamped the sentiment from the Stampin’ Up! Wrapped In Christmas Cling Stamp Set in Mossy Meadow Ink in the center of a Whisper White panel. I stamped the group of 4 trees outline stamp from In The Pines stamp set in Old Olive Ink across the bottom of the panel stamped in full strength, then stamped again without re-inking. I stamped the snow drift image from In The Pines stamp set below the trees in Pool Party Ink. Using the Pine Woods Dies, I cut the bottom of the panel using the smallest curve die. I adhered the Whisper White panel to a Mossy Meadow mat using Stampin’ Seal and then to the inside of the Real Red card base using Multipurpose Liquid Glue.

To complete my card I decorated a Medium Whisper White Envelope. I stamped the small 4 tree outline image from In The Pines stamp set on the envelope front stamped full strength then again without re-inking. I also stamped the single small tree outline image from In The Pines stamp set in Old Olive Ink stamped full strength and again without re-inking. I stamped the snowdrift image from In The Pines stamp set in Pool Party Ink below the trees. I adhered a panel of Heartwarming Hugs DSP to the envelope flap.

Thank you for visiting my blog today. I hope you liked my card and will give it a try. Now that you’ve seen my card, take a minute to hop through all our projects today. If you click on the Next Blog button, you’ll go to Julie’s page. Or you can just click on the names below to go directly to all their blogs! Happy Hopping!!

Karen Ksenzakovic: You Are Here
*********************************************************************************************************
If you need any stamping supplies, I’d love to be your Demonstrator. Just click HERE to go directly to my online store or drop me an email if you have any questions.
MY CURRENT HOST CODE IS: 9XYYG2ZU
Use this host code when you order $50 or greater and receive a free gift from me! If your order is over $150, please do not use this code, but you’ll still get the free gift. The free gift is your choice of any 1 item valued up to $10.00 in the 2020-2021 Annual Catalog! For any orders $50 or more I will also send you my monthly class tutorials. Click HERE or go to my Customer Rewards for more details and to see what this months tutorials are.
Click HERE to shop the clearance rack.
Please remember to use my current Host Code and make sure that you can see my name on the final checkout page listed as your Demonstrator when you order so that you know that you’re ordering with me and you’ll get my rewards!
Happy Stamping, Karen!
*********************************************************************************************************
Beary Comforting
Subscribe November 11-December 10

If you haven’t heard already, Paper Pumpkin is our monthly One-Stop Box™ that offers a wide variety of unique papercrafting projects for subscribers of any skill level! These themed, all-inclusive craft kits encourage customers to explore their creativity, try new techniques, and discover their potential in papercrafting.
December’s cute and cuddly Paper Pumpkin kit—called “Beary Comforting”—is designed to uplift your loved ones as this beary tough year finally comes to a close. After a year like 2020, we all could use a big bear hug! With the help of this bear-themed kit, you can create 12 unbearably cute cards featuring warm and fuzzy friends, sweet stamps, and meaningful messages. Near or far, send your friends and family the extra comfort, love, and encouragement they need with this month’s Paper Pumpkin kit!
ABOUT THE DECEMBER KIT
Details
- Kit contains enough supplies to create 12 cards and coordinating envelopes.
- Card size: 4-1/4″ x 5-1/2″ (10.8 x 14 cm)
- Envelope size: 4-1/2″ x 5-3/4″ (11.4 x 14.6 cm)
- Coordinating colors: Basic Gray, Calypso Coral, Cinnamon Cider, Daffodil Delight, Rich Razzleberry, Soft Sea Foam, Whisper White
SUBSCRIPTION INFORMATION
Subscribe to the December 2020 Paper Pumpkin Kit between 11 November and 10 December at paperpumpkin.com!
Note: Supplies may be limited toward the end of the subscription period.
*********************************************************************************************************
Card stock cuts for this project:
- Mossy Meadow Cardstock 1/2″ X 2 3/4″ (sentiment), 4 1/8″ X 5 3/8″ (inner liner mat)
- Real Red Cardstock 8 1/2″ X 5 1/2″ (card base scored and folded at 4 1/4″)
- Whisper White Cardstock 4 1/4″ X 5 1/2″ (artwork cut with snowdrift dies), 3 1/2″ X 5 1/2″ (trees), 4″ X 5 1/4″ (inner liner)
- Heartwarming Hugs Designer Series Paper 4 1/4″ X 5 1/2″ (card front), 2 1/4″ X 6″ (piece for envelope flap)
*********************************************************************************************************
Product List


")


")


Love, love, love this Karen! What a great design, perfect winter scene! 🙂
LikeLike
Thank you so much Amy 🙂
LikeLike
This is so beautiful!! All the layers are perfect and the plaid DSP is so happy!
LikeLike
Thank you so much Akiko 🙂
LikeLike
Oh – love your card, all the lovely layers and colors for the trees.
LikeLike
Thank you so much Terry Lynn 🙂
LikeLike
Love your card Karen and the plaid DSP is a perfect choice to go with all those wonderful evergreen trees. Beautiful!!!
LikeLike
Thank you so much Kristi 🙂
LikeLike
Karen, the inside and the outside of your card use all the elemnts so well, making it a very lovely card. I love those pine woods! And that DSP is perfect for them.
LikeLike
Thank you so much Julie 🙂
LikeLike
Oh wow, Karen! Love the scene you created. Great card!
LikeLike
Thank you so much Sue 🙂
LikeLike
Oh Karen this is just GORGEOUS! LOVE the dimension you’ve achieved in this wonderful scene! Well done … awesome inspiration! Thanks so much for joining in the fun at our Double D ‘Pine Trees/Pine Cones’ challenge! Good Luck and we hope you’ll come back often.
Darlene
DOUBLE D Challenge Blog
DAR’S CRAFTY CREATIONS
Please stop in for a visit!
LikeLike
Thank you so much Darlene 🙂
LikeLike