

Good Thursday morning stamping friends and welcome to our Happy Inkin’ Thursday Blog Hop. If you are starting with me, thank you. I hope you will stop by everyone’s blog to see what they have created this week. If you are hopping over from Akiko’s blog, thank you for stopping by. This week we have Theme Challenge. If you’d like to see a quick video of how I made this card, Click Here to go to my Instagram Reels. Here is my card using this week’s theme.

I used the Stampin’ Up! Online Exclusive Mixed Florals Bundle along with the Perennial Lavender Designer Series Paper, Stylish Shapes Dies and New Stampin’ Up! The Right Word Cling Stamp Set (available May 6th), for my fun fold card today.

We have a Fun Fold Theme this week.

Score and fold the 3 Pretty Peacock card bases as listed in the measurements below. On a panel of Basic White, stamp the tulip image from the Stampin’ Up! Mixed Florals Photopolymer Stamp Set in Tuxedo Black Ink. Color the image using Berry Burst, Fresh Freesia, Highland Heather, Lost Lagoon and Pretty Peacock Stampin’ Blends Markers. Cut the image out using the Mixed Florals Dies.

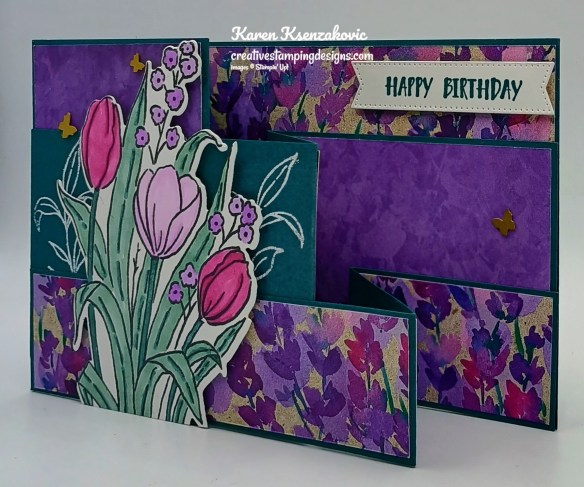
Adhere the panels of Perennial Lavender DSP to the Pretty Peacock card bases. I listed below which piece goes on which part of the card bases. On the front of the center card base panel (4 1/4″ side), stamp the leaf image from the Mixed Florals stamp set in Versamark Ink 3 times. Sprinkle the image with White Embossing Powder, set it using the Heat Tool. Adhere the center card base to the large card base with the 4 1/4″ side in the front, about 1/4″ up from the bottom. Adhere the bottom card base with the 5 1/2″ side in the front, to the large card base on top of the center, lining up the bottom edge
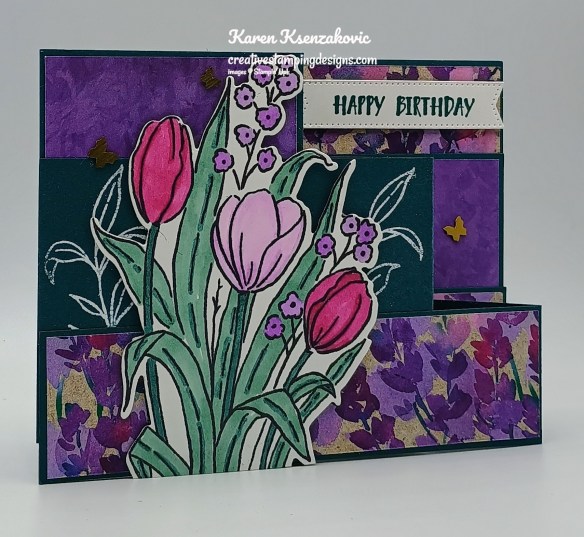
Adhere the die cut flowers to the front panel using Stampin’ Dimensionals, keeping top flowers below the top of the card base. Trim off the bottom of the flower stems/leaves using Paper Snips.
Stamp the sentiment from The Right Word stamp set in Pretty Peacock Ink on a panel of Basic White. Cut the sentiment out using the Stylish Shapes Dies. Adhere the sentiment to the top back panel using Stampin’ Dimensionals. Add a few Brushed Brass Butterflies to the card front.

On a panel of Basic White panel stamp the sentiment from The Right Word stamp set in Pretty Peacock Ink. Stamp the leaf image from the Mixed Florals stamp set in Pretty Peacock Ink multiple times on the side of the panel. Adhere a strip of Perennial Lavender DSP to the side of the panel. Adhere the Basic White panel to a Highland Heather mat then to the back of the Pretty Peacock card base.
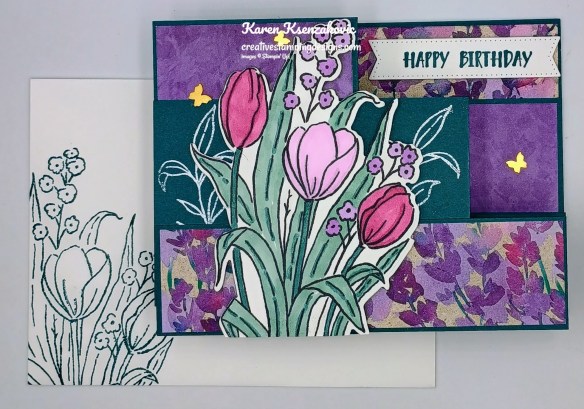
Decorate a Basic White Medium Envelope to complete the card. Stamp the tulip image from the Mixed Florals stamp set in Pretty Peacock Ink on the envelope front. Adhere a panel of Perennial Lavender DSP to the envelope flap.

Thank you for stopping by my blog today. Now that you’ve seen my card, let’s get on with the hop! Click the button below to hop over to see what Tara has created. Happy Hopping!

Karen Ksenzakovic You Are Here
*********************************************************************************************************
Mountain Majesties
Subscribe April 11 – May 10
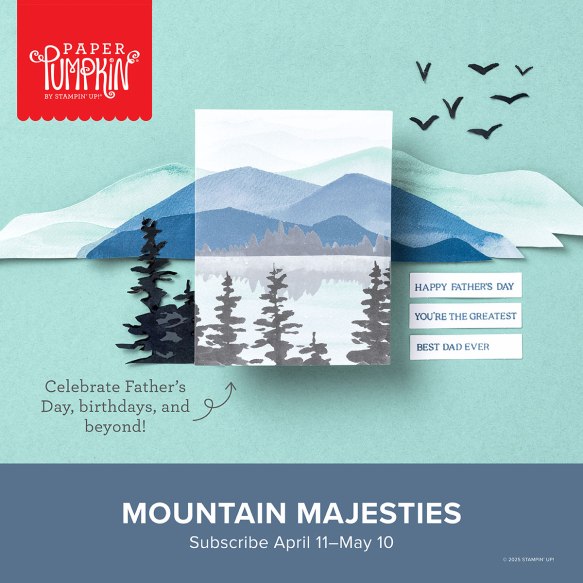
Create Father’s Day cards with layered mountain landscapes!
• Makes 9 cards: 3 each of 3 designs with 9 coordinating envelopes
• Precut vellum and paper pieces
• Watercolor card bases and coordinating envelopes
• Coordinating colors: Basic Black, Lost Lagoon, Misty Moonlight
(Classic Stampin’ Spot), Mossy Meadow, Pecan Pie, Petal Pink
Includes vellum pieces for layering and sentiments tailored to men!
Subscribe to the April Paper Pumpkin Kit between 11 April and 10 May by clicking here!
*********************************************************************************************************
Don’t miss the coordinating
Hugs Abloom Dies Add-On!

Make the most of your Paper Pumpkin kits with the Hugs Abloom Dies add-on! Quickly and cleanly cut out a flower, leaf sprig, sentiment label, or Hugs sentiment to elevate your crafting projects. These additional dies are designed to work with THREE Paper Pumpkin Kits: the Inked Occasions Paper Pumpkin Kit, the Mountain Majesties Paper Pumpkin Kit, and the Full of Charm Paper Pumpkin Kit. Pair these dies with other Stampin’ Up! products for even more creative options!
DETAILS
– 4 dies
– Largest die: 2-1/2″ x 1-1/4″ (6.4 x 3.2 cm)
– Use with a Stampin’ Cut & Emboss Machine (sold separately)
You must be a current Paper Pumpkin subscriber to purchase this item. To become a subscriber, visit www.stampinup.com/paperpumpkin.
Note: Supplies may be limited toward the end of the subscription period.
#166238 $12
*********************************************************************************************************
Card stock cuts for this project:
- Basic White Cardstock 2 – 4″ x 5 1/4″ (flowers & inner liner), 1″ x 4″ (sentiment)
- Highland Heather Cardstock 4 1/8″ X 5 3/8″(back panel mat)
- Pretty Peacock Cardstock 4 1/4″ X 11″(large card base scored & folded at 2 3/4″& 5 1/2″), 2 3/4″ x 11″(center card base scored & folded at 4 1/4″ & 7″), 1 1/2″ X 11″(bottom card base scored & folded at 5 1/2″ & 8 1/4″)
- Perennial Lavender Designer Series Paper 2 5/8″ x 4 1/8″(front of large card base), 4 1/8″ X 5 3/8″(back of large card base), 2 5/8″ X 2 5/8″ (center of center card base), 2 5/8″ x 3 7/8″(back of center card base), 1 3/8″ X 5 3/8″(front of bottom card base), 1 3/8″ X 2 5/8″(center of bottom card base), 1 3/8″ X 2 5/8″(back of bottom card base), 1/2″ X 4″(back panel), 2 1/4″ x 6″(envelope flap)
*********************************************************************************************************
Product List
![Mixed Florals Bundle [ 164642 ]](https://assets1.tamsnetwork.com/images/EC042017NF/164642s.jpg "Mixed Florals Bundle [ 164642 ]")
![Mixed Florals Photopolymer Stamp Set [ 164639 ]](https://assets1.tamsnetwork.com/images/EC042017NF/164639s.jpg "Mixed Florals Photopolymer Stamp Set [ 164639 ]")
![Mixed Florals Dies [ 164641 ]](https://assets1.tamsnetwork.com/images/EC042017NF/164641s.jpg "Mixed Florals Dies [ 164641 ]")
![Basic White 8 1/2" X 11" Cardstock [ 166780 ]](https://assets1.tamsnetwork.com/images/EC042017NF/166780s.jpg "Basic White 8 1/2\" X 11\" Cardstock [ 166780 ]")
![Highland Heather 8-1/2" X 11" Cardstock [ 146986 ]](https://assets1.tamsnetwork.com/images/EC042017NF/146986s.jpg "Highland Heather 8-1/2\" X 11\" Cardstock [ 146986 ]")
![Pretty Peacock 8-1/2" X 11" Cardstock [ 150880 ]](https://assets1.tamsnetwork.com/images/EC042017NF/150880s.jpg "Pretty Peacock 8-1/2\" X 11\" Cardstock [ 150880 ]")
![Perennial Lavender 12" X 12" (30.5 X 30.5 Cm) Designer Series Paper [ 162593 ]](https://assets1.tamsnetwork.com/images/EC042017NF/162593s.jpg "Perennial Lavender 12\" X 12\" (30.5 X 30.5 Cm) Designer Series Paper [ 162593 ]")
![Pretty Peacock Classic Stampin’ Pad [ 150083 ]](https://assets1.tamsnetwork.com/images/EC042017NF/150083s.jpg "Pretty Peacock Classic Stampin’ Pad [ 150083 ]")
![Tuxedo Black Memento Ink Pad [ 132708 ]](https://assets1.tamsnetwork.com/images/EC042017NF/132708s.jpg "Tuxedo Black Memento Ink Pad [ 132708 ]")
![Berry Burst Stampin’ Blends Combo Pack [ 161681 ]](https://assets1.tamsnetwork.com/images/EC042017NF/161681s.jpg "Berry Burst Stampin’ Blends Combo Pack [ 161681 ]")
![Fresh Freesia Stampin' Blends Combo Pack [ 155518 ]](https://assets1.tamsnetwork.com/images/EC042017NF/155518s.jpg "Fresh Freesia Stampin' Blends Combo Pack [ 155518 ]")
![Highland Heather Stampin' Blends Combo Pack [ 154887 ]](https://assets1.tamsnetwork.com/images/EC042017NF/154887s.jpg "Highland Heather Stampin' Blends Combo Pack [ 154887 ]")
![Lost Lagoon Stampin’ Blends Combo Pack [ 161680 ]](https://assets1.tamsnetwork.com/images/EC042017NF/161680s.jpg "Lost Lagoon Stampin’ Blends Combo Pack [ 161680 ]")
![Pretty Peacock Stampin’ Blends Combo Pack [ 161676 ]](https://assets1.tamsnetwork.com/images/EC042017NF/161676s.jpg "Pretty Peacock Stampin’ Blends Combo Pack [ 161676 ]")
![Versamark Pad [ 102283 ]](https://assets1.tamsnetwork.com/images/EC042017NF/102283s.jpg "Versamark Pad [ 102283 ]")
![Basics Wow! Embossing Powder [ 165679 ]](https://assets1.tamsnetwork.com/images/EC042017NF/165679s.jpg "Basics Wow! Embossing Powder [ 165679 ]")
![Heat Tool (Us And Canada) [ 129053 ]](https://assets1.tamsnetwork.com/images/EC042017NF/129053s.jpg "Heat Tool (Us And Canada) [ 129053 ]")
![Stylish Shapes Dies [ 159183 ]](https://assets1.tamsnetwork.com/images/EC042017NF/159183s.jpg "Stylish Shapes Dies [ 159183 ]")
![Brushed Brass Butterflies [ 158136 ]](https://assets1.tamsnetwork.com/images/EC042017NF/158136s.jpg "Brushed Brass Butterflies [ 158136 ]")


Just beautiful Karen! Such an awesome fun fold design! 🙂
LikeLike
Thank you so much Amy 🙂
LikeLike
Gorgeous card!! Love this fun fold – I need to make one! ❤️
LikeLike
Thank you so much Akiko 🙂
LikeLike
Wow! This is stunning!! Love the colors and your flowers are perfect! 🙂
LikeLike
Thank you so much Mary 🙂
LikeLike
Beautiful card! I love the pairing! TFS
LikeLike
Thank you Tara 🙂
LikeLike
Great card – bright, cheerful & love this DSP!
LikeLike
Thank you Terry Lynn 🙂
LikeLike