Good Friday morning my fellow stampers and welcome to my Fun Fold Friday. How was everyone’s week? Are you all ready for the weekend? It’s the last weekend of January already. Does anyone have plans? I have to go into work for a couple hours on Sunday since it’s the last of the month, but I have off tomorrow. It’s my husbands birthday this weekend, so I thought I’d be nice and be home to make him a birthday dinner. Turns out he wants pizza made in his pizza oven, which means he’s cooking.
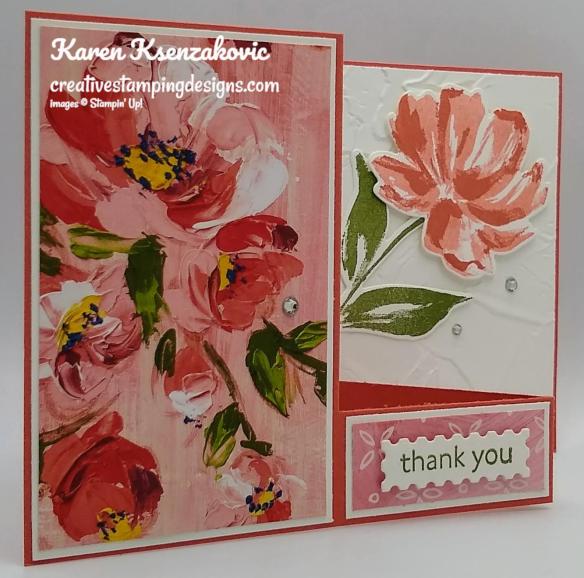
Today’s card I made on my Facebook Live video on Wednesday. If you were able to join me or watched the replay, thank you very much. If you’d like to watch my video and stamp along, the measurements are below along with the links to my Facebook page and my YouTube channel. Here’s my card that I made.

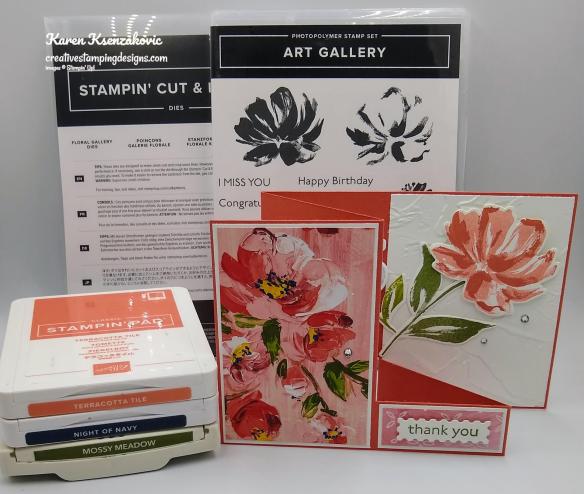
I used the Stampin’ Up! Art Gallery Bundle for my card today along with the Fine Art Floral Designer Series Paper.

I started by doing all the cutting and folding on a Terracotta Tile card base. I started with a panel of 4 1/4″ X 11″ card base. I scored it at the 5 1/2″ mark from the top to 1″ from the bottom. I scored at 6″ from the bottom up 1″. I scored at 3 1/4″ from the bottom up to 1″. I scored at 8 1/4″ from the top down to 1″. I turned the card base and lined the edge up at the 1″ mark on my Trimmer and cut from the 3 1/4″ score line to the 8 1/4″ score line. I valley folded on the 5 1/2″ score line and mountain folded on the 6″ score line. The other score lines kind of just fall into place. It’s explained much better on the video if you are able to watch it.

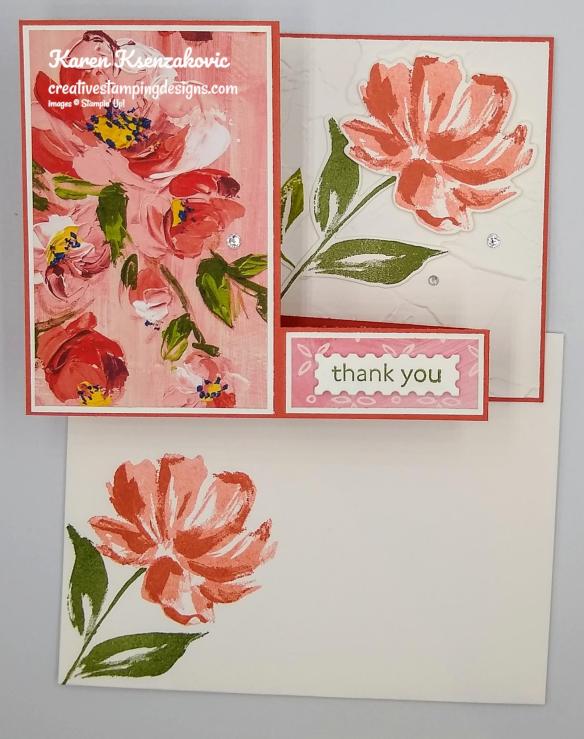
This is the top view of the card base and how it should look.

I adhered the panels of Fine Art Floral DSP to Basic White mats using Stampin’ Seal and then to the card base using Multipurpose Liquid Glue. I stamped the sentiment from the Stampin’ Up! Art Gallery Photopolymer Stamp Set on a panel of Basic White cardstock in Mossy Meadow Ink and cut it out using the smallest label die from the Floral Gallery Dies. I adhered the sentiment to the bottom cut panel of the card base using Stampin’ Dimensionals.

I embossed a panel of Basic White cardstock using the Painted Texture 3D Embossing Folder and adhered it to the back panel of the card base using Multipurpose Liquid Glue. On a panel of Basic White cardstock I stamped the large flower image from the Art Gallery stamp set in Terracotta Tile Ink, stamping off once. I stamped the detail flower image from the Art Gallery stamp set in Terracotta Tile Ink over the stamped off image. I stamped the stem image from the Art Gallery stamp set in Mossy Meadow Ink on the panel of Basic White cardstock. I cut the images out using the Floral Gallery Dies. I adhered the stem image to the embossed panel using Glue Dots. I adhered the flower on the stem using Stampin’ Dimensionals.

For the inside I stamped the bouquet of flowers image from the Art Gallery stamp set by coloring the stems with my Old Olive Stampin’ Write Marker and the tiny buds with my Bumblebee Stampin’ Write Marker, on a panel of Basic White cardstock. I stamped the image again, just inking up the flowers with Night Of Navy Ink, I stamped off on a piece of scrap paper 2 times to get a very light shade. I stamped the small detail flower in Night of Navy Ink over 3 of the stamped flowers. I fussy cut the flowers using my Paper Snips. I adhered the flowers to the bouquet using Multipurpose Liquid Glue, then adhered the bouquet to the card base using Glue Dots. On a panel of Basic White cardstock, I stamped the sentiment from the Stampin’ Up! Simply Succulents Cling Stamp Set in Mossy Meadow Ink. I adhered the Basic White panel to a Mossy Meadow mat using Stampin’ Seal and then to the inside of the Terracotta Tile card base using Stampin’ Seal. I added a few Rhinestone Basic Jewels.

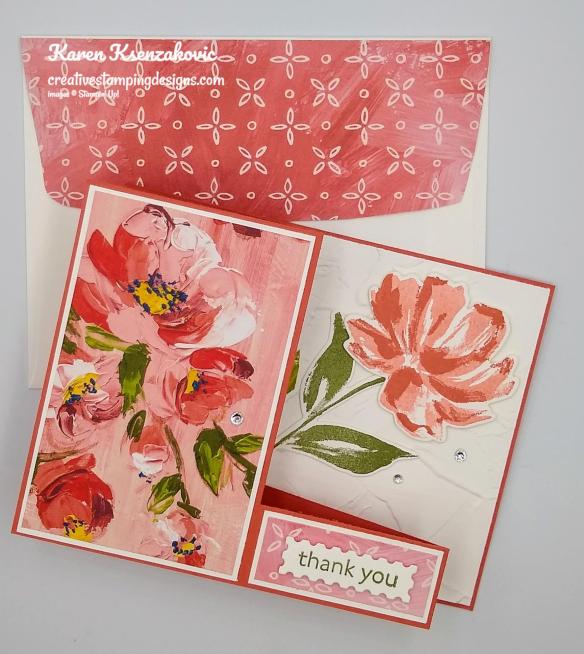
To finish my card I decorated a Basic White Medium Envelope. I stamped the stem image from the Art Gallery stamp set in Mossy Meadow Ink on the envelope front. I stamped the flower image from the Art Gallery stamp set in Terracotta Tile Ink, stamping off once, on the stem. I stamped the detailed flower image over the stamped image in Terracotta Tile Ink. I adhered a panel of the Fine Art Floral DSP to the envelope flap.

Thank you for stopping by my blog today. I hope you liked my card and will give it a try. The list of measurements are below if you’d like to stamp along while watching the video. You can watch my video on my Facebook page Here.
You can also view the video on my YouTube channel Here. Happy Stamping!!
*********************************************************************************************************
If you need any stamping supplies, I’d love to be your Demonstrator. Just click HERE to go directly to my online store or drop me an email if you have any questions.
MY CURRENT HOST CODE IS: C4XDWQT6
Use this host code when you order $50 or greater and receive a free gift from me! If your order is over $150, please do not use this code, but you’ll still get the free gift. The free gift is your choice of any 1 item valued up to $10.00 from the 2020-2021 Annual Catalog or the January-June 2021 Mini Catalog! For any orders $50 or more I will also send you my monthly class tutorials. Click HERE or go to my Customer Rewards for more details and to see what this months tutorials are.
Click HERE to shop the clearance rack.
Please remember to use my current Host Code and make sure that you can see my name on the final checkout page listed as your Demonstrator when you order so that you know that you’re ordering with me and you’ll get my rewards!
Happy Stamping, Karen!
*********************************************************************************************************
Bouquet of Hope
Subscribe January 11 – February 10

What is Paper Pumpkin? Paper Pumpkin is our monthly One-Stop Box™ that offers a unique variety of paper projects for subscribers of any skill level to enjoy! These thoughtfully-themed and all-inclusive craft kits encourage you to explore your creativity, try new techniques, and discover your potential in papercrafting.
Paper Pumpkin introduces you to an impressive collection of Stampin’ Up! products, from our one-of-a-kind ink pads to our eye-catching embellishments. Plus, the carefully-chosen components of each Paper Pumpkin kit highlight the unbeatable versatility and coordination our products provide! This easy and exciting way to stock up on supplies—and create small-batch projects for occasions of any kind—inspires you to continue crafting. With Paper Pumpkin, it’s simple: share what you love, and help others enjoy creativity!
The Bouquet of Hope Paper Pumpkin Kit provides enough supplies to create nine cards and coordinating envelopes. This soft, sympathetic kit includes patterned card bases, die-cut floral elements, ribbon, embellishments, and more!
The kit’s exclusive Bouquet of Hope Stamp Set features supportive sentiments centered around comfort, care, hope, and love. Such a versatile stamp set can be used throughout the year! Sadly, there is heartache in the world all around us. We all know someone who could use a heartfelt, handmade card that gives sympathy and strength during a difficult time. This kit’s cards are a must to have on-hand!
ABOUT THE FEBRUARY KIT
Details
- Kit contains enough supplies to create 9 cards—3 each of 3 designs—and coordinating envelopes. Kit includes card bases, decorative die-cut pieces, embellishments, and more.
- Card size: 4-1/4″ x 5-1/2″ (10.8 x 14 cm)
- Envelope size: 4-1/2″ x 5-3/4″ (11.4 x 14.6 cm)
- Coordinating colors: Basic Black, Bumblebee, Just Jade, Merry Merlot, Mossy Meadow, Rococo Rose
- Coordinates with the Flower & Field Designer Series Paper, an exclusive Sale-A-Bration item.
Subscribe to the February 2021 Paper Pumpkin Kit between 11 January and 10 February at paperpumpkin.com!
Note: Supplies may be limited toward the end of the subscription period.
COORDINATING PRODUCT
155223 | Flower & Field Designer Series Paper
- Earn this pack of paper for FREE with a purchase of $50 USD or more during Stampin’ Up!’s Sale-A-Bration promotion!
*********************************************************************************************************
Card stock cuts for this project:
- Basic White Cardstock 4″ X 5 1/4″ (flowers & sentiment), 2 5/8″ X 4 1/8″ (card front mat), 7/8″ X 2 1/8″ & 7/8″ X 2 5/8″ (bottom dsp panel mats), 2 1/2″ X 3″ (inner liner), 4 1/8″ X 3 1/8″ (embossed panel)
- Mossy Meadow Cardstock 2 5/8″ X 3 1/8″ (inner liner mat)
- Terracotta Tile Cardstock 4 1/4″ X 11″ (card base scored and folded as listed above)
- Fine Art Floral Designer Series Paper 2 1/2″ X 4″ (card front), 3/4″ X 2″ & 3/4″ X 2 1/2″ (bottom card base panels), 2 1/2″ X 6″ (piece for envelope flap)
*********************************************************************************************************
Product List


Wow, gorgeous card. Perfect design for that fun fold. TFS
LikeLiked by 1 person
Thank you so much Susan 🙂
LikeLiked by 1 person
Pretty card Karen! Love the colors and mix of designer papers. 🙂
LikeLiked by 2 people
Thank you Amy 🙂
LikeLiked by 1 person
Beautiful card. Love the DSP.Maureen Wheatley
LikeLiked by 2 people
Thank you so much Maureen 🙂
LikeLiked by 1 person