Good Friday morning my fellow stampers and welcome to my Fun Fold Friday. Hope everyone had a productive week and have some fun plans for the weekend. I’ll be attending OnStage @ Home all day today and tomorrow. I can’t wait to be able to share some of the new items coming in the January-June 2021 Mini Catalog with you.
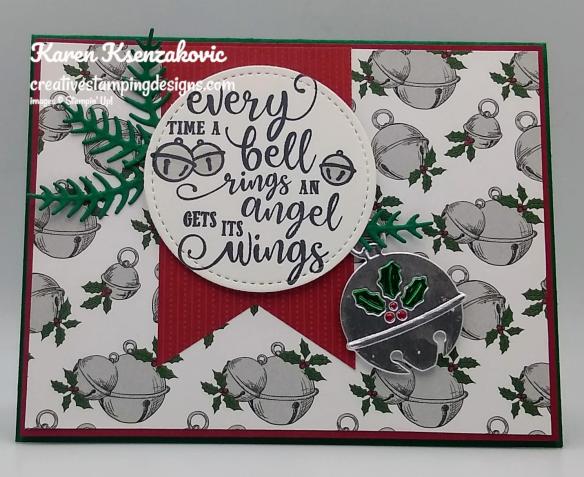
Today’s card I made on my Facebook Live video on Wednesday. If you were able to join me or watch the replay, thank you very much. If you’d like to watch my video and stamp along, the measurements are below along with the links to my Facebook page and my YouTube channel. Here’s the card that I made.

My design is from Try Stamping on Tuesday Challenge #482. Here is their sketch.

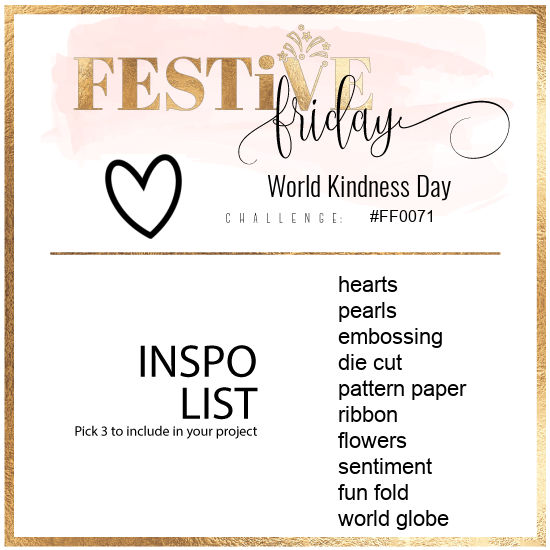
I also joined in with Festive Friday Challenge #0071. Here is their Inspo List. I went with Die Cut, Pattern Paper, Sentiment and Fun Fold


For the card front I adhered a panel of ‘Tis The Season 6 X 6 Designer Series Paper to a Cherry Cobbler mat using Stampin’ Seal. On a panel of Whisper White cardstock I stamped the sentiment from the Stampin’ Up! Christmas Means More Photopolymer Stamp Set in Tuxedo Black Memento Ink. I colored the bells in using my Gray Granite Stampin’ Blends Markers. I cut the sentiment out using my Stitched Shapes Dies.

I cut a panel of ‘Tis The Season DSP into a banner using my Triple Banner Punch and adhered it to the card front using Multipurpose Liquid Glue. I adhered the sentiment on top of the banner using Stampin’ Dimensionals. I cut 4 of the pine boughs out using the Sounds Of The Season Dies from a panel of Shaded Spruce cardstock. I adhered 3 of the pine boughs under the sentiment using Multipurpose Liquid Glue.

I cut the medium bell from the Sounds of the Season Dies from a panel of Silver Foil paper. I took the holly and berries out of the bell and colored them in using my Cherry Cobbler and Shaded Spruce Stampin’ Blends Markers. I put Stampin’ Dimensionals on the back of the bell and fit the holly and berries, like a puzzle, back into the spaces (they will stick to the Stampin’ Dimensionals). I adhered the pine bough through the little hanger using Multipurpose Liquid Glue and adhered the bell just under the sentiment using the Stampin’ Dimensionals. I adhered the card front to the Shaded Spruce card base using Stampin’ Dimensionals. Directions below for the card base.

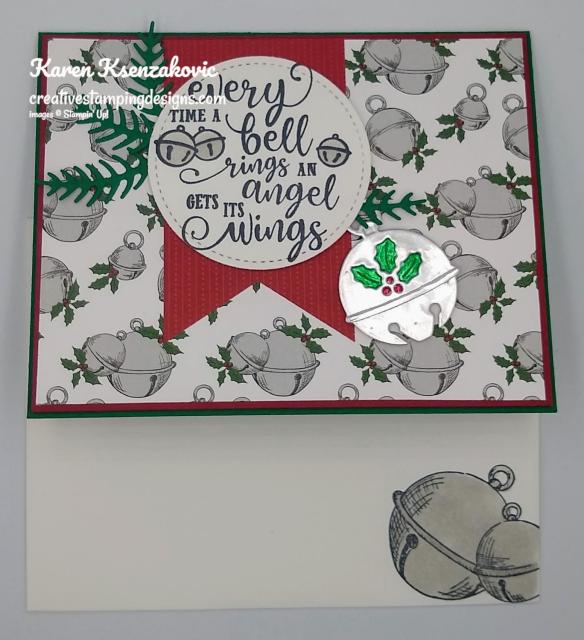
The card base takes a full sheet of Shaded Spruce cardstock. I first scored the cardstock in half at 4 1/4″. I turned the cardstock a 1/4 turn and scored again at 2 3/4″ & 8 1/4″. At the 2 3/4″ scored line, I cut from the top to the 4 1/8″ mark on my Stampin’ Trimmer. I turned the cardstock and lined the edge up with the 4 3/8″ mark and cut down to cut the panel off. I flipped the cardstock around and lined it up with the 8 1/4″ scored line and again cut down to the 4 1/8″ mark on my Stampin’ Trimmer. I turned the cardstock and lined the edge up with the 4 1/8″ mark and cut down to cut the panel off. On the inside I stamped the sentiment from the Stampin’ Up! Cherish The Season Cling Stamp Set in Tuxedo Black Memento Ink in the center of a Whisper White panel. I stamped the larger double bell image from the Cherish The Season stamp set in Tuxedo Black Memento Ink next to the sentiment and colored them in using my Gray Granite Stampn’ Blends Markers. I adhered the Whisper White panel to a Cherry Cobbler mat using Stampin’ Seal and then to the inside of the Shaded Spruce card base using Multipurpose Liquid Glue.

On the gate fold part of the card I adhered 2 panels of ‘Tis The Season DSP using Multipurpose Liquid Glue.

To finish my card I decorated a Medium Whisper White Envelope. I stamped the double bell image from Cherish The Season stamp set in Tuxedo Black Memento Ink on the envelope front and colored the image in using my Gray Granite Stampin’ Blends Markers. I adhered a panel of ‘Tis The Season DSP to the envelope flap.

Thank you for stopping by my blog today. I hope you liked my card and will give it a try. The list of measurements are below if you’d like to stamp along while watching the video. You can watch it on my Facebook page Here.
You can also view the video on my YouTube channel Here. Happy Stamping!!
*********************************************************************************************************
If you need any stamping supplies, I’d love to be your Demonstrator. Just click HERE to go directly to my online store or drop me an email if you have any questions.
MY CURRENT HOST CODE IS: 9XYYG2ZU
Use this host code when you order $50 or greater and receive a free gift from me! If your order is over $150, please do not use this code, but you’ll still get the free gift. The free gift is your choice of any 1 item valued up to $10.00 in the 2020-2021 Annual Catalog! For any orders $50 or more I will also send you my monthly class tutorials. Click HERE or go to my Customer Rewards for more details and to see what this months tutorials are.
Click HERE to shop the clearance rack.
Please remember to use my current Host Code and make sure that you can see my name on the final checkout page listed as your Demonstrator when you order so that you know that you’re ordering with me and you’ll get my rewards!
Happy Stamping, Karen!
*********************************************************************************************************
FREE Bonus Quite Curvy and Curvy Christmas Project Tutorials With Videos When You Purchase The Bundle From Me!!

A group of us worked together to create five awesome tutorials using the Stampin’ Up! Curvy Celebrations special release products with video tutorials! You can get this set of exclusive tutorials when you purchase either the Quite Curvy Variety Bundle (item 158396) or the Quite Curvy Bundle (item 156228) from me between now and January 4!
If your order is $50 or greater and includes either of these bundles, you will get this set of tutorials in addition to the monthly online class tutorials AND your $10 thank you gift! And you’ll also earn my Creative Stamping Designs Reward Points!
*********************************************************************************************************
Jolly Gingerbread
Subscribe October 11 – November 10

Paper Pumpkin is our monthly subscription service that offers unique papercrafting projects for crafters of any skill level! In these all-inclusive kits, subscribers receive pre-cut paper pieces, embellishments, ink, and an exclusive stamp set designed to encourage them to explore their creativity. As their subscription continues, subscribers will have a collection of cards—and other creations—for a variety of occasions, in addition to a stockpile of supplies!
So, what’s in store for this month’s Paper Pumpkin kit? November’s cute, gingerbread-themed kit contains enough supplies to create one-of-a-kind Christmas crafts! Whether it’s a gift card carrier, traditional card, or tasty-looking tag, this sweet and seasonal kit is the key to heartfelt holiday gifting. With curly cutouts, sugary stickers, and delicious die-cut designs in a special-edition box, a jolly holiday will be on its way with this kit!
Details About The November Kit:
- Kit contains enough supplies to create 15 gift card carriers and coordinating envelopes.
- Kit contents can also be used to design traditional holiday cards, gift tags, and other paper projects.
- Contents arrive in a collectible, special-edition box!
- Project size: 2-1/4″ x 4″
- Envelope size: 2-3/4″ x 4-3/8″
- Coordinating colors: Cinnamon Cider, Daffodil Delight, Calypso Coral, Mint Macaron, Shaded Spruce, Blushing Bride, and Whisper White
Subscribe to the November 2020 Paper Pumpkin Kit from 11 October to 10 November at paperpumpkin.com!
Note: Supplies may be limited toward the end of the subscription period.
*********************************************************************************************************
Card stock cuts for this project:
- Cherry Cobbler Cardstock 2 – 4 1/8″ X 5 3/8″ (card front and inner liner mats)
- Shaded Spruce Cardstock 8 1/2″ X 11″ (card base-scores and cuts above and on video), 2 1/4″ X 1 1/2″ (pine boughs)
- Whisper White Cardstock 3″ X 3″ (sentiment), 4″ X 5 1/4″ (inner liner)
- Silver Foil Sheet 1 1/2″ X 2′ (bell)
- ‘Tis The Season Designer Series Paper 4″ X 5 1/4″ (card front), 2″ X 3 1/2″ (banner), 2 – 2 5/8″ X 4″ (inner panels), 2 1/4″ X 6″ (piece for envelope flap)
*********************************************************************************************************
Product List


So pretty Karen! Love the little holly leaves in the jingle bell! Perfect designer paper too! 🙂
LikeLike
Thank you Amy 🙂
LikeLike
Great use of the DSP. This is such a wonderful fun fold. See you OnStage!
LikeLike
Thank you Karen 🙂
LikeLike
Karen – such a sweet holiday sentiment! I like how you tied in the sentiment to your pattern paper and embellishment! Great fun fold, too! Thank you for sharing your creative talents with us at Try Stampin’ on Tuesday!!! -Donna
LikeLiked by 1 person
Thank you so much Donna 🙂
LikeLiked by 1 person
So cute, Karen – and what a fun fold! I’m loving this sentiment set – your “DSP” is perfect! Thanks so much for playing at TSOT!
LikeLiked by 1 person
Thank you so much Heather 🙂
LikeLiked by 1 person
Very pretty card, love the two papers together and how you used them on for the cool fun fold design! Thanks for joining us at Festive Friday.
Melanie
LikeLiked by 1 person
Thank you so much 🙂
LikeLiked by 1 person
Oh, Karen…I LOVE this card! Such a neat fold! The jingle bell is awesome with the holly leaves. Plus, the envelope is a treat, too! Thank you for sharing at Festive Friday this week!
LikeLiked by 1 person
Thank you so much Ann 🙂
LikeLiked by 1 person
A lovely take on our challenge with all those bells – thanks for sharing with us at TSOT this week.
LikeLiked by 1 person
Thank you so much Fiona 🙂
LikeLiked by 1 person